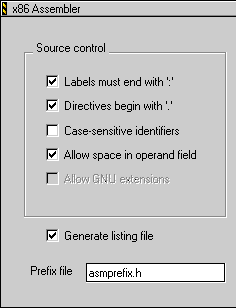
This chapter describes the settings on the Assembler target settings panel that are common to all the assemblers.
To modify the settings for an assembler:
1. Select Edit > Project Settings.
2. In the resulting dialog box, select the name of the assembler to see its settings panel.
Figure 5.1 shows the settings on the Assembler target settings panel that are common to all the assemblers. For information on settings that may be specific to your assembler, see the processor-specific chapters of this manual.
The following common assembler settings exist:
You can use the Labels must end with ':' checkbox to specify whether labels must end with a colon (:). If you select this checkbox, a label must end with a colon (:) and can begin in any column. If you clear this checkbox, a symbol is a label if it starts in column 1 or if it ends with a colon (:).
By default, the Labels must end with ':' checkbox is selected. This checkbox corresponds to the colon parameter of the .option directive, described in "option".
 NOTE
NOTE The Labels must end with ':' checkbox is especially useful when porting existing code that has symbols that do not end with a colon (:).
For more information, see "Labels".
You can use the Directives begin with '.' checkbox to specify whether a period (.) must precede each directive name. If you select this checkbox, a period (.) must precede each directive. If you clear this checkbox, you can omit the period. For more information, see "Using Directives".
By default, the Directives begin with '.' checkbox is selected. This checkbox corresponds to the period parameter of the .option directive, described in "option".
You can use the Case-sensitive identifiers checkbox to specify whether symbols are case-sensitive. If you select this checkbox, symbols are case sensitive. For example, in this case, SYM1, sym1, and Sym1 are three different symbols.
If you clear this checkbox, symbols are not case-sensitive. Therefore, in this case, SYM1, sym1, and Sym1 are the same symbol. For more information, see "Symbols."
NOTE Instruction, directive, and macro names are always case insensitive.
By default, the Case-sensitive identifiers checkbox is selected. This checkbox corresponds to the case parameter of the .option directive, described in "option".
You can use the Allow space in operand field checkbox to specify whether a comment can start with a space in the operand field. If you select this checkbox, the assembler allows spaces in the operand field. If you clear this checkbox, the assembler ignores any text between a space character in the operand field and the end of the line (which makes that text a comment). For more information, see "Comments".
By default, the Allow space in operand field checkbox is selected. This checkbox corresponds to the space parameter of the .option directive, described in "option".
You can use the Generate listing file checkbox to create a text file that you can use to compare your source code with the machine code that the assembler produced. If you select this checkbox, the assembler creates a listing file using the source name and the following suffix:
.list
For example, for the file test.asm, the assembler assigns the following name to the listing file:
test.asm.list
If you clear the Generate listing file checkbox, the assembler does not create a listing file.
By default, the Generate listing file checkbox is cleared.
You can use the Prefix file field to specify a file that the assembler processes before every assembly file in your project. The effect of using a prefix file is similar to putting the same .include directive at the beginning of every assembly file.
By default, no prefix file is specified.