This chapter discusses how to use PowerPlant for drawing to an offscreen graphics environment, a process also known as double buffering.
From the user's perspective, a screen update can be a painful experience. In a traditional approach, an application draws directly to the screen. In effect, you create the image piecemeal before the eyes of the user. As a result, updates can cause interesting and unintended visual effects. Objects may flicker needlessly, for example. In a crowded window with lots of objects, drawing may seem slow.
One solution to this problem is to create an offscreen graphics environment. Rather than draw to the screen, your application draws offscreen. When the drawing is complete, you move the finished image to the screen in one piece, a process known as blitting.
The offscreen drawing process requires slightly more time, because you must first draw the image and then blit it to the screen. However, the image appears all at once. As a result, the user perceives drawing as much faster. The user sees the end result, not the process that creates the result.
The difficulty in implementing offscreen drawing on your own is that you must do a lot of background work to create and manage the offscreen environment. PowerPlant takes care of most of the details for you, making offscreen drawing simple and straightforward.
In this chapter we discuss how you can implement offscreen drawing in a PowerPlant application. The topics discussed include:
As you know, an offscreen graphics environment in the Mac OS is called a GWorld. PowerPlant's classes related to offscreen drawing are very simple. They hide the entire Toolbox API related to GWorlds. As a result, implementing offscreen drawing is extremely simple.
When dealing with the Toolbox directly, GWorlds have many permutations. You can specify that they be created in a specified pixel depth; in the application heap or temporary memory; with a custom color table or the default color table; with a custom GDevice or not; as a purgeable item or not; and so on. PowerPlant lets you manipulate all these features. You may specify parameters to constructors to set up the GWorld to your liking.
However, the simple truth is that most of the time, you just want very straightforward behavior. You want a pixel depth equal to the deepest monitor involved in drawing. You use a default color table, default GDevice, and so on. In PowerPlant, the necessary constructors all have default arguments that set up a default GWorld simply and effectively. As a result, unless you're doing something tricky or unusual, you don't have to worry about these details. PowerPlant takes care of them for you.
PowerPlant gives you two more choices. You can easily create a typical GWorld that persists as long as you want. You can also create a temporary GWorld that lasts for just one function. Although this might seem like an odd thing to do at first glance, a temporary GWorld can be very useful.
There are three classes in PowerPlant related to offscreen drawing. They are:
These classes are not related to each other hierarchically. Both LGWorld and StOffscreenGWorld are completely independent classes that can be used without any other part of PowerPlant. LOffscreen-View is a member of the PowerPlant pane classes, and as such is dependent upon the core of PowerPlant being present.
The source code for these classes is fully commented, and you should read those comments for further insight.
LGWorld is a simple PowerPlant class. It is declared in UGWorld.h and defined in UGWorld.cp. The purpose of LGWorld is to create and manage a GWorld.
This class has four data members, shown in Table 10.1.
| Data member |
Stores |
|---|---|
In general you won't have to deal with these data members directly.
The mMacGWorld data member is set by the constructor when the GWorld is created.
You can retrieve this value with an accessor function, GetMacGWorld(). You set the initial bounds of the GWorld in the class constructor.
The class functions save and restore the graphics port and GDevice
when necessary.
Table 10.2 lists every member function in LGWorld.
| Function |
Purpose |
|---|---|
LGWorld(const Rect &inBounds,
				SInt16 inPixelDepth = 0,
				GWorldFlags inFlags = 0,
				CTabHandle inCTableH = nil,
				GDHandle inGDeviceH = nil);
The only parameter you must provide is the bounds (in pixels, in local coordinates) of the
GWorld you desire. You may pass in other values as you wish, but
most of the time you can rely on the default values declared in
the prototype. A zero pixel depth means that the GWorld uses the
maximum depth of all screen devices intersected by the bounds.
A GWorldFlags value of zero means that the GWorld will be created in the application
heap (among other things). Nil values for the color table and
the GDevice mean you use the default color table and GDevice.
For information on how you can manipulate these parameters to
create various kinds of GWorlds, you should refer to Inside Macintosh:
Imaging with QuickDraw, page 6-16.
Because of the design of the LGWorld constructor, most of the time all you have to do is tell PowerPlant how big you want the GWorld to be. PowerPlant takes care of the rest.
The remaining functions are very simple. The destructor releases
GWorld memory. BeginDrawing() saves the current port and GDevice, sets the port for the GWorld,
and locks the GWorld pixels in place. EndDrawing() unlocks the pixels and restores the saved port and GDevice. In
between calls to BeginDrawing() and EndDrawing(), you do your drawing. Any drawing appears in the GWorld, not
on screen.
 WARNING!
 Every call to BeginDrawing() must be balanced with a corresponding call to EndDrawing().
The CopyImage() function uses the Toolbox CopyBits() function to blit the GWorld to the screen. Once again, it is
worth looking at the prototype.
void CopyImage(GrafPtr inDestPort,
							const Rect &inDestRect,
							SInt16 inXferMode = srcCopy,
							RgnHandle inMaskRegion = nil);
You provide the destination port to which the image is going, and the destination rectangle. The destination rectangle is typically the same size as the GWorld, but can vary if you want to scale the image. The transfer mode and mask region have default parameters, so you do not need to provide them if the default values suit your purpose.
The LGWorld functions do not contain a single call to the Toolbox
routine UpdateGWorld(). This can be a significant problem for a quality implementation
of offscreen drawing.
You should call UpdateGWorld() after every update event, whenever the GWorld changes size, and
whenever the destination window moves or changes size. These events
can cause pixel depth to change if the window crosses multiple
monitors.
For example, you may modify the bounds of a GWorld after you create
it. Use the accessor function LGWorld::SetBounds(). However, SetBounds() doesn't work right because it doesn't call Update-GWorld().
Listing 10.1 shows a better way to set a GWorld's bounds.
A better SetBounds() function:
void MyGWorld::SetBounds(const Rect& inBounds)
{
	mBounds = inBounds;
	GWorldFlags flags = ::UpdateGWorld(&mMacGWorld,
												0, inBounds, NIL, NIL, 0);

// From original LGWorld
	::GetGWorld(&mSavePort, &mSaveDevice);
	::SetGWorld(mMacGWorld, nil);
	::SetOrigin(mBounds.left, mBounds.top);
	::SetGWorld(mSavePort, mSaveDevice);
}
You would of course pass your desired pixel depth to the Update-GWorld() function. You should also check for errors.
There is yet another significant limitation to LGWorld. If you
look at the class declaration in UGWorld.h, you will see that none of the functions in LGWorld are virtual.
Therefore, you cannot use LGWorld as a base class and derive your
own classes from it.
If you wish to extend the functionality of LGWorld, you should simply copy the code from LGWorld into your own class. Then modify your class as you wish, and substitute your class for LGWorld.
Even with these limitations in mind, (incorrect GWorld updating and no way of subclassing LGWorld), LGWorld is a simple wrapper for the Mac OS offscreen graphics worlds. All the complexity is reduced to four functions:
You can use LGWorld in any C++ code. It is completely independent of the rest of PowerPlant.
StOffscreenGWorld is a simple PowerPlant class. It is declared
in UGWorld.h and defined in UGWorld.cp. It is similar to, but simpler than LGWorld. Like LGWorld, it
creates and destroys a GWorld. Unlike LGWorld, the GWorld created
by StOffscreen-GWorld exists for the duration of one function.
StOffscreenGWorld is a stack-based PowerPlant class. The constructor creates a GWorld when you instantiate an StOffscreenGWorld variable. The GWorld continues to exist only as long as the local variable holding the StOffscreenGWorld object remains in scope. When the variable goes out of scope, the StOffscreenGWorld destructor copies the GWorld image to the screen, and destroys the GWorld.
StOffscreenGWorld has the same data members as LGWorld, and they serve the same purposes.
StOffscreenGWorld data members:
| Data member |
Stores |
|---|---|
In general you won't have to deal with these data members directly.
The mMacGWorld data member is set by the constructor when the GWorld is created.
You can retrieve this value with an accessor function, GetMacGWorld(). You set the initial bounds of the GWorld in the class constructor.
Unlike LGWorld, you cannot modify the bounds afterwards. The class
functions save and restore the graphics port and GDevice whenever
necessary.
There are only three member functions in StOffscreenGWorld.
StOffscreenGWorld member functions:
| Function |
Purpose |
|---|---|
StOffscreenGWorld(const Rect &inBounds,
							SInt16 inPixelDepth = 0,
							GWorldFlags inFlags = 0,
							CTabHandle inCTableH = nil,
							GDHandle inGDeviceH = nil);
The only parameter you must provide is the bounds (in pixels,
in local coordinates) of the GWorld you desire. You may pass in
other values as you wish, but most of the time you can rely on
the default values declared in the prototype. A zero pixel depth
means that the GWorld uses the maximum depth of all screen devices
intersected by the bounds. A GWorldFlags value of zero means that the GWorld will be created in the application
heap (among other things). Nil values for the color table and
the GDevice mean you use the default color table and GDevice.
For information on how you can manipulate these parameters to
create various kinds of GWorlds, you should refer to Inside Macintosh:
Imaging with QuickDraw, page 6-16.
The destructor restores the current port to what it was when the StOffscreenGWorld was created, copies the offscreen image to that port, and then destroys the GWorld.
WARNING! When you call the StOffscreenGWorld constructor, the current port must be the destination of the offscreen image. The StOffscreenGWorld destructor copies the image to the port that was current when the StOffscreenGWorld object was created.
You can use StOffscreenGWorld in any C++ code. It is completely independent of the rest of PowerPlant. LOffscreenView uses StOffscreenGWorld.
The LOffscreenView class is a descendant of LView in the LPane class hierarchy. In fact, this class does not do any offscreen drawing directly. It uses StOffscreenGWorld to handle drawing.
In typical use, you don't have to modify or call any function or feature of LOffscreenView. Here's how it works.
Assume you have a complex set of objects you wish to draw to an offscreen graphics environment. You want to do this so that updates appear instantaneous and the user doesn't see each individual object drawn independently.
In PowerPlant's visual interface builder, Constructor, you can add an LOffscreenView to the window. Then put all the objects you wish drawn offscreen into that view.
When PowerPlant attempts to draw the view, it calls the LOffscreenView's
Draw() function. LOffscreenView::Draw() sets up an StOffscreenGWorld variable. From that point on, all
the contents of the view draw into the GWorld, not the screen.
After all the contents of the view have drawn themselves, control
returns to LOffscreenView::Draw(). The StOffscreenGWorld variable goes out of scope, and the offscreen
image is blitted to the screen.
Examine the source code for LOffscreenView::Draw() to see how this works. The function first attempts to build the
GWorld in temporary memory. It is a short-lived GWorld, so this
is an appropriate use of temporary memory. If that fails, it allocates
the GWorld out of the application's own memory space. If that
fails, the objects draw directly to screen.
You get all the benefits of offscreen drawing automatically! Simply place your panes inside an LOffscreenView in Constructor. You can do this for the entire contents of a window, or for one or more parts of a window. The choice is yours. The rest is automatic and free.
The only negative side is that there is a minor time penalty because
the GWorld is created and destroyed every time LOffscreenView::Draw() is called. If this is a significant issue to you, consider designing
your application to use LGWorld instead.
There are, essentially, three strategies you may follow, depending upon your individual needs.
To use LOffscreenView, use Constructor to place your panes inside the LOffscreenView. After that, your work is done. You'll do this in the code exercise for this chapter.
To use StOffscreenGWorld directly, simply instantiate an StOffscreen-GWorld object at the appropriate moment, before the drawing code. When the StOffscreenGWorld variable goes out of scope, the drawing will be blitted to the screen. Listing 10.2 shows a sample of how easy it is.
void MyPane::DrawSelf()
{
	Rect frame;
	CalcLocalFrameRect(frame);
	// Allocate offscreen GWorld where subsequent
	// drawing operations will take place
	StOffscreenGWorld offWorld(frame);

	// draw pane
}
By the simple expedient of creating an StOffscreenGWorld variable,
all pane drawing occurs in the offscreen world. When the pane's
DrawSelf() function goes out of scope, the pane's image is blitted to the
screen by the StOffscreenGWorld destructor.
WARNING! There is a danger here. In a program that uses C++ exceptions, if an exception occurs during the drawing process, the StOffscreenGWorld destructor is called anyway to blit the image to screen. However, the exception might be of such a nature that you do not want to draw the image. If this case applies to you, you should not use StOffscreenGWorld. You should use LGworld, or create your own class that handles exception situations.
Using LGWorld is a little more complicated, but not much. A typical use would be to create a new LGWorld object (in the application's heap) in a pane's constructor. You store the pointer to the LGWorld object in a data member. You delete the LGWorld object in the pane's destructor.
You use the LGWorld to store the visual image of the pane. You
must explicitly call BeginDrawing() before drawing offscreen, and EndDrawing() when done. Use CopyImage() to move the offscreen image to the screen. In Listing 10.3, a sample pane class uses LGWorld to maintain its contents on
a long-term basis.
MyPane::MyPane() { // constructor creates GWorld
	Rect frame;
	CalcLocalFrameRect(frame);
	mGWorld = new LGWorld(frame, 8); // 8-bit depth
}
MyPane::~MyPane() { // destructor deletes GWorld
	delete mGWorld;
}

MyPane::DrawSelf() { // copy GWorld image to screen
	Rect frame;
	CalcLocalFrameRect(frame);
	mGWorld->CopyImage(GetMacPort(), frame);
}

MyPane::AddRectToImage(Rect &inRect) {
	mGWorld->BeginDrawing(); // draw offscreen
	PaintRect(&inRect); // add new rectangle
	mGWorld->EndDrawing(); // end offscreen drawing

	Rect pRect = inRect; // update new drawing
	LocalToPortPoint(&topleft(pRect));
	LocalToPortPoint(&botRight(pRect));
	InvalPortRect(&pRect);
}
The AddRectToImage() function draws a rectangle to the offscreen image and forces
an update of the newly drawn area. The DrawSelf() function just copies the image from the offscreen image into
the frame of the pane. All the rectangles painted by calling AddRectToImage() are accumulated in the offscreen GWorld, and are redrawn properly
on any subsequent screen update.
WARNING! You should be aware that LGWorld has limitations with respect to updating GWorlds, and subclassing. See "LGWorld Limitations."
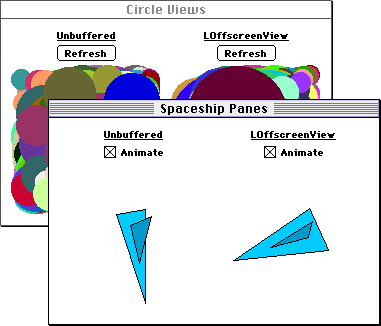
In this exercise you create an application that demonstrates the visual difference between drawing to screen and drawing offscreen. The finished application looks like Figure 10.1.
The Circle Views window shows two groups of random circles. This window demonstrates the effect of offscreen drawing on updating. There are buttons you can use to force an update of either view.
The Spaceship Panes window shows two polygonal spaceships. Each spaceship rotates. There are buttons to turn the animation on or off for each pane. This window demonstrates the effect of offscreen drawing on animation.
In this exercise you implement the offscreen drawing sections of each window. This is a very unusual code exercise, because you don't write any code! All your work will be in Constructor.
1. Build and run the Offscreen application.
project file Offscreen Start Code folder
Before doing anything else, build and run the start code application. The principal goal of this step is to show you how the application uses regular drawing, and to highlight the fact that after you are done with Constructor, the same code works for offscreen drawing.
Open either the Offscreen.68K.µ or the Offscreen.PPC.µ project file. Make sure you use the project in the Offscreen Start Code folder, not the solution code. Then, without making any changes, build and run the application. When it builds successfully,
you'll see the Circle Views window and the Spaceship Panes window.
However, the offscreen portion of each window will be empty.
Click the refresh button above the circles in the Circle Views window. The circles underneath will redraw. Watch the drawing process carefully. You should see a series of random circles draw on top of each other. There are, in fact, 500 circles. The speed of drawing will vary depending upon the speed of the computer running the application. On fast machines, the circles draw quickly. So watch closely.
 NOTE
NOTE The constant kNumCirclePanes controls the number of circles. It is defined in CCircleView.h
if you wish to change it.
Also observe the rotating spaceship in the Spaceship Panes window. Notice how it flashes or blinks as it rotates. You can click the check box to turn animation off or on as you wish.
Both of these conditions (circles drawing on top of each other and the flashing spaceship) are artifacts of drawing direct to screen. In the next few steps you set up the application to draw the exact same items through an offscreen buffer.
For now, quit the Offscreen application.
2. Create an offscreen circle view
Circle Views (ID 1000) Offscreen.ppob
In this step you duplicate the existing circle view, and place it inside an LOffscreenView object. As a result, the new view will draw offscreen rather than directly to screen.
Double-click the Offscreen.ppob file in the CodeWarrior project manager window. This opens the
resource file in Constructor.
In the Constructor project window, double-click the Circle Views
resource (in the Windows and Views) to open up that resource.
Finally, open a hierarchy window (Show Object Hierarchy in the Layout menu). Figure 10.2 shows what you should see.
The Circle Views hierarchy window: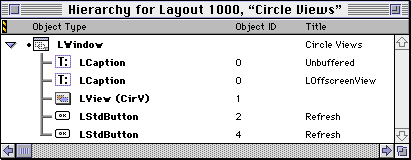
To complete this step you should perform the following tasks.
If you are comfortable with Constructor, just perform these tasks. If you want additional guidance, read the detailed substeps.
Choose Catalog from the Window menu. Drag an LOffscreenView from the Catalog window into either
the hierarchy window or the PPob window.
Open the inspector window for the new LOffscreenView. Set the top to 46, the left to 170, the width and height to 150. All other values are default. Figure 10.3 shows the end result.
The LOffscreenView properties: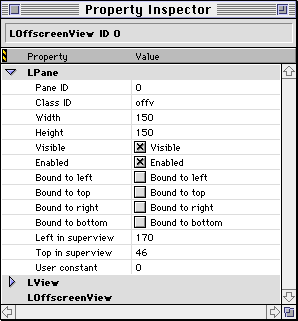
b. Make a copy of the existing circle view.
c. Place the copy inside the LOffscreenView.
You can accomplish both these substeps with a single gesture in the hierarchy window by Option-dragging to copy the item.
In the hierarchy window, select the existing circle view object-the LView (CirV) object. Then press the Option key and drag the circle view underneath the new LOffscreenView. Drop it there.
When you are through, the hierarchy window should look like Figure 10.4. Note especially the position of the new circle view underneath and indented one position to the right of the new LOffscreenView. This tells you that the new circle view is hierarchically inside the LOffscreenView.
The hierarchy window after copying LView: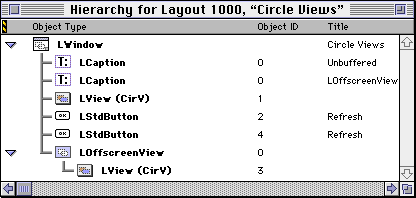
d. Set the new circle view properties.
You must set the location of the new circle view within the LOffscreenView, as well as the pane ID for the new circle view object.
Open the inspector for the new circle view. To do this, double-click the new LView (CirV) in the hierarchy window. Set the top left corner to (0,0). This puts the circle view at the same spot as the top left corner of the LOffscreenView.
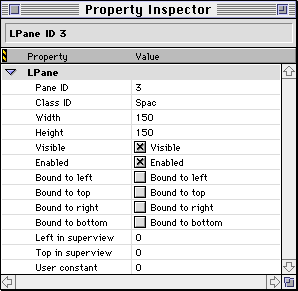
Also, set the pane ID to 3. The application looks for this object by pane ID, and that ID must be 3. When you are finished, the properties for the new circle view should look like Figure 10.5.
The new circle view properties: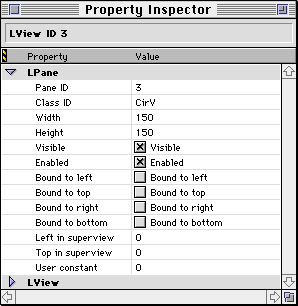
You have completed this step. You have duplicated the existing circle view, and placed it inside an offscreen view. Note that the circle view you created is functionally identical to the original view that draws on screen. The only differences are for PowerPlant housekeeping. You changed the location and pane ID of the view.
At runtime the exact same code for the circle view class will run for both the direct-to-screen and offscreen drawing.
3. Create an offscreen spaceship pane
Spaceship Panes (ID 1100) Offscreen.ppob
In this step you duplicate the existing spaceship pane, and place it inside an LOffscreenView object. As a result, the new pane will draw offscreen rather than directly to the screen.
This step is essentially identical to the step you just completed. The tasks and substeps are the same, except that you're working on the spaceship pane instead of the circle view.
To complete this step you should perform the following tasks.
Add an LOffscreenView. Add this at the same level as the other items in the spaceship window. Make it the same size as the existing spaceship pane. Make a copy of the existing spaceship pane. Place the copy inside the LOffscreenView. Set the new spaceship pane properties. Position the top left of the new spaceship pane at location (0,0). Set the pane ID to 3.
If you are comfortable with Constructor, just perform these tasks. If you want additional guidance, read the detailed substeps below.
Choose Catalog from the Window menu. Drag an LOffscreenView from the Catalog window into either
the hierarchy window or the PPob window for the spaceship pane.
Then open the inspector window for the new LOffscreenView and set its properties. Set the top to 46, the left to 170, and the width and height to 150. All other values are default. Figure 10.6 shows the end result.
The LOffscreenView properties: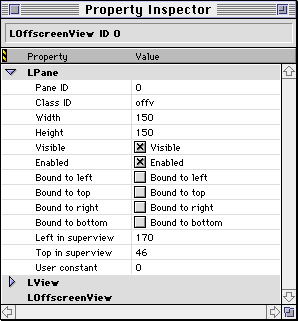
b. Make a copy of the existing spaceship pane.
c. Place the copy inside the LOffscreenView.
You can accomplish both these substeps with a single gesture in the hierarchy window by Option-dragging to copy the item.
In the hierarchy window, select the existing spaceship pane object-the LPane (Spac) object. Then press the Option key and drag the spaceship pane object underneath the new LOffscreenView. Drop it there.
When you are through, the hierarchy window should look like Figure 10.7. Note especially the position of the new spaceship pane underneath and indented one position to the right of the new LOffscreenView. This tells you that the new spaceship pane is hierarchically inside the LOffscreenView.
The hierarchy window after copying LView: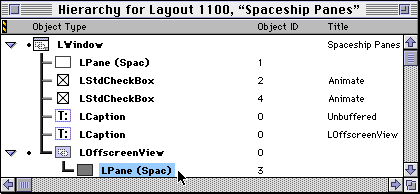
d. Set the new spaceship pane properties.
You must set the location of the new spaceship pane within the LOffscreenView, as well as the pane ID.
Open the inspector for the new spaceship pane. Set the top left corner to (0,0). Set the pane ID to 3.
You have duplicated the existing spaceship pane, and placed it inside an offscreen view. Note that the spaceship pane you created is functionally identical to the original pane that draws on screen. The only differences are for PowerPlant housekeeping. You changed the location and pane ID of the new spaceship pane.
At runtime the exact same code for the spaceship pane class will run for both the onscreen and offscreen versions.
Save your changes, close the windows, and quit Constructor. You're all done.
4. Build and run the application.
Switch back to the CodeWarrior IDE, and run the application. If you ran the application as instructed in Step 1, all the code has already been compiled. Note that none of the code has to be recompiled. In the build process, the only thing that changes is that the new PPob resource file is copied into the application.
When the project builds and runs successfully, both the Circle Views window and the Spaceship Panes window appear.
In the Circle Views window, click the Refresh button above each circle view. Observe the difference in appearance. As the screen circle view updates, each of the 500 circles is visible as it draws, despite the fact that hundreds of them are ultimately concealed.
As the offscreen circle view updates, there is a brief pause, and then the finished drawing appears all at once.
Refresh each circle view several times to get a feel for the perceptual difference between the two techniques. How does it look to you? Which one better represents what you are trying to show to a user? Offscreen drawing hides intermediate drawing steps from the user. This is particularly useful when drawing must overlap. Offscreen drawing can give you a significant enhancement to the look and feel of your application.
Now take a look at the spaceships. When the application starts, both spaceships should be animated. Observe the visual difference between the two techniques: direct-to-screen and offscreen. Once again, how do they look? Which one presents a better experience to the user? Feel free to turn animation off and on at will.
Although less obvious than the random circle views, overlapping drawing is the cause of flicker in the direct-to-screen spaceship pane. The flicker is the result of a repeated cycle of erasing and redrawing. With the offscreen view, only the final result of the erase/draw combination appears on screen. The actual process of erasing and drawing is hidden from the user.
Congratulations! You have implemented offscreen drawing, and you didn't even write any code! Examine the source code for the Offscreen application if you have any doubts about how the circle view and spaceship pane draw.
Neither makes any assumption about where it is drawing. Each simply draws itself like any ordinary pane or view. The real difference is in Constructor, where in one case the pane is placed directly in a window, and in the other it is placed inside LOffscreenView.
COffscreenApp inherits from LListener (to listen to the controls in the windows) and LPeriodical (to animate the spaceships).
Examine the COffscreenApp constructor. It does what any ordinary application constructor does. It registers the necessary classes and creates windows. It also sets itself up as an idler so it can animate the spaceships. There is no offscreen magic going on here.
Each circle view adds kNumCirclePanes to itself. See CCircle-View::FinishCreateSelf() for a good example of building panes on the fly. Each random
circle pane simply paints a circle.
Examine the ListenToMessage() function in COffscreenApp. All it does is tell the appropriate
circle view to refresh itself. This causes an update event. When
the application receives the update event, the view draws itself.
This is when-for the offscreen drawing-LOffscreenView performs
its magic. You should examine the LOffscreenView::Draw() function if you have any questions.
Examine the SpendTime() function in COffscreenApp. This is where the spaceships are animated.
After rotating each ship, the function calls UpdatePort() to redraw the entire spaceship window. It could wait for an update
event (generated by the rotation calls), but this would result
in animation that might skip frames and appear uneven. Instead,
SpendTime() draws immediately for smoother animation.
Once again, the code is executing the standard PowerPlant drawing mechanism. It is the presence of LOffscreenView in the visual hierarchy that makes all the difference.
For further exploration, you might want to experiment with using LGWorld for the offscreen spaceship pane (or the circle view for that matter). See "Using LGWorld" for some tips. The effect on the circle view would probably be more noticeable. Why? Because you don't have to redraw all 500 circles every time there's an update. The circles don't move or change. You can simply blit the LGWorld offscreen bitmap to the screen. You should see a significant speed improvement.
Finally, if you're interested in 3D graphics, you might want to take a look at the functions in the U3DDrawing class. These are very simple functions for rendering polygons.
There are many graphics resources available online. The Usenet
newsgroup comp.graphics.algorithms has a good FAQ.
For hidden surface information, there is an FAQ and source code for Binary Space Partitioning (BSP) Trees at:
<http://www.qualia.com/~bwade/>
This site has a nice sample application done with CodeWarrior that includes excellent C++ classes for 3D graphics. The sample demonstrates a 3D rotation controller called "arcball." The spaceship shape in this example is based on the original demonstration of arcball from:
<ftp://ftp.cis.upenn.edu/pub/graphics/arcball/>