This chapter discusses how to implement drag and drop features in a PowerPlant application.
PowerPlant provides wrappers for the Mac OS Drag Manager, and implements most of the required functionality at a default level. If you use the PowerPlant default behavior, implementing drag and drop can be fairly simple. You also have the option of extending PowerPlant for your own purposes.
The code exercise at the end of the chapter takes you through the process of implementing drag and drop in real code.
This chapter does not teach you the intricacies of the Drag Manager, or the drag and drop human interface. For more information, consult the official Drag Manager documentation: "Drag Manager Programmer's Guide" and "Drag and Drop H.I. Guidelines."
Both of these documents are available from Apple Computer, Inc:
http://developer.apple.com/techpubs/macos8/
The Drag Manager supports drag operations at the window level. A window has a drag tracking handler to handle the visual feedback required as a drag passes across a window's content area. A window also has a drag receive handler to accept the data in the drag and add it to the window's content. Both of these handlers are callback routines used by the Mac OS to implement drag and drop functionality.
Because it works at the window level, the Mac OS Drag Manager has a somewhat coarse resolution. An individual window may have several different sections that display different kinds of data. For example, a window may have a text area, a drawing area, some buttons or controls, a tool area, and so forth. You may want to handle drag tracking and receiving in different ways in different portions of a window.
You can do this with the Drag Manager only if you test the location of the drag at any moment, compare that against the geography of your window contents, and then act accordingly. This kind of complex, location-dependent system is anathema to the principles of object-oriented programming.
PowerPlant extends the Drag Manager so that it becomes an object-oriented tool. PowerPlant implements the concept of a "drop area." In PowerPlant, you add drag and drop functionality to individual panes. The pane could be a window (windows are views, and views are panes), a scrolling view, a text view, a button, or any other pane-based visual element in PowerPlant. Any pane that is drag and drop aware is a drop area. Because a drag always involves a visual item, all drag operations in PowerPlant are pane-related.
There are two important architectural features that determine the internal workings of a drag-aware PowerPlant application. A PowerPlant application has a single tracking and receive handler installed with the Drag Manager. Nevertheless, each drop area has its own internal tracking and receiving handlers.
Here's how it works. PowerPlant maintains a list of all drop areas. The tracking and receive handlers installed for the Drag Manager determine which drop area is involved in the operation, and dispatch control to the correct handler for the particular drop area. As a result, you are no longer limited to window-level resolution. You have object-level resolution for drag and drop functionality. You can define the behavior of each individual class of object with respect to drag and drop, not just each window.
In terms of implementation, a drag operation has a beginning, middle, and end. It begins when the user clicks and begins to drag an item. It continues while the user keeps the mouse button down. It ends when the user releases the mouse button.
The beginning occurs in a pane's Click() function when you write code to test for a drag. When you detect
a drag, you create a drag task object. This may be an LDragTask
object, or an object from a custom class derived from LDragTask.
The drag task contains the data that represents the item or items
being moved by the user. The drag task also contains a function
for initiating the drag.
After creating the drag task object, you tell the drag task to begin tracking the drag. As the drag crosses various panes, you provide feedback to the user during the drag. The pane is responsible for providing the visual feedback during the drag.
A pane involved in a drag and drop operation should inherit from LDragAndDrop. LDragAndDrop is a mix-in class that implements the default behavior required to track a drag and receive a drop. LDragAndDrop is a concrete class that inherits from the abstract class LDropArea.
In a traditional implementation, you might have your window class inherit from LDragAndDrop. Then the user can drop items in your window. However, the PowerPlant strategy allows you to implement drag and drop for any individual pane as well.
When the user releases the mouse button at the end of a drag, the drop area receives the contents of the drop. Once again, it is LDragAndDrop that provides the functionality at the pane level. Any pane that inherits from LDragAndDrop may receive a drop.
PowerPlant provides functions that you override to put data into a drag, and to receive data from a drag. PowerPlant calls these functions at the appropriate moments. You provide the data and receive the data. PowerPlant does most of the rest of the background work.
Let's look at the features of the LDragTask, LDropArea, and LDragAndDrop classes to see how they work.
There are three classes involved in PowerPlant's implementation of drag and drop functionality. They are:
Figure 9.1 illustrates the class hierarchy for these classes.
Drag and drop class hierarchy: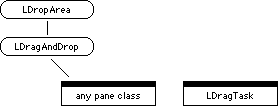
If you wish to support drag and drop in your code, you create custom pane classes. Remember that views are also panes. In a typical implementation, it is a view class that inherits from LDragAndDrop. For example, you might create a text view class that inherits from both LTextEdit and LDragAndDrop.
When the user begins a drag, you create an LDragTask object. LDragTask class has three data members, as shown in Table 9.1.
| Data member |
Stores |
|---|---|
The mDragRef member stores a DragReference value. The Drag Manager creates and uses a DragReference to access information about the drag.
The mDragRegion member stores a handle to the drag region. When tracking a drag,
the Drag Manager draws the region that defines the bounds of objects
being dragged.
The mEventRecord member stores a pointer to an EventRecord. The event record contains the location where the drag started,
in global coordinates.
LDragTask is a simple class. The most useful functions are shown in Table 9.2.
| Function |
Purpose |
|---|---|
The AddFlavors() and MakeDragRegion() functions give you the opportunity to add data in a variety of
flavors to a drag, and to specify the precise drag region you
wish to use. These functions are empty in LDragTask. We'll discuss
when and how to implement them in "Creating a Drag Task."
The AddRectDragItem() function is a utility routine that adds the bounds of the Rect you provide to an accumulating drag region.
The DoDrag() function is the routine you call to initiate the drag. The default
implementation calls AddFlavors(), MakeDragRegion(), and the Drag Manager's TrackDrag() routine.
LDropArea is an abstract base class that provides the interface you use to implement drag tracking and receiving functionality.
LDropArea uses the LArray class. Other than that single exception, LDropArea-like many other independent modules in PowerPlant-does not requires any other PowerPlant classes. You can use LDropArea independently as a wrapper class for the Drag Manager. However, its most common use is as an integral part of a PowerPlant application through LDragAndDrop, its concrete descendant.
Most of the data members in LDropArea are used internally by PowerPlant. You won't have need to use them yourself. Table 9.3 lists the important data members.
| Data member |
Stores |
|---|---|
Notice that the sDragHasLeftSender and sCurrentDropArea are static variables, so all instances of LDropArea share the
same values.
LDropArea also defines a series of static class functions, some of which are shown inTable 9.4.
| Function |
Purpose |
|---|---|
These functions provide the core of PowerPlant's default implementation of drag and drop. These functions are used internally by PowerPlant. You should never have to call or modify these functions.
The DragAndDropIsPresent() function can be called to determine if the Drag Manager is present.
PowerPlant checks at startup. This returns the result of that
check.
The "drop area" functions manage PowerPlant's drop area list.
The two "handle" functions are Drag Manager callback routines.
The InstallHandlers() function installs these tracking and receive handlers for the
Drag Manager as the only handlers for the application. When tracking
a drag inside a window, the default tracking handler calls InTrackingWindow(). The InTrackingWindow() code finds the correct drop area from the drop area list, and
calls the correct handler.
When it is time to receive a drop, the default receive handler
sends a DoDragReceive() message to the current drop area.
There are additional functions for custom drag behavior such as sending data in response to a promise, and custom drag drawing. We discuss those functions in "Providing Custom Drag Behavior." In addition to the static functions just discussed, LDropArea provides a series of functions that are the heart of PowerPlant's implementation of drag and drop. Table 9.5 lists these functions.
| Function |
Purpose |
|---|---|
PointInDropArea() is a pure virtual function, and must be overridden. In addition,
several other functions are empty, including FocusDropArea(), InsideDropArea(), ItemIsAcceptable(), and ReceiveDragItem(). You must provide this functionality in classes that derive from
LDropArea.
In a typical implementation of drag and drop in PowerPlant, you override several of these functions (including the empty functions). We discuss which functions you commonly override in "Implementing Drag and Drop in PowerPlant."
LDragAndDrop is a mix-in class designed to add drag and drop features to a pane. It inherits from LDropArea and is a concrete implementation of that class. A pane that supports drag and drop should multiply inherit from LDragAndDrop, not LDropArea.
 NOTE
NOTE A drag-savvy pane must override certain LDragAndDrop behaviors. We discuss which functions to override in "Implementing Drag and Drop in PowerPlant."
LDragAndDrop adds one data member, mPane, to store a pointer to the pane associated with this drop area.
The LDragAndDrop class overrides three LDropArea functions, as shown in Table 9.6.
| Function |
Purpose |
|---|---|
LDragAndDrop does not declare or define any new functions.
Now that you are familiar with the classes involved in drag and drop, let's examine how to actually implement drag and drop in a PowerPlant application.
This section walks you through the process of implementing drag and drop in a typical PowerPlant application. As you know, this process involves creating a drag task, and having panes that can track and receive a drag. The tasks involved are:
Before using any routine that requires the presence of the Drag
Manager, you should ensure that the Drag Manager is present. Simply
call LDropArea::DragAndDropIsPresent() before any call that depends on the Drag Manager.
How to respond to the absence of the Drag Manager is, of course, a function of your application. If it absolutely requires drag and drop functionality, you should use weak import DragLib. This allows the application to launch even if the Drag Manager is not present. Then, at startup time, check for drag and drop. If it is not present, quit the application gracefully after alerting the user.
If your code is not dependent on drag and drop, you must implement alternative mechanisms, one for the drag manager, and one for when the drag manager is not present. You can do this by subclassing LDragAndDrop, if you carefully test for the presence of drag and drop before calling any Drag Manager or LDropArea routines, and you provide alternative code.
Handling clicks in a window that supports drag and drop is a two-step
operation. First, you set an attribute for the window involved
in the PPob resource for that window. Second, you override the
Click() function inherited from LPane. Let's look at how these two tasks
relate to each other.
The drag and drop human interface guidelines are very specific about how a drag operation should appear to a user. The user should be able to click and drag data from an inactive window into another window, without the source window becoming activated.
NOTE In the traditional human interface, selection highlighting disappears when a window becomes inactive. With drag and drop, the user still needs to see what objects are selected in an inactive window. This requires that you provide background highlighting as described in Apple's drag and drop documentation. The LTable and LTableView classes takes care of background highlighting automatically. TextEdit in the Toolbox provides background highlighting for both LTextEdit and LEditField.
PowerPlant provides support for clicking and dragging from a background
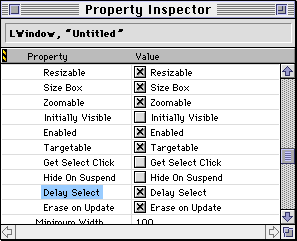
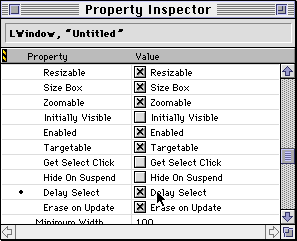
window in the PPob resource through the Delay Select option illustrated in Figure 9.2. This option corresponds to the delay-Select attribute of the LWindow class.
When the delaySelect attribute is set, a click that would normally activate a window
should be processed as if the window were already active. You
accomplish that by overriding Click() for panes that support drag and drop.
As you know, LPane::Click() typically handles any click in a pane, view, or control. The
default functionality usually provides everything you need. In
the case of drag and drop, it does not.
The default code responds to clicks only when the delaySelect attribute is not set. Listing 9.1 shows the relevant code from LPane.
LPane::Click(SMouseDownEvent& inMouseDown)
{
	if (!inMouseDown.delaySelect) {
        // normal click handling code
		}
	}
}
You must override this function and replace the functionality.
Otherwise, when you set the delaySelect attribute, your pane will not respond to clicks when it is in
an inactive window. Replacement code for Click() might be organized like the code in Listing 9.2.
CMyClass::Click( SMouseDownEvent& inMouseDown)
{
	if ( inMouseDown.delaySelect )
	{
		// process the click for selection, etc.
		if( ::WaitMouseMoved(
								inMouseDown.macEvent.where))
		{
			// drag begins
		}
	}

} else
	{
		// Call inherited Click() for default behavior.
	}
}
Of course, the actual structure and functionality of your Click() routine depends upon your pane's contents and behavior. For example,
in a graphics application you might check the location of the
click against an existing selection. If the click is not on an
already-selected item, you should deselect any existing selection,
and select the clicked item. This same approach doesn't work for
text, because you cannot select text with a single click.
After performing any preprocessing on the click, you then test for a drag, as described in "Identifying a Drag." Notice you do this regardless of whether the click occurs in a foreground or background window, or changes a selection. This allows the user to perform a single-gesture selection and drag, as required in the drag and drop human interface. The process of handling a drag is described in the rest of this chapter.
If no drag begins, you simply exit the routine. In that case,
control ultimately returns to the LWindow::ClickInContent() routine in PowerPlant, which activates the window for you.
For more information on topics relating to the drag and drop human interface, consult the drag and drop documentation.
A drag begins when the user clicks and holds the mouse button
down. Call the Mac OS routine WaitMouseMoved() to identify such an occurrence. The WaitMouseMoved() call returns a boolean value of true if a drag has begun. Listing 9.2 contains an example.
When a drag begins, you create an LDragTask object.
In PowerPlant, the LDragTask object manages the data necessary for the Drag Manager: the event that starts the drag, the drag reference, the data being dragged, and the drag region handle.
 TIP
TIP Before creating the LDragTask, call the window's ApplyForeAndBackColors() function to set the proper colors for the port and ensure that
the drag highighting shows up correctly on non-white backgrounds,
or for colored objects.
PowerPlant provides two alternative mechanisms for instantiating an LDragTask object. We will call them the simple approach and the flexible approach. Each approach has its own constructor function.
This technique is suitable for dragging a single item in a single flavor (data type). The constructor routine for the simple approach has several parameters. Here's the prototype for the constructor function.
LDragTask(const EventRecord &inEventRecord,
					const Rect &inItemRect,
					ItemReference inItemRef,
					FlavorType inFlavor,
					void *inDataPtr,
					Size inDataSize,
					FlavorFlags inFlags);
You provide the event record, the bounding rectangle, an item reference (typically the value 1), the flavor type, a pointer to the data, the size of the data, and any flavor flags.
When you call the constructor, PowerPlant takes over. The constructor function stores the event record, creates the necessary drag reference, adds the data to the drag in the flavor type you specify, and creates the drag region.
The drag region is always the bounds of the rectangle you provide in the second parameter. As a result, no matter what the underlying shape is, the drag outline that the user sees is rectangular.
The constructor also starts the drag by calling the Drag Manager's
TrackDrag() function.
In the simple approach, the very act of instantiating the LDragTask object begins the drag operation automatically. However, the simple approach is suitable only for dragging one item in one flavor (data type).
Use this approach if you want to drag multiple items, or if you want to provide multiple flavors for a single item. In practice, the flexible approach is much more useful. A well-designed application drags data in a variety of flavors to increase the likelihood that the destination can understand the data. Remember, the destination may be any other process, not just the source application.
In addition, the flexible approach lets you set flags before starting a drag. For example, you can restrict the drag to the sender only.
The flexible approach uses a very simple LDragTask constructor.
LDragTask(const EventRecord& inEventRecord);You provide the event record that starts the drag. The constructor function stores the event record, and creates the drag reference.
After that, you start the drag by calling the drag task's
DoDrag()function. Here's the code forLDragTask::DoDrag().
LDragTask::DoDrag() { AddFlavors(mDragRef); MakeDragRegion(mDragRef, mDragRegion); ::TrackDrag(mDragRef, &mEventRecord,
mDragRegion); }
Notice that it calls two LDragTask functions,
AddFlavors()andMakeDragRegion(). These are empty functions in LDragTask. You must subclass theLDragTask class and override these functions if you use the flexible
approach.
In your definition of
AddFlavors(), you write code to add data for multiple objects in multipleflavors. How you do that is dependent upon the data in your own
application. Read the Drag Manager documentation for the steps
to take and the calls to make to accomplish this task.
Similarly, in your definition of
MakeDragRegion()you describe the outline of the various objects. Once again,consult the Drag Manager documentation for suggestions. You should
also explore the
LDragTask::AddRectDragItem()code to see how PowerPlant accomplishes the task for a simplerectangle.
Having provided these two functions, your initial work setting
up the drag task and starting the drag is complete. The Drag Manager
begins tracking the drag. During the process it calls your tracking
handler and sends it messages.
Tracking a Drag
Every pane capable of receiving a drag should have a tracking
handler. When the drag is within the bounds of the pane, the pane
provides some visual feedback to the user indicating whether the
drag can be received. For this to work, the pane must inherit
from a class derived from LDragAndDrop.
In its simplest form, implementing drag tracking requires that
you override at least one function.
You must override
ItemIsAcceptable(). In this function you use the Drag Manager to determine whatdata is in the drag. If you can accept it, you return
true. Otherwise, you returnfalse.
The second function you may optionally override is
HiliteDropArea(). The default behavior of LDragAndDrop highlights the drop areawhich is the frame of its associated pane inset by one pixel to
account for the border which usually surrounds a Drop-capable
pane. Override
HiliteDropArea()to provide custom highlighting.
If you want to get fancy, PowerPlant gives you the means to do
so. There are several functions you may override if you wish to
implement custom behavior. Table 9.7 lists the functions.
Override for special tracking behavior:
|
Function
|
Purpose
|
|
|
|
|
|
|
|
|
|
|
|
|
Override UnhiliteDropArea() if HiliteDropArea() does something other than call the Drag Manager's ShowDragHilite() routine.
Override EnterDropArea() and LeaveDropArea() if you want to implement special behavior when such an event
occurs. The default behavior of these functions calls HiliteDropArea() and UnhiliteDropArea() respectively.
Override InsideDropArea() if the drag location inside the drop area affects what happens.
For example, you may wish to indicate an insertion point in a
text area.
The final task you must perform is to receive the data in a drop.
To accomplish this task, you must override the ReceiveDragItem() function.
In the standard implementation, the DoDragReceive() function walks through all the items in the drag, and calls ReceiveDragItem() for each one. You do not need to override DoDragReceive() in a typical application.
Once again, what data you can receive and how you receive it
are matters that are application dependent and beyond the scope
of PowerPlant. Read the Drag Manager documentation for the steps
to take and for the calls to make to accomplish this task.
When a drag begins and ends in the same inactive window, PowerPlant
activates the window automatically. This behavior is required
by the drag and drop human interface guidelines. With that one
exception, a successful drop does not activate the receiving window.
The Drag Manager gives you the option of replacing default Drag
Manager behavior with special callback functions. You can use
these advanced techniques to manage data delivery, drag feedback,
and mouse and keyboard modifiers.
For example, the user may want to drag an item that contains
a large amount of data. Rather than gathering up that data, duplicating
it, and placing it in the drag, you can provide a "promise" to
deliver the data to the destination. If the user aborts the drag
you haven't wasted time or memory on an uncompleted operation.
If the user completes the drag, the Drag Manager calls your custom
callback function. This function fulfills your promise to deliver
data.
Similarly, you may want to customize drag feedback. The Drag
Manager draws a simple grey outline of the drag region. You may
want to do something fancier, like drag an actual bitmap of the
item. To do so, you must provide a custom callback function to
handle drag drawing.
See the Drag Manager documentation for more information about
the circumstances under which you may wish to replace the default
Drag Manager behavior.
Notice that this custom behavior occurs on a per-drag basis.
It has nothing to do with windows, panes, or applications. You
provide the address of the callback function to the Drag Manager
along with the drag reference for which you wish the callback
to be used.
The LDropArea class has a variety of functions to assist you
with these custom callback functions, as listed in Table 9.8.
LDropArea custom callback support functions:
|
Function
|
Purpose
|
|
|
|
|
|
|
|
|
|
|
|
|
|
|
|
|
|
|
The "handle" functions are the Drag Manager callback routines.
They are static member functions. The code in each of the three
"handle" functions is complete. You would not typically override
that behavior. Each calls the corresponding "do" routine.
The code in each of the "do" routines is incomplete. In fact,
all three "do" functions are empty. You must override these functions
in a subclass and provide definitions.
Please note that the LDropArea::InstallHandlers() function only installs the tracking and receive handlers. The
handlers to send data, control input, and perform drag drawing
are not installed by PowerPlant.
If you want the Drag Manager to use these three PowerPlant handlers,
you must call the appropriate Drag Manager routine to install
the handler. The routines are: SetDragSendProc(), SetDragInputProc(), and SetDragDrawingProc().
 WARNING!
When you set any of these three handlers for a particular drag,
you must provide a pointer to the appropriate drop area as the
refcon parameter. The PowerPlant handlers expect to find the LDropArea
pointer in the refcon parameter when called by the Mac OS.
Drag and drop is a powerful tool. Users love the ease of use
and intuitive freedom it provides for copying and pasting data.
However, implementing drag and drop is not always simple. PowerPlant
eliminates much of the pain of basic implementation. It does not
eliminate all of the complexity. As you learned, in many cases
you must still prepare the data in various flavors, and add that
data to the drag. You must also handle receiving the data. This
can be a non-trivial task.
However, PowerPlant gives you a robust framework on which you
can hang your drag and drop code. PowerPlant takes care of dispatch
and control. You provide the functions to determine if a drag
can be received, to receive the items in the drag, and (typically)
to add data to the drag and create a drag region.
PowerPlant also provides a variety of functions you can use to
customize your drag and drop behavior. You can implement a full
range of features using descendants of the LDropArea class.
In this exercise you implement simple drag and drop in an application
named "DragAndDrop." The purpose of this exercise is to give you
experience with drag and drop in PowerPlant-the functions you
override and the tasks you perform. This exercise is not intended
as a tutorial on the Drag Manager.
The vehicle for drag and drop is a small window containing an
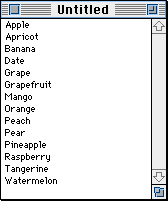
instance of the PowerPlant LTable class. Figure 9.3 shows the window. It contains a single-column table that lists
a variety of fruits.
The general tasks you must perform to support drag and drop in
a PowerPlant application are:
In this exercise you write code to accomplish each of these tasks.
1. Support drag and drop in an inactive window.
Drag Window resource DragAndDrop.ppob
In this step you modify the PPob resource to enable the delaySelect attribute of the window. Open the DragAndDrop.ppob file in Constructor,
open the Drag Window resource, and open the property inspector
for the drag window.
Click on the Delay Select check box to turn it on. With this option active, PowerPlant
will delay activating an inactive window. This gives you an opportunity
to handle the click for drag and drop.
When you are through, save your changes and close the file. You
can quit Constructor is you wish.
In order to support drag and drop, when a click occurs you must
explicitly test for the delaySelect attribute, and the presence of drag and drop. If both conditions
exist, then you can process the click.
The existing code has an empty if test. Test the delaySelect field of the inMouseDown parameter, and call DragAndDropIsPresent(). The code controlled by the if statement is provided for you.
It does the required bookkeeping and calls ClickSelf().
if ( inMouseDown.delaySelect
With these two steps you have accomplished the first principal
task, handling clicks properly. Next, you identify the beginning
of a drag.
ClickCell() CDragAndDropTable.cp
The LTable::ClickSelf() function identifies which cell in the table has been clicked,
and calls ClickCell(). CDragAndDrop-Table overrides ClickCell() to support drag and drop. This is where you detect an incipient
drag.
The existing code has an empty if test. You must test for the presence of the drag manager, and
whether a drag has commenced.
To test whether a drag has commenced, call the Mac OS Toolbox
function WaitMouseMoved(). Pass inMouseDown.macEvent.where as the parameter to WaitMouseMoved().
if ( DragAndDropIsPresent()
			&& ::WaitMouseMoved(

												inMouseDown.macEvent.where ) ) {
The code inside this if statement executes if and only if the user is dragging and the
Drag Manager is present. You have successfully accomplished the
second principal task, detecting a drag. Next, you create a drag
task.
ClickCell() CDragAndDropTable.cp
The code you write in this step goes inside the if statement you modified in the previous step. If the user is dragging,
you create a drag task.
The existing code manipulates table information and sets some
local variables. It gets the cell, the cell frame in a Rect, and the cell data in an Str255. After that, you create a drag task.
This code supports dragging a single item in a single flavor,
so you can implement the "simple" approach to a drag task. This
constructor requires that you pass the event record involved,
the bounds of the drag region, an item reference, the flavor of
data, the address of the data, the length of the data, and flavor
flags.
GetCellData( theCell, theString );
// Create the drag task.
LDragTask theDragTask( inMouseDown.macEvent,
theCellFrame, 1, 'TEXT',
&theString[1],
Remember that creating a drag task in this way also starts the
drag running automatically. There is no need to call DoDrag().
After this code, the existing code performs one more step required
to conform to the human interface guidelines for the Drag Manager.
The code checks to see if the drag ended up in the trash. Here's
the relevant code. You don't have to type this in, it already
exists.
if ( UDragAndDropUtils::DroppedInTrash(
						theDragTask.GetDragReference() ) ) {
If the drag ends up in the trash, the code removes the item from
the table. You have now completed the third principal task required
to support drag and drop. You have created the drag task and started
the drag running. In the next three steps you provide the support
required to track a drag.
TIP
You may find the UDragAndDropUtils class very useful in your own
coding. It has static functions to test for a drop in the trash,
whether the user has the option key down, and whether the drop
is in the same window it started in. These are very useful housekeeping
routines.
5. Determine if the drag is acceptable.
ItemIsAcceptable() CDragAndDropTable.cp
The ItemIsAcceptable() function is a utility function that PowerPlant calls when it
needs to know if a drop can be received by a particular drop area.
To properly support drag and drop, you must define this function.
The table is capable of receiving a text item. You should call
the Drag Manager's GetFlavorFlags() function and determine if the item has the TEXT flavor. You should
also test to ensure that the table is enabled (this is an LPane
function, IsEnabled()).
FlavorFlags theFlags;
return IsEnabled()
&& (::GetFlavorFlags( inDragRef,
inItemRef, 'TEXT', &theFlags ) == noErr);
HiliteDropArea() CDragAndDropTable.cp
PowerPlant calls this function when it is necessary to highlight
a drop area. This provides the user with visual feedback that
the drop is acceptable in the drop area.
In this case, the drop area is the window's content area. This
function should get the local frame bounds, convert it into a
region, call the Drag Manager's ShowDragHilite() function, and dispose of the region.
// Get the frame rect.
Rect theRect;
CalcLocalFrameRect( theRect );
// Show the drag hilite in the drop area.
RgnHandle theRgnH = ::NewRgn();
::RectRgn( theRgnH, &theRect );
::ShowDragHilite( inDragRef, theRgnH, true );
Because you use the ShowDragHilite() function, you do not need to override UnhiliteDropArea().
7. Provide insertion point feedback.
InsideDropArea() CDragAndDropTable.cp
In the DragAndDrop application, the drop area is the table, and
the table occupies the content area of the window. To be very
friendly, there should also be an insertion point to clearly demonstrate
where the drop is going to end up in the list.
To make this work, you must track the drag while it moves around
inside the drop area. While a drag moves inside a drop area, PowerPlant
repeatedly calls InsideDropArea().
The existing code does all the setup work. This application uses
the mDropRow data member to track where in the table the drop should go. The
existing code calls the inherited InsideDropArea() function, gets the mouse location for the drag, and determines
what row is involved.
If it's a new row, it erases the previous dividing line (insertion
point). After that, you should draw a new dividing line.
Save theRow in the mDropRow data member. Then call DrawDividingLine().
mDropRow = theRow;
The code for determining the row and drawing the dividing line
is provided for you. Feel free to examine it.
NOTE
The CDragAndDropTable class also overrides EnterDropArea() and LeaveDropArea(). These overrides simply invalidate the mDropRow value so that a new insertion point is drawn when the drag changes
cells.
With this step you have completed the support required for tracking
a drag. All that remains is receiving a drop.
ReceiveDragItem() CDragAndDropTable.cp
As you know, the purpose of this function is to retrieve data
from the drop. The code in this function is provided for you.
It has more to do with manipulating data in an LTable than anything
else.
Examine the code, and understand the tasks it performs. First,
it gets the data in the drag item by calling the Drag Manager's
GetFlavorData() function. Then it gets the size of the data by calling GetFlavorDataSize().
After that, the code determines if the drag is a move or a copy
operation. It is a move operation if the drag is in the sender
window, and the option key is not down. Otherwise it is a copy
operation. Notice that the code uses the UDragAndDropUtils member
functions for both tests.
If it is a move operation, the code removes the data from one
location in the table and inserts it in another.
If it is a copy operation, the code inserts the data in the proper
location in the table.
9. Build and run the application.
When the application builds successfully and runs, the window
shown in Figure 9.3 appears with the list of fruits.
Click and drag an entry in the list to another location in the
list. Notice that you can select and drag an item with a single
gesture. This is an important feature of the human interface.
While a drag is underway, observe the insertion point feedback
(the black line between entries). The insertion point is the work
of the InsideDropArea() function. As the drag moves, the insertion point follows along.
Notice that there is no drop area highlighting (the border around
the content area of the window). Drop area highlighting only appears
after a drag has left the sender window. To see it, drag the item
out of the window, and then back into the window. When you reenter
the drop area, the drop area highlighting appears indicating that
this is an acceptable drop. The highlight is from the HiliteDropArea() function.
A drag within a single container can be a move or a copy. Hold
down the option key while you begin a drag, or when you drop an
item in the same table as you started. You don't have to hold
the option key down for the entire drag, just at the beginning
or the end. If the option key was down at either of those moments,
the original remains and a copy is placed at the drop location
when you drop the item.
Drag an item to the trash and observe what happens. The item
should disappear from the table. Look in the trash, and you'll
see a text clipping. You can drag that item back out of the trash
and into a table if you wish.
Now, make a new window and drag items back and forth between
windows. In particular, drag an item from the inactive window
into the active window. A drag from an inactive window or a drop
into an inactive window does not cause that window to become active.
This is another important feature of the human interface. Notice
also that the inactive window shows background highlighting of
the currently selected table cell in that window.
Finally, drag an item from a window and drop it on the Finder's
desktop. The item appears on the desktop as a text clipping. Drag
the text clipping into a table. The text appears as a new entry.
Drag and drop works across applications!
Launch a text processor that supports drag and drop, like SimpleText.
Type a phrase into SimpleText. Then drag it into the DragAndDrop
table. The text transfers from one application to another with
no difficulty. Drag something from the table into SimpleText.
It works both ways.
Play around with drag and drop. It makes data transfer so simple
that you might wonder why it hasn't always been this easy. When
you are through playing, quit the application.
PowerPlant gives you a lot of drag and drop functionality for
free. PowerPlant takes care of most of the housekeeping details,
dispatching control to the proper functions when necessary. You
override and define a few, relatively simple hook functions such
as ItemIsAcceptable(), HiliteDropArea(), and so forth.
As always, there is room for further exploration. You could implement
drag and drop for pictures. Follow the same steps as you did in
this exercise, but use PICT data instead of text.
For a greater challenge, you might add multiple flavors of the
same data to a drag (such as both TEXT and PICT). Or you might
add multiple items to a single drag. You might create a drag region
that outlines each individual item in a multiple-item drag, rather
than the encompassing rectangle. See "The flexible approach" for ideas on how to go about this.
Finally, for a real challenge, you could implement custom routines
for managing a drag operation. For example, you could drag around
a bitmap image of the item being moved, rather than a simple outline.
See "Providing Custom Drag Behavior" for hints and clues.
Good luck, and happy dragging.
Visit the Metrowerks website at: http://www.metrowerks.com
For assistance contact Metrowerks Technical Support at: cw_support@metrowerks.com
Copyright © 2000, Metrowerks Corp. All rights reserved.
Last updated: July 21, 2000