
This chapter describes using the MPW ToolServer development environment from within the CodeWarrior IDE.
The topics in this chapter are:
ToolServer is a stand-alone version of Apple's MPW (Macintosh Programmer's Workshop) development environment. You can use ToolServer to execute MPW commands, MPW tools, and MPW scripts from the ToolServer Worksheet in CodeWarrior. You can also use it to look up information in MPW's 411 on-line reference database from any CodeWarrior Editor window. This database contains information from Inside Macintosh, DTS (Developer Technical Support) Technical Notes, or the MPW Command Reference.
Table C.1 describes some of the more popular MPW tools.
Table C.1 Useful ToolServer tools
| This command |
Does this |
|---|---|
Unlike the MPW Shell, MPW ToolServer does not let you execute commands that add menus or control windows. However, you can use the File and Line commands to open a CodeWarrior editor window and find a line in it.
This section explains how to install the ToolServer application on your computer's hard drive. To complete this installation, you will need to copy some of the files from the MPW folder on the CodeWarrior Tools CD.
1. Copy the ToolServer 3.4.1.sit Stuffit archive file from the CodeWarrior Reference CD onto your hard drive.
This archive is located in the Apple lDevelopment lTools folder.
2. Install the Stuffit Expander application (from the CodeWarrior Tools CD) to your hard drive.
You will need to use the Stuffit Expander to unpack the ToolServer
archive. Just drag the ToolServer 3.4.1.sit file onto Stuffit Expander.
You can put the ToolServer folder anywhere on your hard drive. CodeWarrior will find it no matter where you place it.
3. Make sure that you only have one copy of the ToolServer application on your system.
4. Create an alias to the ToolServer Tools folder.
The Tools folder is located inside the folder that you just installed,
and is the same folder that contains the ToolServer application.
Then move this alias to the Metrowerks CodeWarrior folder, the same folder that the CodeWarrior Tools IDE is in.
5. Copy any MPW tools you'll need into the ToolServer Tools folder that you just installed.
If you installed the MPW Shell onto your hard drive, you can make
aliases of the tools in the MPW Tools folder and place them into the ToolServer Tools folder, which is in the same folder as the CodeWarrior IDE.You
can copy any tool you want, but you must copy at least Commando, GetFileName, and GetListItem. If you want to use the MPW 411 database, copy the Get tool also. The 411 database is useful for looking up Macintosh
Toolbox calls and other information. If you'll be using the Rez or Derez resource tools from MPW, copy over these tools too.
6. Create a folder named Interfaces.
Create a folder named Interfaces in the same folder that contains the ToolServer application you
installed.
7. If you do not want to use the MPW 411 on-line database, delete the MWStartup·411 script.
The MWStartup·411 file is in your ToolServer folder. It asks you to locate the
MPW 411 database.
8. Copy the MPW folder named RIncludes into the new Interfaces folder.
This folder is located inside the Interfaces folder in the MPW folder on the CodeWarrior CD.
ToolServer is now ready for use with CodeWarrior.
To start ToolServer, select  > Start ToolServer. CodeWarrior starts up ToolServer, creates a ToolServer Worksheet
window and adds the ToolServer menu to the menubar.
> Start ToolServer. CodeWarrior starts up ToolServer, creates a ToolServer Worksheet
window and adds the ToolServer menu to the menubar.
If the  menu does not appear on the menubar, you need to make sure that
you have enabled the Use ToolServer menu option in the IDE Extras settings panel, as shown in Figure 13.9. To learn more about this and other options, refer to the IDE User Guide.
menu does not appear on the menubar, you need to make sure that
you have enabled the Use ToolServer menu option in the IDE Extras settings panel, as shown in Figure 13.9. To learn more about this and other options, refer to the IDE User Guide.
When ToolServer starts up, it executes these scripts, in the order listed in Table C.2.
Table C.2 ToolServer initialization scripts
| This script |
Sets up |
|---|---|
If you didn't delete the MWStartup·411 script, ToolServer will prompt you to help it find the 411 database.
When ToolServer beeps, choose ToolServer from the application menu.
ToolServer displays a dialog, shown in Figure C.1, asking you to find the 411 database. If don't want to use 411, click Cancel.
The dialog disappears. ToolServer continues executing the rest of your startup scripts, and CodeWarrior disables the commands that use 411.
 TIP
TIP Delete the MWStartup·411 file as soon as possible if you don't plan to use 411 with ToolServer, so that ToolServer won't display this dialog the next time you start it.
Figure C.1 Finding the 411 Folder
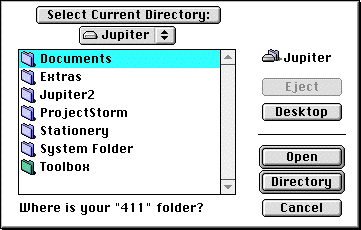
If you want to use 411, select the folder that contains the database and press the Directory button. The dialog disappears. ToolServer saves the location of the database to a file and continues executing the rest of your startup scripts. CodeWarrior enables the commands that use 411.
The next time MWStartup·411 executes, ToolServer will read the location from the file and
won't ask you to find it again.
Choose CodeWarrior from the application menu (in the upper right-hand corner of your Macintosh screen).
CodeWarrior comes to the front, with the ToolServer Worksheet at the front.
CodeWarrior provides several ways to execute MPW commands, tools, and scripts:
The ToolServer Worksheet is a special window. It lets you enter commands, which CodeWarrior sends to ToolServer. CodeWarrior then writes the results of the command back into the window.
To edit text in the worksheet, use the same commands that you use in any Editor window.
To execute a command, script, or tool that you have installed in ToolServer from the worksheet, type the command and press the Enter key. If you don't have an Enter key on your keyboard, you can use Command-Return instead.
CodeWarrior sends the command to ToolServer and prints ToolServer's response directly below the command's line.
If you press Return, instead of Enter or Command-Return, CodeWarrior just moves the cursor to the next line and does not execute your command.
To re-execute a command, script or tool, place the cursor somewhere on the command's line and press the Enter key or Command-Return.
CodeWarrior sends the command to ToolServer and prints ToolServer's response directly below the command's line. The new response appears above any old response.
You can also edit a command in the worksheet window before you re-execute it.
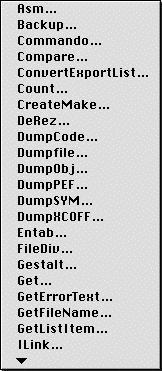
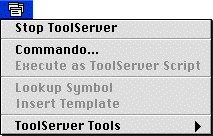
An example of the ToolServer Tools Menu (Mac OS), shown in Figure C.2, is a submenu under the ToolServer menu. This section describes how to add commands to that menu and execute them.
Figure C.2 A ToolServer Tools submenu
Bring the script's Editor window to the front, then choose Execute as ToolServer Script from the ToolServer menu, as shown in Figure C.3.
To add a command, tool, or script to the ToolServer Tools submenu, make an alias to the command, tool, or script on your hard disk.
Although you can use the actual command or script, using an alias helps save disk space.
Move the alias into the (ToolServer Tools) folder inside your Metrowerks CodeWarrior folder.The (ToolServer Tools) folder is in the folder that contains the CodeWarrior IDE, and
not in the folder that contains ToolServer.
The next time you look at the ToolServer Tools submenu of the ToolServer menu, the command or script will appear.
To execute a command, tool, or script from the ToolServer Tools submenu, first choose the command or script from the ToolServer Tools submenu of the ToolServer menu (Figure C.2).
If the item is a command with a commando dialog box, ToolServer displays the commando dialog box. If the item is a command with no commando dialog box, ToolServer displays a dialog box that lets you enter command-line arguments. If the item is a script, ToolServer executes it immediately.
CodeWarrior displays ToolServer's response in the ToolServer Worksheet.
ToolServer lets you use Commando dialog boxes, which are dialog boxes that help you compose a syntactically perfect command, even when you don't know the command's syntax.
This section describes how to bring up these dialogs with the Commando command in the ToolServer menu. You can also bring up a Commando dialog box by typing an ellipsis (Option-;) after a command, like this:
rez
Note that not all commands have Commando dialogs. In order for a command to emit a Commando dialog box for you to use, the developer of the command had to do special things to make the tool Commando-aware.
Choose Commando from the ToolServer menu or enter the Commando command in the ToolServer worksheet (press Enter or Command-Return
to execute your command).
ToolServer comes to the front and displays the Commando dialog box, as shown in Figure C.4.
Figure C.4 The Commando dialog
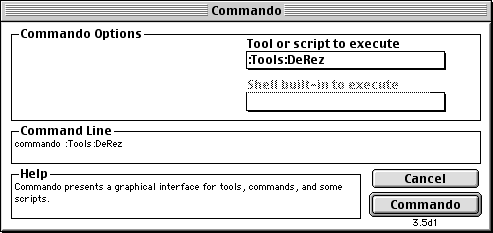
Next, choose the command or script to execute by selecting and option from the Tool or script to execute pop-up menu. You can execute a built-in command, a tool, or a script.
To execute a built-in command, choose it from the pop-up menu named Shell built-in to execute.
To execute a tool or script, choose Select a tool or script to execute from the pop-up menu named "Tool or script to execute". ToolServer displays an open file dialog, as shown in Figure C.5. Select the tool or script you want and click OK.
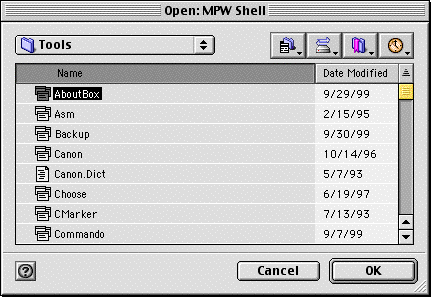
When you have finished configuring the Commando dialog box, click the Commando button in the dialog.
CodeWarrior writes a Commando command-line in the ToolServer WorkSheet.
Then, go back to CodeWarrior by selecting CodeWarrior from the application menu, or clicking on a CodeWarrior window to bring the IDE application to the front. The ToolServer Worksheet may appear as shown in Figure C.6.
Figure C.6 A Commando command-line in a ToolServer Worksheet
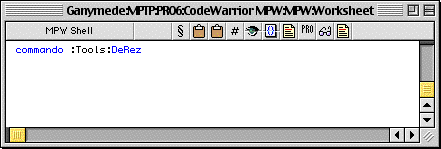
Place the cursor in the Commando command-line and press Enter or Command-Return.
After you press Enter, ToolServer comes to the front and displays the Commando dialog for the command, tool, or script. For example, the dialog for Rez is shown in Figure C.7.
Figure C.7 The Rez Commando dialog box
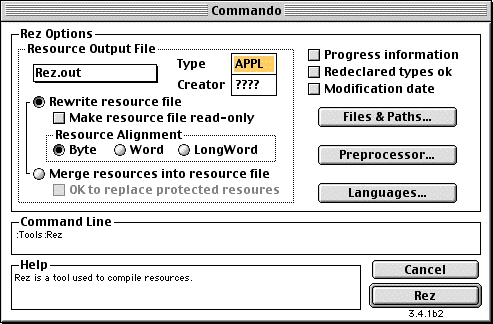
Fill in the dialog items to correspond to the options you want, and press the button that contains the command's name (the Rez button in this case).
After you press the button, CodeWarrior writes a command line in the ToolServer Worksheet. It will look something like Figure C.8.
Figure C.8 The Rez command-line in a ToolServer Worksheet
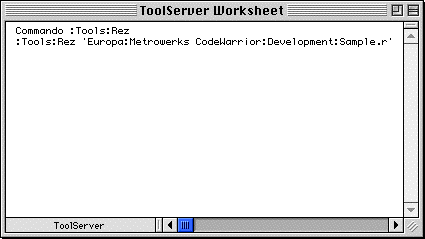
Place the cursor in the command-line and press Enter or Command-Return.
ToolServer executes the command and CodeWarrior writes the result into the ToolServer Worksheet.
CodeWarrior lets you use MPW's 411 database, which allows you
to look up information from Inside Macintosh, DTS Technical Notes,
or MPW Command Reference. Before you use it, make sure the MWStartup·411 script is in your ToolServer folder when you start up ToolServer.
1. In a CodeWarrior Editor window, select the name of the symbol.
You can select the name of almost anything that might be in Inside Macintosh, including functions, types, and variables.
If CodeWarrior finds the symbol in the 411 database, it displays the information in a CodeWarrior Editor window named Help. The cursor is at the beginning of the information. You may need to scroll to see all of it.
If CodeWarrior can't find the symbol in the 411 database, it writes an error message in the ToolServer Worksheet and displays information on the last symbol you looked up.
The Help window contains all the 411 information you've ever looked up. To remove old information, just delete it. CodeWarrior won't display it the next time you look something up.
When you're finished reading the information, close the Help window.
CodeWarrior cannot look up more 411 information if the Help window is open.
In MPW 411, a template is a sample function call which contains the names of the function's arguments. To lookup a symbol:
1. In a CodeWarrior Editor window, select the name of the function.
You can select the name of any function described in Inside Macintosh.
CodeWarrior inserts the parameter list after the selected text.
 to limit the search (To type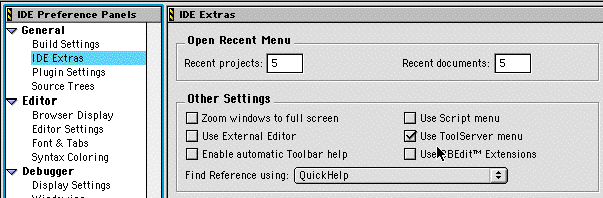
 > Lookup Symbol.
  > Insert Template.