
An MPW tool is a program that you can run under MPW (Macintosh Programmers Workshop). MPW provides a UNIX-like console user interface.
This section describes the following topics:
To learn more about MPW tools, refer to Building Programs in MPW, included on the CodeWarrior Reference CD.
This section describes how to create a 68K or PowerPC MPW tool project.
The topics in this section include:
The steps for creating a 68K MPW tool are:
Use the New Project command under the File Menu, and select Empty Project from the New Project Stationery dialog.
2. In the 68K Target panel, choose Mac OS 68K Linker from the Linker pop-up menu.
3. In the 68K Target panel, choose MPW Tool from the Project Type menu.
Figure 13.10 shows how to do this.
Choosing MPW Tool as the Project Type: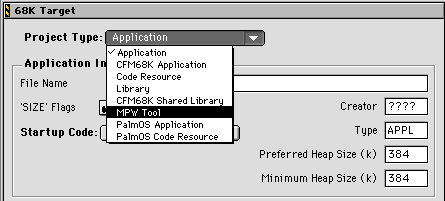
4. Enter the name of the tool in the File Name field.
5. In the C/C++ Language panel, choose MPW C or MPW C++ from the Source Model menu.
Figure 13.11 shows how to do this.
Choosing MPW C for the Project's Language: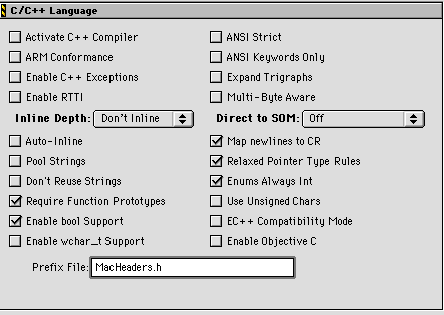
MPW Shell expects its tools to be compiled with options that are compatible with MPW C. These options need to be enabled:
Additionally, if you're using C++, you need to enable:
Activate C++ Compiler Enable C++ Exceptions Enable RTTI
6. In the Access Paths panel, change the folders in the System Paths pane.
Remove the {Compiler } from the System Paths list, and add these folders in the listed
order:
 NOTE
NOTE You must add the folders in the order listed!
The Access Paths panel should now look something like that shown in Figure 13.12.
Access Paths for 68K MPW Tools: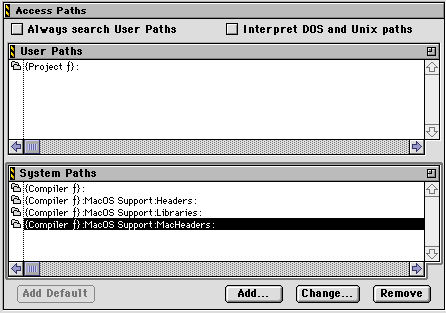
7. In the 68K Processor panel, turn on the 4-byte Ints option
The MPW Shell uses 4-byte integers.
8. Add all the needed libraries to the project.
For more information on choosing libraries, refer to "Choosing Libraries for an MPW Tool Project."
9. If any source file includes fcntl.h or ioctl.h, make sure you use Apple's version instead of Metrowerks's.
The header files fcntl.h and ioctl.h declare functions that the Apple and Metrowerks libraries implement
in incompatible ways. When you create MPW tools, you must use
Apple's versions.
In the source file, edit the #include statements so they use quotes ("") instead of brackets (<>). For example, change
#include <fcntl.h>
#include "fcntl.h"
Then make copies or aliases of the files fcntl.h and ioctl.h in the CIncludes folder, and put the copies or aliases in your project's folder.
If you use the file fcntl.h, also make a copy or alias of the
file Seekdefs.h in the CIncludes folder and put it in the ANSI Headers folder in the Headers folder
in the MacOS Support folder in your Metrowerks CodeWarrior folder.
The CIncludes folder is in the Interfaces folder in the CodeWarrior MPW folder.
NOTE Apple's version of fcntl.h is incompatible with Metrowerks.
These are the steps to follow to create a PowerPC MPW Tool.
1. Create an empty PowerPC project.
Use File > New Project, then select Empty Project from the New window.
2. In the Target Settings panel, choose Mac OS PPC Linker from the Linker pop-up menu.
Figure 13.13 shows how to do this.
Choosing the Mac OS PPC Linker: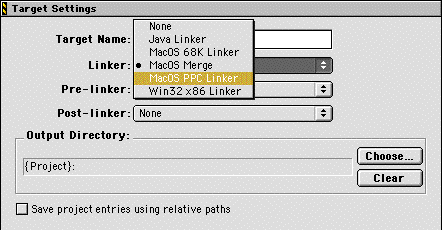
3. In the PPC Target panel, choose Application from the Project Type menu.
4. Enter the name of the tool in the File Name field.
5. Enter the Creator and File Type codes.
Enter 'MPS ' (note the space) as the Creator and 'MPST' as the Type. The PPC Target panel should look like Figure 13.14.
PowerPC MPW Tool Target Settings: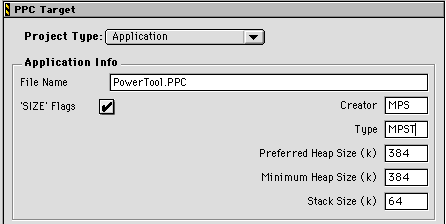
6. In the C/C++ Language panel, set options for MPW C or MPW C++ compatibility.
MPW Shell expects its tools to be compiled with options that are compatible with MPW C. These options need to be enabled:
Additionally, if you're using C++, you need to enable:
Activate C++ Compiler Enable C++ Exceptions Enable RTTI
7. In the Access Paths panel, change the folders in the System Paths pane.
Remove the {Compiler } from the System Paths pane, and add these folders:
NOTE You must add the folders in the order listed!
The System Paths pane of the Access Paths panel should look something like that shown in Figure 13.15.
Access Paths for PowerPC MPW Tools: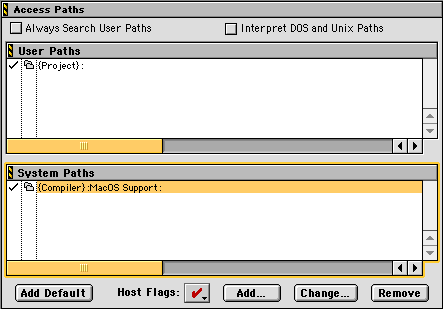
8. Add all the needed libraries to the project.
For more information on choosing libraries, refer to "Choosing Libraries for an MPW Tool Project."
9. If any source file includes fcntl.h or ioctl.h, make sure you use Apple's version instead of Metrowerks's.
The header files fcntl.h and ioctl.h declare functions that the Apple and Metrowerks ANSI libraries implement in incompatible ways. When you create MPW tools, you must use Apple's versions.
In the source file, edit the #include statements so they use quotes
("") instead of brackets (<>). For example, change
#include <fcntl.h>
#include "fcntl.h"
Then make copies or aliases of the files fcntl.h and ioctl.h in the CIncludes folder, and put the copies or aliases in your project's folder. If you use the file fcntl.h, also make a copy or alias of the file Seekdefs.h in the CIncludes folder and put it in the ANSI Headers folder in the Headers folder in the MacOS Support folder in your CodeWarrior folder. The CIncludes folder is in the Interfaces folder in the CodeWarrior MPW folder.
NOTE Apple's version of fcntl.h is incompatible with Metrowerks.
The following procedure describes the easiest way to create a Fat MPW tool.
NOTE This procedure could not be confirmed at press time. Please check the release notes for any late-breaking information on this topic.
There is one other method of creating Fat projects. The procedure listed in "Creating Fat Applications" is not exactly the same as the alternate procedure you would use for creating Fat MPW Tools. However, this method illustrates some of the advanced features of the CodeWarrior IDE and is worth reading. The method discussed here is designed to quickly get Fat MPW tools building.
NOTE Only MPW Shell 3.4d1 and later or ToolServer 3.4d1 and later will use the PowerPC code in a Fat MPW tool. Older versions of MPW running on Mac OS PowerPC computers will execute the 68K code in emulation.
1. Create two MPW tool projects: a 68K project and a PowerPC project.
Before you can create a fat MPW Tool, you must create working 68K and PowerPC tools.
Create each of the two projects from scratch. Don't try to duplicate one project and convert it, since this can cause problems. Refer to
Use the same source files and resource files in each project. Only the libraries should be different. If you need to use different source code for the PowerPC and 68K tools, use code of the form:
#if defined(powerc) /* PowerPC code goes here */
#else
/* 68K code goes here */
#endif
to check which CPU you're compiling for.
2. Test and debug the PowerPC and 68K MPW tool projects.
Both MPW Tools must be working properly before you can create a Fat tool.
3. Create a duplicate of your PowerPC Mac OS project.
Make a duplicate of the PowerPC MPW Tool project file. If you
are developing your code using a Mac OS computer, you can use
the Duplicate command in the Mac OS Finder, or the Save A Copy As command in
the File Menu. If you are developing your code on a Windows computer,
you can use the Save A Copy As command in the File Menu.
Rename the duplicated project to something descriptive. For example,
use WayHappeninMPWToolFAT.µ on the Mac OS, or WayHappeninMPWToolFAT.mcp on the Windows host platform. Figure 13.16 shows the dialog box that appears when you choose the Save A
Copy As menu command.
Saving a Duplicate of Your Fat Project File:
4. Add the 68K project file (as a subproject) to the Fat application project.
Click in your open Fat project file window to make the window active, and then use the Add Files command in the Project Menu to add the 68K project file to the project. This makes the 68K project file a subproject of the Fat project. When the Fat project is built, the 68K project will automatically be updated.
Figure 13.17 shows the dialog that appears when you use the Add Files menu command for selecting a file to add. Click on the 68K project file you want to add, then click the Add button. Then click the Done button.
Selecting a 68K Project File to Add to the Fat Project:
Figure 13.18 shows the Fat project file with the 68K project file added to it.
Fat Project File with 68K Subproject File:
5. Remove the resource files from the Fat project file.
This step is optional. When you do this step, you will minimize the number of warnings you receive at link time for the Fat project.
Remove all resource files from your Fat project file, using the Remove Selected Items menu command in the Project Menu. The reason you do this is to keep duplicate resources from being used at link time, which generates link warnings.
You aren't required to remove the resource files from the Fat project, this step is optional. But the CodeWarrior IDE creates duplicate resource warnings if you don't. You can safely ignore the warnings if they don't bother you.
6. Configure linking for the 68K application.
Click in the Link Column of the Targets view of the Project window, in the same row as the 68K target, as shown in Figure 13.19. When you click there, a small dot appears in the column.
Configuring the Linking of 68K Code into the Fat MPW Tool:
This causes the 68K target output file to be linked into the Fat target's output file. So now, when the Fat target is built, the 68K subproject is built first. Then the output of the 68K target is linked into the Fat target.
Notice that when you click on the Link Column, the Files view of the Project window changes, as shown in Figure 13.20. The output file of the 68K target has now been added to the project as a file.
Including the 68K File in the Project Window Files View:
Use the Make command on the Project Menu to build and link your Fat project.
CodeWarrior creates a new Power PC MPW Tool and copies the code
resources, and the project resources, from the 68K application
into the Fat application.
8. In the File Mappings panel, add a file type entry that lets you add MPW Tools to the
project.
Add a file type entry with the following properties:
MPST'.
None.
The File Mappings panel should look like the one below.
MPW Tool entry in the File Mappings panel: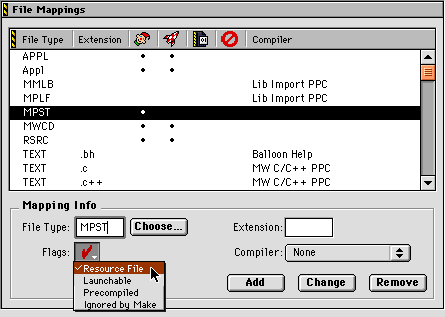
This section describes which libraries to include in 68K and PowerPC MPW Tool projects.
Table 13.3 lists the CodeWarrior libraries you need to add to your 68K MPW Tool projects.
Choosing which libraries to add to an 68K MPW tools project:
| If the project |
Add this |
|---|---|
If the library's name contains xx, you need to choose a library
based on some Target Settings panel options. To learn more about configuring Target Settings panel options, refer to the IDE User Guide. In a nutshell, the settings you need to be concerned with are
4-byte int and 8-byte double, as well as floating point support
and MPW Newlines. You need to make sure that the options you choose
in the options panel match those of the library that you're using.
For example, you can tell from the library name that
needs to have 4-byte integers turned on in the options panel, and MPW Newlines turned on.
To learn more information about the Metrowerks library naming conventions, refer to "Library Naming Conventions."
Table 13.4 lists all the CodeWarrior libraries you might need to add.
Choosing libraries to add to a PowerPC MPW tool project:
| If the project |
Add this |
|---|---|
Listing 13.11 is a main() function for a simple MPW tool that prints its arguments. MPW
Shell command line parameters and environment variables are provided
automatically by the CodeWarrior's MPW runtime library.
main() function for an MPW tool:
#include <stdlib.h>
#include <string.h>
#include <stdio.h>
void main(int argc, char *argv[], char *envp[])
{
	int i;

	printf("Command line parameters:\n");

	for (i = 0; i < argc; i++)
		printf("%s\n", argv[i]);

	printf("Exported shell variables:\n");

	for (i = 0; envp[i] != NULL; i++)
		printf("%s = %s\n", envp[i],
					envp[i] + strlen(envp[i]) + 1);

	exit(0);
}
main() takes three arguments as shown in Table 2.26.
main() arguments for an MPW tool:
This section explains how to execute your newly created MPW Tool.
1. Place your compiled tool inside the Tools folder inside the MPW or ToolServer folder on your Mac OS computer.
MPW Shell and ToolServer can't use the tool unless it's in the Tools folder.
2. In MPW or ToolServer, execute the flush command.
MPW Shell and ToolServer keep a cache of recently executed tools. The flush command empties that cache, so MPW and ToolServer won't execute an old version of your new tool. You should use this command whenever you are testing a new version of your tool.
Type the name of the tool in the WorkSheet and press Enter or Command-Return. Here are the lines you might type to execute these operations:
flush
WayHappeninMPWToolFAT