This chapter introduces you to the CodeWarrior Rapid Application Development (RAD) tools by stepping you through the process of creating a RAD Java applet from start to finish.
Only those topics specific to creating a Java Applet with CodeWarrior RAD tools are covered in this chapter. For general information on using the CodeWarrior IDE refer to the IDE User Guide.
This chapter has the following sections:
This section gives you a very brief overview of CodeWarrior Java RAD tools. For an in-depth view of all CodeWarrior RAD tools, read the appropriate chapters in the IDE User Guide.
RAD stands for Rapid Application Development. RAD tools are generally designed to allow programmers to develop
projects faster, and with better results. Developers can design
and manipulate user interface elements live on the screen without
having to write the software required to create the visual elements.
CodeWarrior Java RAD tools allow Java developers to create and manipulate Java AWT or Java Swing components live on the screen without having to write the code necessary to create those components. CodeWarrior automatically writes the generic initialization routines and the drawing code of each of the components.
In the following sections we will show you how to create and build a Java applet using the CodeWarrior RAD tools.
To create RAD projects using the CodeWarrior IDE, you use a CodeWarrior RAD wizard. RAD wizards step you through the process of creating your project, allowing you to specify the characteristics your software should have, and create the project to your specifications.
This section steps you through using the Java Applet Wizard to create a new RAD Java Applet project.
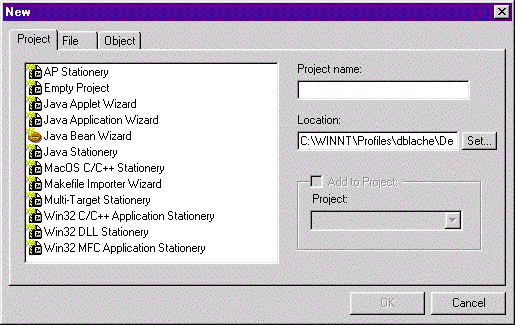
Select File > New. The CodeWarrior IDE displays the New window.
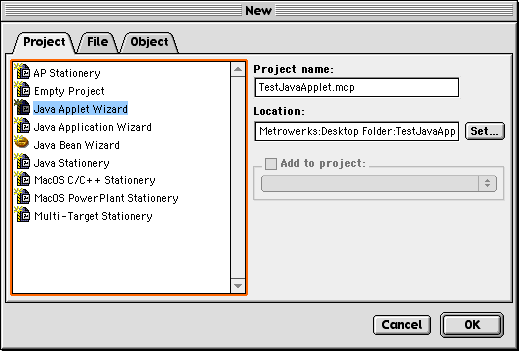
Choose Java Applet Wizard from the list of available project wizards and stationery.
Type TestJavaApplet.mcp in the Project name edit field.
4. Set the project folder location.
Use the default location or set another location by pressing the Set button.
The New window should now appear similar to the one shown in Figure 4.2.
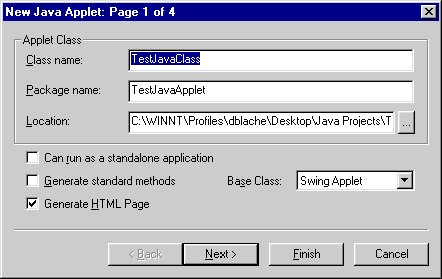
Press OK to continue. The wizard displays the first of four Java applet
information pages (Figure 4.3).
5. Supply the applet class information.
This page contains settings for the applet class name, package name, and location, whether the applet uses AWT or Swing, and other applet attributes.
Set the Class Name to TestJavaClass.
Set the Package Name to TestJavaApplet.
Select Swing Applet from the Base Class pop-up menu to signify that the applet we are creating will use the Swing package.
 NOTE
NOTE This tutorial uses the Java Swing package. CodeWarrior RAD tools support the Java AWT package as well.
Ensure that Generate HTML Page is checked so that the wizard will create an HTML file for use with the applet.
The window should now appear similar to Figure 4.3.
Press Next to continue to the next page in the wizard.
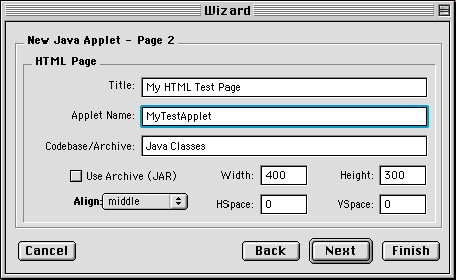
The wizard creates an HTML page for viewing your applet in a web browser. This wizard page lets you set certain attributes of the HTML page.
Set the Title edit field to My HTML Test Page.
Set the Applet Name edit field to MyTestApplet.
Do not change the other settings in this window. The default settings are fine for this tutorial.
The window should now appear similar to Figure 4.4.
Press Next to continue to the next page in the wizard.
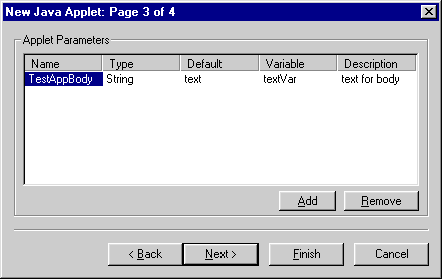
The parameters listed on this page are passed to the applet at
run time initialization. These parameters are also used for passing
arguments from HTML files using the <PARAM> tag.
The first parameter is started automatically for you. Just click in the Name column and start typing to fill in the first parameter. To add another parameter you would click the Add button.
Set the Name column to TestAppletBody.
Click in the Type column and choose String from the pop-up menu. This value determines the type of the data passed in this parameter.
Set the Default column to "text." This is the default data for this parameter.
Type textVar into the Variable column. This is the name of the parameter as it will be referenced
in the source code for the applet.
Set the Description column to "text for body."
The window should now appear similar to Figure 4.5.
Press Next to continue to the next page in the wizard.
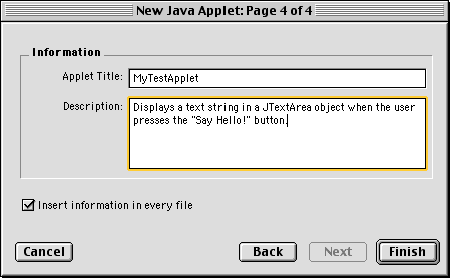
8. Supply the applet title and description.
Set the Applet Title to MyTestApplet. This setting is optional.
The Description creates a comment at the top of each source file in the applet. This setting is optional.
The window should now appear similar to Figure 4.6.
Press Finish to continue to the summary page.
9. View the summary data for the applet.
The Summary window (Figure 4.7) displays information about how the wizard will build the applet.
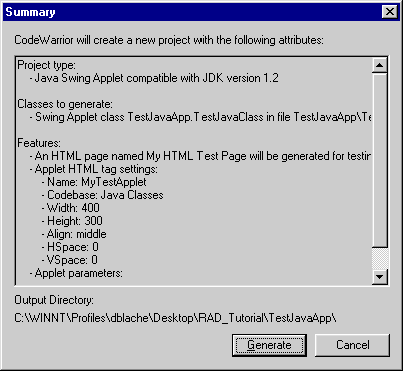 Java Applet Wizard - Summary Page:
Press Generate when you are ready to start building your applet. The CodeWarrior IDE generates the new RAD project according to your specifications, and opens the Object Inspector, Component Palette and a blank Layout window.
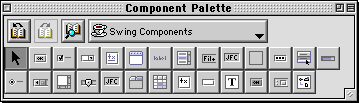
Components are the visual elements that make up a CodeWarrior RAD design. The Component Palette window displays all of the components available to you for creating the visual layout of your design.
We will build our graphical interface using Swing Components from the Component Catalog window.
The Component Palette window (Figure 4.8) is displayed along with the Layout Editor and Project Manager windows when the Java Applet Wizard creates your project.
Select the Component Catalog icon from the Component Palette window (as shown in Figure 4.9).
Component Palette window - Component Catalog icon: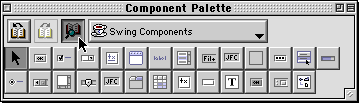
When the Component Catalog icon is pressed, the Component Catalog window is displayed (Figure 4.10).
Select Swing Components in the All Catalogs pane to the left to make sure we will be using the swing components.
Component Catalog viewing Swing components: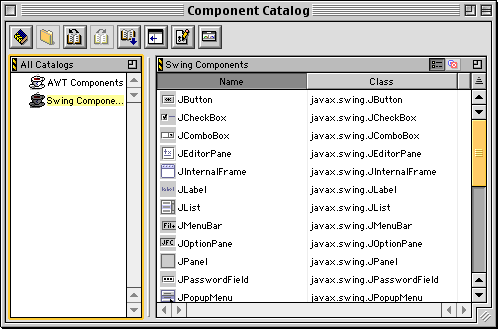
NOTE The Component Palette window and Component Catalog window contain the same components. However, additional class information is available in the Component Catalog window along with support for drag and drop between the Component Catalog window and the Layout Editor window.
Now we need to build our graphical interface using the Swing Components and the Layout Editor. In this section we will add three objects to the layout: a text object and two button objects.
An empty layout is provided to develop the graphical interface. The empty layout is displayed in the TestJavaApplet.TestJavaClass window.
1. Add buttons and text area to the layout.
Click and drag a JButton component from the Swing Components pane of the Component Catalog window to the layout window. Repeat this step to add a second JButton object to the layout. Next add a JTextArea object. Position and size the objects so that they appear as in Figure 4.11.
Layout Editor with added components: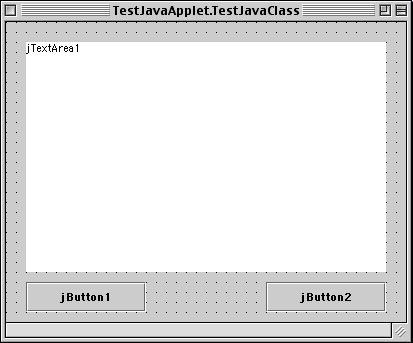
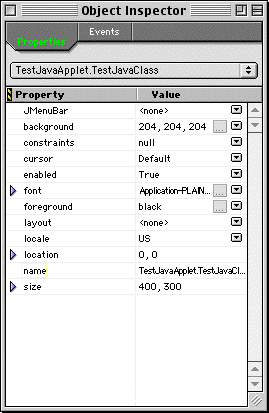
Select Window > Object Inspector from the CodeWarrior menu bar. The Object Inspector window is displayed (Figure 4.12.).
We will set the component properties and events for each of the JButton objects we created in the layout. The JTextArea component properties do not need to be altered. Select the Properties tab in the Object Inspector window if it is not already selected.
a. Select the jButton1 object.
In the TestJavaApplet.TestJavaClass window, select the jButton1 object by clicking on it once. The Object Inspector window displays the object's properties (Figure 4.13).
Object Inspector window - jButton1 object: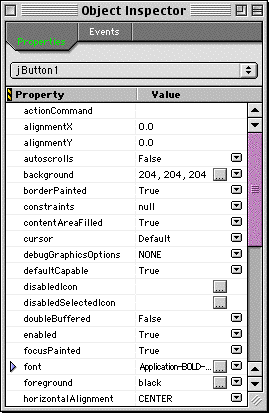
b. Change the jButton1 object name property.
Find the name property in the Property column and change the value to "SayHelloButton." This is the new name of the JButton1 object. We will refer to this name in our source code.
c. Change the jButton1 object text property.
Next, change the text property's value to "Say Hello!." This changes the display name of the button.
d. Select the jButton2 object.
Another way to select an object in the Object Inspector window is to select the objects name in the object pop-up menu (Figure 4.14). Select jButton2 in this menu to display the properties of the jButton2 object.
Object Inspector window - object pop-up menu: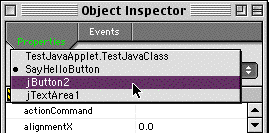
e. Change the jButton2 object name property.
Find the name property in the Property column and change the value to "ClearButton". This is the new name of the JButton1 object. We will refer to this name in our source code.
f. Change the jButton2 object text property.
Next, change the text property's value to "Clear". This changes the display name of the button.
Once the object properties are set, the Layout Editor should appear as in Figure 4.15.
Layout Editor window with properties set: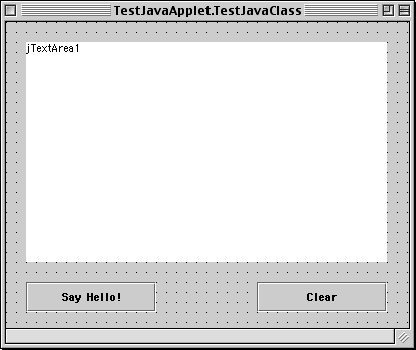
Re
What we have done so far is created everything necessary to get the applet up and running. Once the applet is running, however, it will not do anything. If a button is pressed, nothing happens. In this section, we'll add source code to the applet to make it do certain things.
We want the applet to transfer the contents of the TestAppletBody parameter that we specified in the Java Applet Wizard into the jTextArea1 object when the applet is initialized. That way, we can specify the default value in the HTML file, and can change the default value without having to recompile the applet.
We will accomplish this by adding source code to the initComponents() routine. The source code will simply set the contents of the
jTextArea1 object to the contents of the TestAppletBody parameter.
1. Open the TestJavaClass.java source code file.
Double-click the TestJavaClass.java file in the project window to open it. The IDE displays the file in the TestJavaClass.java window.
2. Locate the initComponent() routine.
Choose TestJavaClass.initComponents from the Routine pop-up menu (Figure 4.16). The IDE scrolls the window to the routine and highlights the routine name for you.
Locating the initComponents() routine: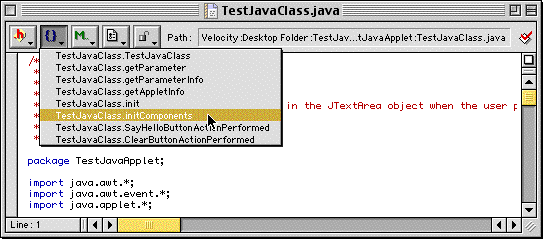
Notice that at the beginning of this routine, there is a source
code comment called "// BEGIN GENERATED CODE". Scroll to the end of this routine. Notice that there is a source
code comment at the end called "// END GENERATED CODE". These comments, and the code that exists between them, are
generated by the CodeWarrior IDE when the project is built. Any
changes you make to anything between these two comments will be
lost the next time the project is built. Any code added outside
of these comments are not modified by the CodeWarrior IDE.
We will add our source code to the end of this routine, immediately
after the "// END GENERATED CODE" comment.
3. Add to the initComponent() routine.
Add the source code listed in Listing 4.2 to the initComponents() routine so that it appears as in Figure 4.17.
initComponents() routine addition:
		//transfer contents of textVar into jTextArea object
		jTextArea1.setText(textVar);
This source code replaces the contents of the jTextArea1 object
with the variable called textVar, which is initialized with the contents of the TestAppletBody
parameter earlier in the initComponents() routine.
initComponents() routine after addition: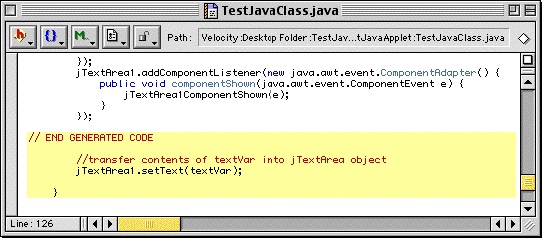
Now the applet will transfer the value of the TestAppletBody parameter specified in the HTML file into the text area whenever the applet is initialized.
We'll add an event handler to the SayHelloButton object next. When this button is pressed, we want the applet
to place the text "Hello Java World!" into the jTextArea1 object.
1. Display the SayHelloButton object properties.
Choose SayHelloButton from the object pop-up menu in the Object Inspector window. The properties belonging to the SayHelloButton object are displayed.
2. Start the SayHelloButtonActionPerformed() routine.
Click the Events tab at the top of the Object Inspector window to display the list of events to which the SayHelloButton object can respond.
We are interested in the actionPerformed event. Click in the Routine column next to the actionPerformed event label. The CodeWarrior
IDE automatically inserts the default routine name "SayHelloButtonActionPerformed" and highlights the edit field. For this tutorial, we'll use
the default routine name.
Press the return key on your keyboard to acknowledge that you
wish to use the default routine name. The CodeWarrior IDE displays
the TestJavaClass.java source code window and automatically selects
the SayHelloButtonActionPerformed() routine for you (Figure 4.18). This routine is empty and does not do anything yet.
 TIP
TIP You can also view an event routine by double-clicking on the name of the event in the Object Inspector. This is handy if you happen to close the source code window while you are working.
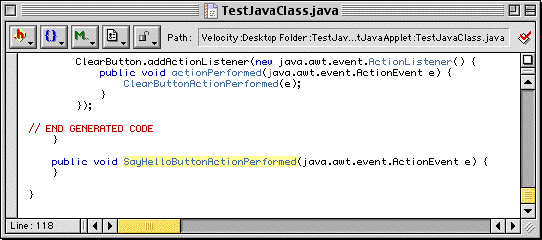
You are now ready to supply the source code that determines what will happen when the button is pressed.
3. Complete the SayHelloButtonActionPerformed() routine.
Add the source code listed in Listing 4.2 to the SayHelloButtonActionPerformed() routine so that it appears as in Figure 4.19.
SayHelloButtonActionPerformed() routine:
public void
SayHelloButtonActionPerformed(java.awt.event.ActionEvent e) {
	String offset = jTextArea1.getText();
	jTextArea1.setText(offset + "Hello Java World!\n");
}
This source code appends the text "Hello Java World!" to the contents of the jTextArea1 object.
SayHelloButtonActionPerformed() - finished routine: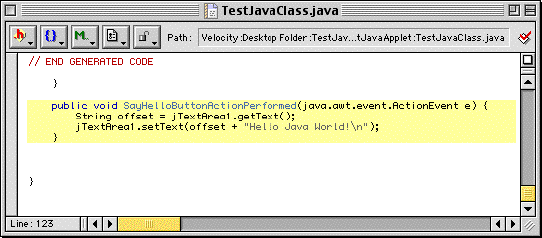
Now when the Say Hello! button is pressed, the applet will append the words "Hello Java World!" to the contents of the text area.
Next we'll add an event handler to the ClearButton object. This routine will simply clear the contents of the jTextArea1
object. One way to accomplish this is to replace the contents
with "" (an empty string).
1. Display the ClearButton object properties.
Choose ClearButton from the object pop-up menu in the Object Inspector window. The properties belonging to the ClearButton object are displayed.
2. Start the ClearButtonActionPerformed() routine.
Click the Events tab at the top of the Object Inspector window to display the list of events to which the object can respond.
As with the SayHelloButton object, we are interested in the actionPerformed
event. Click in the Routine column next to the actionPerformed event label. The IDE automatically
inserts the default routine name "ClearButtonActionPerformed" and highlights the edit field.
Press the return key on your keyboard to acknowledge that you
wish to use the default routine name. The CodeWarrior IDE displays
the TestJavaClass.java source code window and automatically selects
the ClearButtonActionPerformed() method for you (Figure 4.20).
ClearButtonActionPerformed() - empty routine: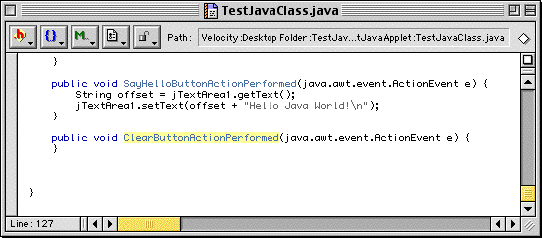
You are now ready to supply the source code that determines what will happen when the button is pressed.
3. Complete the ClearButtonActionPerformed routine.
Add the source code listed in Listing 4.3 to the ClearButtonActionPerformed() routine so that it appears as in Figure 4.21.
ClearButtonActionPerformed() routine:
public void
ClearButtonActionPerformed(java.awt.event.ActionEvent e) {
	jTextArea1.setText("");
}
This source code replaces the contents of the jTextArea1 object with "" (an empty string).
ClearButtonActionPerformed() - finished routine: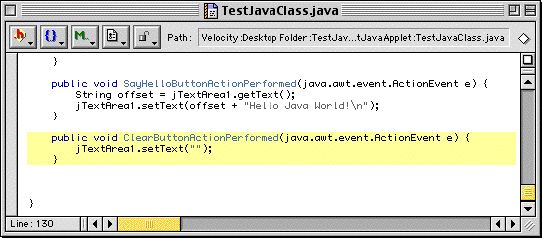
Now when the Clear button is pressed, the applet will clear the text area.
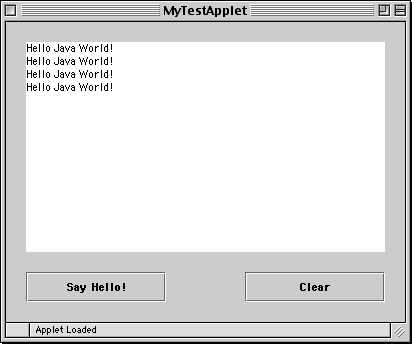
Select Project > Run from the CodeWarrior menu bar to execute the Java applet. The
applet should look similar to the one in Figure 4.22.
If you receive any errors while trying to build or run the applet,
repeat the steps in this tutorial and be sure you followed them
correctly.
TIP The CodeWarrior IDE automatically generated an HTML file when
it created the project. The HTML file can be opened in your favorite
web browser. Microsoft Internet Explorer is recommended for running
Java applets. To view your applet in a web browser open the TestJavaClass.html file created by the CodeWarrior IDE.
Congratulations! You have just completed your first Java applet with CodeWarrior Java RAD tools. For more information on CodeWarrior Java RAD components refer to the IDE User Guide.
 Java Applet Wizard - Page 2:
 Java Applet Wizard - Page 3:
 Java Applet Wizard - Page 4: