This chapter discusses options you can specify to configure various aspects of your project's behavior, such as how it compiles and links.
The CodeWarrior IDE maintains a group of settings for each build
target in a project. These settings are referred to as target settings. Target settings determine various aspects of your project's
behavior, such as how it compiles and links. Choosing the right
settings can significantly improve the size and speed of your
final code.
Target settings are accessible from the Target Settings window, and are organized into settings panels (Figure 5.1). Different settings panels control various properties of the project.
This chapter discusses only those project settings panels that relate specifically to Java programming:
 NOTE
NOTE Some of these settings panels may not be available in your particular version of CodeWarrior.
See the IDE User Guide and C Compilers Reference for information about other settings panels available in the Target Settings window.
The Target Settings panel is the most critical panel in CodeWarrior. This is the
panel where you pick the platform and/or microprocessor your project
is to run on.
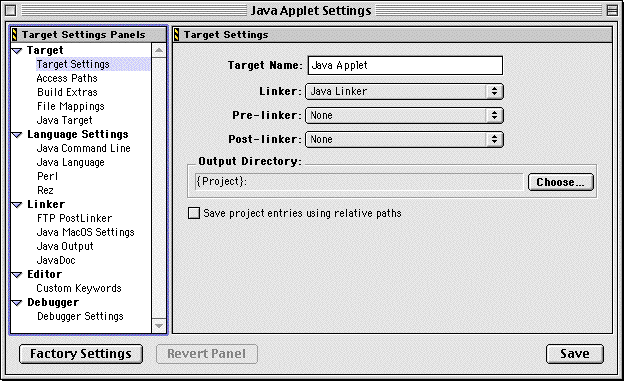
The Target Settings panel, shown in Figure 5.2, allows you to set the name of your target, as well as which
linker and post linker plugins to use for the target. When you
select a linker, you are specifying the target operating system
and/or processor. The other panels available in this window will
change to reflect your choice.
Because the linker choice affects the visibility of other related panels, you must set which linkers your project will use before you can specify other target-specific options like compiler and linker settings.
Target Settings settings panel: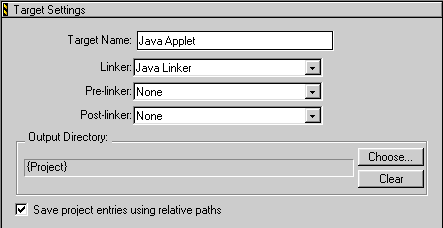
The items in this settings panel are:
Use the Target Name field to set or change the name of a build target. When you use
the Targets view in a project window, you will be able to see this name.
NOTE This is not the name of your final output file. It is the name you assign to the build target for your project file to use. The name of the final output file is set in the Java Output panel.
Choose a linker from the items listed in the Linker pop-up menu.
Some targets have pre-linkers that perform additional work (such as a data format conversion) before linking. There is one pre-linker for Java: the JavaDoc Pre-Linker. For more information on the JavaDoc pre-linker, see "JavaDoc.".
Some targets have post linkers that perform additional work (such as a data format conversion) on the final executable. The post linkers available for your use are described in Table 5.1:
NOTE Some of the items in Table 5.1 may not appear in your particular CodeWarrior installation.
This text area displays the path to the directory where the final
linked output file will be placed. The default location is the
directory that contains your project file. Click the Choose button to specify another directory. Click the Clear button to clear the path.
When enabled, this checkbox allows the IDE to distinguish between files with the same names but in different directories. If you do not have files with the same name in your project, you can leave this option off.
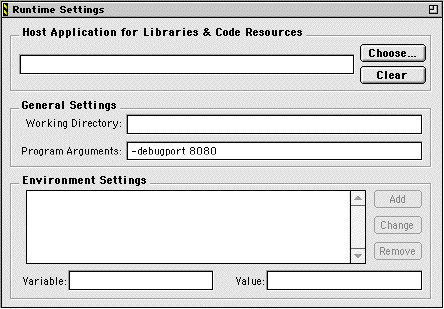
The Runtime Settings panel contains certain options that pertain to Java projects.
This section describes these options in detail.
The items in this settings panel that pertain to Java development are described in detail below:
This area of the settings panel allows you to specify two things:
Set the Working Directory edit field edit field if you require a different working directory.Leave this edit field blank to use the default working directory. The default working directory is where the VM executable resides. This edit field replaces the Working Directory edit field in the Java Target panel, which is obsolete now.
The Program Arguments edit field holds application parameters to be passed to the main() method of the application when it is run in the Java VM. A series
of arguments must be delimited by spaces. Leave this edit field
blank if you do not wish to supply application parameters. This
edit field replaces the functionality of the previous Parameters edit field in the Java Target settings panel, which is obsolete now.
The Environment Settings edit field allows you to create entries that are passed as properties to the running application. Enter the property name into the Variable edit field. Enter the property value into the Value edit field.
On classic Mac, these entries are added to the .properties file. On other platforms, these entries are added to the command
line as -D properties.
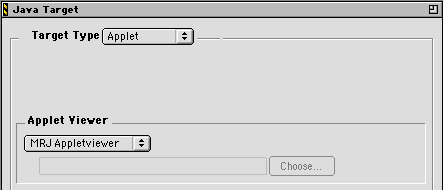
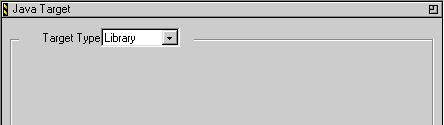
The options in the Java Target settings panel (shown in Figure 5.4) depend on whether you are creating a Java applet, application,
or library. The settings in this panel change based on which option
is selected in the Target Type pop-up menu. The following options are available:
If the Target Type pop-up menu is set to Applet (Figure 5.4), the CodeWarrior IDE will create a Java applet from the project
when the project is built.
On Windows and Mac OS, this area of the panel contains the Applet Viewer pop-up menu as shown in Figure 5.5. The menu contains an item for each applet viewer found on your
computer, and an Other item, which enables the Choose button.
NOTE Although many applications can run an applet on Mac OS, only applications that use Apple MRJ to run an applet are supported by the CodeWarrior debugger. This is because the debugger requires the application to support the Sun Java debugging API.
On Windows, this menu also contains a "current" item. When chosen, the IDE obtains the current VM from the Windows registry and uses it to run your applet.
Applet Viewer area (Windows and Mac OS):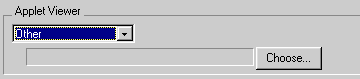
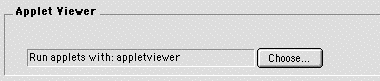
On Solaris, this area of the settings panel contains the Applet Viewer text field that displays the currently-selected applet viewer
(Figure 5.6).
To use an applet viewer other than those listed by default, click the Choose button. The CodeWarrior IDE displays an open file dialog box, allowing you to locate and select an alternate applet viewer.
The Virtual Machine option is available on Windows and Solaris:
If you have any alternative VMs installed and configured, such as the PersonalJava Emulation Environment, they appear in this pop-up menu. For more information see "Using Alternative Virtual Machines".
NOTE The Windows-hosted CodeWarrior IDE uses the Sun JDK VM by default. You may also use the Microsoft VM.
The CodeWarrior IDE uses the JDK 1.1.8 Virtual Machine by default.
The items in this pop-up menu reflect the contents of the (jdk_options) folder, which resides in the Java_Support folder of your CodeWarrior installation. The IDE scans this folder
when building this pop-up menu and adds to the menu any files
it finds in the folder. CodeWarrior includes jdk1.1.8 and jdk1.2 by default.
The files in the (jdk_options) folder are expected to be soft links to the root level of the
JDK package in question. Items can be added to this menu to allow
you to run your applets with newer versions of JDKs as they become
available. The JDK package itself may reside anywhere on the system.
A soft link to that package must be placed into the (jdk_options) folder.
For example, to add a menu item for JDK 1.3, you would issue the following commands in a terminal:
cd /usr/local/Metrowerks/CodeWarrior3.3/Java_Support/
ln -s "(jdk1.3)" "(jdk_options)/jdk1.3"
This creates a soft link in the (jdk_options) folder that points to the jdk1.3 folder which resides in the Java_Support folder. The next time the menu is built, it will contain the
new link.
If the Target Type pop-up menu is set to Application as shown in Figure 5.7, CodeWarrior will create a Java application from your project
when you build it.
Target Type set to Application: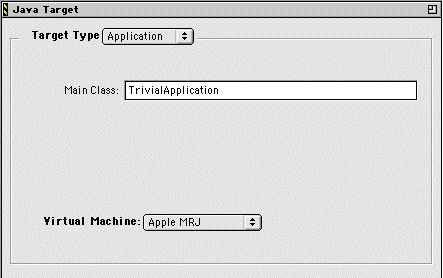
The Main Class field identifies the name of the class containing the main() method in a Java application. Enter only the name of the class.
Do not use the .class extension - you are specifying the class itself, not the file.
NOTE the main() method must be declared public static void main(String args[]), and must be in a public class. Also, the capitalization of the
name in the Main Class edit field must match the capitalization in the Java file. In
Java, myclass and MyClass are different classes.
CodeWarrior passes this name to the Java VM running the application so it can begin execution. This field must have a value in order to run a Java application.
If the application is a stand-alone MRJAppBuilder application,
this value is transferred by the CodeWarrior IDE to the "com.apple.mrj.application.main" property in the .properties file belonging the MRJAppBuilder application.
The Parameters edit field is no longer located in this settings panel. It is
now found in the Runtime Settings panel. For more information, see "Runtime Settings".
The Virtual Machine popup menu allows you to select the virtual machine to be used
for this target. This setting is identical to the Virtual Machine option described in "Applet". For Windows and Mac OS, see "Windows and Mac OS". For Solaris, see "Solaris".
If the Target Type pop-up menu is set to Library (Figure), the CodeWarrior IDE creates a Java library from your
project.
The Java Command Line settings panel (Figure 5.9) allows you to set the parameters used by the JCommand Line post-linker
to launch a Java application after your project is successfully built to do further processing of your project output.
Java Command Line settings panel: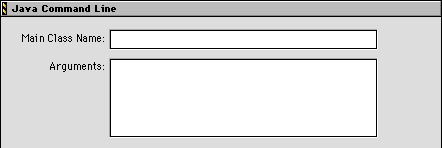
For instance, you may use the JCommand Line post-linker to launch
		RMIC, a Java utility that generates stub classes from
.class files. The java linker would generate the .class files. Then the RMI compiler (RMIC) would take those class files
and generate stub class files for use with RMI. Similar utilities
can be found in the Classes.zip Java library file.
Since this linker invokes a command line tool, it requires that a Java VM be installed. On Windows, the linker requires the Sun JDK VM 1.1.6 (or later), or Microsoft's Java VM. On Mac OS, this linker requires MRJ 2.0 (or later).
This settings panel contains the following items:
Put the name of the main class of the application to be invoked into this field. Once the build target is successfully built, the linker will run the application.
Put any arguments to be sent to the application into this field.
NOTE Although the linker can execute any Java application specified in the command line settings, its intended use is to invoke java command line post linker type tools (such as RMIC, obfuscators, etc.). Therefore, there is no support for AWT-based applications nor applications which make use of System.in.
This linker adds paths to all zips and jars in the project to the VM classpath. It also adds the project output to the classpath.
 WARNING!
 Since it is impossible for the post linker to know what type of application it is invoking, it is your responsibility to make sure that only the appropriate type of command line tools are specified.
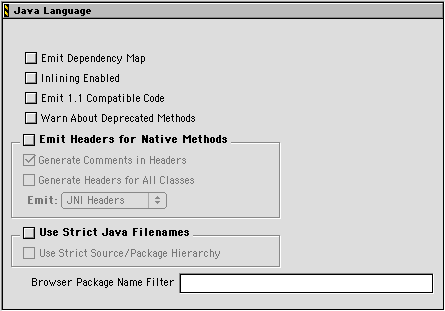
The Java Language settings panel (Figure 5.10) contains project settings related to code generation for the
Java platform.
The options in this panel are:
This option is similar to generating a link map in other languages
such as C and C++. When enabled, a new file is created in the
same directory as your project file called sourcefile.JMAP, where sourcefile is the name of your .java source file. The JMAP file lists all the class dependencies for
each class in the file.
For example, the statement import java.* is common in Java source code. The dependency map tells you the
exact class dependencies. So the statement import java.* may become:
import java.applet.Applet; import java.applet.AppletContext;
You can then use these statements in your Java source files instead of importing everything. This makes things cleaner, faster and more portable to other Java compilers.
Allows inlining of smaller methods where appropriate.
This checkbox enables a fix for a very obscure bug that occurs in the following scenario:
If you open objects that were serialized in a 1.1 virtual machine,
and compiled with the 1.1 Sun compiler, a serialization exception
will occur. The serialization implementation in version 1.1 contains
a bug where it considers the existence of the <clinit> method when determining signatures. In addition, the Sun 1.1
compiler has a bug where it will not emit a static initializer
for initializations that match the default value of a variable,
meaning sometimes the <clinit> method will not be provided, even though the language specification
says you should have one.
This option makes the CodeWarrior compiler leave out static initializers for variables that would be initialized to that value by the virtual machine. This way serialization will work as expected.
WARNING! You should only enable this option if you understand the bug described here and you know the bug is affecting you.
Gives warning messages if you are using any deprecated methods. This allows you to find references to deprecated methods in your code so that you can update your code to the newer methods.
This option makes the compiler generate native headers for each
class in the project where appropriate. When this option is enabled,
the Emit pop-up menu appears allowing you to choose between JNI Headers and Sun VM Headers. JNI headers are the newest and preferred method. However, for
compatibility reasons, you may wish to choose the Sun VM Headers option.
If JNI headers is selected, the compiler will generate headers only for native
methods defined in classes. If Sun VM Headers is selected, the compiler generates the old-style headers only
for classes that declare native methods, unless the Generate Headers for All Classes option is enabled, in which case the compiler generates headers
for all classes, regardless of whether or not native methods are declared.
The other options that can be used in conjunction with Emit Headers
for Native Methods are Generate Comments in Headers and Generate Headers for All Classes.
Generate Comments in Headers moves comments from the java sources files to the native headers.
Generate Headers for All Classes generates native headers for all classes in the project, including classes in .jar and .clas files that have been added to the project.
Forces strict class names based on the Java source file names.
The public class defined in the source file must match in name,
the name of the file. For example, if you have a java source file
called FooBar.java, the compiler expects to find a public (or non-public) class
called FooBar in this file. While no other public classes can be in this file, non-public classes are allowable.
The Use Strict Source/Package Hierarchy option forces strict adherence to source and package hierarchy paths.
 TIP
TIP Turning on these options improves compile speed.
Accepts a semicolon delimited list of names that you do not want
to show up in the class browser. If you type in: java.io; java.lang, the browser will only display File, Object and reflect.Method for classes like java.io.File, java.lang.Object, and java.lang.reflect.Method.
You can also use wildcards like java.*, in which case the browser will strip off the entire package
for any class starting with "java."
Finally, you can also type in "*" (no quotes), in which case the browser strips all packages off
everything.
The FTP Post Linker settings panel (shown in Figure 5.11) allows you to move a folder containing your completed Java binary and any associated files to a server to be accessed through the network.
FTP Post Linker settings panel: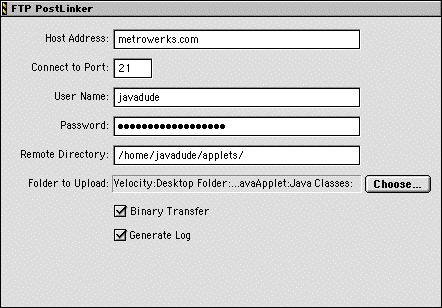
If you are using this linker on Windows, you must have the Sun
JDK 1.1.6 (or higher) installed. The installation program for
the current Sun JDK is in the "Extras" folder at the base of the CodeWarrior Tools CD.
If you are using this linker on Mac OS, you must have Apple's MRJ 2.0 (or higher) installed.
The host address of the server to which the Java files are to be uploaded.
Your user ID on the FTP server.
Your password on the FTP server.
The remote directory you want to upload the Java files to on the server. You must have access privileges for this directory.
The full path to the folder on your local hard drive containing the files to upload. There is no way to specify that individual files be uploaded, so the linker will transfer the entire contents of the folder specified here. Make sure you do not have any files that you do not want transferred in this folder.
Transfer the files to the server using Binary mode instead of ASCII. It is recommended this option always be turned on to avoid any transfer problems.
Generates a text log file of the transfer. Any errors or problems are recorded in this file.
CodeWarrior Java tools use Apple's MRJAppBuilder to generate stand-alone
Mac OS Java applications. The Java MRJAppBuilder settings panel (shown in Figure 5.12) contains options that control how Mac OS Java applications
are packaged by MRJAppBuilder.
For more information on generating stand-alone Mac OS Java applications, see "Stand-alone Applications for Mac OS".
Java MRJAppBuilder settings panel: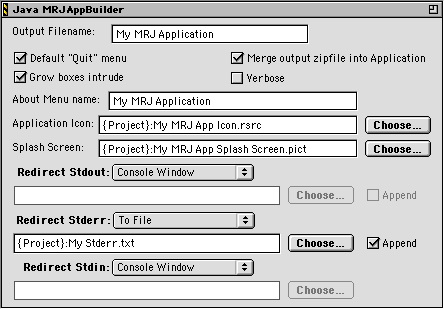
This section describes each setting in detail:
The Output Filename edit field contains the name of the Java application file. The
CodeWarrior IDE gives this name to the final stand-alone Java
application when the build target is built with the Make command.
If this checkbox is enabled, a fully-functional Quit menu is incorporated into the Java application. No coding is
required for the Quit menu.
If you do not want this feature in your application, disable this checkbox.
If this checkbox is enabled, the Jar file output by the IDE is merged into the final stand-alone Java application. If a Java application is generated with this feature, only the application file is needed to run the Java application.
If this checkbox is disabled, the Jar file will be separate from the application file, and should reside in the same directory as the application file for the Java application to run properly.
If this checkbox is enabled, grow boxes (the boxes used to resize the window) intrude into the inside of the writable area of console windows.
If this checkbox is disabled, grow boxes do not intrude into the writable area of console windows.
If this checkbox is enabled, error messages generated by MRJAppBuilder are displayed. Disable this checkbox if you do not wish to see MRJAppBuilder error messages.
Supply in this edit field the text that should appear after the
word "About" in the About menu of your Java application. For example, if
you want the About menu to say "About My Application", you should put "My Application" into this edit field.
Icon resources in the specified file are copied into the final
Java application resource fork when the target is built. Press
the Choose button to select a file containing icon resources.
The picture in the specified file is copied into the final Java
application resource fork when the target is built. The file must
be of file type "PICT." Press the Choose button to select a file containing a picture.
Use this feature to redirect Stdout text to a Console window, Nowhere (/dev/null/), or To File (to a file you specify). The Append checkbox is available only if the To File option is selected. If the Append checkbox is enabled, text is added to the end of the file. If Append is disabled, the file is cleared before any text is written.
Use this feature to redirect StdErr text to a Console window, Nowhere (/dev/null/), or To File (to a file you specify). The Append checkbox is available only if the To File option is selected. If the Append checkbox is enabled, text is added to the end of the file. If Append is disabled, the file is cleared before any text is written.
Use this feature to redirect Stdin text to a Console window, Nowhere (/dev/null/), or To File (to a file you specify). If the To File option is selected, the Append checkbox is available. The Append checkbox is available only if the To File option is selected. If Append is disabled, the file is cleared before any text is written.
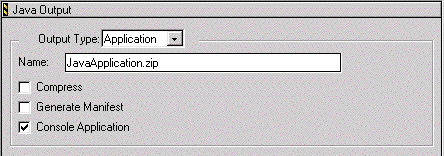
The settings in the Java Output panel control the operation of the CodeWarrior linker for Java.
The Output Type can be one of the following:
This section describes the settings for each option in detail.
A Jar file is a Java Archive file. The Jar File option (Figure 5.13) allows you to control how the Jar file is created. Choose Compress to create a compressed Jar file. Choose Generate Manifest to have manifest information added to the Jar file.
Jar file output type (Mac OS):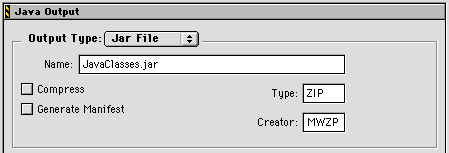
The Type and Creator fields only appear in the Mac OS hosted version of CodeWarrior.
These fields allow you to set the default application used to
open the Jar file. With the default settings the Mac OS will
open the Jar file in Class Wrangler.
If you choose Class Folder from the Output Type pop-up menu, the settings panel appears as in Figure 5.14.
When the target is built, the IDE creates a new folder with the
name specified in the Name edit field. This folder is created in the Output Directory specified in the Target Settings panel. Every class in your project will be placed in this folder.
TIP If the Name edit field is left blank, no folder is created, and output files are placed at the root of the output directory. This is useful for outputting multiple targets into a single directory.
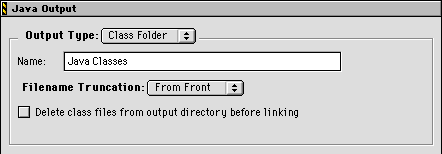
Delete class files from output directory before linking simply removes all class files in the target directory before
linking your code. This is useful if you recompile your source
often, as it ensures that no old code exists in the target folder.
Choose Application from the Output Type popup menu to create a Java application (Figure 5.15).
This option is only available on the Windows hosted version of CodeWarrior. For information on creating Mac OS stand-alone Java applications, see "Stand-alone Applications for Mac OS".
Choose Compress to create a compressed Jar file. Choose Generate Manifest to create manifest information in the file.
When the Console Application option is enabled, the DOS prompt window is displayed when you
launch the application. System.out, System.err and System.in use the console's I/O streams for standard input/output - making
the application a CUI Windows application.
When the Console Application option is disabled, the console window does not display because the application is built as a GUI Windows application. The user will not be able to see standard I/O unless they pipe it somewhere else.
NOTE When running the application from within the CodeWarrior IDE, the console is always displayed.
The Java linker generates two files when the project is built:
a Windows application (.exe), and a zip file.
The main class is obtained by the Java linker from the Java Target settings panel and embedded into the Windows application.
VM arguments, and application parameters are obtained by the Java linker from the Runtime Settings panel and embedded into the Windows application.
The path to the JDK is obtained by the Windows application by examining the Windows registry to obtain the latest JRE entry. The JRE entry provides the path to the root of the JRE home directory. From the JRE home directory, the Windows application is able to determine the path to the Java VM DLL files.
When run, the Windows application uses JNI to instantiate the Java VM and launch the Java application. The Java application then executes the main class in the new VM session.
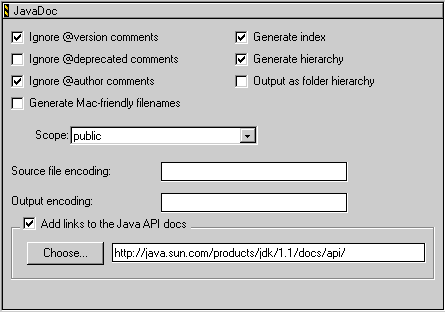
The JavaDoc settings panel (Figure 5.16) controls how JavaDoc creates documentation for your Java source.
Three ignore options: Ignore @version comments, Ignore @deprecated comments, and Ignore @author comments tell JavaDoc to omit from the final output comments with these
tags.
This option tells JavaDoc to generate filenames shortened to 31 characters to create cross-platform HTML documents. This option is not available in the Mac OS version of CodeWarrior.
This edit field contains the four-character creator type to be used for generated HTML files. This option is only available in the Mac OS version of CodeWarrior.
Generate index tells JavaDoc to create index information in the final output.
Sometimes, the index can be very large. Turn this option off if
you do not want index information generated for your project.
Generate hierarchy tells JavaDoc to generate class hierarchy information. Turn this
option off if you do not want hierarchy information created.
Instead of only outputting the HTML files for a project to a flat folder hierarchy with extremely long filenames, the JavaDoc Pre-Linker has the option of putting the files into a package-based folder hierarchy. The actual file names are only the class name.
The Scope pop-up menu controls which classes will be included in the documentation.
Choices include:
NOTE If you do not specifically declare a class to be public, private, or protected, it will automatically be declared as package.
The two encoding options: Source file encoding and Output encoding are for internationalization of your JavaDoc files. For example,
the Java source files can be in Arabic and output in English.
Encoding numbers are used in each field. JavaDoc converts the number in the source field to Unicode, and then from Unicode to the value specified in the output field. Leave these fields blank to use the default ISO Latin (9859-1) encoding.
For more information on encoding, see:
http://java.sun.com/products/jdk/1.1/intl/html/intlspec.doc7.html
Links to the main Java API documentation are added to the output
where appropriate. The default link is on the web. If you have
a dial-up connection, you may prefer to have the API docs somewhere
on your local machine. This way, you can specify the URL to be
something like file://my_drive/jdk_docs/. You may also specify a relative URL.
NOTE If you move the Java API documentation files, the links may break.
The JavaCheck settings panel (Figure 5.17) allows you to specify settings specific to Sun's JavaCheck tool.
In the CodeWarrior IDE, JavaCheck is implemented as a post-linker.
To enable the JavaCheck post-linker, choose JavaCheck from the Post-linker pop-up menu as shown in "Target Settings". When the post-linker is enabled, JavaCheck is activated after
the Java source code is compiled by the IDE. The output from JavaCheck
appears in an Errors & Warnings window when the process is complete.
NOTE The preferred way to use JavaCheck is to activate the JavaCheck target using the build target pop-up menu. See "Using JavaCheck (PersonalJava)" for more information on how to run JavaCheck.
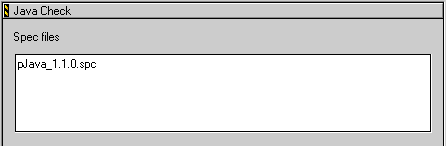
This edit field holds the platform specification files that the Java source code in the project is to be checked against. To specify more than one file, separate them with line breaks (carriage returns) in this edit field. The files are passed in the order shown.