This chapter discusses how to create, copy, modify, open, and delete resources in a Constructor project.
You manage resources from the Constructor project window. For details on the project window, see "Project Window." In general, you select the resource or resources you want to work with, and then do something with or to that resource.
The topics discussed in this chapter include:
For the most part, you perform each of these tasks in the same way regardless of the type of resource involved.
To make a new resource, choose New Resource from the Edit menu. What happens next depends upon the selection in the project
window.
Based on the selection, if Constructor knows for sure what kind of resource you want, it creates an untitled resource of the correct type, and gives it the next available ID number. If Constructor does not know what type of resource you want, Constructor displays a dialog that asks you to specify additional information.
Other chapters in this manual discuss how to edit the contents of each individual type of resource. This section simply discusses how to work with the resource as a whole.
The topics in this section are:
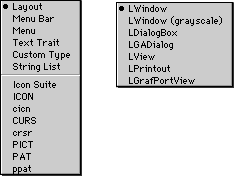
In the project window, if you have no resource selected, a layout resource selected, or resources of different types selected, then Constructor does not know for sure what kind of resource you want to create. Constructor presents the Create New Resource dialog, as shown in Figure 3.1.
 TIP
TIP To see this dialog no matter what resource (if any) is selected, use Command-Option-K.
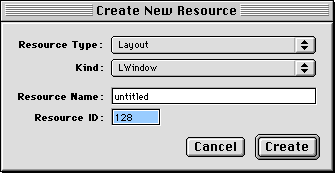
You select the desired resource type from the Resource Type pop-up menu, as shown in Figure 3.2.
If the resource type is a layout, you select the top-level view type from the Kind pop-up menu. If the resource type is not a layout, the Kind pop-up menu is disabled. You may also specify the resource name and resource ID number. Then click the Create button to create the new resource.
Use this technique to make a Constructor resource of any type. Each type also has one or more methods for creating that specific type.
There are three ways to create a new layout resource.
New Resource from the Edit menu.
If you have a layout resource selected in the project window,
when you choose New Resource the Create New Resource dialog illustrated in Figure 3.3 appears. You must also choose the view type you wish to be the
top-level view for this layout resource.
Creating a view with the new resource dialog: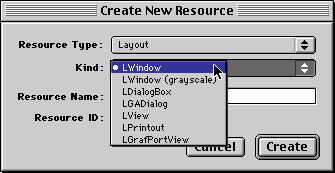
You may choose from LWindow, LDialogBox, LView, LPrintout, and LGrafPortView. Choose the top-level view type you wish this layout resource to have, and click the Create button.
For detailed information on these view classes, and when it is appropriate to use them, see The PowerPlant Book. Table 3.1 lists the usual circumstances for which you use each type of view.
Choosing the top level view in a PPob:
| View |
Use for |
|---|---|
Alternatively, you can drag any pane from the Catalog Window into the project window.
TIP Creating a new PPob by dragging means that you aren't limited to the five views available in the Create New Resource dialog. For example, you can drag a custom window class (derived from LWindow) from the Catalog Window and use it as a top-level view.
There are two ways to create a new menu bar resource.
New Resource from the Edit menu.
Constructor creates a new, untitled menu bar resource with the next available ID number.
 NOTE
NOTE A typical Constructor project file has only one MBAR resource. PowerPlant expects that resource to have ID number 128.
There are two ways to create a new menu resource.
New Resource from the Edit menu.
Constructor creates a new, untitled menu resource with the next available ID number.
You can use constructor to create a variety of resources that contain bitmap data. The available resources are:
There are two ways to create a new layout resource.
Follow the instructions in Creating Any Constructor Resource. Select an existing bitmap resource in the project window (or the
grey resource header bar), and then choose New Resource from the Edit menu.
Constructor creates a new, untitled bitmap resource of the selected type, with the next available ID number.
There are two ways to create a new text traits resource.
New Resource from the Edit menu.
Constructor creates a new, untitled text traits resource with the next available ID number.
There are two ways to create a new string list resource.
New Resource from the Edit menu.
Constructor creates a new, untitled string list resource with the next available ID number.
There are two ways to create a new custom type resource.
New Resource from the Edit menu.
Constructor creates a new, untitled custom type resource with the next available ID number.
When you create a new resource, you must then edit the resource to define its contents properly. (How to edit individual resources is discussed elsewhere in this manual. ) Sometimes it is more efficient to make a copy of an existing resource, and then make minor modifications to the copy.
There are three ways to copy a resource. First, you select one or more resources. Then you can:
Copy and Paste commands in the Edit menu
Duplicate command in the Edit menu
If you copy and paste in the same project, or if the destination project has a resource of the same type with the same ID number as the copy, Constructor may complain about a duplicate ID number. The Duplicate Resource ID dialog appears.
Duplicate Resource IDs dialog: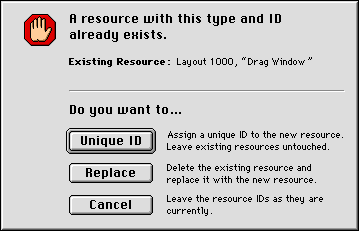
Constructor lets you assign new a new ID number, replace the existing resource, or cancel the operation. The new ID number will be the next available ID number for that type.
Each resource has a name, ID number, and attributes. The name is optional, but helps identify the actual purpose of the resource.
The name and ID can be edited in place in the Project Window. Simply click on the text or ID number, and wait a moment. A frame appears around the item, and the text becomes selected inside the frame. You can then edit the text. Use the Tab key to move between the name and ID number.
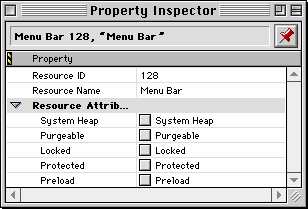
To edit resource attributes as well as name and ID, select the resource and use the Property Inspector Window. Figure 3.5 shows the resource properties in an inspector window.
You cannot change the resource type. However, you can modify the name, ID number, and attributes.
By default, all attributes for Constructor resources are off. PowerPlant works correctly with the attributes off. Typically, there is no need to turn on any attribute, and you should not do so unless you are familiar with the consequences.
After you select a resource, you can open an editor to modify the contents of the resource. To open the editor associated with a resource, you can:
Edit Resource from the Edit menu
You may open and edit several resources of any type at the same time. If you open them simultaneously, Constructor staggers the editor windows on the monitor. Details of the various editor windows can be found in the appropriate chapters of this manual.
To delete a resource or resources, first select the resource(s).
You may then delete the resource(s) using one of these techniques:
You can Undo a delete until you perform another action.