This chapter is an introduction to Constructor. It gives you a high-level overview of what Constructor is and how to use it effectively.
Constructor is a resource editor designed to create and edit several resource types.
Constructor was originally created as a PPob resource editor to accompany PowerPlant. As such, it has become the premier visual interface builder for the Mac OS.
Over time, Constructor has come to understand more resource types, most of which have no direct connection with PowerPlant. For example, Constructor can edit `MENU' and `MBAR' resources, and many different kinds of bitmap-based resources. These resources do not have to be inside a PowerPlant-based project.
You can use Constructor to edit these resources in any kind of file.
The topics in this overview include:
A resource is a structured format for storing data. Any program that understands the format can then locate and use data stored in the resource.
Mac OS uses resources heavily. There are dozens if not hundreds of standard resources recognized by many applications, and creating your own resource formats for proprietary use is easy. Resources are such an integral part of Mac OS programming that it is built right into the Mac OS file system. Every file has two parts, a data fork and a resource fork. In common usage, the data fork stores data preserved in application-unique formats (such as the information in a spreadsheet program). The resource fork stores data preserved in standard formats such as window desriptions, buttons, menu text, pictures, cursors, icons, and other data structures.
Fundamentally, Constructor is an interactive resource editor primarily devoted to the visual interface supported by the PowerPlant application framework. The resource types that Constructor manages include:
Constructor has no editor for WIND or RidL resources. They are created, maintained, and managed by Constructor automatically. You modify Mcmd resources using the MENU editor.
A typical PowerPlant application has several visual elements such as windows, buttons, check boxes, and so forth. In PowerPlant terminology, these are all types of panes. Views and controls are subcategories of panes. (For more on the precise meaning of the terms pane, view, and control, see The PowerPlant Book.)
With Constructor you design a window and its contents interactively right on the screen. With Constructor you can see and manipulate windows and panes directly. When you're finished designing the window, Constructor saves the results in a PPob (PowerPlant object, pronounced pea-pob) resource.
Like the WIND, DLOG, and DITL resources used by the Macintosh Toolbox, the PPob resource allows you to specify the location and appearance of each element in a window. However, the PPob format is more comprehensive. The PPob also contains information about the behavior and relationships of the panes. The PPob describes a window, its location, its contents, the location of the contents within the window, and the visual containment hierarchy of the contents.
PowerPlant's UReanimator class uses the information in the PPob
resource to create the visual appearance of your program. For
example, when your program calls the function LWindow::CreateWindow() with a resource ID, it reads the corresponding PPob resource
and generates the window based on the panes described there.
Constructor is first and foremost a visual editor for a PPob resource.
A typical PowerPlant application also has menus. PowerPlant uses three menu-related resources, the MBAR, MENU, and Mcmd resources.The PowerPlant Book describes how PowerPlant code uses these three resources. With Constructor you can create, manage, and edit all three menu-related resources interactively. The resources do not have to be in a PowerPlant-based application.
Bitmaps abound in Mac OS programming. Constructor has a single bitmap editor you can use to create and modify bitmaps in a wide variety of resource types, including icon suites, cursors, pictures, patterns, and more. The resources do not have to be in a PowerPlant-based application.
A typical PowerPlant application uses text in many ways. It might have static text items, buttons with labels, and so forth. PowerPlant describes the characteristics of text such as font, size, alignment, and color in a Txtr (text traits) resource. With Constructor you can create, manage, and edit Txtr resources.
Constructor also lets you create and edit an STR# resource that contains an indexed list of strings.
The predefined PowerPlant objects may not be enough for your work. You are likely to define custom objects with special features. With Constructor you can create and define the attributes of custom visual objects with a CTYP resource.
This section discusses how Constructor stores information in files, and how you work with those files. Topics include:
Constructor works on resources in Constructor project files. By
convention, Constructor project file names end with the extension
.ppob. This reflects Constructor's primary purpose as a visual interface
builder. Information about windows and their contents is stored
in the PPob resource in the Constructor file. However, the file
may contain other resources.
Constructor can recognize and edit many (but not all) resource types. Constructor ignores non-Constructor resource types, but retains them in the file. You cannot see or edit non-Constructor resource types in Constructor.
You may prefer to keep Constructor resources in a Constructor file, and most other resources in a separate resource file). Double-clicking the file (either in the Finder or the CodeWarrior project window) then opens the appropriate resource editor: Constructor for Constructor-related resources, and your favorite resource editor for other resources.
 TIP
TIP Some panes reference an icon or picture resource. If you have the resource in the same file as the PPob resource, Constructor displays the picture in the layout window. See "Displaying Pane Features."
Use the standard File menu commands to manage project files.
Managing a Constructor project file:
| To... |
Do this |
|---|---|
Your ability to save changes will be affected by the status of the file. If the file is locked or read-only, you can't save any changes. If the file has modified read-only status from a source code control system, you may not be able to check the file back into the system.
For more information on this topic, see the CodeWarrior IDE User Guide section on file privileges.
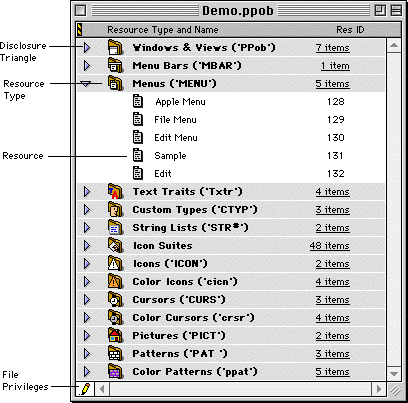
When you open a Constructor project file, Constructor displays a window that lists each type of resource, and the individual resources available for each type. Figure 2.1 shows this window.
The project window is the central or main Constructor window where you create new resources and manage existing resources. "Managing Resources Overview" introduces this topic.
Each grey bar in the project window reflects a resource type. There are many resource types, including:
To the left of each type heading is an disclosure triangle. Open or close the list of resources of that type by clicking on the triangle.
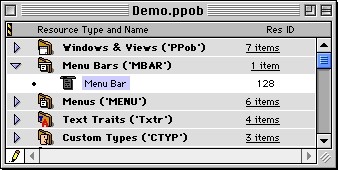
Whenever any resource listed in the project window has changed and has not been saved, a mark appears to the left of that resource, as shown in Figure 2.2, where the menu bar resource has changed.
You may have multiple projects open simultaneously, and copy resources from one to another.
The file privileges icon in the lower left corner of the project window indicates the read/write status of the file, usually with respect to a source code control system. The file privileges icon works just like the same icon in the CodeWarrior IDE. For information on this topic, see the IDE User Guide section on file privileges.
Each type of resource has a resource editor. To open an individual resource for editing, use one of the following techniques:
Edit Resource from the Edit menu
Whichever you choose, Constructor opens an editor window that allows you to modify the resource. Each kind of resource has a different editor window. Figure 2.3 shows the Txtr editor window.
The text traits editor window: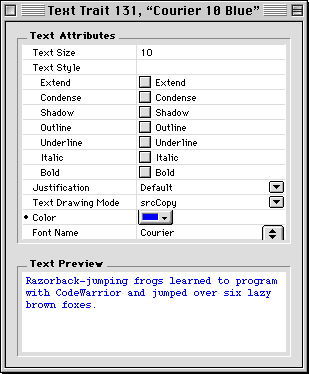
TIP You can close or save all Constructor windows by holding down the Option key and choosing Close All or Save All from the File menu.
See these topics for a discussion of the individual editors:
To open the Property Inspector Window, choose Property Inspector from the Window menu.
The Property Inspector Window displays attributes of a selected item, which might be:
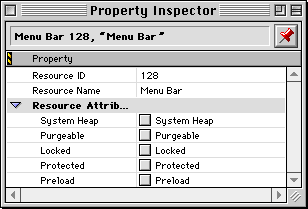
Whenever you select one of these items, its properties appear and can be edited in the Property Inspector Window. Figure 2.4 shows you this window displaying properties for a resource.
The top of the window identifies the item whose properties are on display. In many cases there are groups of properties, such as the Resource Attributes group in Figure 2.4. To display or hide a group of attributes, click the disclosure triangle.
The Property Inspector Window stays in synch with whatever other view is open. If you modify the data in the Property Inspector, all other views on the same data update simultaneously. If you modify the data in some other view (such as in the Project Window, the Property Inspector updates its data at the same time.
For a discussion of how the Property Inspector works with various items in Constructor, see
Resources-"Modifying Name, ID, and Attributes" Panes-"Setting Pane Properties" Menus-"Setting Menu Properties" Menu items-"Setting Menu Item Properties" Custom pane class-"Setting Class Properties" Custom pane data item-"Setting Data Item Properties"
Constructor has many of the interface features you expect in a good interactive program. These include features that support:
The figures in this section use the project window to illustrate the interface. The same techniques work in individual editor windows, when the technique is appropriate for the kind of data displayed in the window. Interface features are not available in all windows under all circumstances. In some situations, particular features are not appropriate.
Constructor follows the standard behavior with respect to selecting items. In general, you first select an item or group of items, then you perform an operation on the item(s).
To select an item, you click it.
To extend a selection (select an additional item while keeping previously selected items), you press the Shift key and click.
To select contiguous items with one gesture, click and drag the mouse. Items that intersect the area defined by the resulting selection marquee become selected when you release the mouse button. Figure 2.5 illustrates a selection marquee.
Selecting multiple items with a marquee: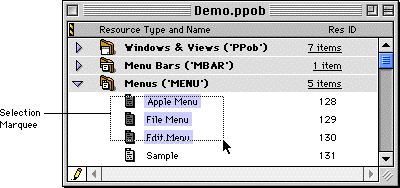
For marquee selection to work, the drag must begin in an empty area of the window. If you click and drag on an item, you move or copy the item instead of starting a marquee.
TIP For a layout window, a drag that begins in the top-level view and not inside an individual pane starts a marquee selection. If you start your drag inside an individual pane, you select the pane and then move or resize it. To get around this problem, hold down the Control key when you begin a drag inside a pane.
To select all items in a window, choose the Select All item in the Edit menu.
To deselect all selected items, click outside of any item. For example, you can click the simulated desktop in a layout window to deselect all selected items.
In the layout window only, you may also press the Control key while clicking an item. See "Layout Window."
To move or copy an item, you click and drag it. If you drag an item to another location in the same window, you move it.
If you drag an item from one window and drop the item in another window, Constructor makes a copy of the item in the destination window. The item is not removed from the originating window. Figure 2.6 illustrates copying a PPob resource by dragging from one project window into another.
Copying a resource by dragging: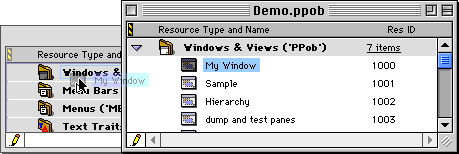
To copy an item you move within a window, press the Option key when beginning the drag or when dropping the item.
 NOTE
NOTE Dragging to create a copy does not work in the project window. Use the Duplicate command (see below).
Drag and drop also works in the bitmap editor, in both the Editing View and the Sample Views.
You can drop bitmaps onto either the Editing View or the Sample Views. If you drop on the Editing view, the original bitmap is scaled to fit. If you drop on the editing view, the bitmap does not scale.
You can drag from the Sample Views to other windows in Constructor and applications that support drag and drop, including the Finder desktop and the Scrapbook.
In addition to drag and drop, the standard Cut, Copy, and Paste commands in the Edit menu work in the traditional manner at all appropriate times.
You may also choose the Duplicate command in the Edit menu to make a copy of an item in the same window.
To delete an item, select it. Then press the Delete key, or use
the Clear command from the Edit menu.
TIP When copying, duplicating, moving, or deleting a pane that contains other panes, you work on the container and its contents.
Some Constructor windows, like the project window, display lists of information. You can navigate through lists of items by typing the up or down arrow keys. Each time you do, the next or previous item in the list becomes selected.
Constructor uses disclosure triangles to open and close lists. Click on the triangle to change the state of the associated list. If the triangle is next to a selected item, you may also type the right or left arrow keys to open or close a list, respectively.
You can extend a selection in a list by pressing the Shift key and typing the up or down arrow key.
Textual items appear in many places in Constructor windows. For example, lists of items have names. Many windows have editable text fields.
To activate a text item for editing, click on the item. Then either move the cursor off the text, or wait a second. You know the item is editable when a frame appears around the text, the text in the item becomes selected, or when the text insertion cursor appears in the item. Figure 2.7 shows how you can edit items in the project window.
Editing text in-place in the project window.: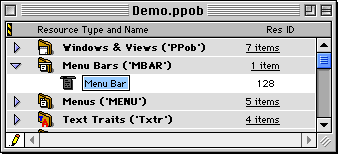
You navigate through the text in an item by using the arrow keys. You select text by dragging with the mouse in the text item. You can select a word by double-clicking the word.
To move from one item to the next in a series of text fields, use the Tab key. For example, if you are editing the name of a resource in the project window, if you press the Tab key the ID field becomes selected and editable. You can then modify the ID number if you wish.
Constructor has single-level undo. Most operations can be undone
(and subsequently redone) using the Undo or Redo items in the Edit menu.
If undo is unavailable after a given action, the menu item will
read Can't Undo.