[ First ] [ Previous ] [ Next ] [ Last ] [ Manuals ]
Java Applet Wizard

The Java Applet wizard is divided into the following steps:
1. Describe the applet class for the Java applet.
2. Specify an HTML page for the Java applet. (optional)
3. Create parameters for the Java applet.
4. Provide additional information for the Java applet.
To use the Java Applet wizard, follow these steps:
1. Describe the applet class for the Java applet.
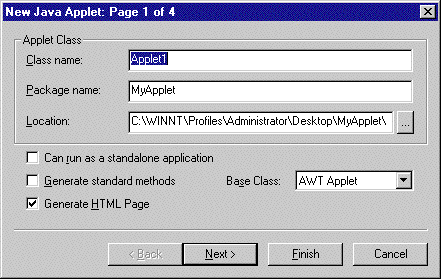
This section of the wizard, shown in Figure 12.4, lets you specify the class name, package name, and location for the new applet. Other options are available to further describe the applet.
This section includes the following parts:
Class Name
Enter a name for the applet's class in this field. An example name is provided.
Package Name
If you wish, you can enter in this field a package for the applet class. A sample package name is provided.
Location
In this field, type a location in which to save the applet class for the new applet. Alternatively, click the button next to the field. A standard window displays. Use the window controls to select a location. Note that a valid location depends on your settings for strict filenames and strict package roots.
Can run as a standalone application
Enable this checkbox if you want the new applet to operate without needing to be called from another application. Disable this checkbox otherwise.
Generate standard methods
Enable this checkbox if you want the new applet to generate standard methods for its interface, such as show() and dispose(). Disable this checkbox otherwise.
Generate HTML Page
Enable this checkbox if you want to create an HTML page to help you test the new applet. Disable this checkbox otherwise. Note that the Java Applet wizard displays the HTML Page section only when you enable the Generate HTML Page checkbox. This checkbox is enabled by default.
Base Class
Choose from this pop-up menu the desired base-class applet type. You can choose AWT applet or Swing applet.
2. Specify an HTML page for the Java applet. (optional)
This section of the wizard, shown in Figure 12.5, is displayed only when you enable the Generate HTML Page checkbox from the previous section. The HTML Page section lets you define a Hypertext Markup Language (HTML) page to test the new applet.
This section includes the following parts:
Title
Enter in this field a title for the HTML page you wish to generate. An example title is provided.
Applet Name
Your HTML browser displays messages about the applet by using the name you type in this field. A sample applet name is shown.
Codebase/Archive
If desired, use this field to specify a codebase or archive for use with the new applet. An example is shown.
Java Applet wizard - HTML Page: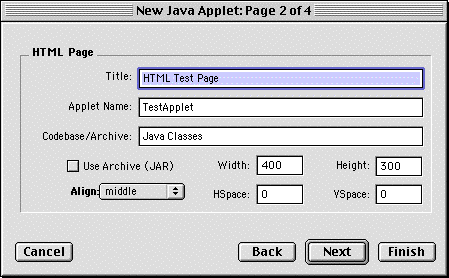
Use Archive (JAR)
Enable this checkbox if you want to use a Java archive (JAR) with the new applet. If this checkbox is enabled, a ".jar" extension is appended to the name in the Codebase/Archive field.
Width
The number you type in this field represents the number of pixels that span the width of the applet within the HTML page.
Height
The number typed in this field specifies the number of pixels that span the height of the applet within the HTML page.
HSpace
The number in this field defines the number of pixels placed on the left side and on the right side of the applet within the HTML page.
VSpace
The number in this field defines the number of pixels placed above and below the applet within the HTML page.
Align
Use this pop-up menu to determine the alignment of the applet within the HTML page:
3. Create parameters for the Java applet.
This section of the wizard, shown in Figure 12.6, lets you create a set of parameters for the new applet. Each parameter has the following fields:
Name-the name of the parameter
Type-the data type of the parameter
Default-the default value for the parameter
Variable-the variable that represents the parameter
Description-a short description of the parameter
A sample <New> parameter is ready for you to modify. To change a particular field, double-click it, enter a new value, and press Enter/Return to confirm your changes.
Java Applet wizard - Applet Parameters: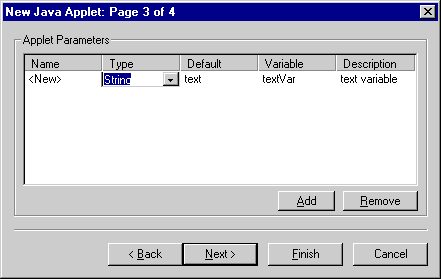
 NOTE
NOTE
By default, new applet parameters are named <New>. You should change this default name. The wizard ignores parameters named <New> when creating the applet.
When you double-click the Type field, choose a new value from the pop-up menu that appears inside the field. Alternatively, use the keyboard in one of the following ways:
For example, if you want to choose the short data type, double-click the Type field and type the letter s to change the field to String, then type the letter s again to change the field to short, and press Enter/Return to confirm the short data type.
To add another parameter to the applet, click Add. The wizard creates a <New> parameter for you to modify. To remove a particular parameter, select one of its fields and click Remove.
4. Provide additional information for the Java applet.
This section of the wizard, shown in Figure 12.7, lets you provide additional information to describe the applet.
This section includes the following parts:
Applet title
Description
Insert information in every file
Java Applet wizard - Information: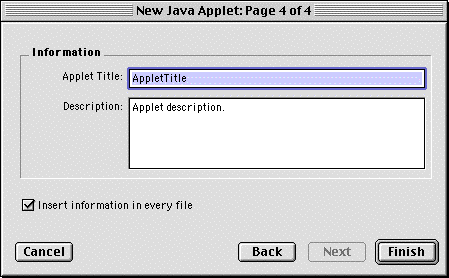
Applet title
If desired, enter a title for the new applet in this field.
Description
If you wish, type a description for the new applet in this field.
Insert information in every file
To add the information contained in the Applet title and Description fields to the beginning of every applet file, enable this checkbox. Disable the checkbox otherwise. The checkbox is enabled by default.
[ First ] [ Previous ] [ Next ] [ Last ] [ Manuals ]
Visit the Metrowerks website at: http://www.metrowerks.com
For assistance contact Metrowerks Technical Support at: cw_support@metrowerks.com
Copyright © 2000, Metrowerks Corp. All rights reserved.
Last updated: August 17, 2000