This chapter discusses how to display tabular data in a PowerPlant application.
Tabular data is a feature of many applications. The ability to display data in one or two dimensions is a common mechanism familiar to users. Tables are so common that it makes little sense to reinvent common table-related functionality, and that's where PowerPlant comes into play.
The PowerPlant table classes provide a framework for displaying tabular data. Taken together, the PowerPlant table-related classes provide all the basic functionality you expect from a table, and much more. You can display data in individual cells. You can add and remove rows and columns of cells. You can add, remove, and modify data in cells. You can display any kind of data: words, numbers, icons, pictures, and so forth. You can even create hierarchical tables where you can expand or collapse the display of sublevels of data to arbitrary depth.
These features mean that you can use the table classes as a powerful list manager. Just think of a list as a table with one column.
In this chapter we discuss how you can use table classes in a PowerPlant application. The topics discussed include:
PowerPlant has gone through three iterations of support for tabular data. For information on the original LTable class, see The PowerPlant Book.
The classes that represent the second iteration for tabular data
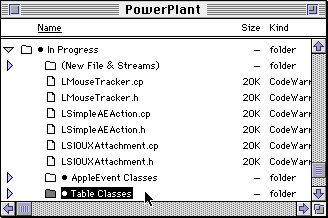
center around LNTable. These classes are located in the PowerPlant:· In Progress:· AppleEvent Classes:Table & Text Classes:Table
Classes folder. In the future, they will move into the obsolete folder.
This chapter discusses the third and newest set of table classes.
These classes are based on the LTableView class found in the PowerPlant:Table Classes folder. The LTableView design is highly modular for flexibility
and extensibility. It factors table-related functionality into
core table classes and three or four associated helper classes.
Some of the support classes are found in the PowerPlant: · In Progress:· Table Classes folder.
With respect to the LTableView classes, in this section we discuss:
A table cell has a geometry (its dimensions), can be selected, and stores data. PowerPlant has families of helper classes to manage:
When you create a table, you associate an instance of each helper classes with the table. By substituting a different kind of helper class you can modify the behavior of the table.
For example, if you want every cell in the table to be the same physical size, you use LTableMonoGeometry as the geometry helper class. If you want cells that can vary in size, you use LTableMulti-Geometry. Likewise, if you want to allow only one cell to be selected at a time, LTableSingleSelector serves the purpose. If you want to allow multiple cells to be selected, LTableMultiSelector will do.
While this strategy creates a large number of classes, the underlying architecture is highly modular and flexible. By factoring out behavior that relates to cell size, cell selection, and data storage, you can use the same base table class for a variety of different kinds of displays, with different levels of functionality.
This design also gives you the opportunity to replace individual portions of table behavior with custom behavior designed to suit your own purpose.
There is one more kind of helper class that can be a real benefit to managing the display of tabular data, the collapsable tree.
PowerPlant supports hierarchical tables. In a hierarchical table, one row in the table serves as a header or "node" in a tree that can expand to reveal a sublevel of data, or collapse to hide all subsidiary data. A familiar example of this functionality can be seen in a Finder window using a list view. Each folder in the list is a node. By clicking the expansion triangle to the left of the folder, you open the folder to see its contents. The folder may contain other folders, and so on to arbitrary depth.
The PowerPlant hierarchical tables support this same functionality. You can have an expansion triangle appear to the left of a row in a hierarchical table. PowerPlant manages most of the details. It expands or collapses sublevels of data automatically, so you can concentrate on the real work.
When working with tabular data, several questions can arise concerning how to address individual cells in a table. The answers to these questions are essentially arbitrary. However, knowing how to count cells is vital to success in managing tabular data.
A row is a horizontal set of cells. A column is a vertical set of cells. PowerPlant uses 1-based counting for rows and columns in tables. The top row of a table is row 1, not row 0. The left column of a table is column 1, not column 0.
PowerPlant declares a data type, TableIndexT, for referring to columns, rows, and cells by index. This is
an unsigned 32-bit integer. Tables in PowerPlant can have more
than four billion cells.
Each cell in a table may be addressed by index number. Cells are ordered by column (across) first, and then by row (down). In other words, cell counting starts at the top left corner, then proceeds to the right across all columns along the row. When the full width of the table has been reached, the count wraps to the beginning of the next row, as shown in Figure 6.2.
The table classes have a function for getting the index number of any cell specified by row and column.
Finally, in PowerPlant a cell can be an object in its own right, an instance of the STableCell class. Details about this class can be found in "STableCell." In brief, a cell object has a row and column, and a series of behaviors that allow easy manipulation of cell location (but not cell contents). Many of the member functions of the PowerPlant table classes require or return a reference to an STableCell object.
There are many classes related to tables in PowerPlant. This chapter does not discuss them all. This chapter concentrates on the latest and most powerful implementation of tables in PowerPlant.
For information on the LTable class, see The PowerPlant Book chapter
on views. There is no formal documentation on the table classes
found in the Advanced Classes folder. Read the source files if you're interested in these classes.
The classes discussed in this chapter are those based on and connected
with LTableView. At the time of this writing, the source files
for these classes are located in the PowerPlant In Progress folder.
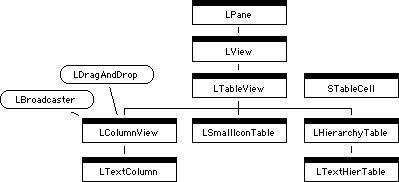
These classes can be collected into two groups: the principal table classes, and the table helper classes. Figure 6.3 shows the table class hierarchy.
LTableView is the base table class. It inherits from LView. LColumnView supports a table with a single column. LTextColumn describes a table with one column of text items. LHierarchyTable supports nodes and multiple levels of data. LTextHierTable displays text in a hierarchical table. STableCell represents an individual cell in a table.
LSmallIconTable is a trivial implementation of LTableView to display small icons, and is intended to be a simple demonstration.
Figure 6.4 shows the four helper class hierarchies.
The table helper class hierarchies: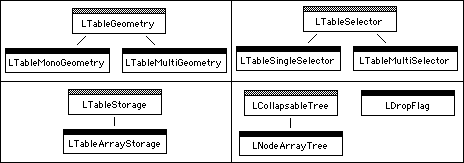
The base class for each group of helper classes is an abstract class that defines the interface for the helper. Concrete classes provide various implementations.
LTableMonoGeometry provides a table where all cells are the same size. LTableMultiGeometry provides a table where cells may vary in size.
LTableSingleSelector provides a table where only one cell may be selected at any moment. LTableMultiSelector provides a table where multiple cells may be selected simultaneously, including discontiguous selection.
The LTableArrayStorage class provides for data storage for each cell in the table. You may use any subclass of LArray for data storage. You may choose LArray where each cell has the same length data storage. You may also use LVariableArray to support cells with varying data lengths.
The LNodeArrayTree class, working with LDropFlag, provides a standard implementation of a data hierarchy. The LDropFlag class manages the expansion triangle used to display or hide sublevels of data in a hierarchical table.
When you create a table, you instantiate a storage mechanism, a selector, and a geometry and attach them to the table. If the table is hierarchical, you also attach a tree helper object.
The remainder of this section discusses each table class in detail. The classes are:
STableCell is defined in the UTables.h file. All the member function definitions are in the header file,
and are inline functions.
There are two data members, row and col. The constructor sets the cell location to (0,0) unless you provide
a row and column. You can also pass a Point variable as an initializing
value. PowerPlant sets row to the vertical value in the Point, and col to the horizontal value in the Point. Table 6.1 lists the member functions.
| Function |
Purpose |
|---|---|
In this context, cell location is the row and column location of the cell in the table.
When you create a table, you typically do not create a complete set of STableCell objects, one per cell. You create an STableCell object as necessary to manipulate an individual cell in the table. Also, note that none of the cell's member functions relate to the contents of the cell, only to cell location. You manipulate contents of the cell using member functions in the table classes.
LTableView is a complex class that forms the basis for the table classes discussed in this chapter. The class data members store the data you need to create and manage a table. The class member functions implement standard table-related behavior.
LTableView derives from LPane via LView. Therefore it is a view like any other. See The PowerPlant Book chapters on panes and views for details of this aspect of LTableView.
Although LTableView is a concrete class, you do not typically instantiate an LTableView object. The default behavior of LTableView creates a table whose cells contain the row and column number. At the very least you would typically override the drawing routines to display the appropriate data for your table.
 TIP
TIP LTableView is an excellent class to instantiate for study purposes because it is a complete implementation of a default table (albeit with demonstration data). You can create an LTableView object, and then walk through the code as you perform table-related operations to see how PowerPlant works.
LTableView has five data members, detailed in Table 6.2.
| Data member |
Stores |
|---|---|
The number of rows and columns determines the dimensions of the table. The number of rows and columns is set after the table has been created.
The other data members correspond to the three helper classes associated with every table. (Hierarchical tables also have a tree helper object). Typically you create an LTableView descendant based on a PPob resource built in constructor. After the view is created, you instantiate helper objects and set the data members. The member functions for setting these data members are:
LTableView has member functions designed to provide a wide variety of services devoted to:
Table 6.3 lists some of the row, column, and cell management functions and their purpose.
LTableView cell management functions:
| Function |
Purpose |
|---|---|
mRows and mCols data members directly. You should only modify those values by
calls to the appropriate functions listed above.
Table 6.4 lists some of the cell access functions and their purpose. Use these functions to find a desired cell in the table
LTableView cell access functions:
| Function |
Purpose |
|---|---|
Table 6.5 lists some of the cell geometry functions and their purpose. Use these functions to get or modify cell size.
LTableView cell geometry functions:
| Function |
Purpose |
|---|---|
Each of these functions sends messages to the associated geometry helper object.
You cannot modify the size of an individual cell. You must modify the dimensions for an entire row or column. All cells in the same row must have the same height. All cells in the same column must have the same width. You may set the size of several contiguous rows or columns in a single call.
Table 6.6 lists some of the cell selection functions and their purpose. Use these functions to modify the selection range in a table.
LTableView cell selection functions:
| Function |
Purpose |
|---|---|
Each of these functions (except SelectionChanged(), which is empty) sends messages to the associated selection helper
object.
Table 6.7 lists some of the data management functions and their purpose.
LTableView data storage functions:
| Function |
Purpose |
|---|---|
Each of these functions sends messages to the associated storage helper object.
When you get data, you must provide a pointer to storage that you have allocated. In PowerPlant, storage helpers copy data from the table into your storage. You do not get a pointer to the cell data storage. Similarly, when you set data for a cell your data is copied into the cell storage.
 WARNING!
 The calls to GetCellData() and SetCellData() require a reference to an STableCell to specify the cell. In the STableCell you specify the row and column of the cell. In a hierarchical
table, those values must reflect the position the cell would occupy
if the table were fully expanded. This is called the wide-open
cell. For more on the concept of a wide-open table, see "LHierarchyTable."
Table 6.8 lists some of the drawing and clicking functions and their purpose. Use these functions to manage the visual appearance of the table and its cells, and to manage clicks in cells.
LTableView drawing and clicking functions:
| Function |
Purpose |
|---|---|
LTableView and its descendants can properly handle both foreground and background highlighting. If the only thing your table does on activating or deactivating is modify highlighting, the default functions take care of you. If you want to add functionality, you can override HiliteCellActively and HiliteCellInactively.
The DrawSelf() and ClickSelf() functions search for the cell(s) involved and call DrawCell() or ClickCell().
You will override the DrawCell() and ClickCell() functions in derived classes. The default DrawCell() function in LTableView draws a string in the cell that contains
the row and column number. The ClickCell() function beeps on a double-click. You must replace this behavior
with functionality appropriate for the kind of data you display
in your table.
LColumnView is a simple class that derives from LTableView. It also inherits from LDragAndDrop and LBroadcaster. The intent of this class is to define an interface for a table that contains a single column of data. Functions for adding and removing columns have been overridden to do nothing but display a signal if signaling is on.
This class supports drag and drop in the table cells. It broadcasts a message when a cell is double-clicked, or when the selection changes.
LColumnView does not override LTableView::DrawCell(), and so cannot be used directly. In typical use, you would subclass
LColumnView to display data of the appropriate type. The LTextColumn class does that.
LTextColumn is a simple class that derives from LColumnView. The intent of this class is to create a table that consists of a single column of text. This is a common visual interface object: a simple list of text items.
LTextColumn has a single text traits resource that applies to all cells in the table. It uses a 'STR#' resource to specify the initial items in the column.
WARNING! The constructor reads the data from the `STR#' resource, but does not release the resource. You should mark the resource purgeable if you wish to free up the memory.
You can use functions inherited from LTableView to modify the contents of the cells after creation. The only
function LTextColumn overrides is LTableView::DrawCell().
LSmallIconTable is a simple class derived from LTableView. This class serves as a demonstration of how to derive a class from LTableView to display a unique kind of data-in this case, a small icon.
This class uses the LTableMonoGeometry, LTableSingleSelector, and LTableArrayStorage helper classes to create a table with cells of a uniform size and that allows one cell to be selected.
This class has no additional data members or member functions.
It does override DrawCell() to plot an icon in the cell. It stores the small icon ID and
a name for each icon in a simple struct, which serves as the data
for each cell.
LHierarchyTable is a moderately complex class that adds the ability to display tabular data hierarchically to LTableView. LHierarchy-Table adds two new data members, listed in Table 6.9.
| Data member |
Stores |
|---|---|
The mCollapsableTree member is analogous to the geometry, selection, and storage data
members in LTableView. The table object uses this value to access
the services of the tree helper object.
The LHierarchyTable class uses an LNodeArrayTree as its tree helper object. The LHierarchyTable constructor function creates an LNodeArrayTree object for the table. See "LNodeArrayTree."
The mFlagRect data member contains the size of the standard expansion triangle
(the drop flag). The LHierarchyTable::ClickSelf() member function uses this rectangle to determine if a click is
in the expansion triangle or not, and responds accordingly.
Table 6.10 lists several of the LHierarchyTable member functions. You should not have to modify any of these functions. However, use these functions to get the correct index number and to add rows to the table at the proper level in the hierarchy.
LHierarchyTable member functions:
| Function |
Purpose |
|---|---|
A hierarchical table may be partially or fully expanded. You may
need to get the index number of a cell in either situation. Use
GetWideOpenIndex() and GetExposedIndex() to convert an index from one form to the other. Expanding and
collapsing parts of the table only affects rows. There is no way
to hide columns of data.
When you insert a row or rows into a table, you specify the row after which the new rows should appear. In a hierarchical table, the new rows may be at the same level as the "after" row (a sibling), or nested inside the "after" row (a child).
WARNING! The calls to insert child or sibling rows require that you specify the wide-open index number of the row after which you want the new rows to appear.
LHierarchyTable overrides InsertRows() so that it creates sibling rows. This mimics the behavior of
a non-hierarchical table. LHierarchyTable also overrides RemoveRows(). You can only remove one row at a time from a hierarchy table.
If that row is a parent row (one with children), all the children
are removed as well.
LHierarchyTable also has functions that handle expanding and collapsing levels in the hierarchy. If you click on the expansion triangle, you expand or collapse that level. If you Option-click the expansion triangle, you expand or collapse all levels below that level (known as deep expand or deep collapse).
In a typical implementation of a hierarchical table you won't have to call or override the member functions concerned with expanding or collapsing levels in the hierarchy. PowerPlant takes care of all the housekeeping for you.
LTextHierTable is a simple class derived from LHierarchyTable. This class serves as a demonstration of how to derive a class from LHierarchyTable to display text.
This class adds four data members, detailed in Table 6.11
| Data member |
Stores |
|---|---|
This class uses the text traits data members to control the appearance of text. By default, they are the system font for child rows, and the application font for parent rows.
This class adds no new member functions. It overrides DrawCell(), HiliteCellActively(), and HiliteCellInactively() to draw and highlight text without including the expansion triangle.
LTableGeometry is an abstract class that specifies the interface for the geometry helper objects. These functions provide behaviors to maintain the location, width, and height of each cell in a table.
This class has one data member, mTableView. This is a pointer to the table that owns this helper.
All of the functions in this class are pure virtual or empty. These functions form the basis for interacting with a table's geometry in PowerPlant. Most of the time you will not need to concern yourself with these functions. The PowerPlant table classes call these functions to get or set required data. In general, you should call the table functions, not the related geometry functions.
For background purposes, Table 6.12 lists LTableGeometry functions.
LTableGeometry member functions:
| Function |
Purpose |
|---|---|
All the get and set functions are pure virtual.
The insert and remove functions are all empty. The purpose of these functions in subclasses is to maintain the geometry, not to actually add or remove cells from the table. See LTableMultiGeometry for an example.
LTableMonoGeometry is a concrete implementation of LTableGeometry to support a table where all cells are the same size.
This class has two data members, mColWidth and mRowHeight.
LTableMonoGeometry adds no new member functions, but implements every pure virtual function listed in LTableGeometry.
The insert and remove rows and columns functions remain empty.
LTableMultiGeometry is a concrete implementation of LTableGeometry to support a table where rows and columns may vary in size.
This class adds four data members, as detailed in Table 6.13.
LTableMultiGeometry data members:
| Data member |
Stores |
|---|---|
LTableMultiGeometry adds no new member functions, but implements every function listed in LTableGeometry.
The insert and remove rows and columns functions maintain the arrays of heights and widths for the table.
LTableSelector is an abstract class that specifies the interface for the selector helper objects. These functions provide behaviors to maintain the selection range in a table.
This class has one data member, mTableView. This is a pointer to the table that owns this helper.
All of the functions in this class are pure virtual or empty. These functions form the basis for interacting with selected cells in PowerPlant. Most of the time you will not need to concern yourself with these functions. The PowerPlant table classes call these functions to get or set required data. In general, you should call the table functions, not the related selector functions.
For background purposes, Table 6.14 lists LTableSelector functions.
LTableSelector member functions:
| Function |
Purpose |
|---|---|
All the select functions are pure virtual.
The insert and remove functions are all empty. The purpose of these functions in subclasses is to maintain the selection range, not to actually add or remove cells from the table.
LTableSingleSelector is a concrete implementation of LTableSelector for a table that may have one and only one cell selected at a time.
This class has one data member, mSelectedCell. This is an STableCell object representing the currently selected
cell, if any.
LTableSingleSelector adds no new member functions, but implements every function listed in LTableSelector.
LTableMultiSelector is a concrete implementation of LTableSelector to support a table where multiple cells may be selected. LTableMultiSelector supports discontiguous selection.
This class adds two data members: mSelectionRgn and mAnchorCell. The anchor cell is the most recently selected cell. The selection
region describes the "region" occupied by selected cells.
The use of the region in this instance is actually a neat trick. The code that selects a cell adds a square 1-pixel in size to the region. That square is defined by the cell's row and column as the top left coordinate, and adds one pixel for the bottom right coordinate. Then, to determine if a cell is selected, the code simply checks whether that row and column falls within the selection region.
LTableMultiSelector adds one new member functions, SelectCellBlock() to select a range of cells.
TIP If you wish to operate on all selected cells, use the LTableView
function GetNextSelectedCell() to walk through the entire table, stopping on selected cells.
LTableStorage is an abstract class that specifies the interface for the data storage helper objects. These functions provide behaviors to maintain the data associated with a table.
This class has one data member, mTableView. This is a pointer to the table that owns this helper.
All of the functions in this class are pure virtual. These functions form the basis for interacting with data in the table. Most of the time you will not need to concern yourself with these functions. The PowerPlant table classes call these functions to get or set required data. In general, you should call the table functions, not the related storage functions.
For background purposes, Table 6.15 lists LTableStorage functions.
LTableStorage member functions:
| Function |
Purpose |
|---|---|
The purpose of the insert and remove functions in subclasses is to add or remove data, not to add or remove cells from the table.
When inserting new rows and columns, the data for a single cell is specified. All new cells receive the same data.
LTableArrayStorage is a concrete implementation of LTableStorage to support a table where data is stored in an array (an LArray object, or an object of a class that inherits from LArray).
This class has two data members, mDataArray and mOwnsArray. The mDataArray member is a pointer to the array that holds the data. The mOwnsArray member determines whether the array is destroyed when the LTableArrayStorage
object is destroyed.
The nature of the array can be specified using various LTableArrayStorage constructors. There are three constructors. The parameters and purpose of each are listed in Table 6.16.
LTableArrayStorage constructors:
| Parameters |
Purpose |
|---|---|
LTableArrayStorage adds no new member functions, but implements every function listed in LTableStorage.
LCollapsableTree is an abstract class that specifies the behavior of a hierarchical tree with expandable nodes.
This class has no data members.
All of the functions in this class are pure virtual. These functions form the basis for interacting with a hierarchical tree. Most of the time you will not need to concern yourself with these functions. The PowerPlant hierarchy table classes call these functions to get or set required data. In general, you should call the table functions, not the related LCollapsableTree functions.
For background purposes, Table 6.15 lists some LCollapsableTree functions.
Some LCollapsableTree member functions:
| Function |
Purpose |
|---|---|
There is no function in the table classes that corresponds to
the GetNestingLevel() function. If nesting level is a concern,
you can send the message directly to the tree helper object through
the mCollapsableTree data member of the table. See "Drawing a Cell."
There are also functions to expand and collapse nodes, and to perform other node-related functions.
LNodeArrayTree is a concrete implementation of LCollapsableTree. It uses an array to track the hierarchy of rows and nested rows.
This class has two data members, mHierarchyArray and mExposedNodes. The mHierarchyArray member is a pointer to the array that holds the nested hierarchy
of nodes. The mExposedNodes member is the number of exposed nodes at any moment.
LDropFlag manages the expansion triangle in a hierarchical table.
It has two static functions, Draw() and TrackClick(). The hierarchy table classes use these functions to draw the
expansion triangle and to determine whether the user has clicked
in the triangle.
WARNING! To use LDropFlag you must also include the DropFlags Icons.rsrc file in your project.
This section discusses how to work with the PowerPlant table classes from a task-based perspective. While the collection of table-related classes appears very complex, in fact they hide an underlying elegance in design. Using these classes is actually a straightforward process. The specific table classes, LTableView and LHierarchyTable, provide almost all the functionality you need.
You will occasionally direct messages to helper objects, but by and large the complexity of the geometry, selection, storage, and tree classes is hidden.
Each topic reflects a table-related task you must perform. This section includes the following topics:
The simplest way to create a table is to use Constructor when you generate the visual interface for the window containing the table. Use an LTableView object or one of its descendants (either a standard PowerPlant class or a custom class you created). See the Constructor Manual for details.
A table built in this way does not have any of the necessary helper objects, not does it have any cells or data.
You need to create three helper objects and attach them to the table after the table object is instantiated. They are the geometry helper, the selection helper, and the storage helper. Create objects of the class you choose for the functionality you desire-uniform cell size or not, single or multiple cell selection, the type or array for storage.
You can create these helper objects in the table constructor function,
in the table's FinishCreateSelf() function, or in an initializer function called from the table
constructor. Use operator new and specify the appropriate class constructor for each helper.
Store the pointer to the objects in the table's mTableGeometry, mTableSelector, and mTableStorage data members, respectively.
After creating the helper objects, you need to insert the appropriate number of rows and columns. See "Managing Rows and Columns" for details. The order of events is important. The process of adding rows and columns may affect the geometry, selection, and storage objects, so those objects should exist and be attached to the table before adding rows and columns.
You should also initialize the contents of each cell as necessary. See "Setting Cell Data."
Every table has rows and columns of cells. There are three things you can do with rows and columns. You can insert them into the table, remove them from the table, or manage their size.
Use the InsertCols() function. It has five parameters.
| Data type |
Parameter |
Purpose |
|---|---|---|
The inDataPtr parameter points to one cell's data. Each cell receives the identical
data initially. You can then set each cell's data as necessary.
See "Setting Cell Data."
The InsertRows() function matches InsertCols() described in Table 6.18. You specify the row after which new rows appear.
WARNING! For hierarchical tables, the inAfterRow parameter in the call to InsertRows() must specify a wide-open index value. That is, it is the index
number the row would have if the table were fully expanded.
For hierarchical tables, a call to InsertRows() creates non-collapsable sibling rows. You can also call InsertSiblingRows(). It has one additional parameter that specifies whether the row
is collapsable or not. If you want to create a collapsable row,
you must use InsertSiblingRows().
Parameters for InsertSiblingRows():
| Data type |
Parameter |
Purpose |
|---|---|---|
The inDataPtr parameter points to one cell's data. If you are inserting more
than one cell, each cell receives the identical data initially.
You can then set each cell's data as necessary. See "Setting Cell Data."
To insert child rows under a row, call InsertChildRows(). The parameters are the same as those for InsertSiblingRows(), except that the second parameter specifies the parent row under
which the new child rows will appear.
Call the LTableView functions RemoveRows() and RemoveCols(). Each call has three parameters, detailed in Table 6.20.
Parameters for removing rows and columns:
| Data type |
Parameter |
Purpose |
|---|---|---|
Removing a row or column also removes the associated data from the table storage.
You can only remove one row at a time from a hierarchical table. However, if that row is a parent row, all of its children are removed along with it.
Call the LTableView functions SetRowHeight() and SetColWidth(). Each call has three parameters, detailed in Table 6.21
Parameters for changing row and column size:
| Data type |
Parameter |
Purpose |
|---|---|---|
For tables that use LTableMonoGeometry, the range of rows or columns is ignored. All rows or columns are set to the new size.
For tables that use LTableMultiGeometry, the range specified is inclusive. The rows or columns at the beginning and end of the range are resized, along with all rows or columns in between.
Use GetRowHeight() or GetColWidth() to get the size of an individual row or column.
A table usually has associated data storage. Storage is not mandatory. For example, the default implementation in LTableView has no storage. It draws the row and column number directly in each cell.
Use SetTableStorage() to provide a pointer to an LTableStorage helper object to the
table.
If there is storage, then you can set each cell's data individually
using the LTableView function SetCellData(). This function takes care of all the interaction between you
and the data storage. It determines where in the storage to place
the data you provide. There are three parameters, as detailed
in Table 6.22
Parameters for setting cell data:
| Data type |
Parameter |
Purpose |
|---|---|---|
You specify the cell by row and column number in the inCell parameter. PowerPlant copies the data into storage. You can dispose
of the original data after the call returns if you wish.
It is frequently necessary to retrieve data associated with a
cell. If there is storage, then you can get each cell's data individually
using the LTableView function GetCellData(). This function takes care of all the interaction between you
and the data storage. It determines where in the storage your
data is located, and retrieves a copy of it for you. The three
parameters are detailed in Table 6.22
Parameters for getting cell data:
| Data type |
Parameter |
Purpose |
|---|---|---|
You specify the row and column number of the cell in the inCell parameter.
You must allocate the data buffer before making this call. The
buffer must be large enough to hold the data. You provide the
size of the buffer in the ioDataSize parameter. However, if you use an LArray object in the LTableArrayStorage
(as opposed to LVariableArray), LArray ignores this parameter.
LArray copies data that is the size of each item in the array
regardless of the size of the buffer.
WARNING! If the data buffer you provide is smaller than the size of an item in an LArray attached to LTableArrayStorage, PowerPlant will raise a signal. Ignoring this problem can lead to crashes.
PowerPlant copies the data from storage and places it in the buffer, thus giving you a copy of the data, not a pointer to the data in storage. If the data for this cell changes in storage, your copy will be outdated until you get the data again.
TIP Actually, there is a way you can access table data directly. Create
an array object ahead of time, and keep a pointer to the object.
Use that object when you create the LTableArrayStorage object
that you attach to the table. You then have two paths into the
table storage: the LTableView calls, and LArray calls such as
GetItemPtr(). With a pointer to the array item, you can modify table storage
directly. This may be optimal when you have continuously-updated
data and speed is an issue.
In most circumstances, when the user clicks in a cell you respond
to the click. The LTableView::ClickSelf() function handles all cell selection automatically using the selector
helper object you attach to the table. LHierarchyTable::ClickSelf() also handles expanding and collapsing levels in a hierarchical
table.
You may want to implement additional behavior beyond simply selecting the cell. You may want to allow the user to select part of the contents of a cell (such as a range of text). Exactly how you implement these additional features is application dependent and beyond the scope of an application framework.
However, the framework does provide the hook. Declare a subclass
of the appropriate table class (LTableView or LHierarchyTable).
Override the ClickCell() function. PowerPlant calls this function whenever a click occurs
inside a cell.
You can use GetClickCount() (an LPane function) to determine if a click is a single or multiple
click.
If you wish to perform some action when the selection range in
a table changes, override the SelectionChanged() function. The selection could change because a new cell is selected,
a cell is added to an extended selection, a cell is removed from
the selection range, selected cells are removed from a table,
and so on. Whatever the cause, PowerPlant calls SelectionChanged() whenever the selection range changes.
What you do is, of course, up to you. You might want to walk the cells and perform some action based on which cell or cells are currently selected. You might want to update menus based on whether cells are selected. PowerPlant provides the hook. You provide the application-specific functionality.
There are several issues that arise when it comes time to draw a cell. Of course, you must draw the contents. In addition, you must occasionally refresh the contents explicitly, or highlight the cell.
Precisely what you do to draw the data in your cell is, of course,
data dependent. PowerPlant includes two example classes to demonstrate
how it's done-LSmallIconTable (for LTableView) and LTextHierTable
(for LHierarchyTable). The code exercise in this chapter implements
DrawCell() to draw both an icon and text.
PowerPlant calls DrawCell() whenever you should render the contents of the cell. You override
this function in your own table class, and provide the necessary
code to draw the data in the cell. Typically you perform some
pixel-based calculations to determine precisely where the data
should appear in the cell, and then use Mac OS Toolbox calls to
draw the data.
In a hierarchical table, the nesting level can affect where you draw the data.
The nesting level is the number of levels down from the top level a particular cell occupies. Top level nodes are at nesting level zero.
If you stagger your data according to nesting level, then you
must take a row's level into account before you draw data. This
is one case where you address a helper object directly. Use the
table's mCollapsableTree data member and send the tree helper object a GetNestingLevel() message. This call returns the nesting level. You can then use
the nesting level and a standard indent of some amount to adjust
the horizontal location of the information you draw in the cell.
The code exercise in this chapter demonstrates this technique.
In a hierarchical table, the first cell in an expandable row should
have an expansion triangle. To display this flag, call DrawDropFlag(). You provide the cell, and the wide-open index value for the
row. PowerPlant handles the rest.
PowerPlant usually takes care of highlighting automatically. However, you may wish to control highlighting. For example, you should not highlight the drop flag area in a hierarchical table.
To modify highlighting behavior, override HiliteCellActively() and HiliteCellInactively(). You should not need to override HiliteCell() or HiliteSelection().
WARNING! At the time of this writing, LTableView::HiliteSelection() has two separate implementations, one of which is inactive. The
inactive code calls HiliteCellActively() and HiliteCellInactively(). The actual code handles highlighting directly, and therefore
overrides of these two functions will not be called! Until the
code stabilizes, you may need to override HiliteSelection() directly. Examine the source code for further enlightenment.
PowerPlant usually handles updating the screen for you. However,
there may be times when you want to explicitly mark a cell or
range of cells for refreshing during the next update event. Use
RefreshCell() or RefreshCellRange() for this purpose. You specify the cell or range of cells to refresh.
Managing tabular data frequently requires that you walk through each cell, a range of cells, or each selected cell, in a table. As you go through the cells, you perform some operation on each cell.
PowerPlant provides two functions for walking the cells in a table.
They are GetNextCell() and GetNextSelectedCell(). Each begins the walk at the cell you specify. Each returns a
boolean value false when there is no next cell. You can use calls to these functions
in a while loop to walk through the desired cells.
Cells are ordered by column (across), and then by row (down). Row zero is before the first cell. The next cell after row zero and any column is cell (1,1). Column zero is before column one. The next cell after row "r" and column zero is Cell (r,1).
To look for all cells in a table, you would write code like this:
STableCell theCell (0,0); // start with first cell
while (GetNextCell (theCell))
{
	// operate on cell
}
What you do when you find the cell is up to you. You can set or retrieve data, select or deselect the cell, search for data, and so forth.
PowerPlant provides a search mechanism for locating a cell that
contains specified data. Call FindCellData(). This call has three parameters, detailed in Table 6.24
Parameters for finding cell data:
| Data type |
Parameter |
Purpose |
|---|---|---|
You specify the data to search for and the length of the data.
If a cell is found that contains the data, the call returns true and puts the cell location in outCell. Otherwise the call returns false.
FindCellData() always begins the search at the first cell in the table, and
returns the first cell it encounters that contains the specified
data. If you wish to search for multiple hits, you can't use FindCellData(). You'll have to write code to walk the cells and look in each
cell's data individually. You could also create a custom data
storage class with a different search mechanism.
Using the LTableArrayStorage class, storage is an array where
each element in the array matches the corresponding index value
of a cell in the table. The LTableArrayStorage uses an LArray
function to search for the data in the array. The search goes
from the beginning of the array to the end. The search terminates
as soon as a matching data item is found. If you use a custom
data storage class, the results of FindCellData() will depend upon your implementation of the search.
Tables do not have built in scroll bars. If the table image area is larger than the table frame, you should embed the table inside an LScroller or LActiveScroller view. See The PowerPlant Book chapter on views for information on scrolling.
A table is a familiar mechanism for displaying lists or matrices of data in rectangular cells arranged by row and column. PowerPlant implements a well-factored, and elegant representation of tabular data. Because each table uses helper objects for cell geometry, cell selection, and data storage, it is possible to mix and match from a variety of options to create a table that has the functionality you need.
The resulting collection of table classes therefore appears complex. However, with a few exceptions, every function you need to use and understand is in either the LTableView or LHierarchyTable classes.
PowerPlant's ready-made helper classes for geometry, selection, storage, and trees provide most of the table-related functionality you need indirectly. LTableView and LHierarchyTable use these helper classes extensively, but the complexity in those classes is hidden from you, the PowerPlant programmer.
Actually creating and using a table in PowerPlant turns out to be fairly straightforward. There are specific functions to manage rows, columns, and cells. You can set or get data, draw data, handle clicks and cell selection, walk through cells in the table, and search for data. You perform many of these tasks in the code exercise accompanying this chapter.
In this exercise you create an application that displays a hierarchical table. The table groups a list of items, in this case URL bookmarks. This isn't a full-featured application. It doesn't save data, open files, or support copy and paste. However, it does show you how to create, manage, and use a table in PowerPlant.
The table is one column wide with an arbitrary number of rows. There are two types of items that can occupy a cell, a group item and a data item. Each item displays a small icon and a label.
A group item is like a folder that contains either data items or other group items. You can expand and collapse a group item. In other words, the group item is a parent and can have children.
A data item cannot be expanded, because a data item cannot have children. Each data item is, in theory, a URL to some location on the World Wide Web. This particular little application does not have a mechanism for connecting to the web site. However, the potential for that functionality is built into the design, as you'll see when you go through the code exercise.
The necessary PPob resource has been built for you. It describes a standard window containing two panes. One is a scrolling view to contain the table. The other is a CBookmarksTable. CBookmarks-Table inherits from LHierarchyTable to support expandable groups.
With this brief overview behind us, let's get into the code.
Struct declaration CBookmarksTable.h
The purpose of this step is to give you a little background into the kinds of data you will put into cells in this table. This has nothing to do with tables in general, but will help you understand what's going on in this exercise.
At the end of the CBookmarksTable header file there is a short struct declaration for an object of type STableItem. This struct represents an item in the table-that is, the contents of a single cell.
Here's the code for quick reference. You do not need to enter this code. It already exists and has been provided for you. As usual, existing code is shown in italic style.
struct STableItem { DataIDT mType;
Str31 mName;
Str255 mLocation;
// Some constructors to make things easier.
STableItem();
STableItem( DataIDT inType );
 STableItem( DataIDT inType, Str31 inName,

		Str255 inLocation );
};
// Bookmark table item types.
const DataIDT kGroupItemType = 'Grup';
const DataIDT kBookmarkItemType = 'Book';
The same struct serves for both group and bookmark items. Each
item has a type, a name, and a location. The name is the text
that appears in the cell. The location is the URL associated with
the item. For a group item, the mLocation field is typically empty.
In subsequent steps you will install items of each type as the
data associated with cells in the table. All the remaining steps
in this code exercise take place in CBookmarksTable.cp.
2. Examine the CBookmarksTable constructor.
CBookmarksTable() CBookmarksTable.cp
In the design of this application, the real work of setting up
a table occurs in InitBookmarksTable(). You write that function in the next step. However, the process
begins in the table constructor.
The CBookmarksTable constructor sets up a series of constants for cell height, indents for sublevels, text traits for the two kinds of items, and an icon ID for each kind of item. Once again, this code is provided for you. You don't have to type it in.
const SInt16 kCellHeight = 16; const SInt16 kFirstIndent = 20;
const SInt16 kLevelIndent = 16;
const ResIDT kGroupTextTraits = 131;
const ResIDT kBookmarkTextTraits = 132;
const ResIDT kGroupIconID = 1001;
const ResIDT kBookmarkIconID = 1000;
You could set up a CPPb resource in Constructor so that you could specify these values as part of the PPob data stream.
InitBookmarksTable() CBookmarksTable.cp
This is the step where you begin real work. As you know, to fully create a table you must attach helper objects, insert columns, insert rows, and install data.
The existing code in this function does some of the setup. It
initializes the data members for indents, text traits, and icon
IDs. It also creates two STableItem items: one group item and one bookmark item. These will be the
default table entries.
After that, you can create the helper objects and store the pointers to the objects in the appropriate data members. There are three helper objects: the geometry, the selector, and the storage.
Use LTableMonoGeometry, and specify the width and height of a
cell. Because this table will have a single column, the width
of a cell should be the width of the table frame, mFrameSize.width. The height is in the parameter inCellHeight.
Use LTableSingleSelector as the selection helper.
Use LTableArrayStorage as the storage helper. The size of the
data is sizeof(STableItem). Use the constructor to create an LArray for storage (as opposed
to LVariableArray).
The table has been created, and the helper objects have been attached
to the table. Now you can insert columns and rows. Insert a single
column in the table. Call InsertCols(). This column appears after column zero, there is only one column,
with no data. There is no need to refresh the screen. The startup
code will draw the window after creation.
c. Insert rows and install data.
So that there will be some default information, add two rows to
the table. You have two items to add to the table, theGroupItem and theBookmarkItem.
Add the group item first as a sibling row. Call InsertSiblingRows(). You are adding one row, after row zero. Also pass the address
of theGroupItem, the size of STableItem, a boolean value true (this is an expandable row), and a boolean value false (no need to refresh).
Then add the bookmark item as a child row of the group. Call InsertChildRows(). You are adding one row, as a child of row 1. Also pass the address
of theBookmarkItem, the size of STableItem, a boolean value false (this is not an expandable row), and a boolean value false (no need to refresh).
The code for all three of these substeps is listed here. The remaining code adds an attachment that allows the user to use the page keys on an extended keyboard to scroll the view.
// Create helper objects for this table. mTableGeometry = new LTableMonoGeometry( this,
mFrameSize.width, inCellHeight );
mTableSelector = new LTableSingleSelector(this);
mTableStorage = new LTableArrayStorage( this,
sizeof(STableItem) );
// Insert a single column.
InsertCols( 1, 0, nil, nil, false );
// Insert default items.
InsertSiblingRows( 1, 0, &theGroupItem,
sizeof(STableItem), true, false );
InsertChildRows( 1, 1, &theBookmarkItem,
sizeof(STableItem), false, false );
You have just created a table one column wide, two rows deep, with data in each cell. All cells are the same size, you can select one cell at a time, and the data storage for each cell is the same size.
For the table data to appear on screen, you must draw the contents of each cell. In this step you do the table-related setup work. The code that does the actual drawing is provided for you because it has no direct relevance to the table classes.
In a hierarchical table, any expandable item might be collapsed. As a result, a cell has two index values, one for a fully-expanded or wide open table, and one for its position among all the exposed cells. In this situation you need the wide open index.
To prepare for drawing, you need to do four things: get the wide open index, draw the expansion triangle, get the data for the cell, and get the nesting level of the cell.
What you want is the index number for the row. The DrawCell() function receives the cell to be drawn through the inCell parameter. Call GetWideOpenIndex() and get the inCell.row index. This gives you the index for the row.
b. Draw the expansion triangle.
Call DrawDropFlag(). Pass inCell and the wide open index. PowerPlant takes care of the rest.
Call GetItemFromCell(). This is a custom function declared as part of the CBookmarksTable
class. You write this function in the next step. The existing
code declares an STableItem variable, theItem. This serves as the data buffer into which the cell's data will
be placed. When you call GetItemFromCell(), pass inCell and theItem.
Existing code later in this function uses the nesting level to
determine how far to indent the cell's data so that child items
appear indented under parent items. Existing code declares a UInt32 variable, theNestingLevel. Call GetNestingLevel() to get that value. This is an LCollapsableTree function. You
have a pointer to the tree helper object in mCollapsableTree.
The code for all substeps is listed here.
// Get the wide open index for the row. TableIndexT theWideOpenIndex;
theWideOpenIndex = GetWideOpenIndex(inCell.row);
// Draw the cell drop flag.
DrawDropFlag( inCell, theWideOpenIndex );
// Get the cell data.
STableItem theItem;
if ( GetItemFromCell( inCell, theItem ) ) {
// Get the nesting level.
UInt32 theNestingLevel;
theNestingLevel = mCollapsableTree->
GetNestingLevel( theWideOpenIndex );
The remaining code in this function, provided for you, positions the icon (using the nesting level) for each item and draws the icon. It then draws the name of each item to the right of the icon.
GetItemFromCell() CBookmarksTable.cp
In this step you complete GetItemFromCell() to retrieve the data from a particular cell. Existing code set
theDataSize for an STableItem, and ensures that the data is valid.
To complete this function, you must do three things: get the wide
open index for the row, create an STableCell object for the desired cell, and then get the data.
a. Get the wide open index for the row.
The value in inCell may contain the row and column for the exposed cell, as opposed
to the wide open cell. You want the index value for the wide open
row. Call GetWideOpenIndex(), pass inCell.row.
b. Create an STableCell for the cell.
Declare an STableCell variable. The solution code uses the name theWideOpenCell. Set its row to the wide open index value for the row. Set the
column to 1.
c. Get the data from the cell.
Call GetCellData() for this wide open cell. The data buffer is the outItem parameter received by the call.
// Get the wide open index for the row. TableIndexT theWideOpenIndex;
theWideOpenIndex = GetWideOpenIndex(inCell.row);
// Create an STableCell object for the cell.
STableCell theWideOpenCell(theWideOpenIndex, 1);
// Get the cell data (the bookmark item).
GetCellData(theWideOpenCell, &outItem,
GetCellData() copies the data from storage into the outItem buffer. All the data in storage is the size of an STableItem, and the buffer is declared in the caller to be an STableItem.
6. Insert an item in the table.
InsertNewItem() CBookmarksTable.cp
This is a complex step, because there are several situations that this function must handle. The item might be a group or a bookmark. Either item might be placed as a sibling or a child.
The algorithm implemented in this function decides how to place the new item based on whether there is a selected row. If the selected row is a group and the group is expanded, the new item is a child of the group. If the selected row is a bookmark or a collapsed group, the new item is a sibling of the selected row. If there is no selected row, the new item is placed at the top level of the hierarchy.
Existing code does three things.
It creates a new default item of the correct type, either a group
or bookmark, and stores that in theNewItem.
It sets a boolean value collapsable to the correct value for the type of item. Groups can be expanded,
bookmarks cannot. You'll use this value when you create a new
row.
Existing code sets an STableCell variable, theCell, to (0,0). This variable ultimately holds either the selected
cell, or the default value if no cell is selected. You start your
search for a selected cell at (0,0).
In the existing but empty if statement, call GetNextSelectedCell(). Pass theCell as the only parameter. The code you write in substeps b through f go inside this if statement and execute if a selected cell is
found.
b. Get data from the selected cell.
Call GetItemFromCell() for the selected cell. Pass theItem as the data buffer. This variable is declared in existing code
at the start of the function.
c. Get the wide open index for the row.
Call GetWideOpenIndex() for the selected cell's row.
d. Determine if the selected item is an open group.
There is an existing but empty if statement. Inside that if statement, perform two tests. First, look at the mType field of theItem. This variable now holds the data retrieved from the selected
cell. The desired type is kGroupItemType.
Also, determine if the group is expanded. Call the LCollapsableTree
function IsExpanded(). Use the wide open row index.
If both tests pass, you execute the code in substep e. If either test fails, you execute the code in substep f.
If both tests in substep d pass, then the selected item is an open group. Create a child
row under that group. Call InsertChildRows() and pass in the appropriate parameters. The data is in theNewItem. The collapsable variable holds the appropriate boolean value for either group
or bookmark items.
If either test in substep d fails, then the selected item is either not a group or not open.
Create a sibling row immediately after the selected row. Call
InsertSiblingRows(). This code goes in the first existing else statement.
g. If no cell is selected, create an item at the start of the table.
All of the previous substeps related to a selected cell. If there
is no selected cell, create a sibling row at the start of the
table. This code goes inside the second existing else statement. Additional existing code inside this statement also
sets theCell.column to the value 1 so the new cell can be properly selected in the
next substep.
To create the sibling row, call InsertSiblingRows().
After the if/else check for a selected cell, in all cases you want to select the
new cell.
Call UnselectAllCells() to eliminate any existing selection.
Then, increment theCell.row by one, because the new row is one greater than the previous
selected row. If there is no selected cell, theCell.row is zero, so incrementing makes the cell (1,1).)
Then call SelectCell(). You should check to ensure that the new cell is a valid cell
by calling IsValidCell() before calling SelectCell().
 NOTE
NOTE The call to UnselectAllCells() is not really necessary if you use LTableSingleSelector. However,
it is necessary for LTableMultiSelector.
The code for all these substeps is listed here.
STableCell theCell( 0, 0);
// If we find a selected cell.
if (GetNextSelectedCell (theCell)){
// Get data from cell, assume it's valid.
GetItemFromCell( theCell, theItem );
// Get the row wide open index.
theWideOpenIndex = GetWideOpenIndex(
theCell.row);
// If selected row is a group and is open.
if (theItem.mType == kGroupItemType &&
mCollapsableTree->IsExpanded(
theWideOpenIndex)){
InsertChildRows( 1, theWideOpenIndex,
&theNewItem, sizeof(STableItem),
collapsable, true );
} else { // not a group or not open
// create sibling right after this one
InsertSiblingRows( 1, theWideOpenIndex,
&theNewItem, sizeof(STableItem),
collapsable, true );
}
} else { // nothing selected
// We enter here with theCell at (0,0).
theCell.col = 1;
// Add a sibling row at start of list
InsertSiblingRows( 1, 0, &theNewItem,
sizeof(STableItem), collapsable, true );
}
// Unselect all cells and select the new cell.
UnselectAllCells();
theCell.row++;
if ( IsValidCell( theCell ) ) {
SelectCell( theCell );
}
7. Remove a row from the table.
HandleKeyPress() CBookmarksTable.cp
The last important task to accomplish is to remove a row from a table. In the example application interface, the selected row is removed when the user types the Delete key.
The existing code identifies the keypress, searches for a selected cell, and gets the wide open index for that row. You have already written code to perform the same tasks in previous steps.
After getting the wide open index, call RemoveRows(). Remember, with a hierarchical table you can only remove one
row at a time. However, if that is a parent row, all children
are removed as well.
theWideOpenIndex= GetWideOpenIndex(theCell.row);
RemoveRows( 1, theWideOpenIndex, true );
8. Examine other table features.
various functions CBookmarksTable.cp
You have performed all the principal tasks associated with tables in PowerPlant. The code provided for you performs some additional tasks worthy of a brief look.
CBookmarksTable overrides both HiliteCellActively() and HiliteCellInactively() to exclude the expansion triangle area from the cell highlighting.
This is a common feature of hierarchical tables.
The application enables or disables some items in the Bookmarks menu based on selection. CBookmarksTable overrides SelectionChanged() to update menus when the selection changes. There is nothing
table-specific going on here, but this does point out the function
you override if you need to respond to a changed selection.
CBookmarksTable also overrides ResizeFrameBy(). This is an LView function. Because this table has a single column,
that column fills the width of the frame. When the user resizes
the window (and the table view contained therein), this function
sets the column width to match the frame width. It uses SetColWidth().
Finally, take a peek at ClickCell(). CBookmarksTable overrides this function so that when the user
double-clicks a bookmark cell, the OpenLocation() function is called. The OpenLocation() function just beeps. However, this gives you a hook to implement
code that would go out across the network and connect to the URL
stored in that bookmark. Cool!
Finally, the code to edit the contents of a table cell has been completely provided for you. Most of that code concerns managing dialogs in which you edit the contents of the table cell. You have already mastered any table-related calls used in that code.
9. Build and run the application.
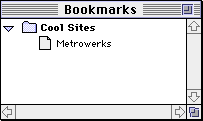
You're all done! When the application builds successfully and runs, the window shown in Figure 6.5 appears with one group, "Cool Sites," and a bookmark for the Metrowerks web page.
Use the Bookmarks menu to add new rows (items) to the table. Experiment with all
the possibilities.
With no item selected, create a new group. It appears selected and open (with no contents yet) as the first item in the window. Add a new bookmark. It appears selected as a child of the new group. Create another new group. It appears as sibling to the bookmark you just made.
Click the expansion triangle to collapse a group. Select that closed group, and make a new group. It appears as a sibling to the selected group.
Continue to experiment with adding and removing table items. To remove an item, select the item and type the Delete key. If it is a parent row, all the children disappear.
When you are through playing with the demo, quit the application. There is plenty of room for further exploration on your way to mastery of the PowerPlant table classes.
For example, when there is no item selected a new row appears at the beginning of the table. Make the item appear at the end of table.
Change the currently selected cell in response to arrow keys.
Use LTableMultiSelector instead of LTableSingleSelector to manage cell selection in the table. Simply attach a different helper object. However, if you want to manage multiple selections, such as deleting multiple selected rows properly, you'll have to write some additional code.
Use LTableMultiGeometry so you can make the group rows taller than item rows. You can also design an interface to allow the user to set the height of selected rows.
Add a second column of data. Instead of resizing the table cell to match the width of the table frame, let the table become wider than the window. The horizontal scroll bar should then activate, so you can scroll left and right as well as up and down the table.
As always, have a good time exploring. PowerPlant's table classes can give you a real head start when you need to display tabular data.