This chapter demonstrates how to create new application projects for the Mac OS. The procedure is nearly the same regardless of the kind of project, the programming language used, or the host platform on which the code is developed. The only differences between the different kinds of projects are the libraries you use, the project settings, and the target type you are developing for.
CodeWarrior can be used to create the many basic types of applications. Application types on the Mac OS are a combination of a CPU architecture like 68K or Power PC, a version of the Mac OS APIs like the Macintosh Toolbox or Carbon, or even by its compatibility with other programming environments.
The application project types include:
Applications written for 68K-processor machines run on any Mac
OS computer. The code is contained in the resource fork of the
application file in resources of type 'CODE'. A Mac OS computer that uses a PowerPC processor contains a
software emulator that translates the 68K application instructions
into Power-PC instructions. A 68K Mac OS computer runs your 68K
code without any translation.
Some applications use the Code Fragment Manager for 68K. This
software is contained in a software extension called CFM-68K Runtime Enabler, that only works on Mac OS computer with MC68020 or later 68K
chip. A CFM68K application maintains its code in a single 'rseg' resource. It's useful if you want the advantages of shared libraries
on a 68K Mac OS computer. You must have the CFM-68K Runtime Enabler installed on the 68K computer that you want to run your application
on.
Applications that are compiled into PowerPC code can run only on a PowerPC-based Mac OS. A PowerPC application contains its code in the data fork of the file. The resulting application is almost always faster than a 68K application, since PowerPC processors are very fast, and because no translation of instructions is required.
Fat applications run on a 68K or on a PowerPC-based Mac OS computer. A Fat application contains both 68K or CFM68K code and PowerPC code (in the data fork) and runs without translation on either 68K and PowerPC computers. Note that the application's code size is larger than either 68K or PowerPC applications since both types of instructions are linked into the program.
 NOTE
NOTE A Fat application doesn't run natively on Mac OS X, but only in the Classic environment.
Carbon applications are linked using the CarbonLib. A Carbon application contains PowerPC code and runs on Power
PC-based Macintoshes running Mac OS 8.1 or later with CarbonLib installed, and Mac OS X. The resulting application takes advantage
of many Mac OS X features like preemptive multi-tasking and many
other features.
The Mac OS Finder recognizes four different flavors of applications. Each uses a four-character type code to identify different application types. The CodeWarrior software can create any of the following application types:
APPL' - normal Mac OS application (default).
appe' - a Mac OS faceless background application. No user interface
is provided, and control is normally through a control panel or
other application.
APPD' - Mac OS desk accessory application (replaces `DRVR' file type, see "68K Device Driver").
APPC' - Mac OS Control Panel application (replaces `cdev' file type).
Visit Apple's Developer Technical web site for access to all the latest development kits, documentation, technical support, tools, and much more. The URL is:
http://developer.apple.com/technical/
To directly access Apple's Technical Documentation site for Mac OS 8 and 9, visit:
http://developer.apple.com/techpubs/
This section describes the basic steps for creating 68K, PPC, Fat, and Carbon application projects. Within each step there are references to other sections in this chapter that provide additional detail.
We highly recommend that all your projects be created from Project Stationery. This greatly reduces the amount of work you need to do in regard to choosing standard libraries. You should only add extra libraries if your particular code requires them.
For example, if you are creating a Carbon application, the steps helpfully point out which stationery projects support Carbon development, the project options available for Carbon applications, and identify which libraries are Carbon ready and can be used with your Carbon project. After that, all you need to do is write your application's source code to make the application a reality.
As with any CodeWarrior projects, there is a set of steps you should follow to get a new project up and running quickly. The following instructions provide a high-level overview of creating application projects.
Select File > New to create a new project, then provide the new project with a Project name and Location, click OK.
2. Choose the stationery appropriate for the project.
It's easy to get started with an application project if you start with pre-defined stationery. Remember, stationery projects include all the files and libraries you need to start a project. Once you have determined the type of application you are coding, choose the stationery project that best matches your application's requirements in the New Project window, then click OK.
To learn more about the various stationery projects and what they include, see Application Project Stationery.
To determine which project stationery is available for your project, refer to the appropriate topic below. For example, if you are creating a PPC only project, you should refer to the Power PC Application Stationery section for additional details.
While you could just accept the default project settings that accompany the project stationery, you should review them to verify they will work for your project. If not, necessary, you should change them to best suit your project goals. Choose Edit > targetName Settings to open the Target Setting window. Refer to the following sections for details:
68K and CFM68K Application Options Power PC Application Options Fat Application Options Carbon Application Options
4. Add any additional libraries required.
If you chose a stationery project to start your project, all the standard libraries required for that project type are already included within the project file. However, if your project requires additional functionality not found in the standard libraries, such as special math routines for extensive calculations, you will have to add the required libraries to your project. Use Project > Add Files... to locate and select the desired library files.
See the appropriate topic below for information on choosing which libraries to add:
68K and CFM68K Application Libraries Power PC Application Libraries Fat Application Libraries Carbon Application Libraries
5. Code, build, debug, and sell one million copies.
While we can't tell you what to code, or how to sell your finished application, we can cover what you need to do when debugging your project. See the chapters Debugger Setup and Options, Advanced Debugging for additional debugging help.
There is a host of application stationery included with CodeWarrior that enables you to get started writing your code quickly. Table 3.1 describes the contents of the project stationery so you can determine which would work best for your project.
| Stationery chosen |
Does this |
|---|---|
In addition, CodeWarrior includes additional project stationery
for developing cross-platform Windows applications using C, C++,
or the MFC framework. Look in the (Project Stationery) folder to see these stationery options.
To create 68K or CFM68K applications, choose the appropriate project stationery from the list in Table 3.2. Remember, 68K and CFM68K applications run natively on 68K Mac OS machines, but only 68K applications run under emulation mode on Power PC Mac OS machines.
68K and CFM68K project stationery options:
| Development for |
Then choose |
|---|---|
To create PPC applications, use any of the project stationery listed in Table 3.3. Remember, PPC applications only run on Power PC Mac OS machines.
Power PC project stationery options:
| Development for |
Then choose |
|---|---|
To create Fat applications, use any of the project stationery listed in Table 3.4. Note that Fat applications run natively on both 68K and PPC Mac OS machines as the Mac OS runs the appropriate binary for most efficient operation.
Fat project stationery options:
| Development for |
Then choose |
|---|---|
To create Carbon applications, use any of the project stationery
listed in Table 3.5. Note that Carbon applications can only run on Power PC Mac OS
machines capable of running the CarbonLib extension. This includes Mac OS 8.1 or later, Mac OS 9, and Mac
OS X.
Carbon project stationery options:
| Development for |
Then choose |
|---|---|
This section provides information on the options for target settings for your application project. The topics include:
The general guidelines to change a target option are as follows:
1. Select Edit > targetName Settings.
The Target Settings window appears.
2. Click the target setting panel to display it.
Select the specified panel from the Target Settings Panels list.
3. Set the specific panel options.
Set the options required for that panel.
That's it. Any changes you have made are saved to the project file and applied to any subsequent operations.
NOTE Each build target in the project has its own set of target setting options, so changing the settings in one target doesn't change it for another build target.
To write 68K or CFM68K applications, use Table 3.6 as a target settings guide.
68K application project options:
| In Target Settings window... |
Set the following options... |
|---|---|
|
|
The following options can be set now or later: 'SIZE' Flags Startup Code Creator Type Preferred Heap Size Minimum Heap Size |
|
To specify a single-segment application set:
|
|
If the application is less than 32K in size:
If the application is greater than 32K in size or Extended Resource is enabled: Code Model > Large Struct Alignment > 68K |
|
For Power PC application projects, use Table 3.7 to see which target settings are required for a PPC application project.
Power PC application project options:
| In Target Settings window... |
Set the following options... |
|---|---|
|
|
The following options can be set now or later: 'SIZE' Flags Creator Type Preferred Heap Size Minimum Heap Size Stack Size |
|
To optimize your code for a specific Power PC processor, select it from: Target Processor > targetProcessor |
|
For Fat application projects, use Table 3.8 to see which target settings are required for a Fat application project.
Fat application project options:
| In Target Settings window... |
Set the following options... |
|---|---|
The following options can be set now or later: Copy Code Fragments Suppress Warnings Copy Resources Skip Resource Types Creator Type |
|
To write Carbon applications, use Table 3.9 as a target settings guide. Notice that the majority of settings you use for Carbon are identical to writing PPC projects. The difference is in the libraries included and used in the project and how you write your code to them.
Carbon application project options:
| In Target Settings window... |
Set the following options... |
|---|---|
|
|
The following options can be set now or later: 'SIZE' Flags Creator Type Preferred Heap Size Minimum Heap Size Stack Size |
|
To optimize your code for a specific Power PC processor, select it from: Target Processor > targetProcessor |
|
This section describes which libraries to include in 68K, PPC, Fat, and Carbon application projects. The CodeWarrior libraries use a naming scheme that makes it easy to identify which library works for a specific project, see "Library Naming Conventions" for more details.
The topics in this section include:
NOTE If the library's name in a table contains "xx", you must choose a library based on some settings panel options. To learn how to choose a library by name, refer to "Library Naming Conventions" to read about the naming conventions for libraries.
Table 3.10 lists all the CodeWarrior libraries you might need to add to a 68K C or C++ project.
Choosing libraries for a 68K application projects:
| If the project |
Add this |
|---|---|
Table 3.11 lists all the CodeWarrior libraries you might need to add to a CFM68K C or C++ project.
Choosing libraries for a CFM68K application projects:
| If the project |
Add this |
|---|---|
Table 3.12 lists all the CodeWarrior libraries you might need to add.
Choosing libraries for a PPC application project:
| If the project |
Add this |
|---|---|
There are no special libraries associated with creating Fat applications. Since a Fat application simply merges the executable code of 68K and PPC applications into a single application that executes natively on both 68K and PPC Mac OS computers, the libraries for each environment are already included.
Table 3.13 lists all the CodeWarrior libraries you might need to add to support developing Carbon applications.
Choosing Carbon application libraries:
| If the project |
Add this |
|---|---|
Table 3.14 lists all the CodeWarrior libraries you might need to add to support Motorola's AltiVec technology, called the Velocity Engine by Apple.
Choosing AltiVec application libraries:
| If the project |
Add this |
|---|---|
|
|
A Fat application is one that contains code for both 68K and PowerPC-based Mac OS computers, and will run natively on either system. In other words, on PowerPC Mac OS computers, the PowerPC instruction will be executed. On 68K Mac OS computers, then 68K instructions will be executed.
The following discussion describes two completely different, yet elegant ways to create a Mac OS Fat application. The methods discussed for creating Fat applications are:
Which method is better for you? It depends on whether you like the build-process modularity of subprojects. Multiple targets is a nice way to go if you want to just have one project file. Using multiple targets, you can have both debug and shipping versions of both 68K and PowerPC, created as targets within one project. If it isn't obvious to you which one you would prefer, read the descriptions and decide for yourself.
The method using subprojects is perhaps easier for novices to accomplish, though the trade-off is that slightly more build time is incurred due to the overhead of checking the build dependencies for the subproject. The multiple target approach uses the full sophistication of the CodeWarrior IDE's features. Also, the multi-target approach will make it easier to keep the project's file lists more manageable as you go along.
NOTE A Fat application doesn't run natively on Mac OS X, but only in the Classic environment.
The first method we will discuss involves the use of multiple targets within a single project. Once you have written and debugged the original 68K target, you clone the build target, change the target settings to create a PPC build target, add any additional libraries, and then debug the new PPC target. Finally, you repeat the cloning process to create a Fat target within the project.
We will demonstrate how to do this using the Mac OS Toolbox 68K stationery project as our starting point. From there we will create a PPC target, then a Fat target.
NOTE You could just select the Mac OS Multi-Target project stationery and avoid all of these steps, but that would not teach you how to convert older single target projects to be multi-targeted.
The following example first creates a new 68K project, then clones the 68K target to create a PPC target, and then clones the PPC target to create the final Fat target.
Select File > New to create a new project, then provide the new project with a Project name and Location. For this example, select Mac OS C Stationery from the Project list, then click OK. In the New Project window, select Mac OS Toolbox 68K, then click OK.
2. Run the 68K target to ensure it works.
This is an important step - don't skip it! If your program fails to build and run as expected, you should correct the problems before preceding to avoid even more problems later.
Follow these steps to create a new PPC target based upon the 68K target already in the project.
a. Click the Targets view tab in the project window.
b. Choose Project > New Target.
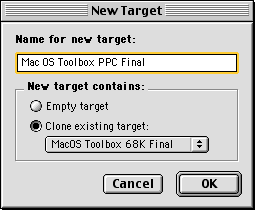
c. Type a target name into the Name for new target field.
For this example, we used "Mac OS Toolbox PPC Final" as shown in Figure 3.1.
d. Select Clone existing target > Mac OS Toolbox 68K Final, then click OK.
4. Set the PPC target options.
Use the Power PC Application Options to setup the PPC target to produce a PPC executable. For purposes of this example, you must change the target to use the PPC linker by choosing Linker > Mac OS PPC Linker in the Target Settings pane.
5. Add required PPC libraries.
Use the Power PC Application Libraries table to add the appropriate libraries to your new PPC target. For this example, you need to add the following libraries:
6. Remove the 68K library files from the PPC target.
Click the Link Order tab in the project window. Remove all 68K library files from the Link Order list. For this example, you need to remove the following 68K libraries:
7. Run the PPC target to ensure it works.
Again, this step is vital - don't skip it! If your program fails to build and run as expected, you should fix the problems now to avoid more difficulties later.
Follow the same steps you used to create the PPC target to create a new Fat target based upon the PPC target already in the project. Name the new target "Mac OS Toolbox Fat Final," and clone the "Mac OS Toolbox PPC Final" target.
9. Set the Fat target options.
Use the Fat Application Options to setup the Fat target to produce a Fat executable. For purposes of this example, you must change the target to use the Mac OS Merge linker by choosing Linker > Mac OS Merge in the Target Settings pane.
10. Link the 68K and PPC targets into the Fat target.
Since a Fat target requires code from both the 68K and PPC targets, they must be linked into the Fat target (see Figure 3.2). You do this in the Targets view using drag-and-drop to drag the 68K and PPC targets into the Fat target. Click the disclosure triangle next to the Fat target to view the dependent files.
68K and PPC targets linked to Fat target: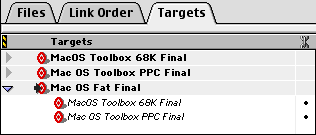
Next, click in the Link column to make the Fat target dependent (black marker in Link column) upon both targets being built prior to building the Fat target. The marker (·) tells the IDE to use the output file of the target at link time for the target that depends on this. In other words, the Fat target depends on the 68K and PPC targets, and so when they are linked, the output files are used to merge-link with the Fat target.
That's it. If both the 68K and PPC targets ran successfully, the Fat target should build and run without a problem.
If you encounter a succession of linker warning messages about duplicate resources, you can safely ignore them. You can avoid them in the future by deleting the duplicate resources out of the PPC target's resource file or by enabling the Suppress Warnings option.
NOTE Be sure to delete the SIZE resource from your 68K application into your fat application,
overriding the Minimum Heap Size, Preferred Heap Size, and 'SIZE' Flags settings
This method leads you through the process of building a Fat application by creating two separate project files. After you create the two separate files, you create a dependency relationship between them.
1. Create, build, and debug both 68K and PPC projects.
Before you can create a Fat application, you must create working 68K or CFM68K, and PPC application projects. To do this, create two different projects, by twice performing the procedure outlined in "Creating Application Projects."
You may be tempted to bypass this step - don't do it. Take the time to make sure you have two properly-functioning applications built from two different projects, and you will avoid trouble in the rest of this procedure.
2. Duplicate your PowerPC project.
Make a duplicate of the PowerPC application project file. In the Finder, select File > Duplicate. Rename the duplicated project file to something descriptive, like "Fat Appl.mcp". Now, open the Fat project file in the CodeWarrior IDE.
3. Add the 68K project to the Fat application project.
Use Project > Add Files to add the 68K project file to the Fat project as a subproject. In the Add Files dialog, select only the Fat target to add the 68K project. The next time the Fat project is built, the 68K project will automatically be updated.
4. Configure linking for the 68K application.
Click in the Link column of the Targets view in the project window, in the same row as the 68K targets. Small markers (·) appear in the column to indicate which output files will be linked into the PPC target's output file. So now, when the Fat target is built, the 68K subproject is built first. Then the output of the 68K target is linked into the PPC target.
Notice that when you click on the Link column, the Files view of the Project window changes. The output file of the 68K target has now been added to the project as a file.
5. Remove resource files from the Fat application (optional).
We recommend that you do this step. If so, you will minimize the number of warnings you receive at link time for the Fat project. You aren't required to remove the resource files from the Fat project, but the CodeWarrior IDE generates duplicate resource warnings if you don't. You can safely ignore the warnings if they don't bother you.
To remove all resource files from your Fat project file, use the Project > Remove Selected Items option. .
If you don't remove the resource files, you should be aware that
CodeWarrior will copy the 'SIZE' resource from the 68K application into your final linked Fat
application. It will ignore the Preferred Heap Size, Minimum Heap Size, and 'SIZE' Flags settings in the Fat project's Target Settings panel.
6. Build the Fat application project.
Use Project > Make to build and link your Fat project. CodeWarrior creates a new
Power PC application and copies the code resources, and the project
resources from the 68K application, and the binary from the PPC
version into the Fat application.
The following topics cover a range of special issues that a Mac programmer should be aware of in order to write efficient code.
If you look at the names of the library files furnished with the CodeWarrior product, you may find that you need some help determining what each library does. This information is required if you are trying to build a project from scratch, or if you are trying to determine which library you should use to convert one of your old projects to MSL, or the Metrowerks Standard Libraries.
The general naming convention for MSL C and C++ is based on the following format:
MSL [language].[processor] [Far|MPW](compile settings).[A4 addressing for 68K].Lib
For example, a library might be named something like:
MSL C++.68K Fa(4i_8d).Lib
This nomenclature scheme is intended to quickly identify binaries for all the various MSL targets. It is also intended to allow for library names to be unchanged across all CodeWarrior host platforms, so no reserved characters are used in library names.
In addition to the rules presented here, it is important to note the following additional hints:
DLL' and a 4-character extension for PPC or Carbon, use `Shlb'.
Lib'.
Intel has its own naming convention which is followed for x86 libraries for Microsoft compatibility. Refer to the Targeting Windows manual on the CodeWarrior CD for additional information about x86 libraries.
For all other targets, specific names are of the form indicated here:
MSL [C|C++].[68K|PPC|Carbon|AltiVec] [Fa|MPW](NL_xi_F_8d).[A4].Lib
Where:
      C - standard language library for ISO C
    C++ - standard language library for draft ISO C++
    68K - Motorola 680x0 processors (68000, 68020, 68030, 68040)
    PPC - A/I/M processors using the PowerPC ISA (e.g. 403, 601,
          603, 603e, 603ev, 604, 604ev with Mac OS/PowerOpen ABI)
 Carbon - Mac OS API used for creating Carbon binaries
AltiVec - Motorola AltiVec enhanced processors (G4, G4e)
     Fa - far data turned on, default is off
    MPW - built to use MPW entry points and signal naming
          conventions
     NL - built with "convert NL to CR" on, default is off
     xi - built with "x" size integers (i.e. 2 byte, 4 byte),
          default varies w/ processor (68K = 2, PPC = 4)
      F - 68K only, built with math coprocessor support activated
          (68881)
     8d - built with 8 byte double types, default varies
     A4 - applicable to 68K for code resources only, uses A4
          addressing for data
If you need to use different source code for the PPC and 68K applications,
use the directive #if defined(powerc) to bracket code that depends on the processor you're compiling
for.
For example, use #if defined(powerc) for fat application as shown below:
#if defined(powerc)
		/* do nothing for PowerPC */
#else
    SetA5(oldA5); /* set A5 world for 68K */
#endif
This will do nothing on the PPC, but it will set the A5 graphics
world for 68K applications. By using this kind of if-else scheme in your source code, its possible to write code that works
across most Mac OS computers.
For Carbon and non-Carbon applications use a standard Apple definition,
TARGET_API_MAC_CARBON, to differentiate code between Carbon and Classic applications
as shown below:
#if TARGET_API_MAC_CARBON
		/* do nothing for Carbon app */
#else
    SetA5(oldA5); /* set A5 world for Classic apps */
#endif
A SIOUX console window is much like a dumb terminal or TTY. You
can write to it and read from it with the standard C functions
and C++ operators, such as printf(), scanf(), getchar(), putchar(), <<, and >>. It helps you create programs with a simple interface or port
programs with a command line interface (CLI) such as DOS and UNIX
programs.
If you use an MSL C or C++ library, you should know that these
libraries contain Input/Output (IO) routines, such as printf(), and cout. This means that you will get linker errors if you don't have
a SIOUX library in your project.
Use the file console.stubs.c in lieu of the SIOUX libraries when you want to use Standard
C Library functions such as string routines or memory routines,
but do not need the SIOUX input and output window.
The console.stubs.c file suppresses the initialization overhead of the console windows
by using stub (do nothing) functions, minimizing the size of your
code. The console_io source files are used to build the libraries, and you would not
normally want to add these files to your project.
For more information on SIOUX, see the MSL C Reference and MSL C++ Reference for details.