This chapter explains how to create and manage Java projects, and how to set the options in Java project settings panels.
This chapter contains these sections:
This section discusses the various types of executables that you can create for Java. They include the following:
An applets have classes derived from java.lang.applet, and are usually called from a web browser or applet viewer utility.
Applets can consist of multiple class files or a single Jar file.
Java applications consist of a main class with a main() method declared as public static void that accepts a string array argument, along with any other classes that main() calls. Applications run in the environment that the host OS provides. Java Applications can consist of a single executable file, a single Jar file, or multiple class files.
For information on creating stand-alone Windows Java applications, see "Java Output".
For information on creating stand-alone Mac OS Java applications, see "Stand-alone Applications for Mac OS".
A Java Library is a collection of Java classes that can be used in many projects. Libraries are usually compiled into zip files (like classes.zip) or Jar files.
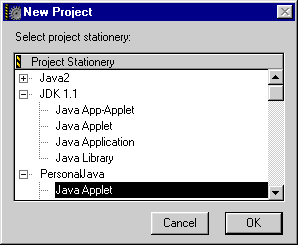
The New Project dialog box (Figure 6.1) displays a list of several different pre-configured projects
and their associated files, called Project Stationery.
 NOTE
NOTE The supplied stationery may vary between releases of CodeWarrior. Project stationery is configurable by the user. Because of this, what you see in the New Project window may be slightly different from the pictures in this manual.
Each set of project stationery is pre-configured for different types of Java projects. This saves you time when creating your own project files as you only need to change a few options instead of setting up a project from scratch.
Table Table 6.1 lists each project stationery option.
| Stationery |
Description |
|---|---|
NOTE CodeWarrior PersonalJava stationery contains a build target for JavaCheck that automatically runs JavaCheck when the project is built. For more information see "JavaCheck (PersonalJava)".
This section describes how to create, run, and debug any kind of Java project, including applets, applications, and libraries. The topics in this section are:
The following procedure describes how to create a new Java project. The project can be either an applet, an application, or a library of Java code.
Choose File > New Project. CodeWarrior displays the New Project dialog box.
In the New Project dialog box, select the proper stationery for the kind of project you want to create: applet, application, or library. To learn more about various kinds of application projects, see "Types of Java Projects."
You may also decide whether to have CodeWarrior create a new folder for you in which to place all your files. Typically you want to create a new folder.
When you click the OK button, CodeWarrior displays a file dialog.
In the file naming dialog, enter a name for the project, and click
OK.
If you are using the Windows hosted CodeWarrior IDE, use the .mcp suffix. If you do not supply a suffix, CodeWarrior adds it for
you.
 TIP
TIP If you want your project to be recognized by all versions of CodeWarrior,
the project suffix must be .mcp.
If the Create Folder check box was enabled in the New Project window, CodeWarrior
creates a new folder. Inside that folder, CodeWarrior puts a new
project file (with all project settings identical to the stationery
project you selected), and duplicates any files included in that
stationery project.
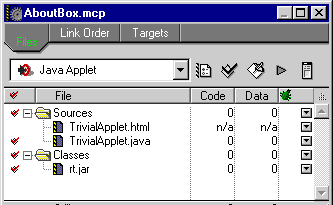
For example, for an applet, you get a new project file, an HTML
file, named TrivialApplet.html, and a Java source file named TrivialApplet.java.
The project file has the name you entered in the dialog box. The new folder has the same name as the project file without any naming extension.
 WARNING!
 The project manager also creates a directory named MyProject Data, where MyProject is the name of your project. CodeWarrior uses this directory to store internal data. Do not modify or move any file in this directory.
After creating the files and folder, CodeWarrior displays a new project window, like the one in Figure 6.2.
The stationery projects hold example files. In typical use you modify these files and save them with a new name, or replace them with your own files.
The classes.zip file is a shared library of standard Java classes your applet
can use. For more information, see "Using the classes.zip Library."
To create Java code, use the CodeWarrior tools: the editor, the browser, and the project manager. For details on these tools, see the IDE User Guide.
In typical practice, you start with a project based on stationery, which includes example or "placeholder" files. To learn how to create a project in this way, see "Creating a New Java Project."
For example, if you are creating an applet based on the Java applet
stationery, there are two such files: TrivialApplet.java and TrivialApplet.html.
The TrivialApplet.java file contains a sample Java applet. You can open the file, replace
its contents with your own code, and save the file under a new
name. You can add any other source file as well.
NOTE If the Use Strict Java Filenames option (located in the Java Language settings panel) is enabled, then each Java file must contain
only one public class. The file name must be the same name as
the public class with the suffix .java. For example, if the name of your class is MyClass, the Java
file must be named MyClass.java. If this option is disabled, CodeWarrior will compile the project;
but other Java compilers may not.
Similarly, the TrivialApplet.html file contains sample HTML code. You can modify this file so that
it displays your applet. You typically specify both the location
of the applet (a folder name) and the name of the class containing
the main function. You can set the name of your classes folder
by opening the Target Settings dialog box, and modifying the name specified in the Output panel. See "Target Settings" and "Java Output" for more information.
If you use project stationery as a starting point, you generally will not need to change many of the settings. The default settings are perfect for most projects. However, this is not the case for all settings or all projects. This is especially true if you have more than one target in a project. You can modify a variety of settings for Java projects. Each panel is explained in detail in "Target Settings for Java."
Common settings you might change are the main class (for Java applications) and the output name (the name of your final program). For applications you may also choose whether to output your files in a class folder, or in a zip file.
To tell CodeWarrior the name of your main class for a Java application,
go to the Java Target panel, make sure that you are creating an application, and set
the name in the Main Class field in the panel. For more information, see "Application."
To tell CodeWarrior what to name your final output file, go to
the Java Output panel and enter the name in the Name field. For more information, see "Java Output."
To tell CodeWarrior whether to create a class folder or a Jar file, go to the Java Target panel and set the Output Type option. For more information, see "Java Target."
You may run applets and applications. You cannot run libraries.
To run a project, choose Project > Run. At that time, CodeWarrior compiles and links any changed files,
and launches your program. Precisely how your program launches
depends upon whether it is an applet or an application.
When developing an applet, you typically have a small HTML file
that calls the applet so that you can test the applet during development.
CodeWarrior uses this file to run your program from within the
IDE. When you choose Project > Run, CodeWarrior opens the first HTML file in the Link Order view with an HTML browser or applet viewer. In other words, the
order of HTML files in the File view in the Project window does not matter. It is the order as
shown in the Link Order view in the Project window that is significant
NOTE For applet projects, if there is no HTML file in your project,
the Run command is disabled.
You can add as many HTML files as you want to a project. If your applet is complex, you may want several HTML files that test different aspects of your applet. To change the HTML file that CodeWarrior uses, simply rearrange the files in the Link Order view of your project window.
NOTE You can also run an applet by opening one of its HTML files with any Java-enabled browser.
To run an application, choose Project > Run in the CodeWarrior IDE. The Virtual Machine chosen in the Java
Target settings panel loads the application's code and runs the
main method of the application's main class. If you entered a value
in the Main Class field in the Java Target settings panel, it will use that class.
Otherwise, it will assume the main class is the first class in
the first file in the project window. For more information on
how to specify the main class, see "Application."
You debug an applet project the same way you debug any other project. For more information on the CodeWarrior debugger, consult the IDE User Guide. For more information on Java-specific features in the debugger, see "Debugging Java Projects."
To debug a Java project, follow these steps:
This step can be skipped if debugging is already enabled.
Choose Project > Enable Debugger. You may see a dialog box telling you that certain settings must
be modified for debugging. Click the OK button, and CodeWarrior sets up debugging automatically. In the
project window, black dots appear in the debugging column next
to the source files.
2. Run the project under the debugger.
Choose Project > Debug. CodeWarrior compiles any changed files and generates debugging
information for all files that have a black dot in the debugging
column of the project window. CodeWarrior launches your project
using the appropriate mechanism for your project. For a discussion
of this process, see "Running a Java Project."
Once the project is running, control returns to the debugger. You can now debug the applet like you would any other program. For more information on the debugger, see the Debugger User Guide. For more information on Java-specific features in the debugger, see "Debugging Java Projects."
CodeWarrior lets you generate Java applications in several different output types. The output type of the Java application is determined by the Output Type pop-up menu in the Java Output settings panel. Following is a brief description of each type:
.exe application that must reside in the same folder as the Jar file
in order to work. For more information on this output type, see
"Application". For information on creating stand-alone Mac OS Java applications,
see "Stand-alone Applications for Mac OS".
The classes.zip file is a library of Java classes that all Java programs share.
It includes all the packages in the Java API, such as the Abstract
Windowing Toolkit (AWT), I/O, and Applet packages.
The location depends on where JDK is installed on your machine. Following is a list of the locations where they can normally be found:
Windows:
in the lib directory of the JDK directory
Mac OS:
in a Classes folder in a subfolder of the Extensions folder
Solaris:
in the lib directory of the JDK directory
NOTE You can also find the standard classes.zip file in the CodeWarrior Java_Support folder.
Almost every Java program that you create uses classes.zip. However, classes.zip is a large file (about 1.5 megabytes). So you probably do not
want to copy it into every one of your Java applications and applets.
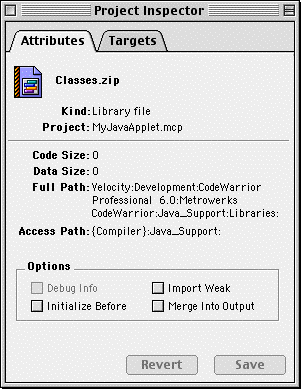
To instruct the IDE to merge the Classes.zip file into the final output, first select the Classes.zip file in the project window. Then choose Window > Project Inspector to open the Project Inspector. Make sure that the Merge Into Output checkbox is enabled. The IDE will copy the library into your
finished program.
NOTE The Initialize Before option is ignored by the CodeWarrior Java compiler.
JavaCheck is a tool for testing whether applications and applets are compatible with a particular Java environment by analyzing class files to find dependencies not included in a particular Java API specification. This helps Java programmers write Java applications and applets that can run safely on different Java platform implementations.
For more information on JavaCheck go to this web page:
http://www.javasoft.com/products/personaljava/javacheck.html
NOTE Currently JavaCheck only provides support for the PersonalJava Specification.
CodeWarrior tools provide direct support for JavaCheck by providing a build target in the PersonalJava stationery that runs JavaCheck automatically after a build is completed.
To use JavaCheck, activate the JavaCheck build target of your PersonalJava project using the build target pop-up menu. For more information on this pop-up menu refer to the IDE User Guide.
When a build is complete, JavaCheck is invoked and the results are reported in a CodeWarrior Errors & Warnings window. Results appear similar to this:
JavaCheck: Version 3.0m, (10/16/98), Copyright 1994 - 1998, Sun MicroSystems, Inc.
Package Precedence = default.
Classpath = C:\WINNT\Profiles\Administrator\Desktop\My Personal Java Stuff\my_pjava_applet\Java Classes.
JavaCheck: Loaded platform specification: PersonalJava (version 1.1).
1 class was loaded.
JavaCheck:  3 dependencies were analyzed,
JavaCheck:  0 dependencies were Unsupported,
JavaCheck:  0 dependencies were Optionally implemented,
JavaCheck:  0 dependencies were Modified,
JavaCheck:  0 dependencies were Unresolved,
JavaCheck:  3 dependencies were OK.
The class files CONFORM to the specified platform.
The JavaCheck executable that is invoked and the platform specification
files are located in the Java_Support folder of your CodeWarrior installation.