This chapter discusses Constructor's bitmap editor. You use the bitmap editor to create and modify bitmaps inside a variety of resources.
Many different kinds of resources store information in bitmaps. The ability to interactively edit bitmap data in a graphical user interface greatly increases productivity and efficiency. You can see what you're doing while you do it.
Constructor has a simple, powerful, and intuitive bitmap editor. Constructor uses a single bitmap editor to modify bitmaps in a variety of resource types, including:
Each type of resource has a separate section in the Constructor project window. However, when you open up any of these resources Constructor opens the same bitmap editor.
This chapter discusses how to manage and modify the contents of a bitmap resources. For information on how to create, copy, open, modify, and delete a bitmap resource as a whole, see "Managing Resources Overview."
The topics in this chapter are:
The Bitmap Editor-the various parts of the editor window Bitmap Editor Tools-each individual editor tool and how to use that tool Editing a Bitmap-tips and ideas on how to use the bitmap editor
Figure 6.1 illustrates the bitmap editor with all its features.
The Constructor bitmap editor: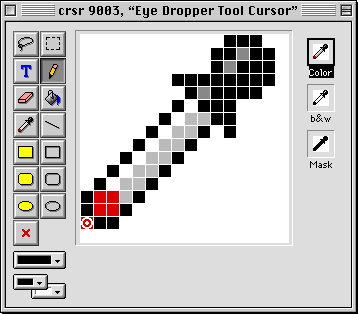
The same bitmap editor works for all resources containing bitmaps. However, certain features of the editor are only applicable to some resources.
The Constructor bitmap editor has the following components:
The tool palette is a set of push buttons representing various operations. Figure 6.1 shows the bitmap editor tools on the left of the editor window.
To use a particular tool, click the tool to select it. When you do, the button representing the tool changes appearance and looks pushed. Table 6.1 lists each tool, its icons (both pushed and unpushed), and the tool's purpose. For detailed information on each tool, see that tool's individual topic in "Bitmap Editor Tools."
| Tool |
Icons |
Purpose |
|---|---|---|
The Editing View is the central part of the Constructor bitmap editor window, as shown in Figure 6.1. You modify the contents of the Editing View to modify the underlying bitmap. This works regardless of the kind of resource in which that bitmap appears.
The contents of the Editing View are usually shown in fat bits. This is a magnified image of the bitmap where a block of pixels in the Editing View represents a single pixel in the actual view. Magnification of bitmaps is automatic and depends upon the relationship of the size of the underlying bitmap to the dimensions of the Editing View.
To edit the contents of a bitmap, you first select a tool in the Tool Palette. Then you move the cursor to the Editing View. When the cursor is inside the Editing View, the cursor changes to reflect the currently selected tool. You can then click and drag to modify the pixels in the Editing View. For details on each individual tool and how to use it, see "Bitmap Editor Tools."
As you make changes, the Sample Views update to reflect the new bitmap.
The Editing View supports the usual mechanisms for transferring data between windows and between applications. You can copy, cut, and paste bitmaps into the Editing View. You may also drop a bitmap into the Editing View.
You may drag from another Constructor window, or from an application that supports drag and drop (such as the Finder desktop or the Scrapbook).
When you drop an item on the Editing View, it remains at its original scale. It is not resized to fit. If the original bitmap is larger than the bitmap in the Editing View, the original bitmap will be cropped.
The Sample Views are on the right side of the bitmap editor window, as shown in Figure 6.1.
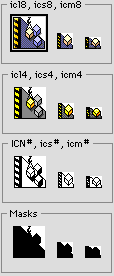
The actual Sample Views displayed in the editor window vary depending upon the nature of the resource. Figure 6.1 shows the `crsr' Sample Views. Figure 6.2 shows the Sample Views for an icon suite. Other resources have different Sample Views. Larger PICT images have no sample view, because the Editing View shows the bitmap at actual size.
Each sample view represents either a different resource or a different portion of a resource. The Editing View displays the data for the currently selected sample view. The selected sample view has a heavy black border around it.
To switch to a different sample view, click the desired sample view. This selects the view and displays the data in the Editing View.
You can use drag and drop with any sample view. The operation can be between Sample Views in the same window, between Constructor bitmap editor windows, or between applications.
If you drop a bitmap from another source on a sample view, the bitmap is scaled to fit. If you drop a bitmap with more colors onto a sample view that displays fewer colors, the colors are converted automatically.
 TIP
TIP You can use drag and drop with the icon suite Sample Views to create 4-bit icons, black and white icons, and masks by simply dragging the 8-bit icon into the various Sample Views.
This section discusses the individual tools available on the tool palette. The tools are:
The icon for the lasso tool is: 
Use the lasso tool to select pixels in an irregularly shaped area.
To use the tool, select it in the tool palette. Then click and drag in the Editing View. As you do, a thin line appears following your path. When you release the mouse button, the path closes and converts into an animated dashed line (also known as marching ants).
The bounds of the marching ants indicate the selected pixels. If you do not complete a closed path with the tool, Constructor closes the path with a straight line between your starting point and the point at which you released the mouse button.
The lasso tool ignores pixels in the current background color. If you have an object in a bitmap surrounded by background color, you can draw the lasso loosely around the object. When you release the mouse button, the lasso tightens around the object automatically.
TIP Double-click the lasso tool to select the outermost outline of non-background-color pixels in the Editing View.
See also: "Tool Palette," "Marquee Tool," "Selecting Pixels."
The icon for the marquee tool is: 
Use the marquee tool to select pixels in a rectangular area.
To use the tool, select it in the tool palette. Then click and drag to define a rectangular area. As you do, an animated selection rectangle (also known as marching ants) appears. When you release the mouse button, pixels within the selection rectangle are selected.
If you hold the Shift key down while dragging, the marquee is restricted to a square shape.
TIP Double-click the marquee tool to select the entire bitmap in the Editing View.
See also: "Tool Palette," "Lasso Tool," "Selecting Pixels."
The icon for the text tool is: 
Use the text tool to enter text in a bitmap. Select this tool, click in a bitmap to set an insertion point, and type. The initial position of your click forms one margin for your text, either right or left depending upon your justification settings. Text will then extend to the edge of the bitmap before wrapping. To force a shorter line, use the Return key.
Use the Font and Style menus to choose text characteristics for the text you enter. Text appears in the current foreground color. You can have only one font/style/color per text entry.
Once you click the mouse to end text entry, the text becomes part of the bitmap and loses its textual nature. You cannot edit the text after this happens except by modifying the pixels in the bitmap that make up the letters.
The text editor does not support cut, copy, or paste.
TIP To increase or decrease font size by one point as you enter text, type Command-Up Arrow or Command-Down Arrow respectively.
The icon for the pencil tool is: 
Use the pencil tool to draw a pixel, usually in the foreground color.
To use the tool, select it in the tool palette. Then click a pixel in the Editing View. That pixel changes to the current foreground color, with one exception. If the pixel you click is already in the foreground color, the pixel changes to the background color.
If you click and drag the pencil, each pixel in your path changes to the foreground color. If the first pixel clicked is already in the foreground color, then the pencil draws in the background color.
The pencil is one pixel high and wide. You cannot change the default pencil size of one pixel.
TIP Change any non-foreground color pixel to background color by double-clicking the pixel with the pencil.
You can constrain drawing to a straight line. To do so, press the Shift key before drawing, and then begin dragging. The pencil is constrained to move in a straight line, either horizontally or vertically. You may release the Shift key after you start dragging and the pencil remains constrained. Pressing the Shift key after you begin dragging does not constrain pencil movement.
See also: "Tool Palette," "Paint Bucket Tool," "Line Tool."
The icon for the eraser tool is: 
Use the eraser tool to change pixels to the background color. Erasing does not automatically turn pixels white. When you erase the pixel, you set its color to the currently selected background color.
To use the tool, select it in the tool palette. Then click a pixel in the Editing View. That pixel changes to the current background color. If you click and drag the eraser, each pixel in your path changes to the background color.
TIP Double-click the eraser tool to erase the entire Editing View. Another way to erase pixels is to select them with the lasso or marquee tool, then press the Delete key.
You can constrain erasing to a straight line. To do so, first press the Shift key before erasing, and then begin dragging. The eraser is constrained to move in a straight line, either horizontally or vertically. You may release the Shift key after you start dragging and the eraser remains constrained. Pressing the Shift key after you begin dragging does not constrain movement.
See also: "Tool Palette," "Lasso Tool," "Marquee Tool.".
The icon for the paint bucket tool is: 
Use the paint bucket tool to fill an area with the current pattern. The pattern is based on the current foreground and background colors.
To use the tool, select it in the tool palette. Then click a pixel. That pixel and all contiguous pixels of the same color will change to the current pattern. Contiguous pixels are those horizontally or vertically adjacent to each other. Two pixels of the same color that are next to each other diagonally are not contiguous as far as the paint bucket tool is concerned.
TIP The paint bucket tool fills an area with the current pattern, not the current foreground color (although the pattern is based on the current foreground and background colors). To fill an area with the current foreground color, set the pattern to a solid fill before using the paint bucket tool.
See also: "Tool Palette," "Pattern Tool," "Color Tool."
The icon for the dropper tool is: 
Use the dropper tool to set the foreground or background color.
To use the tool, select it in the tool palette. Then click a pixel in the Editing View. (The dropper's hot spot is indicated in red, at the tip of the dropper.)
When you click a pixel with the dropper tool, the foreground color changes to the color of the clicked pixel. If you hold the Shift key down while clicking a pixel, the background color changes to the color of the clicked pixel.
TIP You can set foreground and background color at any time without selecting the dropper tool. Option-click a pixel to set the foreground color. Shift-Option-click a pixel to set the background color.
The dropper tool does not affect the clicked pixel. It is just an easy way of "picking up" a color from the Editing View so that you can apply it elsewhere.
TIP Because the dropper sets the foreground or background color, it also affects the color of the current pattern as well.
See also: "Tool Palette," "Pattern Tool," "Color Tool."
The icon for the line tool is: 
Use the line tool to draw a line with the foreground color.
To use the tool, select it in the tool palette. Then click and drag in the Editing View. As you drag, all the pixels in a straight line between your initial click and your current position change to the foreground color. When you release the mouse button, the line is added to the bitmap. The line is one pixel wide.
You can constrain the line direction to 45\xa1 increments. To do so, press the Shift key. You may press or release the key at any time. While the Shift key is pressed, the line direction is restricted to multiples of 45\xa1 .
You cannot change the default line width of one pixel.
See also: "Tool Palette," "Pencil Tool."
The icon for the filled rect tool is: 
Use the filled rect tool to draw a rectangle that is filled with the current pattern. A filled rectangle has no outline. The current pattern is applied over the entire area of the rectangle. The pattern is based on the current foreground and background colors.
To use the tool, select it in the tool palette. Then click and drag in the Editing View. As you drag, your initial click and your current position define the corners of a rectangle. All pixels in the rectangle are changed to match the current pattern. When you release the mouse button, the rectangle is added to the bitmap.
You can constrain the rectangle to a square shape. To do so, press the Shift key. You may press or release the Shift key at any time. While the Shift key is pressed, the rectangle's sides are equal.
See also: "Tool Palette," "Empty Rect Tool," "Filled Rounded Rect Tool," "Empty Rounded Rect Tool," "Filled Oval Tool," "Empty Oval Tool," "Using Shape Tools."
The icon for the empty rect tool is: 
Use the empty rect tool to draw a rectangle whose bounds are drawn in the foreground color.
To use the tool, select it in the tool palette. Then click and drag in the Editing View. As you drag, your initial click and your current position define the corners of a rectangle. The bounding pixels of the rectangle are set to the foreground color. The bounds are one pixel wide. Pixels inside the rectangle's bounds remain unchanged. When you release the mouse button, the rectangle is added to the bitmap.
You can constrain the rectangle to a square shape. To do so, press the Shift key. You may press or release the key at any time. While the Shift key is pressed, the rectangle's sides are equal.
You cannot change the default pen size of one pixel.
See also: "Tool Palette," "Filled Rect Tool," "Filled Rounded Rect Tool," "Empty Rounded Rect Tool," "Filled Oval Tool," "Empty Oval Tool," "Using Shape Tools."
The icon for the filled rounded rect tool is: 
Use the filled rounded rect tool to draw a rectangle with rounded corners that is filled with the current pattern. A filled rounded rectangle has no outline. The current pattern is applied over the entire area of the rounded rectangle. The pattern is based on the current foreground and background colors.
To use the tool, select it in the tool palette. Then click and drag in the Editing View. As you drag, your initial click and your current position define the corners of a rectangle. All pixels in the rounded rectangle are changed to match the current pattern. When you release the mouse button, the rounded rectangle is added to the bitmap.
You can constrain the rectangle to a square shape. To do so, press the Shift key. You may press or release the key at any time. While the Shift key is pressed, the rectangle's sides are equal.
You cannot change the amount of roundness that Constructor uses at the corners.
See also: "Tool Palette," "Filled Rect Tool," "Empty Rect Tool," "Empty Rounded Rect Tool," "Filled Oval Tool," "Empty Oval Tool," "Using Shape Tools."
The icon for the empty rounded rect tool is: 
Use the empty rounded rect tool to draw a rounded rectangle whose bounds are drawn in the foreground color.
To use the tool, select it in the tool palette. Then click and drag in the Editing View. As you drag, your initial click and your current position define the corners of a rectangle. The bounding pixels of the rounded rectangle are set to the foreground color. The bounds are one pixel wide. Pixels inside the rectangle's bounds remain unchanged. When you release the mouse button, the rounded rectangle is added to the bitmap.
You can constrain the rectangle to a square shape. To do so, press the Shift key. You may press or release the key at any time. While the Shift key is pressed, the rectangle's sides are equal.
You cannot change the default pencil size of one pixel, or the amount of roundness that Constructor uses at the corners.
See also: "Tool Palette," "Filled Rect Tool," "Empty Rect Tool," "Filled Rounded Rect Tool," "Filled Oval Tool," "Empty Oval Tool," "Using Shape Tools."
The icon for the filled oval tool is: 
Use the filled oval tool to draw an oval filled with the current pattern. A filled oval has no outline. The current pattern is applied over the entire area of the oval. The pattern is based on the current foreground and background colors.
To use the tool, select it in the tool palette. Then click and drag in the Editing View. As you drag, your initial click and your current position define the bounds of an oval. All pixels in the oval are changed to match the current pattern. When you release the mouse button, the oval is added to the bitmap.
You can constrain the oval to a circular shape. To do so, press the Shift key. You may press or release the key at any time. While the Shift key is pressed, the oval is constrained to a circle.
See also: "Tool Palette," "Filled Rect Tool," "Empty Rect Tool," "Filled Rounded Rect Tool," "Empty Rounded Rect Tool," "Empty Oval Tool," "Using Shape Tools."
The icon for the empty oval tool is: 
Use the empty oval tool to draw an oval whose bounds are drawn in the foreground color.
To use the tool, select it in the tool palette. Then click and drag in the Editing View. As you drag, your initial click and your current position define the corners of an oval. The bounding pixels of the oval are set to the foreground color. The bounds are one pixel wide. Pixels inside the oval's bounds remain unchanged. When you release the mouse button, the oval is added to the bitmap.
You can constrain the oval to a circular shape. To do so, press the Shift key. You may press or release the key at any time. While the Shift key is pressed, the oval is constrained to a circle.
You cannot change the default pen size of one pixel.
See also: "Tool Palette," "Filled Rect Tool," "Empty Rect Tool," "Filled Rounded Rect Tool," "Empty Rounded Rect Tool," "Filled Oval Tool," "Using Shape Tools."
The icon for the hot spot tool is: 
Use the hot spot tool to set the hot spot for a cursor. This tool is available only for resources of type `CURS' and `crsr'.
To use the tool, select it in the tool palette. Then click a pixel in the cursor's Editing View where you want the hot spot to be. That pixel appears in the Editing View as a target bull's-eye, as shown in Figure 6.3. You can have one and only one hot spot in a cursor. The hot spot occupies one pixel.
The hot spot is the point used by the Mac OS Toolbox calls such
as GetMouse() to determine the precise location of the cursor.
Setting the hot spot does not affect the visual appearance of the chosen pixel at runtime. It only modifies the appearance in the Editing View so you can see where the hot spot is.
See also: "Tool Palette."
The hot spot for the dropper tool: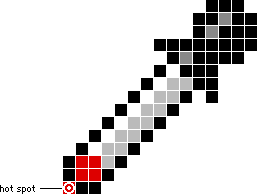
The icon for the pattern tool is: 
Use the pattern tool to select a pattern to use when drawing.
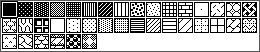
To use the tool, click the icon and hold the mouse button down. While the mouse button is down, a pop-up menu appears showing you available patterns. Drag the mouse to the pattern you wish to use, then release the mouse button. When you do, the central area of the pattern tool changes to reflect your selected pattern.
Figure 6.4 illustrates the pattern pop-up menu. The currently selected pattern is outlined. In this case, it is the solid fill pattern in the top left corner of the pop-up menu.
The available patterns use the current foreground and background colors. If you change the colors, you change the colors for the patterns as well.
You cannot edit the default patterns available in Constructor.
See also: "Tool Palette," "Color Tool," "Setting Colors and Patterns."
The icon for the color tool is: 
Use the color tool to set the foreground and background colors. There are actually two icons, one in front of the other. The front icon represents the foreground color. The other icon represents the background color.
To use the tool, click the icon for the foreground or background color, and hold the mouse button down. While the mouse button is down, a pop-up menu appears displaying a color palette. Drag the mouse to the color you wish to use, then release the mouse button. When you do, the central area of the appropriate color tool changes to reflect your selected color.
The colors available in the pop-up menu depend upon two factors:
the resource being edited, and the setting in the Colors menu.
Some resources support color, others do not. For example, if you
are editing a `CURS' resource, you are limited to black and white.
Those are the only colors that appear in the pop-up menu, and
the Colors menu is disabled.
If you are editing a resource that supports color, the Colors menu is enabled. You can then pick from several color palettes.
If you do not wish to be limited to a color palette, choose the
Use Color Picker item in the Colors menu. When this item is checked and you click the color tool,
the standard dialog appears allowing you to pick any color.
The available patterns use the current foreground and background colors. If you change a color, you change the color for the patterns.
TIP You can also set the foreground color to match an existing pixel by clicking a pixel with the dropper tool, or Option-clicking a pixel at any time. Set the background color by Shift-clicking a pixel with the dropper tool, or Shift-Option-clicking a pixel at any time.
See also: "Tool Palette," "Dropper Tool," "Pattern Tool," "Setting Colors and Patterns," "Choosing a Color Palette."
Editing a bitmap with Constructor is so simple it hardly needs explanation.
Select the tool that represents the operation you wish to perform. Then click (or click and drag) in the Editing View to modify the pixels in the bitmap. See "Bitmap Editor Tools" for details on how to use each individual tool.
You can perform operations in any order, on any pixel, at any time. You can undo or redo the most recent operation.
However, some functions do have less obvious features that deserve some explanation. Topics discussed in this section include:
The bitmap editor window usually shows several Sample Views of the bitmap. The sample view currently on display in the Editing View has a heavy black border, as shown in Figure 6.5. To view the bitmap for a particular resource, click on the sample view.
For example, to edit the `icl4' resource of an icon suite, simply click the `icl4' sample view, and it appears in the Editing View.
Choosing which resource to edit: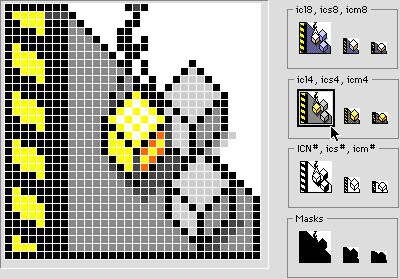
You may select pixels in a variety of ways.
Use the Lasso Tool to select irregular shapes. Double-click the Lasso Tool to select the outermost outline of non-background-color pixels in the Editing View.
Use the Marquee Tool to select rectangular shapes. Use the Shift key to contrain the selectoin marquee to a square shape. Double-click the Marquee Tool to select the entire bitmap.
You may select an entire bitmap by choosing the Select All command in the Edit menu.
Sometimes you want to move a group of pixels just a few pixels away from its current position. It can be difficult to be this precise dragging with the mouse.
To nudge pixels, first select the pixels. Then use the cursor control keys (the arrow keys) to move the pixels in the desired direction: up, down, left, or right. Each time you type an arrow key, the selected pixels moves by one pixel in the corresponding direction.
You can copy the current selection using standard Edit menu commands. You can also press the Option key while dragging
the selection. An Option-drag copies selected pixels. The Option
key must be pressed when the drag begins. You can release the
Option key at any time.
When a bitmap editor window is active, an Options menu contains commands related to manipulating bitmaps. You can
use these commands to flip or rotate currently selected pixels.
The Flip Vertical command turns the selected pixels upside down.
The Flip Horizontal command swaps selected pixels left and right. This creates a
mirror image of the pixels.
The Rotate Right command turns selected pixels 90\xa1 clockwise.
The Rotate Left command turns selected pixels 90\xa1 counterclockwise.
The Make Transparent command in the Options menu allows you to combine bitmaps in interesting ways. In this
case a picture is worth a thousand words.
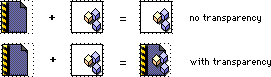
Figure 6.6 demonstrates the effect of transparency. Assume the background color in the original document icon is white. You want to combine another icon-sized shape with the original document icon. Most of that new icon is occupied by white pixels.
When you put one icon on top of the other without transparency,
the new icon obliterates the underlying document icon. If you
choose Make Transparent, the currently selected pixels that match the background color
do not hide any pixels that appears behind them. This allows you
to combine bitmaps as shown in Figure 6.6. This works for any bitmap, not just icons.
There are three ways you can set foreground and background colors. To set the foreground color you can:
1. use the foreground Color Tool
2. select the Dropper Tool and click a pixel
To set the background color you can:
1. use the background Color Tool
2. select the Dropper Tool, then Shift-click a pixel
In addition, you can choose the Black & White command in the Colors menu to set the foreground to black and the background to white.
The Swap Fore & Back Colors command in the Colors menu lets you switch the foreground and background colors simply.
Any change in either foreground or background color affects the colors in the current pattern. By judiciously picking colors, patterns, and transparency, you can quickly create complex effects such as grid lines, slashes, and interesting color blends.
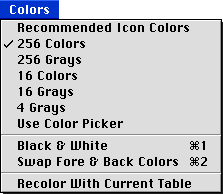
Use the Colors menu to pick the color palette you wish to use. This menu is
enabled when the bitmap editor is active and you are working on
a bitmap that supports color. The currently selected palette is
marked with a check mark. To turn off a check mark, you must select
another item on the menu.
Most items in the menu are self-explanatory.
Palettes are only available when appropriate. If the resource
does not support certain colors or grays, the corresponding palette
choice in the Colors menu will be disabled.
The Recommended Icon Colors reflect Apple Computer's suggested colors for Mac OS icon design.
These colors are optimized for desktop display. The other color
palettes reflect standard color and gray palettes used by the
Mac OS System.
If you choose the Use Color Picker item, you modify how the Color Tool behaves. When this item is checked and you click the Color Tool, the standard color dialog appears. This allows you to select
any color. See "Color Tool."
The Recolor To Current Table changes the colors in the Editing View to match the currently-checked color palette. This is useful
to update your bitmap.
 WARNING!
 If you choose a palette with fewer colors or grays, and then recolor your bitmap, you cannot restore original colors or grays at a later time. The color information is lost.
For example, assume you have a bitmap that uses 256 colors. You choose the 256 grays palette, and then recolor the bitmap to use those grays. The bitmap changes to match the new palette. If you subsequently choose the 256 colors palette, and recolor the bitmap to use 256 colors, your original colors do not reappear. The color information is lost when you reduce available colors, either by switching to gray or using a palette with fewer colors or grays.
 Use these tools to draw shapes without having to manipulate the
shapes pixel by pixel.
Use these tools to draw shapes without having to manipulate the
shapes pixel by pixel.
Use a filled shape tool (in the left column of the tool palette) to draw a shape that is filled with the current pattern. Use an empty shape tool (in the right column of the tool palette) to draw a shape whose bounds are drawn in the foreground color.
To use the tool, select it in the tool palette. Then click and drag in the Editing View. As you drag, your initial click and your current position define the bounds of the shape. When you release the mouse button, the shape is added to the bitmap.
You can constrain the shape with the Shift key. You may press or release the Shift key at any time while drawing the shape. While the Shift key is pressed, the sides of the shape are equal. This makes rectangle shapes square, and oval shapes circular.
TIP To create an outlined and filled shape, draw an empty shape first. Then use the Paint Bucket Tool to fill the insides of the empty shape with your chosen pattern.
See also: "Tool Palette," "Empty Rect Tool," "Filled Rounded Rect Tool," "Empty Rounded Rect Tool," "Filled Oval Tool," "Empty Oval Tool."
The bitmap editor has powerful drag and drop features, especially related to the Sample Views. Although you cannot edit the Sample Views directly, they are fully active for drag and drop.
Here are some tips for easy bitmap editing with drag and drop.
After you create an 8-bit icon in large and small sizes, drag the samples to the corresponding 4-bit, black and white, and mask samples. You now have a whole icon family! Best of all, you only had to draw each icon once. You may want to fine-tune the new icons, but most of the work has been done automatically. The same trick is useful for other kinds of resources, such as color cursors. You can even drag a large icon into a small icon sample view, although scaling generally doesn't generate particularly aesthetic results.
When editing a bitmap, you can make an instant backup to save work in progress. Simply drag the sample to the desktop, or to any folder. If you later decide you want to revert to a previous stage of development, drag your saved work from the desktop back into the sample view.
If you have a favorite bitmap that you want to use as a basis for further work, use Constructor to open the source file that contains the original bitmap resource. Then you can simply drag the original bitmap into your own Constructor project, and you're on your way.
You can drag and drop between different bitmap editor windows. For example, to create an ICON, simply drag the sample from another large icon, such as an `icl8' and drop it in the ICON sample view.