This chapter discusses Constructor's menu bar and menu editors.
Menu bars and menus are closely intertwined, both in Constructor and in a real application. An MBAR resource is little more than a list of MENU resources to include in the menu bar at runtime. Constructor follows the same pattern. The menu bar editor displays a collection of menus and allows you to modify them. The two editors-menu bar and menu-are virtually identical.
This chapter discusses how to manage and modify the contents of menus. For information on how to create, copy, modify, open, and delete menu bar and menu resources as a whole, see "Managing Resources Overview."
The major sections in this chapter are:
PowerPlant adds menu command numbers to menu items. Each menu item has a unique command number. The command number strategy allows you to rearrange menus without having to change your menu dispatch code, as long as the command number moves along with the menu item.
Command numbers are stored in an Mcmd resource. The resource ID of the menu and associated Mcmd are the same. Constructor creates and maintains the required Mcmd resources automatically based on the data you provide in the menu editors.
 NOTE
NOTE Some menus cannot be described ahead of time. Font menus, for example, depend on the fonts installed on the machine. For these kinds of menus, PowerPlant uses a concept called the synthetic command number. See The PowerPlant Book chapter on commanders and menus for a thorough explanation.
Standard menu items like the New item in the File menu have standard command numbers in PowerPlant. In the Constructor
menu editors, PowerPlant command numbers are displayed with their
symbolic name rather than a numerical value. In the property inspector
for menu items, the pop-up menu for command numbers lists all
defined PowerPlant menu commands.
You are responsible for ensuring that the command number you assign
to a menu item is handled properly in your code. In general, this
means using predefined PowerPlant command numbers whenever possible.
These values are declared in the PP_Messages.h file in the PowerPlant source files. PowerPlant reserves and
uses command numbers -999 to 999 for the standard menu commands.
 TIP
TIP Use the ppob file from the PowerPlant stationery project as a reference for standard menus and command numbers.
This chapter does not discuss the PowerPlant menu strategy, or how to use menu command numbers to best effect, any further. For information on PowerPlant's use of menus and menu commands, see The PowerPlant Book chapter on commanders and menus.
The menu bar and the menu resource each have their own editor window. This section discusses both:
In addition, you can use the Property Inspector Window to examine and set the properties of either a menu or a menu item. See "Setting Menu Properties" and "Setting Menu Item Properties."
See also "Property Inspector Window."
The menu bar editor displays a collection of menu resources contained in the menu bar resource. To open the menu bar editor window, you can:
Edit Resource from the Edit menu
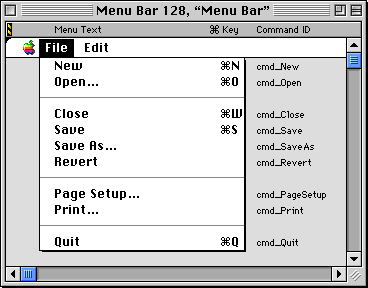
When you do, the window shown in Figure 5.1 appears. This illustration shows a typical menu bar resource.
The grey bar across the top of the window contains the column heads for the data displayed in the window. You see menu text, the command key associated with each menu item, and the PowerPlant menu command number for each menu item.
Like the layout window, the menu bar editor displays a simulated desktop. The white bar that contains menu titles is analogous to an actual menu bar on the Mac OS desktop, right down to the curved corner at the top left of the title bar.
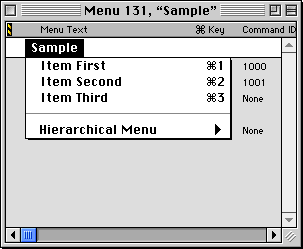
In the grey area below the title bar, Constructor displays the actual menu items in each menu. The menu items appear just as they would if you pulled the menu down in a running application. The Constructor menu bar editor is WYSIWYG-what you see is what you get-with two exceptions. Constructor does not display submenus interactively, although it does display the triangle indicator for a hierarchical menu item. Constructor also does not display an icon if the menu item has an icon attached.
A menu bar is really just a collection of menu resources. The Constructor menu bar editor allows you to see and edit not only which menus are in the menu bar, but the contents of each menu as well.
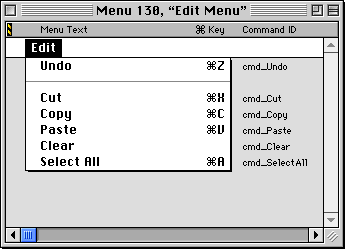
The menu editor window is virtually identical to the menu bar editor. The only difference is that the menu editor displays a single menu. The menu bar editor can contain several menus.
To open a menu editor window, you:
Edit Resource from the Edit menu
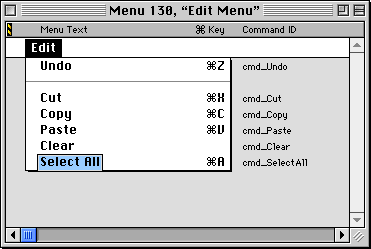
When you do, the window shown in Figure 5.2 appears.
This section discusses the tasks you perform to manage and edit a menu bar resource. All of these tasks are performed within the menu bar editor. The topics discusses in this section are:
"Creating a Menu Bar Resource"-how to create a menu bar resource "Menu Bar Editor Window"-how to open the menu bar editor "Editing Menu Items"-how to edit particular menu items
To make a new menu, choose the New Menu item in the Edit menu. When you do, a new menu title appears in the menu bar editor
to the right of the currently selected menu title. If there is
no selection, the new menu is added to the end of the menu bar.
If the new menu is one of the first three menus added to the menu bar, Constructor automatically assigns the correct menu title: Apple icon, File, or Edit. For subsequent menus, the initial menu title is "untitled."
When you create a new menu, the menu title is placed in editing mode so you can modify the text. To end editing mode, click in an empty place in the editor window, or press the Tab or Return keys.
When you create a new menu, Constructor also creates the required MENU resource. The new resource will appear in the Menus section of the project window. Constructor assigns consecutive resource ID numbers to new MENU resources.
Creating a new menu does not add items to the menu. For more information on this topic, see "Making a New Menu Item."
If you have an existing menu resource that is not already in the menu bar, you can add it. Drag the desired menu resource from the project window and drop it into the menu bar editor.
In the project window, select the menu resource(s) you want to
add to the menu bar. It must not be in the menu bar already. You
can tell which menu resources are not in the menu bar, because
the icon to the left of the resource is clear and not grey. In
Figure 5.3, look at the difference in the icons for the Edit menu and the other two menu resources. The icons for menus that
are already in the menu bar are grey because they are open.
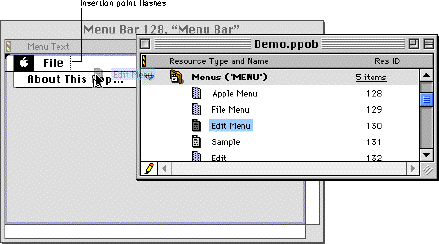
Drag the selected menu resource(s) from the project window into the menu bar editor area, as shown in Figure 5.3. As you do, a small vertical line will flash in the menu bar title area indicating the insertion point for the menu you are adding. Drop the menu where you want it to appear in the menu bar.
Notice that you don't have to drop the menu in the actual title area. You can drop it anywhere in the editor window. The insertion point will track your mouse movements horizontally to show you where the menu will appear in the menu bar.
TIP If you select multiple resources, all must be absent from the menu bar or none will be added when you drop the menus.
You may change a menu title, the menu resource ID, and the MDEF (menu definition) resource used to draw the menu.
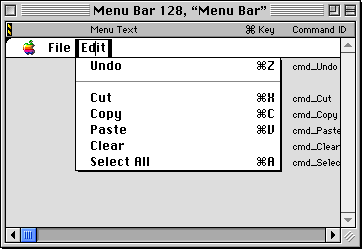
To change the title, you can put the text into edit mode. Then you can modify the text in place, as shown in Figure 5.4. See "Text Editing" for more information.
To change the menu resource ID and the MDEF, open the Setting Menu Properties by double-clicking the menu title. You can change the menu title text in the Property Inspector Window as well. See Setting Menu Properties.
To modify menu properties, use the Property Inspector Window. For menus, the window displays data that applies to an entire menu. To open this window you:
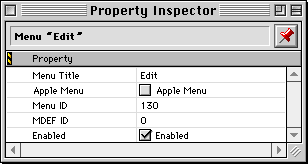
When you do, the Property Inspector Window displays that menu's properties, as shown in Figure 5.5.
You can modify the menu title, menu ID number, and the MDEF resource
ID number. Use the Apple Menu check box to set the menu title to be the Apple icon.
 WARNING!
 The Mac OS Toolbox uses the Menu ID value. Constructor automatically sets the menu ID to the resource ID number. Because most programmers use these two values interchangeably, they should be the same. Don't change the Menu ID unless you absolutely need to, and you understand the consequences. Constructor will reset the Menu ID if you change the resource ID.
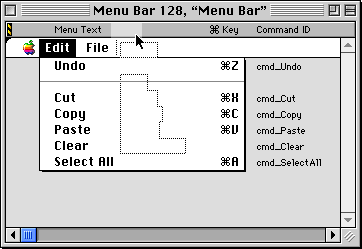
To change the order of menus in the menu bar, simply drag a menu
to a new location. A flashing insertion point indicates where
in the menu bar the menu will appear when you drop it. Figure 5.6 illustrates the process of moving the Edit menu to the right of the File menu.
To remove a menu from the menu bar, first select the menu. Then you can:
TIP When you click the menu title to select it, it is likely to go into edit mode. Simply press the Return or Tab keys, or click in an empty part of the window to turn off edit mode.
This section discusses the tasks you perform to manage and edit the items that make up a menu. For information on modifying the menu title, or information related to the menu as a whole, see "Editing a Menu Bar."
All of the tasks discussed in this section may be performed within either the menu bar editor or the menu editor. The functionality of the menu bar and menu editors is virtually identical. The menu bar editor is simply a means of accessing a series of menus in the same window. The menu editor displays one menu.
As a practical matter, the menu bar editor is a lot more useful, because you can work with several menus simultaneously. However, it does not display submenus. Use the menu editor for submenus and other menus not in the menu bar, such as pop-up menus.
Whenever you move a menu item, Constructor takes care of managing and modifying the associated Mcmd resources automatically.
The topics discussed in this section are:
For information on related topics, see also:
"Creating a Menu Resource"-how to create a menu resource "Menu Bar Editor Window"-how to open the menu bar editor "Menu Editor Window"-how to open the menu editor
Working with menu items usually requires that you select one or more items. When you select an item, you may or may not want it to go into edit mode for in-place text editing.
There are four ways you can select menu items.
1. Arrow keys. Use the up or down arrow key to select the previous or next item in the menu. Press the shift key to extend the selection.
2. Click text. Click text in a menu item. If you move the cursor off the item or wait one second, the item will go into edit mode for in-place editing. You can click the item text, the Command-key character or the command number to put them into edit mode.
3. Click the menu line. Click the white space to the left or right of a menu item. This selects the item without going into edit mode. Press the shift key to extend the selection.
4. Selection marquee. Selects any intersecting item without going into edit mode.
You can also choose Select All from the Edit menu to select all the items in a menu.
TIP Use the left or right arrow key to change menus. Although you can select multiple menu items, you cannot select multiple menus.
You can get into and out of edit mode at will.
Click on the text and move the mouse off the text (or wait a second). Alternatively, you can also select a single item and press the Tab key to enter edit mode.
Press the Return key. The item remains selected but edit mode is turned off.
To add a new menu item to a menu, choose New Menu Item from the Edit menu. The new item is added after any existing selected menu
item, or at the end of the menu if there is no selected item.
New items are named "untitled item," have no command key equivalent,
and a menu command number of zero. Make sure you modify the command
number appropriately.
You can copy, paste, and duplicate selected menu items. A pasted item appears after any selected item, or at the end of the menu if there is no selected item. Duplicated items appear immediately after the original. If an item is in edit mode, editing operations affect the item text, not the item as a whole.
If you have two or more menu editor windows open simultaneously, you can drag a menu item from one window to another to create a copy.
You can make a separator item using any of these techniques:
New Separator Item in the Edit menu.
Separator Item check box.
You cannot put a separator item into edit mode. To convert a separator
back into a regular menu item, use the Property Inspector Window and turn off the Separator Line check box. You can then edit the menu text normally.
You can also copy and paste, duplicate, or copy a separator item by dragging.
The editor window displays the menu item text, the command key equivalent, and the command number. These items may all be edited in place. Select the item and put it into edit mode. Then edit the item. For information on selecting an item and entering edit mode, see "Selecting a Menu Item."
When editing a menu item in place, the Tab key advances you to the next part of the item. You can move from item text, to command key, to command number with the Tab key.
For command numbers, you can enter a numerical value, or a four-character text string. Constructor automatically recognizes non-numerical entries and displays them as text (inside single quote marks). To enter a series of numerals as text (for example, you want the command to be `1234' rather than the number 1234) use single quote marks around the numerals as you enter them.
Make sure each menu item has a unique menu command number. You will encounter unpredictable results if duplicate command numbers occur.
Use the Property Inspector Window to see and modify other item-related properties. You can open the property inspector by double-clicking a menu item. In that window you can set not only the item text, command key equivalent, and command number, but a marking character, text style, an icon, and much more.
See "Setting Menu Item Properties" for a detailed discussion.
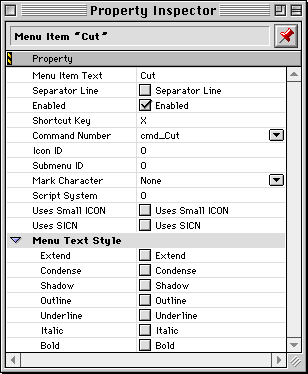
To modify menu item properties, use the Property Inspector Window. The menu item property inspector displays data that applies to a particular menu item. To open this window you:
When you do, the Property Inspector Window displays that item's properties, as shown in Figure 5.8. You can modify many attributes of a menu item. Following the illustration, Table 5.1 list each item in the window and the menu attribute it specifies.
TIP For menu command numbers, the pop-up menu lists all standard PowerPlant command numbers by symbolic name.
| Item |
Specifies |
|---|---|
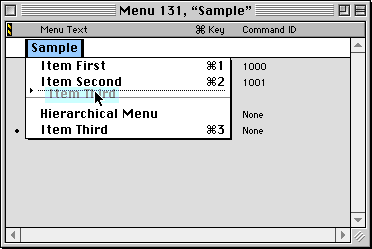
To reposition a menu item in a menu, simply drag it to a new location in the menu. Figure 5.9 illustrates the process.
There is a small arrow and a flashing line that indicate the insertion point in the menu.
You can change the order of menu items using cut and paste. A pasted item is placed in the list after the currently selected item, or at the end of the menu if there is no selected item.
You can also drag a menu item from one menu to another in the menu bar editor. Drag the item to the menu bar. The menu bar editor dynamically switches menus as you drag the item across the menu bar. When you reach the proper destination menu, drag down the menu to drop the menu item in the correct location.
To make a menu item a hierarchical menu item, you must attach a submenu to it. To do so, open the Setting Menu Item Properties. Then enter a non-zero value in the Submenu ID field.
The Submenu ID must be a value from 1 to 255 for an application submenu. Of course, you must also create a menu with the correct ID, or the hierarchical menu item will not work at runtime.
When you set the Submenu ID field, the standard hierarchical triangle mark appears to the right of the menu item in the menu editor window, as shown in the last menu item in Figure 5.10.
To remove one or more menu items from a menu, first select the item or items. Then you can:
The items disappear from the menu.