[ First ] [ Previous ] [ Next ] [ Last ] [ Manuals ]
Files View

The Files view shows the files for all build targets in the project. You can arrange the files into hierarchical groups without affecting the way the IDE handles a build target. The Files view also shows information about modification status, file access paths, code size, data size, current build target, debugging status, and other information.
The following topics describe the Files view:
File column
The File column lists files and groups in a configurable hierarchical view. A group can contain files and other groups.
Double-clicking a file name in the File column opens that file. For more information on opening files from the File column, refer to "Opening Files from the Project Window."
Use the hierarchical control, shown in Figure 3.2, to display and hide group contents in the File column.
To see the path along which the IDE accesses a file, follow these steps:
Windows
Right-click the file name in the Project window, then choose Open in Windows Explorer from the contextual menu that appears.
Mac OS
Control-click the file name in the Project window, then choose File Path from the contextual menu that appears. The File Path submenu lists the path to the file.
Solaris and Linux
Click and hold on the file name in the Project window, then choose File Path from the contextual menu that appears. The File Path submenu lists the path to the file.
Project Window: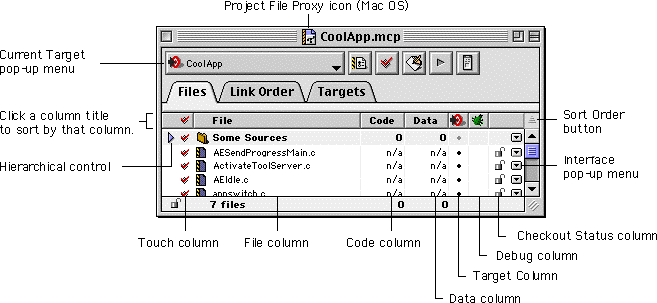
Code column
The Code column shows the size, in bytes or kilobytes, of the compiled executable object code for files and groups. A 0 in the Code column indicates that the file is not currently compiled. A n/a in the column indicates that the file is not in the current build target, or that the IDE cannot compile executable code for the file.
The values in the Code column do not reflect the amount of object code that the IDE adds to the final output file. The linker might not use all the object code in a file when creating the final output. Instead, the linker can ignore data and code that other files in the project do not reference (known as deadstripping code).
For more information on how the linker works, see "Compiling and Linking a Project."
Data column
The Data column shows the size, in bytes or kilobytes, of non-executable data in the object code for files in the project. A 0 in the Data column indicates that the file is not currently compiled, or that the file does not contain a data section in its object code. A n/a in the column indicates that the file has no object code.
Like the Code column, the values in the Data column do not reflect the amount of data that the IDE adds to the final output file.
For more information on how the linker works, see "Compiling and Linking a Project."
Target column
The Target column shows whether an item is in the current build target. This column appears only when the project has more than one build target. A black marker in the Target column indicates that the corresponding item is in the current build target. A gray marker for a group indicates that only some of the files in the group are in the current build target.
To toggle the assignment of a particular file in the project to the current build target, click the Target column for that file. To simultaneously toggle the assignment of every file in the project to the current build target, use one of the following techniques:
Windows, Solaris, and Linux
Alt-click in the Target column
Mac OS
Option-click in the Target column
For information on using the Target column to add and remove files in build targets, see "Assigning Files to Build Targets."
Debug column
The Debug column shows whether the IDE generates debugging information for specific files. A black marker in this column indicates that the IDE generates debugging information for the corresponding item. A gray marker for a group indicates that the IDE generates debugging information for only some of the files in the group.
To toggle the generation of debugging information for a particular file in the project, click the Debug column for that item. To simultaneously toggle debugging information generation for every file in the project, use one of the following techniques:
Windows, Solaris, and Linux
Alt-click in the Debug column
Mac OS
Option-click in the Debug column
To learn more about file debugging, see "Generating Debugging Information for a File."
Touch column
The Touch column shows whether a file needs to be compiled the next time the IDE builds a target. A black marker in this column indicates that the IDE re-compiles the corresponding item the next time you choose the
To toggle re-compilation for a particular file in the project, click the Touch column for that item. To simultaneously toggle re-compilation for every file in the project, use one of the following techniques:
Windows, Solaris, and Linux
Alt-click in the Touch column
Mac OS
Option-click in the Touch column
To learn more about this feature, see "Synchronizing modification dates."
Sorting items
You can sort the items listed in the Files view of the Project window. Click a particular column title to sort the listed items accordingly. The active column title appears darker than the other column titles. Click the active column title a second time to stop sorting the items.
For example, clicking the File column title, as shown in Figure 3.3, sorts the listed items alphabetically by file name. Clicking the title again stops sorting according to file-name criteria. You can click only one column title at a time.
After clicking a column title to sort items, you can toggle the sort order by clicking the Sort Order button. This button changes its appearance to indicate the current sorting order:
 Items are currently sorted in ascending order.
 Items are currently sorted in descending order.
Sorting Listed Items in the Files View: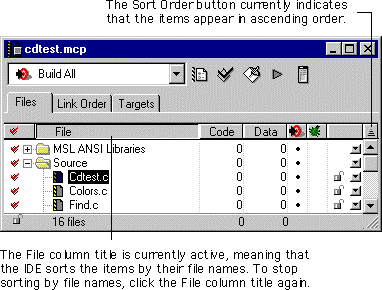
Interface pop-up menu
The Interface pop-up menu lists and opens interface and header files for your source-code files. This pop-up menu also lets you touch or untouch the selected item and set other options.
For groups, the Interface pop-up menu lists the files within the group. To open a file, choose its name from the list in the pop-up menu.
For more information about opening interface and header files, see "Interface pop-up menu."
Project window contextual menu
Figure 3.4 shows a sample contextual menu that appears in the Project window. Use one of the following techniques to display the contextual menu:
Windows
Right-click a file name in the Project window.
Mac OS
Control-click a file name in the Project window.
Solaris and Linux
Click and hold on a file name in the Project window.
Contextual Menu in the Project Window: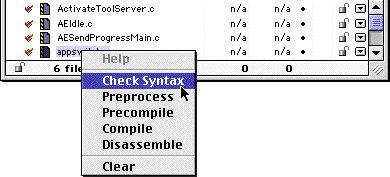
You can choose a command from the contextual menu to operate on the selected item. The commands that appear in the menu depend on the selected item. The following examples show you how to use some common commands in the contextual menu:
For more information about contextual menus in other parts of the IDE, see contextual menus in the index.
Checkout Status column
The Checkout Status column, shown in Figure 3.2, shows whether files are checked in or checked out of a version control system (VCS). Use this column to track changes to your code, particularly when more than one person works on your software project. The Checkout Status column appears only when you configure your CodeWarrior project to use a version control system. For more information about using a particular VCS product, refer to its documentation.
Project Checkout Status icon
The Project Checkout Status icon shows whether a project is writable, as well as the file access permissions for that project. A version control system assigns these permissions when you check in or check out a project file.
To learn more about the Project Checkout Status icon and how the icon relates to the access permissions assigned to your source-code files, see "Getting a File's Status". To learn more about using a particular version control system, refer to its documentation.
Project File Proxy icon (Mac OS)
The Project File Proxy icon, shown in Figure 3.2, allows you to manipulate the project file whose contents currently appear in the Project window. This proxy icon behaves the same way as the proxy icons in the Finder of Mac OS 8.5 or later. For example, to move the project file to the trash, click and hold the proxy icon until it changes color, then drag it from the Project window to the trash.
[ First ] [ Previous ] [ Next ] [ Last ] [ Manuals ]
Visit the Metrowerks website at: http://www.metrowerks.com
For assistance contact Metrowerks Technical Support at: cw_support@metrowerks.com
Copyright © 2000, Metrowerks Corp. All rights reserved.
Last updated: August 17, 2000