[ First ] [ Previous ] [ Next ] [ Last ] [ Manuals ]
Customizing Commands

You can customize the menu commands that appear in the IDE's menu bar. You can control the appearance of specific menu commands, create new command groups in which to place menu commands, and associate a command line (Windows) or a script (Mac OS) with a new menu command. The customized menu commands that you create have access to IDE information, such as the current editor selection, the frontmost window, the current project, and the output file of the current project.
For example, you can create a command group called MyMenu and place in it a menu command called RunApp, which launches an external application. The Customize IDE Commands window helps you define the new command group and menu command.
Click the Commands tab at the top of the Customize IDE Commands window to display the Commands view, shown in Figure 8.32 (Windows) and Figure 8.33 (Mac OS). You use this view to create and modify new command groups and menu commands for use with the IDE.
Customize IDE Commands - Commands View (Windows):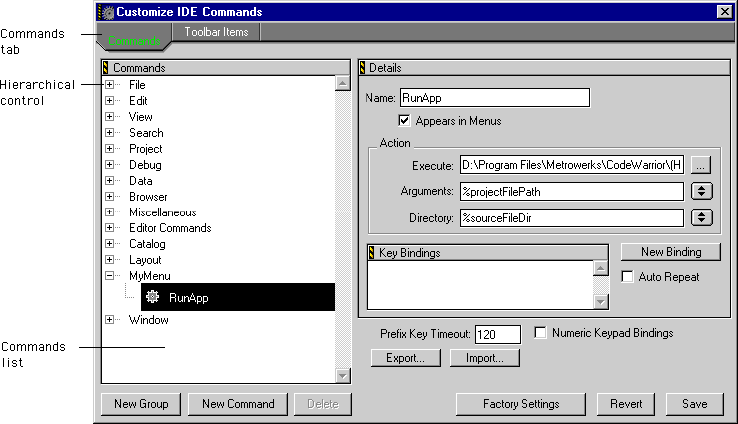
Customize IDE Commands - Commands View (Mac OS):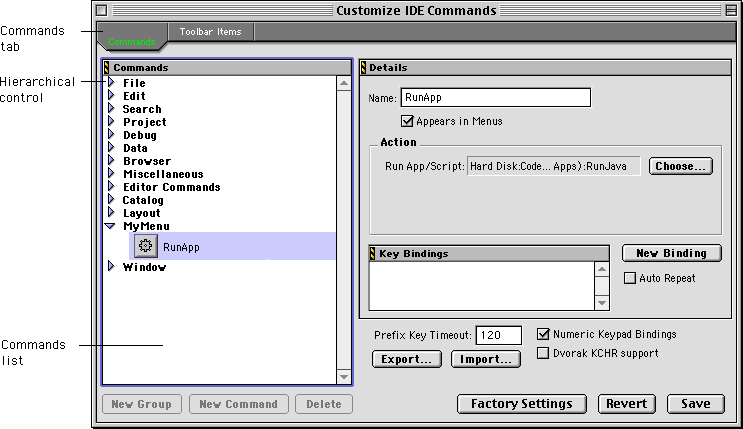
This section discusses the following topics:
Modifying existing command groups and menu commands
You can use the Commands view of the Customize IDE Commands window to examine and modify existing command groups and menu commands. The Commands view includes a Commands list, shown in Figure 8.32 (Windows) and Figure 8.33 (Mac OS). This hierarchical list organizes individual menu commands into command groups. Click the hierarchical control next to a command group to expand that group and view its contents.
To examine a particular item, select it in the Commands list. The information for the selected item appears on the right-hand side of the Customize IDE Commands window. The window provides the following information for each selected item:
Adding customized command groups and menu commands
The Customize IDE Commands window lets you add new menu commands to the CodeWarrior menu bar and arrange those new menu commands into command groups. You can configure your new menu commands to run a command line (Windows) or an application or script (Mac OS).
Click the Commands tab at the top of the Customize IDE Commands window to display the Commands view, shown in Figure 8.32 (Windows) and Figure 8.33 (Mac OS). You use this view to create new menu commands and arrange them into command groups. The top-most level of the Commands list shows existing command groups. Existing menu commands appear within the command groups.
This section discusses the following topics:
Creating a command group
To create a new command group in which to place menu commands, follow these steps:
1. Click the New Group button.
The IDE creates a new command group named New Group, adds it to the Commands list, and displays its information in the Customize IDE Commands window.
2. Enter a name for the new command group.
You can change the default name of New Group. Enter a new name in the Name field of the Customize IDE Commands window.
3. Enable or disable the appearance of the new command group in the IDE's menu bar.
The Appears in Menus checkbox toggles the appearance of the new command group. Enable the checkbox to display the command group in the menu bar. Disable the checkbox to prevent the command group from appearing in the menu bar.
4. Click Save.
The IDE saves your new command group. If you enabled the Appears in Menus checkbox, the new command group appears in the menu bar.
Creating a menu command
To create a new menu command, follow these steps:
1. Select a command group in which to place the new menu command.
You must select an existing command group in the Commands list. To create a new command group in which to place the menu command, follow the steps described in "Creating a command group".
2. Click the New Command button.
The IDE creates a new menu command named New Command and places it within the selected command group. The information for the new menu command appears in the Customize IDE Commands window.
3. Enter a name for the new menu command.
You can change the default name of New Command. Enter a new name in the Name field of the Customize IDE Commands window.
4. Enable or disable the appearance of the new menu command within the selected command group.
The Appears in Menus checkbox toggles the appearance of the new menu command. Enable the checkbox to display the menu command within the command group. Disable the checkbox to prevent the menu command from appearing within the command group.
5. Define the desired Action for the new menu command.
See Defining menu-command actions (Windows) or "Defining menu-command actions (Mac OS)" for more information.
6. Click Save.
The IDE saves your new menu command. If you enabled the Appears in Menus checkbox, the new menu command appears within the selected command group.
Defining menu-command actions (Windows)
After creating a new menu command as described in "Creating a menu command", the Customize IDE Commands window shows three fields in the Action section. These fields help you associate an action with the new menu command:
Defining menu-command actions (Mac OS)
After creating a new menu command as described in "Creating a menu command", the Customize IDE Commands window shows the Run App/Script field. This field appears in the Action section of the window, shown in Figure 8.33. Click the Choose button next to the field to display a standard Open dialog box. Use the dialog box to select an application or script. The IDE launches this application or script each time you choose the menu command. The path to the selected application or script appears in the Run App/Script field.
Deleting customized command groups and menu commands
You can delete the command groups and menu commands that you create for use with the IDE. Once removed, the command groups no longer appear in the IDE's menu bar, and the menu commands no longer activate their associated command lines (Windows) or applications or scripts (Mac OS).
 TIP
TIP
If you need to temporarily remove your customized command groups and menu commands, consider exporting your settings. Using this approach, you do not need to reconstruct your settings if you need to use them in the future. Instead, you can import your settings into the IDE and make them available for use once again. See "Exporting commands and key bindings".
To delete a command group or menu command, follow these steps:
1. Select the command group or menu command that you wish to delete.
If necessary, click the hierarchical control next to a group to expand and view its contents.
2. Click Delete.
After clicking the Delete button, shown in Figure 8.32, the selected command group or menu command disappears from the Commands list.
3. Click Save.
Click the Save button to confirm the deletion. The IDE removes deleted command groups from its menu bar. Deleted menu commands disappear from their respective command groups.
[ First ] [ Previous ] [ Next ] [ Last ] [ Manuals ]
Visit the Metrowerks website at: http://www.metrowerks.com
For assistance contact Metrowerks Technical Support at: cw_support@metrowerks.com
Copyright © 2000, Metrowerks Corp. All rights reserved.
Last updated: August 17, 2000