[ First ] [ Previous ] [ Next ] [ Last ] [ Manuals ]
Customizing Key Bindings

You can customize the keyboard shortcuts used for menu, keyboard, and editor commands in the CodeWarrior IDE. You can attach, or bind, a set of keystrokes to virtually any command. To activate the command, you can type its associated keystroke set, or key binding. The Customize IDE Commands window lets you manipulate IDE key bindings.
For example, you can look up default key bindings for specific commands. You can also change existing key bindings to better suit your needs. In either case, you use the Customize IDE Commands window to find and modify key bindings.
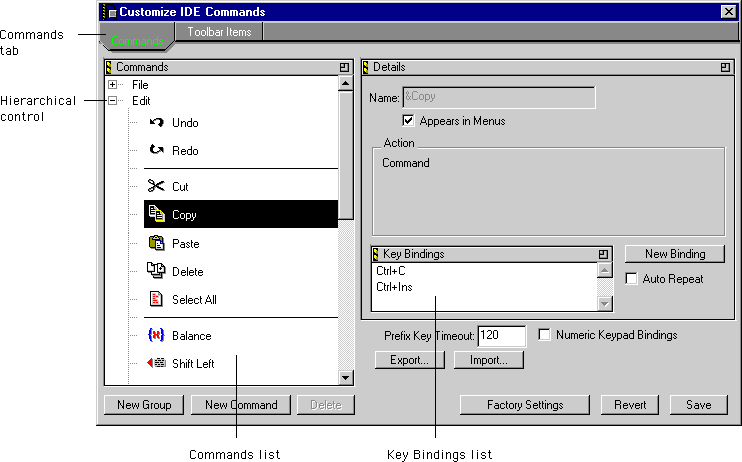
Click the Commands tab at the top of the Customize IDE Commands window to display the Commands view, shown in Figure 8.34. You use this view to configure the key bindings for menu commands, editor actions, and other miscellaneous actions. You can also specify special prefix keys.
This section discusses the following topics:
 NOTE
NOTE
(Solaris and Linux) You can map modifier keys to any key on the keyboard by using the Keyboard Preferences dialog box in the Info menu. Since this manual assumes that the mappings retain their default values, you must remember any changes that you make. See "Keyboard Preferences Dialog Box" for more information on changing the default modifier key mappings.
Restrictions on choosing key bindings
When you customize key bindings, you must take into account specific keys that you can and cannot use:
Modifying key bindings
The Commands view of the Customize IDE Commands window includes a Commands list, shown in Figure 8.34. This hierarchical list organizes the IDE's commands into categories. Click the hierarchical control next to a category to expand that category and view its contents.
To modify a key binding, follow these steps:
1. From the Commands list, select the command that you wish to modify.
Click the hierarchical controls next to categories to expand them as necessary so that you can see individual commands. Select the individual command that you wish to modify.
NOTE
If you want to use your keyboard's numeric keypad as part of the new key binding, enable the Numeric Keypad Bindings checkbox in the Customize IDE Commands window.
2. In the Key Bindings list, double-click the key binding that you wish to change.
The Key Bindings list appears in Figure 8.34. After double-clicking the desired command in this list, the Edit Key Binding dialog box appears (Figure 8.35).
3. Press the key combination that you wish to use for the selected command.
For example, to change the key combination to Ctrl-8, press the Ctrl key and the 8 key at the same time.
If you decide against the key combination that you just entered, or if you make a mistake, click Cancel in the Edit Key Binding dialog box. The IDE returns you to the Customize IDE Commands window.
Edit Key Binding Dialog Box: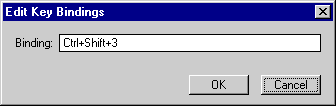
NOTE
(Mac OS) If you use a Dvorak keyboard and the IDE has trouble recognizing the Command key, enable the Dvorak KCHR Support checkbox in the Customize IDE Commands window.
4. Click OK in the Edit Key Binding dialog box.
The new key binding appears in the Key Bindings list of the Customize IDE Commands window.
5. Click Save in the Customize IDE Commands window to save your changes.
The new key binding is now available for use in the IDE.
Adding key bindings
You can use the Customize IDE Commands window to specify additional key bindings for a particular command.
To add a key binding, follow these steps:
1. From the Commands list, select the command to which you want to add a new key binding.
Click the hierarchical controls next to categories to expand them as necessary so that you can see individual commands. Select the individual command that you wish to modify.
NOTE
If you want to use your keyboard's numeric keypad as part of the new key binding, enable the Numeric Keypad Bindings checkbox in the Customize IDE Commands window.
2. Click New Binding.
The New Binding button appears in Figure 8.34. After clicking this button, the Edit Key Binding dialog box appears (Figure 8.35).
3. Press the key combination that you wish to use for the selected command.
For example, to add the key combination Ctrl-8, press the Ctrl key and the 8 key at the same time.
If you decide against the key combination that you just entered, or if you make a mistake, click Cancel in the Edit Key Binding dialog box. The IDE returns you to the Customize IDE Commands window.
NOTE
(Mac OS) If you use a Dvorak keyboard and the IDE has trouble recognizing the Command key, enable the Dvorak KCHR Support checkbox in the Customize IDE Commands window.
4. Click OK in the Edit Key Binding dialog box.
The new key binding appears in the Key Bindings list of the Customize IDE Commands window.
5. Click Save in the Customize IDE Commands window to save your changes.
The new key binding is now available for use in the IDE.
Deleting key bindings
You can delete key bindings that you do not wish to use with the CodeWarrior IDE. Once removed, the key bindings no longer activate their assigned commands.
To delete a key binding, follow these steps:
1. From the Commands list, select the command that contains the key binding that you wish to delete.
Click the hierarchical controls next to categories to expand them as necessary so that you can see individual commands.
2. In the Key Bindings list, select the key binding that you wish to delete.
The Key Bindings list appears in Figure 8.34.
3. Delete the selected key binding.
Press the Backspace key (Windows, Solaris, and Linux) or Delete key (Mac OS). The CodeWarrior IDE removes the key binding from the Key Bindings list.
4. Click Save in the Customize IDE Commands window to save your changes.
The removed key binding no longer activates its associated command.
Setting Auto Repeat for key bindings
The Auto Repeat checkbox, shown in Figure 8.34, changes the automatic behavior of the items shown in the Key Bindings list.
Enable the Auto Repeat checkbox to automatically repeat the assigned command while you hold down the key combination. Disable the checkbox to require you to press the key combination each time you wish to activate its assigned command.
A useful example is the Find Next command. If you enable Auto Repeat for the Find Next key binding, you can hold down the key combination while you watch the search engine find all text matching your search criteria in the open file. This technique quickly searches the file, finding all matching patterns and displaying them on the screen. If you disable Auto Repeat, then you must release and press the key combination each time you wish to activate the Find Next command.
Exporting commands and key bindings
You can export commands and key bindings for later use by following these steps:
1. Click Export in the Customize IDE Commands window.
After you click this button, a standard Save dialog box appears.
2. Select a location in which to save the commands and key bindings file
3. Click Save.
The IDE exports the current commands and key bindings to a file at the specified location.
 TIP
TIP
You should complete the name of the commands and key bindings file with a .mkb file-name extension, like this: MyCmdsAndKbs.mkb. This naming convention helps you quickly identify the file as a Metrowerks Key Bindings file. Furthermore, the Windows-hosted version of the CodeWarrior IDE uses this extension to properly recognize the commands and key bindings file.
Importing commands and key bindings
You can import commands and key bindings from a previously exported file by following these steps:
1. Click Import in the Customize IDE Commands window.
After you click this button, a standard Open dialog box appears.
2. Use the dialog box to locate and open the commands and key bindings file that you wish to import.
The IDE adds the imported commands and key bindings to the Commands list in the Customize IDE Commands window.
Prefix keys
Prefix keys let you create multiple-keystroke command keys, such as those used in the Emacs text editor available on several computer platforms. For example, the Emacs key sequence to save a file is Control-X followed by Control-S.
To emulate this Emacs key binding in the CodeWarrior IDE, you can set a prefix key to Control-X and then set the command key for the Save menu command to Control-X Control-S.
You can also adjust the maximum time to wait for a keypress after entering a prefix key. To learn how to do this, see "Setting the Prefix Key Timeout."
Quote Key prefix
The Quote Key is a special prefix key with a very simple function. This key lets you use a simple printing character as a key equivalent (without any modifier key), and still retain the ability to use that character in editor windows.
In typical use, a key equivalent involves two keys: a modifier key (such as the Ctrl key) combined with a printing key. The IDE does not require a modifier key.
For example, you can assign the 2 key (with no modifier) to a command. However, if you make this assignment, you can no longer type a 2 into your source code in the editor. This conflict occurs because the IDE interprets the 2 as a command key instead of a printing key. The Quote Key prefix provides the solution to such conflicts.
You can configure the IDE to recognize any key as the Quote Key prefix. For more information, see "Assigning the Quote Key prefix". Despite its name, the Quote Key prefix does not have to be the key that creates the quote character (") in source code.
After typing an assigned Quote Key prefix, the IDE interprets the next keypress as a keystroke, not as a command.
Returning to the earlier example, assume that you assign the 2 key to a command and the tilde key (~) to be your Quote Key prefix. To execute the command, you would type the 2 key. To enter the character 2 into source code, you would type the tilde key first, then the 2 key. To enter the tilde character into source code, you would press the tilde key twice.
 WARNING!
The Quote Key only affects the next key or key combination that you type. You must use the Quote Key once for each bound key or key combination for which you want to type the equivalent character on the screen.
Assigning the Quote Key prefix
To assign the Quote Key prefix, follow these steps:
1. Click the hierarchical control next to the Miscellaneous item.
The Miscellaneous item, shown in Figure 8.36, is part of the Commands list in the Customize IDE Commands window.
2. Select the Quote Key item.
The Quote Key item is part of the Miscellaneous command group.
NOTE
If you want to use your keyboard's numeric keypad as part of the new key binding, enable the Numeric Keypad Bindings checkbox in the Customize IDE Commands window.
3. Click New Binding.
The New Binding button appears in Figure 8.36. After clicking this button, the Edit Key Binding dialog box appears (Figure 8.35).
Customize IDE Commands - Quote Key Prefix: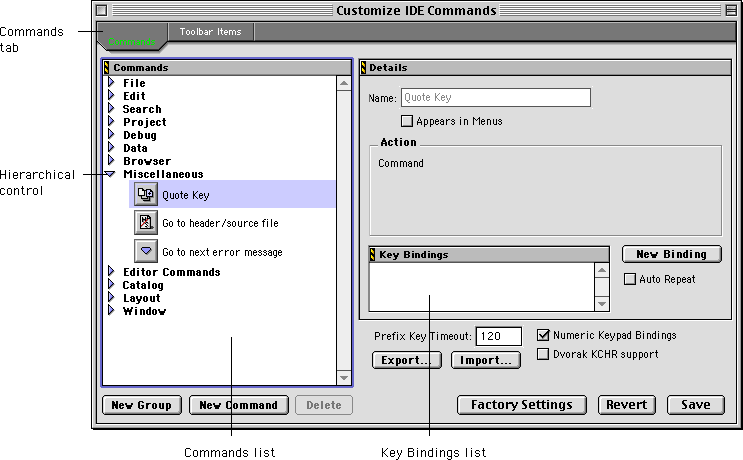
4. Type the desired Quote Key prefix.
The keys you type appear in the dialog box. If you make a mistake or decide against the keys you typed, click Cancel to return to the Customize IDE Commands window.
NOTE
(Mac OS) If you use a Dvorak keyboard and the IDE has trouble recognizing the Command key, enable the Dvorak KCHR Support checkbox in the Customize IDE Commands window.
5. Click OK in the Edit Key Binding dialog box.
The new Quote Key prefix appears in the Key Bindings list.
Setting the Prefix Key Timeout
The Prefix Key Timeout field specifies the length of time that the IDE waits for the second key after you press a prefix key. The larger the value in this field, the longer the IDE waits for you to press the second key.
The IDE measures the timeout value in ticks, where each tick equals 1/60th of a second (16.67 milliseconds). Legal values range from 1 to 999 ticks. The default value is 120 ticks.
[ First ] [ Previous ] [ Next ] [ Last ] [ Manuals ]
Visit the Metrowerks website at: http://www.metrowerks.com
For assistance contact Metrowerks Technical Support at: cw_support@metrowerks.com
Copyright © 2000, Metrowerks Corp. All rights reserved.
Last updated: August 17, 2000