In this chapter we discuss printing in a PowerPlant application.
Like file I/O, printing is typically the responsibility of a document. If you have not already done so, you should read "The Document Strategy" to ensure that you understand the role of the document in a PowerPlant application. In this chapter we assume you are familiar with document concepts.
PowerPlant's approach to printing involves the collaboration of several different classes. As a result, it will help a great deal to look at the overall printing strategy before we go into class-level details. With that in mind, the topics in this chapter are:
As usual, we'll end the chapter with a summary and code exercise.
PowerPlant creates a special view for managing printing, LPrintout.
The member functions of this class provide you with all the routines
you need to loop through your document's pages and print them.
LPrintout mediates between your application and the printer, accommodating
things like paper size, page breaks, which objects appear on which
page, and so forth. In the default implementation, each pane's
DrawSelf() function ultimately draws the pane's contents onto the printed
page.
A printout contains one or more instance of a special view called a placeholder. The placeholder interacts with the printout-its superview-to determine printing dimensions based on paper size.
The placeholder begins life as an empty view with no contents. However, after you create the placeholder and before you print, you give the placeholder a single occupant. That occupant is another view-one of the views you have already encountered. It might be a single LTextEditView. It might be an LView object containing an arbitrary number of subpanes.
The critical feature here is that the placeholder itself has a single occupant, so it has one view with which it communicates. That view contains all the subviews and panes to be printed within that placeholder's boundaries.
To install the occupant into the placeholder, you temporarily move the view from its original visual hierarchy into the printing hierarchy. The placeholder takes care of putting the view back where it belongs when printing is complete.
After you have installed the occupant, you're ready to print. We'll talk about the code-level details required to accomplish this task later on in this chapter. In this section, we want to concentrate on what happens when you tell the printout to print itself.
Because the printout is at the top of a visual hierarchy-in this case the printing hierarchy-it can ask all of its subpanes for information. In this context, the piece of information of greatest interest to the printout is, essentially, how big are the panes? The printout must determine how many pages there are in the document, and on which page each pane should be printed.
To accomplish this task, PowerPlant introduces the concept of a panel, as distinguished from a page.
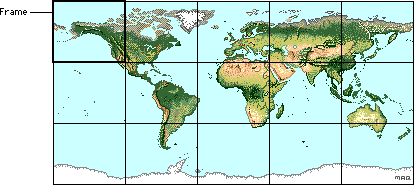
Remember that a view (and LPrintout is a view) has both an image and a frame. A panel is one "framefull" of an image. Figure 14.1 illustrates the concept of a panel in relation to a frame.
This image has 15 panels, extending five wide by three high. You would take that many frames to completely cover the image. In this particular example, the image is perfectly divisible by the size of the frame, but that's not necessary. PowerPlant always rounds up to ensure that the number of panels fully covers the image.
Of course, if the frame changes size, the number of panels also changes. Each view is responsible for figuring out the number of panels required to cover its entire image, using its contained views and panes in the process. Ultimately, LPrintout is the highest level view, and it keeps track of the total number of panels in its contents, and puts them on the correct page when printing.
PowerPlant contains code to count panels, measure panels, determine which panel is on which page, and so forth. Happily, you don't have to concern yourself with these details. That's the beauty of a framework. Let PowerPlant take care of figuring out low-level details like panels and pages. You can concentrate on high-level concepts like printing the document without worrying too much about counting pixels.
Now let's take a look at the actual classes that implement this strategy, and see how to use them effectively.
The functionality encapsulated in LPrintout gives you almost everything you need to print in PowerPlant. To support this functionality, LPrintout has several features that no other view class has. In this section we discuss
LPrintout has several features necessary for its work-printing panes and views. In this section we discuss LPrintout's:
As you know, all views have a frame. In LPrintout, the frame is the paper size in the current printer record. If the user changes printers or paper size, PowerPlant updates the LPrintout frame.
In LPrintout, the (0,0) point in local/image coordinates is the top left of the paper rectangle. As a result, all coordinates are the absolute location on the paper. This simplifies setting margins and otherwise placing panes for printing. We will revisit this topic when we discuss "Adding a placeholder."
Do not confuse the paper size with the printable area supported by a printer. The printable area is usually smaller than the paper rectangle because most printers have mechanical limitations that prevent them from printing to the very edge of the paper.
In addition to its unusual use of the frame characteristic, LPrintout has the data members listed in Table 14.1
| Data Member |
Stores |
|---|---|
Most of this information is maintained for you automatically by PowerPlant.
The only attribute currently defined in PowerPlant for printing determines whether to number pages down or across in a large, multi-page document.
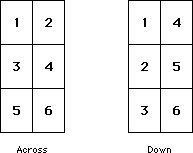
Assume you have a document that is six pages long-two pages wide and three pages deep. Should page two be the page to the right of page one or the page below page one? Figure 14.2 illustrates the alternatives.
By default, PowerPlant counts across, so that all pages along
the top row print first. You can modify this attribute using LPrintout's
attribute accessors HasAttribute() and SetAttribute(). The constant to count pages down is printAttr_NumberDown.
LPrintout has a series of functions that implement printing in the Mac OS using standard QuickDraw.
Table 14.2 lists the LPrintout printing functions.
| Function |
Purpose |
|---|---|
All of these functions are fully realized in PowerPlant, and most
are used internally. The only one you are likely to call directly
is DoPrintJob(). We'll discuss the circumstances under which you make this call
in "Printing a Document."
You may have noticed that there are no functions for common, printing-related tasks such as displaying the print job dialog, the page setup dialog, and so forth. Those functions are in a utility class, UPrinting, discussed in "Printing Utilities."
In summary, most of the features and behaviors in LPrintout are
only of indirect interest to you. PowerPlant uses them internally.
The important facts to remember are that LPrintout uses the paper
size for its frame, can number pages across or down, and has the
DoPrintJob() function to print its contents.
Now let's take a look at the placeholder.
LPlaceHolder is a unique view class designed to assist the printing process. The purpose of a placeholder is to allow you to print a pane at a size and/or location that is different from the pane's characteristics when displayed in a window. It is a simple class with very few (but important) distinctions between itself and LView.
A placeholder has two characteristics that differentiate it from other views. It has an occupant, and the occupant has an alignment.
There may be one and only one occupant in a placeholder. The occupant must be another pane (including most views and controls). However, the occupant cannot be an LWindow or LDialogBox. LWindow (and any class derived from LWindow) must be a top-level view and cannot reside inside LPlaceHolder.
When you install the occupant in the placeholder, the placeholder stores the occupant's original size, location, and superview. When you remove the occupant from the placeholder, or delete the placeholder, the placeholder automatically restores the occupant to its original size, location, and superview.
While in the placeholder, the occupant has an alignment. This
locates the pane inside the placeholder's dimensions. PowerPlant
uses the Mac OS Toolbox AlignmentType values. The possible values are defined in the icons.h file in
the universal headers. The possible alignments are:
kAlignNone kAlignLeftkAlignVerticalCenter kAlignCenterLeftkAlignTop kAlignTopLeftkAlignBottom kAlignBottomLeftkAlignHorizontalCenter kAlignRightkAlignAbsoluteCenter kAlignCenterRightkAlignCenterTop kAlignTopRightkAlignCenterBottom kAlignBottomRight
If you specify no alignment, the frame of the occupant pane-typically a view-is resized to fit the placeholder dimensions. If you don't specify a horizontal alignment, the occupant width is set to the placeholder width. Similarly, if you don't specify a vertical alignment, the occupant height is set to the placeholder height.
The "no alignment" option allows you to keep the frame of the occupant view automatically adjusted to the size of the placeholder. This resizing is very important in a typical application.
The placeholder frame controls the print area of your document. You can think of the placeholder frame as the panel size for the document. If the occupant view's frame matches the placeholder frame, then your occupant view's frame fills the printing panel. If the occupant view's image is less than or equal to the frame size, then you get one page. If the occupant view's image is greater than the frame size, you get multiple pages.
Subpanes within the occupant view are not resized. They remain at the same size and position relative to the top left corner of their superview.
Other than constructors and destructor, LPlaceHolder has two new behaviors that it adds to those it inherits from LView. LPlaceHolder also overrides two panel-related functions it inherits from LView. Table 14.3 lists all four functions.
| Function |
Purpose |
|---|---|
Based on the pane and alignment you specify, InstallOccupant() preserves the pane's original state and resizes the pane to fit
the placeholder as necessary. RemoveOccupant() restores the original state. The LPlaceHolder destructor calls
RemoveOccupant().
The panel-related functions tell the occupant to perform the requested task. They add no new functionality to these behaviors.
PowerPlant has four printing classes that perform all the real
work of printing. The four classes defined in UPrinting.h are:
You must add UPrinting.cp to any project based on LDocument or LDocApplication. UPrinting.cp
includes the necessary files for classic printing (UClassicPrinting.cp) or Carbon printing (UCarbonPrinting.cp) based on the target.
Although we have ignored them until now, all views and panes have printing-related behaviors. This section gives you background information on these functions. With one exception, it is unlikely that you will ever override or modify any of these functions. PowerPlant printing functionality is virtually complete.
Printing-related functions in views and panes perform three tasks:
Printing follows the visual hierarchy. You start with a top-level view and work down to the leaf-level panes. Let's look first at the printing functions in views, and then at panes.
Table 14.4 lists the five printing-related functions in views.
| Function |
purpose |
|---|---|
Table 14.5 lists the same five functions as implemented in panes.
| Function |
purpose |
|---|---|
A pane always has one panel. Remember, a panel is a "framefull" of the image. In a pane, the image and frame are the same size.
All of the functions for counting panels and passing the printing request down through the visual hierarchy to the final panes is complete and fully realized in PowerPlant. You typically will not have to modify this process.
Of all of these functions, the only one you are likely to override
is PrintPanelSelf(). We talk about that in "Printing a Document."
Before we get into the real work of printing a document in PowerPlant, let's take a quick look at how the Mac OS handles some basic printing rectangles, and relate that to PowerPlant's use of the same rectangles. This should help ease your conversion to PowerPlant printing. Table 14.9 lists some printing rectangles as they are expressed in both the Mac OS and PowerPlant.
 NOTE
NOTE How the Mac OS handles basic printing rectangles depends on whether you're using Carbon or Mac OS Classic. Instead of accessing data members directly, use the accessor functions listed in Table 14.6.
| Concept |
Mac OS (Classic or Carbon) |
PowerPlant |
|---|---|---|
The paper size is the size of a sheet of paper. The printable area is the area where the printer is capable of printing. The printing area is the area where you are actually printing. Typically, the printable area is a rectangle within the paper size, and the printing area is a rectangle within the printable area.
If the printing area is larger than the printable area, or offset so that part of the printing area extends outside of the printable area, part of your image will not print.
In PowerPlant, the LPlaceHolder frame controls the printing area. This should be less than or equal to the printable area. The LPlaceHolder frame should also be positioned within the LPrintout frame so that it stays on the paper.
Typically you set the position and size of the LPlaceHolder frame
in Constructor. At that time you may make assumptions about the
size of the paper and the printable area. At runtime, you may
want to modify LPlaceHolder to adjust to the actual printable
area. Check the LPlaceHolder frame against the Mac OS LPrintSpec::GetPageRect() information.
Fundamentally, printing is a visual task. LPrintout is a view class. Panes and views handle most of the low-level drawing, whether on screen or to a printer.
This section has these principal topics:
You can create a printing hierarchy using Constructor, or on the fly in your code. We talk about each method. Then we discuss what to do when you derive your own class from LPrintout.
Printing uses the same PPob resource concept with which you are
familiar. If you have built a PPob resource in Constructor, creating
the printing hierarchy is simple. You call LPrintout::CreatePrintout() with the resource ID number for the PPob resource that describes
the LPrintout object.
Creating a printout in Constructor is simple. While in the Constructor
project window, with no resource or a PPob resource selected,
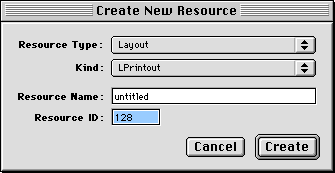
choose New Resource (command-K) from the Edit menu. When you do, the dialog in Figure 14.3 appears.
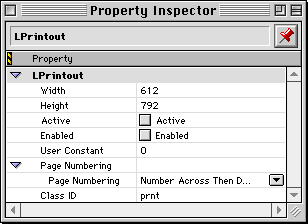
Choose LPrintout as your view type. Click the create button to create the new PPob resource. Open the new PPob resource, and then the Property Inspector window for this particular printout, as shown in Figure 14.4. This is where you set the printout characteristics.
Setting printout properties with Constructor: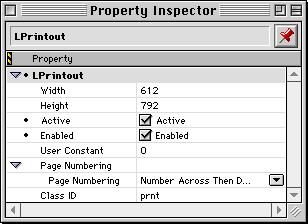
A printout has width, height, class ID, and a user constant. The width and height aren't that important because PowerPlant resizes the printout to match the paper size of the current printer record.
Set the printout to be active and enabled. You can also set your page numbering option. See "Page numbering."
The other characteristics of panes and views are not used. Remember, if you derive your own printout class you must change the class ID to your own unique value and register the class with PowerPlant before creating any objects of that class.
"Register PowerPlant Classes."
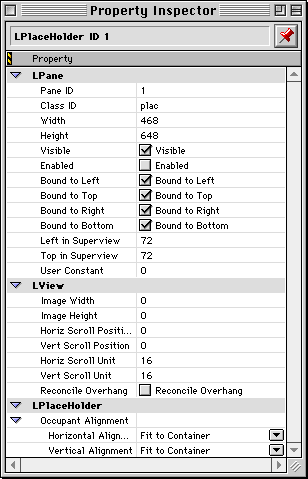
Inside the printout view, you add one or more placeholders-objects of the LPlaceHolder class. The placeholder describes the bounds of a printable area of your document. In many cases, the printout has a single placeholder. After installing each placeholder, set the placeholder's characteristics. Figure 14.5 shows the window.
Setting LPlaceHolder properties: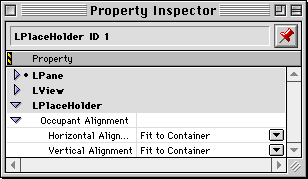
The placeholder has many of the features of other views.
The placeholder's position, size, and binding relative to the superview are important. The superview is the LPrintout object. PowerPlant resizes the printout object to match the paper size of the printer-not the printable area. If you put the placeholder at the very top left corner of the printout-setting both top and left to zero-part of your view's image area will be truncated. Most printers cannot print to the edge of the paper.
If you want your placeholder to occupy all but a certain margin around the edge of the paper, put the top left corner of the placeholder where you want the top left pixel to appear on the paper. For example, a margin of one inch would be 72 pixels. Then set the size to provide the proper margins on the right and bottom. Finally, make sure that frame binding is on for all four sides. Then, when PowerPlant resizes the printout to match whatever the paper size is, your placeholder will resize properly and still give you the correct margin.
Scrolling is typically of no relevance to a placeholder, so the values for image size, scroll unit, scroll position, and reconcile overhang are unimportant.
Set the placeholder's ID, and make sure it is enabled and visible.
The only new characteristic of a placeholder is its alignment. If you do not specify an alignment in your code, PowerPlant uses the alignment specified in the PPob. Typically, you use no alignment. In that case, the view ultimately installed as the occupant in the placeholder resizes automatically to the dimensions of the placeholder.
You do not need to create a placeholder for every single pane and view in your visual hierarchy. You only need a single placeholder. At runtime you place a view into the placeholder as its sole occupant. That view should contain all the panes you want printed.
If you wish to create a printout on the fly, you can define a new printout using the default LPrintout constructor. This sets up and initializes the printout to default values. You can then modify the printout's characteristics as necessary. Study the LPrintout source code and the PowerPlant Reference for details.
You will also need to create one or more LPlaceHolder views and install them inside the printout.
Creating your own printout class is a fairly unusual occurrence. Most of the traditional printing functionality in the Mac OS is built right into PowerPlant, thus eliminating the need to subclass from LPrintout. However, there are reasons why you might want to derive a new printout class with additional functionality.
For example, you might want to implement a different printing architecture, such as QuickDraw GX. You might want to add error control or display a custom printing status dialog. In the latter case, you are very likely to override the functions listed in Table 14.7.
Commonly overridden LPrintout functions:
| Function |
Purpose |
|---|---|
If you examine the source code for these two functions you'll see that the locations where you need to add code are already mapped out for you.
After you have the printing hierarchy set up, the steps you follow to print a document in PowerPlant are simple and straightforward. The details may become very complex depending upon the nature of your documents. As always, implementation details are independent of PowerPlant.
This section discusses the general steps you must follow, and gives suggestions for typical ways in which you might modify the standard approach to printing.
In this section we talk about how to:
Printing from the Finder is a much-ignored feature of the Macintosh
human interface. In a well-designed Mac OS application, the user
can select document icons on the desktop and choose Print from the Finder's File menu.
In response, your application prints the selected documents. Your application may or may not be running at the time. If your application is running, the document or documents chosen may not be open.
When the user prints from the Finder, your application receives
a print document event. In PowerPlant, the application object's
DoAEOpenOrPrintDoc() function handles it. The default PowerPlant function calls the
application's PrintDocument() function.
In both PowerPlant application classes-LApplication and LDocApplication-this function is empty. You must implement this function in your derived application class if you support printing from the Finder.
The steps to follow in your application's PrintDocument() function are clearly defined. They are:
1. Open the document if it is not already open. You receive a Mac OS FSSpec record for the document to be printed. If the document is not already opened, it should never be displayed on the monitor, just printed.
2. Print the document. In a well-factored application, this usually means calling the document's printing behavior.
3. Close the document if it was not already open.
You do not need to worry about quitting your application. If the user is printing from the Finder, the Finder takes care of that for you by sending the necessary quit application Apple event.
Finally, if you do not support printing from the Finder, you can
leave PrintDocument() empty. It is not used as part of the normal document printing
from within an application.
When the user chooses the Print item in your application's File menu, your application prints the document. Responsibility for
handling this command will rest with whatever commander class
identifies and responds to the printing command in its ObeyCommand() function. For example, you might want to have a derived window
class respond to this command to print its contents.
However, it is more typical to have a document respond to this
command. You may recall from the previous chapter that LDocument
has both ObeyCommand() and DoPrint() functions.
The default LDocument::ObeyCommand() function handles the Print command completely. The function ensures
that there is a print record. It displays the standard print dialog.
It sends an apple event for recording purposes. Then it calls
the DoPrint() function.
NOTE The default ObeyCommand() does nothing if there is no print record. You may want to override
this behavior to tell the user why printing failed.
However, the default LDocument::DoPrint() function is empty. In your derived document class, you implement
this function. The tasks to accomplish in DoPrint() are:
2. Set the print record for the printout view.
4. Install the occupant view in the placeholder.
5. Call the printout view's PrintJob() function.
Listing 14.1 contains sample code for a typical DoPrint() function.
An example DoPrint() function:
CMyDoc::DoPrint()
{
  	// Create the printout.
	StDeleter<LPrintout>	thePrintout(LPrintout::CreatePrintout(PPob_TextPrintout));
	ThrowIfNil_(thePrintout.Get());

		// Set the print record.
	thePrintout->SetPrintSpec(mPrintSpec);

		// Get the text placeholder.
	LPlaceHolder* thePlaceholder = dynamic_cast<LPlaceHolder*>
							(thePrintout->FindPaneByID(kTextPlaceholder));
	ThrowIfNil_(thePlaceholder);

		// Install the text view in the placeholder.
	thePlaceholder->InstallOccupant(mTextView, atNone);

		// Set the frame size.
	SetPrintFrameSize();

		// Print.
	thePrintout->DoPrintJob();

	// Delete the printout (handled automatically by the
	// StDeleter object). The text view is returned
	// to the window when the placeholder is destroyed.
}
In this example, the code first creates the LPrintout view, just as it would any other view. It sets the printout view's print record. It then gets a pointer to the LPlaceHolder pane inside the printout view.
The CMyDoc class has a data member, mView, that stores the view representing the document. The code installs
that view inside the placeholder. It then calls the printout's
DoPrintJob() function to print the contents of the view. Finally, it deletes
the printout.
 TIP
TIP The view you place as occupant inside the placeholder cannot be an LWindow. LWindow must be a top-level view. If you want a single view encompassing the contents of a window, put a simple LView object inside the window, then put the window contents inside the enclosing LView object.
As the printing process in PowerPlant progresses, the ultimate
responsibility for drawing an individual pane falls on that pane's
PrintPanelSelf() function. In this section, we use the term "pane" in its most
general sense to include all panes-including views. The default
implementation of PrintPanelSelf() simply calls the pane's DrawSelf() function.
Override PrintPanelSelf() if you want a pane to print differently than the way it draws
on screen. There are several common reasons why you might want
to do this.
If your pane erases and then draws, you might want to eliminate
erasing. Erasing is a major cause of slow printing. You don't
have to erase a blank sheet of paper. For example, a window view
erases itself before drawing if the EraseOnUpdate attribute is set.
You may want to add items to the printed document that do not appear in a view. You might want to add page numbers, or a header or footer to a document. Conversely, you may not want to print certain items that appear on screen but that are unimportant in the printed document.
If your pane draws offscreen and uses CopyBits() to draw, you may want to replace that behavior for printing.
Text that is blitted to the printer port comes out jaggy. Text
that is drawn directly to the printer port comes out smooth.
If a pane crosses a page boundary, you might want to ensure that the break occurs at a reasonable spot. Again using text as an example, the page boundary might slice right through the middle of a line of text. That text should appear on the following page, rather than have the top half of the line appear at the bottom of one page, and the bottom half of the line appear at the top of the next page.
Resolving these sorts of boundary problems is non-trivial, but they are beyond the scope of PowerPlant. An application framework does the general work. You extend that framework to meet your application's individual requirements. Along the way, you may encounter a need to use certain utility functions in PowerPlant.
LPrintSpec is a wrapper class that handles the classic PrintRecord
as well as the new Page Format used by Carbon. LPrintSpec keeps
two different kinds of print records. There is a default or "global"
print record. In addition, every PowerPlant document has its own
LPrintSpec stored in the mPrintSpec data member.
The default Print and Print One command handlers in LDocument use the document's print record to control the printing process.
However, the document does not handle the Page Setup command itself. In the default implementation in PowerPlant, that task resides in LDocApplication. LDocApplication responds to the Page Setup command by changing the values in the default or global print record, not the print record in any document. This is as it should be. At the application level (that is, when no documents are open), you should modify a default print record.
When a document is open, a good application should modify the
document's print record. This behavior does not exist in LDocument
or LSingleDoc. To implement this behavior, you must override the
LDocument::ObeyCommand() function to identify and handle the Page Setup command. The code
might look like this:
Modifying a document's print record:
case cmd_PageSetup:
  UDesktop::Deactivate();
  if (mPrintSpec == nil)
  {  // get default print record
    THPrint defaultPrintRecord =
                   LPrintSpec::GetPrintRecord();
    // make a copy
    mPrintSpec = defaultPrintRecord;
    ThrowIfOSErr_( ::HandToHand(&(reinterpret_cast<Handle>
												(mPrintSpec)));
  }
  UPrinting::AskPageSetup(mPrintSpec);
  UDesktop::Activate();
  break;
You would save the print record with the document, and restore it when opening a file. We discussed file I/O in the previous chapter.
TIP If a document has no print record, LDocument::ObeyCommand() creates a new print record by calling LPrintSpec::GetPrintRecord(). You might want to override this behavior and call LPrintSpec::GetPrintRecord() yourself and make a copy of the default record. Changes made
when no windows are open are then used for new windows by default.
Should you find yourself required to deal with the Mac OS Printing Manager, you should use the functions in UPrinting. This class is a wrapper for the most common Printing Manager calls you are likely to make. Table 14.8 lists all the available functions.
| Function |
Purpose |
|---|---|
Each of these functions is a static function, so they are always available. Consult the PowerPlant Reference and the source code for details.
In this chapter you learned how several PowerPlant classes work together to implement printing.
LPrintout is responsible for managing most of the printing tasks. Its dimensions match the paper size for the printer, it counts panels, converts panel number to page number, has the main printing loop, and so forth.
LPlaceHolder keeps track of its occupant view. The placeholder dimensions describe the printing area on each page.
You create a printing hierarchy consisting of a printout and one or more placeholders.
In your document class you write the DoPrint() function. You identify the view that contains all the panes you
want printed. You install that view as the placeholder's occupant,
and print.
If necessary, you override the PrintPanelSelf() functions in various pane and view classes to customize printing
behavior.
To ease your conversion to PowerPlant printing, Table 14.9 lists some printing concepts as they are expressed in both the Mac OS and PowerPlant.
Mac OS and PowerPlant printing data:
| Concept |
Mac OS (Classic or Carbon) |
PowerPlant |
|---|---|---|
The paper size is the size of a sheet of paper. The printable area is the area where the printer is capable of printing. The printing area is the area where you are actually printing.
If the printing area is larger than the printable area, part of your image will not print.
In PowerPlant, the LPlaceHolder frame controls the printing area.
This should be less than or equal to the printable area. Typically
you set the dimensions of LPlaceHolder in Constructor. However,
if you want to modify LPlaceHolder at runtime to match the printable
area, or to ensure that the printing area is smaller than the
printable area, check the LPlaceHolder frame against the Mac OS
LPrintSpec::GetPageRect() information.
In this exercise you add printing functionality to the same application you worked with in the previous chapter. First you create the interface and then you write the code necessary to implement printing.
The text window remains intact and unchanged from the previous chapter. If you'd like to review the text window components, refer to that exercise. To implement printing, you need to add two elements to the interface, a printout and a placeholder.
Open the Printing.ppob project file in Constructor. It should look like Figure 14.6. In the start code there is already one PPob resource, the one
for the text window and its contents. In this section you add
another PPob resource for the printout.
The Printing.ppob file from the start code: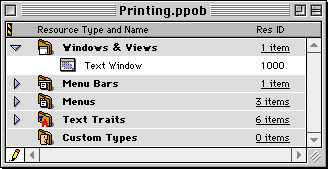
With no items or a PPob resource selected in the Constructor project
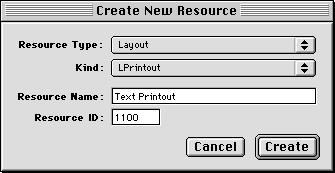
window, choose New Resource (command K) from the Edit menu. When you do, the Create New Resource dialog appears, as
shown in Figure 14.7.
Set the resource type to Layout. Set the view kind to LPrintout. Set the resource name. Set the resource ID to 1100. Then click the Create button.
A new entry for this PPob resource appears in the Constructor project window. Double-click the entry, and a large window opens containing the new text printout. Double click the printout view to see its characteristics, as shown in Figure 14.8.
The default width and height are 8.5" x 11" at 72 dpi. You can turn off the Active and Enabled check boxes. Close the LPrintout characteristics window when you're through. Leave the LPrintout window open so you can add a placeholder to the printout.
2. Create an LPlaceHolder view.
Open the Catalog window. Drag an LPlaceHolder object and drop it onto the LPrintout view. Double-click the new placeholder to set its characteristics, as shown in Figure 14.9.
The location and size of the placeholder allow for a 72-pixel (one inch) margin between the printout and the placeholder. The placeholder is bound on all sides to the printout. Set the pane ID to 1. Make sure the placeholder is visible, but it can be disabled. Set the other characteristics accordingly. Make sure you set both the horizontal and vertical alignment to none.
There is no need to set the view hierarchy. There is only one item in the view, the placeholder. It is automatically contained in the LPrintout view.
That's it. You have just completed the printing interface for this application. Save your work and quit Constructor.
In the previous exercise you implemented opening and saving a document. In this section you implement printing a document.
Like the previous exercise, the steps take a top-down approach. That is, you start at the application level and implement the application functions necessary to support printing a document. That means supporting printing from the Finder.
Then you add printing to a document class derived from LSingleDoc. This is where the real work takes place. Happily, PowerPlant does most of the work. Let's see how.
3. Implement printing from the Finder.
PrintDocument() CPrintingApp.cp
Recall from earlier in this chapter that PowerPlant calls this
function in response to a print document Apple event received
from the Finder. Such an event is generated when the user selects
your document on the Desktop, and chooses Print from the Finder's File menu, or drops your document on a desktop printer icon. This
function is not called when the user chooses Print from your application's File menu.
Recall also that in the PowerPlant document strategy, a document is responsible for printing itself.
Therefore, there are two steps you must take to implement printing from the Finder.
You did this in the previous exercise. This function receives a file specification. Call the document constructor. Pass in the supercommander and the file specification.
b. Tell the document to print itself.
Call the document's DoPrint() function.
// Create a new document using the file spec.
CTextDocument *theDocument = new CTextDocument(this, inMacFSSpec);
Assert_( theDocument != nil );
// Tell the document to print.
theDocument->DoPrint();
That's it. You have just implemented printing from the Finder. Save your work and close the file. Of course, you have just delegated printing responsibility to the document. You implement that functionality in the next step.
TIP This code might be a little too simple. For example, what happens if the user selects a file in the Finder that is already open in your application? This might have repercussions in your application, or it might not. Keep it in mind.
PowerPlant calls this function whenever the user chooses the Print item in the File menu. Recall that this document class inherits from LSingleDoc,
and ultimately from LDocument. In LDocument, the DoPrint() function is empty. In your subclass (in this case CTextDocument),
you must supply the necessary functionality.
In this function the document should print itself. There are several steps you must go through to accomplish this task. They are:
Call the LPrintout class creator function. The declared constant for the PPob resource is rPPob_TextPrintout. In the process of creating the LPrintout, that object is assigned the default print record by a call to UPrinting::GetPrintRecord().
b. Set the print record for the printout.
You want to print the document with the document's own printing options, not the default printing record. The document has an mPrintSpec member. However, this data member may be nil. If the document has a print record, set the printout's print record to match the document. Call the printout's SetPrintRecord() function.
The declared constant is kTextPlaceholder for the placeholder pane ID.
d. Install the text view in the placeholder.
Call the placeholder's InstallOccupant() function. Use no alignment. Remember, this makes the text view
resize to fill the placeholder completely, which is just what
you want to happen in this case.
e. Adjust the size of the frame.
Call SetPrintFrameSize(). This function is provided for you. This task is specific to
this application, and not to printing in general. However, it
does illustrate how you can adjust the printed frame to allow
for aesthetic concerns.
Here's the problem. Remember, that the text view frame has just been resized to fill the placeholder. It is unlikely that an integral number of lines of text will just fit perfectly in the frame. As a result, the top part of a line of text may appear at the bottom of one page, and the bottom part of that same line of text would appear at the top of the next page. That makes the document difficult to read, to say the least.
The SetPrintFrameSize() function adjusts the bottom of the text view frame so that an
integral number of lines just fits in the frame. As a result,
the printed document looks good.
When you implement printing in your own application, you will run into similar concerns relating to page and object boundaries.
Ah, here's the critical step. PowerPlant does all the work. Call
the printout's DoPrintJob() function. You're done.
When you're through, delete the printout object. When the placeholder is destroyed, it returns the text view object to its original condition in the scrolling view in the text window.
Here's the solution code that accomplishes all these tasks.
		// Create the printout.
	StDeleter<LPrintout>	thePrintout(LPrintout::CreatePrintout(rPPob_TextPrintout));
	ThrowIfNil_(thePrintout.Get());

		// Set the print record.
	thePrintout->SetPrintSpec(mPrintSpec);

		// Get the text placeholder.
	LPlaceHolder* thePlaceholder = dynamic_cast<LPlaceHolder*>
							(thePrintout->FindPaneByID(kTextPlaceholder));
	ThrowIfNil_(thePlaceholder);

		// Install the text view in the placeholder.
	thePlaceholder->InstallOccupant(mTextView, atNone);

		// Set the frame size.
	SetPrintFrameSize();

		// Print.
	thePrintout->DoPrintJob();

	// Delete the printout (handled automatically by the
	// StDeleter object). The text view is returned
	// to the window when the placeholder is destroyed.
}
Well done! That is all you have to do to implement printing. Save your work and close the file. Let's see how it works.
5. Build and run the application.
When the project builds correctly and you run the application, a familiar text window appears. Enter some text, or open a text document, and print it. It should print fine. If you have more than one page of text, lines should break evenly across page boundaries.
Admittedly, this is a simple case of printing, but it does everything you need to do to print a document in PowerPlant. There is plenty of room for experimentation and enhancement, however.
For example, you still cannot print from the Finder. If you try,
TeachText launches! This application does not have a custom creator
type or a BNDL resource. Correct this problem, and try Finder
printing. While in the Finder, select the icon for a document
created by your application, then choose Print in the Finder's File menu. If you have a desktop printer icon, drop a document on
your printer icon. Either way, your application should launch
and print the document.
The human interface guidelines say that when printing from the Finder, if the document is not already open you should not display a window. You should just print the document. Make your application follow that guideline.
Remember the page-numbering option in PowerPlant to count pages down or across. Experiment with that setting on a large and wide document, and see what happens. Give the user the option of choosing which way to go.
Create a printout with two or more placeholders-for example, a header or footer in a text document. Play with the margins and with alignment settings. Implement even and odd printing. The possibilities are endless. As always, have a good time exploring. And when you're through, we can move on to the final chapter.
Congratulations! Fourteen down and one to go. In the next chapter we take on periodicals and attachments. These are two of the coolest features in all of PowerPlant.