In this chapter we begin the process of building an application in PowerPlant. In the Basic Building Blocks chapters we used a class-centered perspective to learn about the pane classes. We talked all about LPane, LView, LControl, and their descendants.
From now on we're going to use a task-based perspective. We won't be able to avoid talking about classes, but for the most part you're going to see these discussions centered around how to use a class to accomplish a particular programming task.
As usual, you will close out the chapter with a code exercise.
The application class is the basic foundation of a PowerPlant application. In this section we discuss the fundamental information you need to know to understand and use an application object, including:
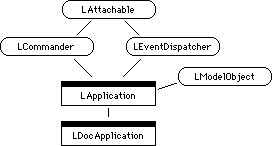
Figure 9.1 illustrates the class hierarchy. There are only two application classes in PowerPlant, LApplication and LDocApplication.
The LDocApplication class is effectively identical to LApplication, except that it provides member functions to support documents and printing. We will discuss documents in Chapter 13, "File I/O" and printing in Chapter 14, "Printing" later in this manual.
LApplication is the basis of our discussion in this chapter. We are going to concentrate on setting up an application, and on the event handling features of an application.
Notice that LApplication inherits from several mix-in classes. Each of these is the source for part of the nature of an application:
LEventDispatcher-an application receives, identifies, and dispatches events. (See "Event Handling and Dispatch.")
In addition to the behavior it inherits or overrides from its various base classes, an application has a few functions that it implements for itself. Table 9.1 lists each function and its purpose.
| Function |
Purpose |
|---|---|
An application's state reflects what it is doing. Listing 9.1 contains the three possible states the application may be in.
enum EProgramState {
  programState_StartingUp,
  programState_ProcessingEvents,
  programState_Quitting
};
PowerPlant uses these values internally, and typically you won't be concerned with or modify an application's state.
If you want to quit the application, you can do so by setting
the application's mState data member to programState_Quitting. At the risk of repeating ourselves, PowerPlant's default behavior
takes care of this for you. You shouldn't have to do this on your
own. In fact, doing so may bypass features like checking to save
changed documents before allowing the application to quit.
Typically you derive your own application class from either LApplication or LDocApplication. Most of an application's standard behavior, as implemented by PowerPlant default member functions, will suit you just fine.
You will certainly override some LApplication member functions, including:
ShowAboutBox()-because you're going to want a killer About Box.
StartUp()-to respond to an open application Apple event in your own way-for
example, to display a splash screen.
Initialize()-last chance to initialize Application before processing events.
In addition, you'll want to override some member functions inherited from LCommander including
ObeyCommand() FindCommandStatus()
We'll talk about these last three functions in the next chapter. In the rest of this chapter we'll talk about setting up an application and LApplication's event handling features.
Every C++ program needs a main() function. A PowerPlant application is no exception. PowerPlant
itself does not have a main(), but the CHyperApp.cp file does. When you use PowerPlant stationery to create a new
project, this file is automatically included in the project. Listing 9.2 contains the code for this main() function. We'll use it as an example throughout this chapter.
When you create a new project from stationery, you should open
the CHyperApp.cp file and save it with a new name in your project's folder. This
will automatically update the CodeWarrior project file at the
same time. You can then make necessary changes to the file.
Alternatively, you can create your own version of main() that suits your own needs.
void main(void)
{
  // Set Debugging options
  SetDebugThrow_(debugAction_Alert);
  SetDebugSignal_(debugAction_Alert);
  // Initialize Memory Manager - Parameter is
  // number of Master Pointer blocks to allocate
  InitializeHeap(3);

  // Initialize standard Toolbox managers
  UQDGlobals::InitializeToolbox(&qd);

  // Install a GrowZone function to catch
  // low memory situations.
  new LGrowZone(20000);

  // replace this with your App type
  CHyperApp theApp;
  theApp.Run();
}
Initializing and launching an application requires that these tasks be performed as necessary:
Let's look at each of these tasks. We're going to take the opportunity to explore some utilitarian features of PowerPlant in great detail, particularly debugging and memory management.
PowerPlant has powerful debugging macros that you can use when
developing software. You can read about these features in two
files: UDebugging.h and UException.h. You should also consult the PowerPlant Reference.
You can use PowerPlant's debugging features without using any other part of PowerPlant. Simply include the header files and corresponding source files in your project.
The PowerPlant debugging-macro strategy is straightforward. You
may "throw" an error or raise a signal. The "throw" occurs if
you use the Throw_ macro. This is similar the C++ keyword throw, and in fact, eventually performs a C++ throw. Throw_ performs an extra notification of the error condition through
a dialog or low-level debugger. We will use the macro name Throw_ to avoid confusion. In addition to Throw_ there are four signal macros that we'll refer to generically
as Signal_.
 WARNING!
 PowerPlant debugging support requires the presence of a debugger like MacsBug (or other low-level debugger such as TMON or Jasik) or the CodeWarrior IDE. If you do not have such a debugger present, you will crash.
An error indicates something is wrong. A Signal_ indicates something unusual has happened or just an informative
message. If you ignore an error, something bad happens. If you
ignore a Signal_, nothing bad happens.
In general, you should Throw_ when an error occurs. An error may be defined as a situation which,
if not handled, can cause significant problems (like crashing
the computer.) You should raise a Signal_ for a condition which does not threaten the integrity of the
application or the stability of the computer, but which is unusual.
For example, you might want to Throw_ an error if you encounter a nil handle. You might want to raise
a Signal_ if you try to unlock an already unlocked handle.
To activate these macro capabilities, you #define two terms: Debug_Throw and Debug_Signal. The effects of defining or not defining these terms are listed
in Table 9.2.
| Term |
Macro |
action |
|---|---|---|
In either case-Throw_ or one of the four Signal_ macros-PowerPlant defines four possible actions to take, as shown
in Listing 9.3.
typedef enum {
  debugAction_Nothing =0,
  debugAction_Alert = 1,
  debugAction_LowLevelDebugger = 2,
  debugAction_SourceDebugger = 3
} EDebugAction;
The alert action displays a dialog containing the exception code,
as well as the source code file name and line number that generated
the Throw_ or Signal_. The low-level debugger action displays a string-in MacsBug for
example-identifying the routine and offset into the routine, and
the exception code. The source-level debugger stops with the current
statement arrow pointing to the line containing the Throw_ or Signal_.
WARNING! If you use the low-level debug action and don't have a low-level
debugger installed, you will crash when you Throw_ or Signal_. If you use the source-level debug action and don't have a source-level
debugger running, you may crash, or you may break into a low-level
debugger if one is available. We recommend you have a low-level
debugger like MacsBug installed at all times.
 TIP
TIP It is best, for compatability purposes, not to use the source-level debug action. This avoids Mixed Mode Manager switches when debugging on PowerPC Mac OS computers and keeps your debugging information in tact.
PowerPlant maintains two global variables, gDebugThrow and gDebugSignal that specify which of the four possible actions to take on either
a Throw_ or a Signal_. By default, gDebugThrow and gDebugSignal are set to debugAction_Nothing. You can set their values at any point in the program if you
want to use different options in different sections of code. Usually,
you set their values at the beginning of your main program.
For example, this code from main()...
SetDebugThrow_(debugAction_Alert);
SetDebugSignal_(debugAction_Alert);
...uses macros to set the global variable to a debug action.
Having defined Debug_Throw and Debug_Signal and having set the values for gDebugThrow and gDebugSignal, you can use the macros defined in UDebugging.h. Table 9.3 lists their usage.
| Macro |
Usage |
|---|---|
Using these macros is pretty straightforward, with one exception.
Remember that if Debug_Signal is not defined, then any signal macro does nothing. This includes
the popular Assert_ macro. When your code is compiled, every occurence of a signal
macro generates no code.
As a result, you should be very careful that the test inside the signal macro have no side effects. A test with side effects can lead to very subtle bugs creeping into your code when you turn debugging off. Take a look at this sample code.
void main(void)
{
  int number = 5;
  Assert_(--number < 10);
  cout << "number = " << number << '\n';
}
The test in the Assert_ macro has the side effect of decrementing the value in number.
When Debug_Signal is defined, the macro test executes, and number has a value of
4. When Debug_Signal is not defined, the macro generates no code, and number has a
value of 5. The code does not run the same when debugging is off.
UException.h defines several more macros that are especially useful for Mac
OS programming. The macros for throwing exceptions defined in
UException.h all eventually invoke the underlying Throw_ macro.
More PowerPlant debugging macros:
| Macro |
Usage |
|---|---|
You will find these macros used throughout the PowerPlant source
code. You can use them in your own code as well. When you want
to turn off all the debugging code, simply comment out your definition
of Debug_Throw and/or Debug_Signal. If you turn off Debug_Throw, all of your Throw_ macro calls will automatically call the standard C++ throw().
TIP PowerPlant has several stack-based classes for memory management. The advantage of stack-based objects is that the destructor is automatically called, even when there is an exception thrown. See "Stack-based memory classes."
A Throw_ occurs inside a Try_ block. The Try_ macro is the PowerPlant equivalent of the C++ try keyword. They are identical.
Of course you must have something to handle a Throw_. The PowerPlant macro is Catch_(). It maps directly to the C++ catch mechanism but will only catch
a throw of type ExceptionCode. For example:
Catch_(iErr)
catch ( Exceptioncode iErr )
are equivalent. If you need a "catch all," use the C++ catch().
If you do not have a catch() handler of some type, your program will terminate. The LApplication::Run() function has a universal catch handler, so a PowerPlant application
isn't likely to terminate. However, that handler simply displays
a message.
TIP Grab a good C++ book and look over the C++ exception handling
mechanisms such as new_handler, unexpected(), terminate, etc. Remember, even though you are using the PowerPlant framework, you are still using in the C++ Language. All of the benefits and features of the C++ language are available
to you...feel free to explore and use them!
None of the PowerPlant debugging features prevents you from using
the standard C++ try, throw(), catch() exception handling mechanism. The PowerPlant macros map to this
mechanism. However, the PowePlant macros offer an additional layer
of information and debugging capability.
TIP Although not related to PowerPlant, CodeWarrior also includes
DebugNew-a utility for debugging memory allocation. Examine the
file DebugNew.cp for additional debugging features regarding the new operator.
The second task you must perform when launching an application
is to initialize the application's heap. The sample main() function calls InitializeHeap(). This function is defined in UMemoryMgr.cp. It is not a member of any class.
Call this function at the beginning of your program (before initializing
the Toolbox) to expand the heap zone to its maximum size and allocate
a specified number of master pointer blocks. If you want to perform
unusual tasks, such as modifying the size of the stack, you can
replace InitializeHeap() or call your own function in addition, as appropriate.
After initializing the application's memory space, you must set
up the Mac OS Toolbox for your application's use. PowerPlant provides
the UQDGlobals class to handle this for you. Our sample main() function calls UQDGlobals::InitializeToolbox(&qd).
This function initializes all the common Toolbox managers, as shown in Listing 9.5.
UQDGlobals::InitializeToolbox() snippet:
::InitGraf((Ptr) &sQDGlobals->thePort);
::InitFonts();
::InitWindows();
::InitMenus();
::TEInit();
::InitDialogs(nil);
If you have additional managers to initialize, you must do so
at this phase of the startup process. You may override the UQDGlobals
class, but a more typical solution would be to simply put the
necessary code either in your own function or directly in main().
TIP If your application uses QuickTime, initialize the QuickTime Manager
with UQuickTime::Initialize().
A good application framework provides significant assistance for managing memory. PowerPlant certainly qualifies.
PowerPlant establishes an emergency memory reserve and uses a
GrowZone() function to release it. PowerPlant also provides a series of
memory-related classes for helping you with typical memory-related
housekeeping.
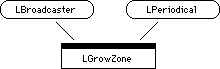
LGrowZone encapsulates the PowerPlant memory management strategy. It has two parts: a memory reserve, and a strategy for asking other objects to release memory. Figure 9.2 illustrates the inheritance hierarchy for LGrowZone.
Notice that LGrowZone is one of PowerPlant's free-standing classes. You can use LGrowZone by including nothing more than it, LPeriodical, LBroadcaster, and LListener in your projects.
In your application you create a single instance of LGrowZone.
When you call the LGrowZone constructor, you specify the size
of the memory reserve, as our main() function does with this code:
new LGrowZone(20000);
Notice that LGrowZone inherits from LBroadcaster. When faced with a memory shortage, LGrowZone does two things. It asks all listeners to release memory, and it releases the memory reserve.
Objects that are able to free memory when needed should be listeners. You attach them to the LGrowZone object so that the listeners are notified when memory is low, using code like this:
LGrowZone::GetGrowZone()->AddListener(myObject);
When memory runs short, the object receives a ListenToMessage() call with a msg_GrowZone message and a pointer to the number of bytes still needed. The
object can then respond accordingly. The object tells LGrowZone
the number of bytes freed. If it cannot release any memory, it
must supply a zero so LGrowZone knows that memory was not released.
LGrowZone also inherits from LPeriodical. We discuss LPeriodical in greater detail in Chapter 15, "Periodicals and Attachments." In a nutshell, a periodical object is called from the main event loop either on every pass through the loop, or when null events are received.
In this case, LGrowZone's constructor sets up the object so that
its SpendTime() function is called each time through the main event loop. In
that function, if the reserve has been used up, LGrowZone tries
to re-establish the reserve. If it cannot, it warns the user.
Consult the PowerPlant Reference for more details on LGrowZone.
PowerPlant gives you a set of simple classes to help you allocate
and deallocate memory safely. These classes are all declared in
UMemoryMgr.h.
In these utility classes, the constructor performs some action and the destructor undoes the action. The advantage of stack-based objects is that the destructor is automatically called, even when there is an exception thrown.
Effect of stack-based memory classes:
| Class |
Constructor |
Destructor |
|---|---|---|
Note that the StHandleLocker class does not move the handle high in the heap.
The StHandleBlock class may use temporary memory if the application's heap is full. StClearHandleBlock does not.
There are two other block-related functions you may wish to use,
BlocksAreEqual() and BlockCompare(). See the PowerPlant Reference for details.
Finally, UMemoryMgr.h also declares the StValueChanger template class. The constructor saves the original value and changes to the specified new value. The destructor restores the original value. This is a useful class for preserving and restoring state information.
PowerPlant does not use a memory pre-flighting strategy where memory requests are tested against available memory before an attempt is made to allocate the memory.
If you would like to implement memory pre-flighting, or use a memory management strategy with a finer resolution than simply releasing the memory reserve in one fell swoop, you may certainly do so. You may derive your own memory management class from LGrowZone, or create your own.
Although not obvious, our sample main() function does a simple assessment of the operating environment.
Your application may need to do more. Our main() creates an instance of the application object.
CHyperApp theApp;
In the process, its constructor and the default LApplication constructor
are called. In the LApplication::LApplication() constructor, PowerPlant looks for the version of QuickDraw in
the environment (among other tasks). See Listing 9.6.
Lapplication::LApplication() snippet:
    // Check for Color QuickDraw
  SInt32 qdVersion = gestaltOriginalQD;
  ::Gestalt(gestaltQuickdrawVersion, &qdVersion);
  UEnvironment::SetFeature(env_SupportsColor,
               (qdVersion > gestaltOriginalQD));
PowerPlant uses the UEnvironment class to track several features, as shown in Listing 9.7.
PowerPlant environment tracking:
enum {
  env_SupportsColor       = 0x00000001,
  env_HasDragManager      = 0x00000002,
  env_HasThreadsManager   = 0x00000004,
  env_HasThreadManager    = 0x00000004,
  env_HasAOCE             = 0x00000008,  // obsolete
  env_HasStdMail          = 0x00000010,  // obsolete
  env_HasStdCatalog       = 0x00000020,  // obsolete
  env_HasDigiSign         = 0x00000040,  // obsolete
  env_HasQuickTime        = 0x00000100,
  env_HasAppearance       = 0x00001000,
  env_HasAppearanceCompat = 0x00002000,
  env_HasAaron            = 0x00004000,
  env_HasAppearance101    = 0x00008000   // AM 1.0.1 installed?
};
You can inquire if a feature is available by calling UEnvironment::HasFeature(), a static member function.
The application constructor is a good place for application-level
initialization and environment testing. For example, The LApplication() constructor builds the menu bar. In your own constructor you
may wish to do additional testing for other features of the environment,
modify the application's sleep time, and so forth. You could also
perform these tasks in a separate initialization function immediately
after creating an application object if you wish.
the PowerPlant Reference for more information on UEnvironment.
Your application object's constructor typically performs one more critical function-it registers the necessary PowerPlant classes. PowerPlant relies heavily on stream-based creator functions in its visual (UI) classes. The PPob resource encapsulates the information necessary to build you UI elements from scratch using this stream-based creator function technique.
When creating a PPob-based object, PowerPlant must know which creator function to call for which class. It does this by maintaining a table that associates a unique class ID with that class's stream-based constructor. You must have an entry in this table for the class creator function before instantiating a PPob-based object.
To register an individual class, you use the RegisterClass_() macro. You provide your class name, the macro does the work of
creating a creator function and adding it to the class table.
Your class must have a unique class ID in the class definition.
WARNING! If you do not register each and every class that you directly
utilize in your PPob resource(s), your application will not work
properly. If you have the Signal_ debugging features turned on, you should get a "Unregistered
ClassID" signal raised in UReanimator.cp when you try to instantiate a class without first registering
that class.
Failing to register a class is perhaps the single, most common cause of problems encountered by new PowerPlant programmers.
Here's an example call to RegisterClass_() that registers the LButton class.
RegisterClass_(LButton);
It is not necessary to register PowerPlant classes that are not explicitly used in your PPob resource(s).
For example, if you have a class called CMyPane that inherits from LPane.You use CMyPane in your PPob but never use LPane (directly). You do of course need to register CMyPane, but you do not need to register LPane as you never directly utilize LPane in your PPob. In this case, you still need to include LPane.cp in your project since CMyPane inherits from it.
WARNING! Previously, to register an individual class, you had to call URegistrar::RegisterClass() and provide the class ID and the creator function. This method
is obsolete and should not be used. The obsolete method is currently
supported for compatibility with existing classes, but will not
be supported in the future. You should update your code accordingly.
Finally, don't forget that you must register any PPob-based class that you derive.
After you create your application object, perform any additional
initialization, and register each and every PPob-based class you
use, it's time to start the main event loop running. Our sample
main() function does the following to accomplish this task:
theApp.Run();
Just call the application object's Run() function, and you're on your way. The Run() function makes the menu bar and calls the LApplication::Initialize() function to perform additional setup such as modify the menus
in the application. We'll discuss this task in the next chapter.
The application's Run() function calls ProcessNextEvent() repeatedly. ProcessNextEvent() does the real work. It:
Because LApplication inherits from LEventDispatcher, it can dispatch
events. It calls the inherited DispatchEvent() function. This function parses the event and calls the appropriate
handler.
Each handler performs whatever additional parsing (if any) is necessary. The handler might identify the most recently clicked pane, or retrieve the current target object in the command hierarchy. You can study the LEventDispatcher code to see the details.
The handler dispatches the event to the appropriate object. A click goes to a pane. A command or keystroke goes to a commander. The pane or commander is responsible for handling the event.
If a commander does not handle a command itself, it passes the command back up the command chain until someone does handle it. The ultimate supercommander is your application object. It is responsible for any command not handled by objects below it in the command hierarchy. We'll discuss this process in more detail in Chapter 10, "Commanders and Menus."
Before we do, notice that this section on events and dispatching does not include any instructions for typical ways in which you override or derive classes to modify the default event-dispatch behavior of PowerPlant. While you are certainly free to do so, it is unlikely that you will ever need to modify event handling and dispatch. This behavior is a gift from PowerPlant. Enjoy it.
However, there is one tricky detail that occasionally trips up new PowerPlant programmers-Apple events.
PowerPlant relies on Apple events for some of its basic functionality. The process of launching an application is a good example. When you launch an application from the Finder, after the application launches it receives one of three Apple events from the Finder-open application, open documents, or print documents.
Assuming that you aren't opening or printing documents, the application
receives the open application Apple event. In response to that
event, the application calls the application's StartUp() function.
In this function you can perform some setup work for the application.
For example, you might want to have a default window open on launch
if the user isn't opening documents. There are any number of tasks
you might perform in the StartUp() function.
However, for this to work your application must be aware of Apple
events. To ensure that it is, go to the 68K Processor or PPC Processor target settings panel (depending on your build target), and examine
the SIZE flags. Make sure the "isHighLevelEventAware" flag is
checked(Figure 9.3). If it is not, your application will not receive Apple events,
and StartUp() won't be called.
You must also have the proper `aedt' resources in your application.
If you use PowerPlant project stationery, the file PP AppleEvents.rsrc is contains these resources and is included for you.
isHighLevelEventAware flag in target preferences: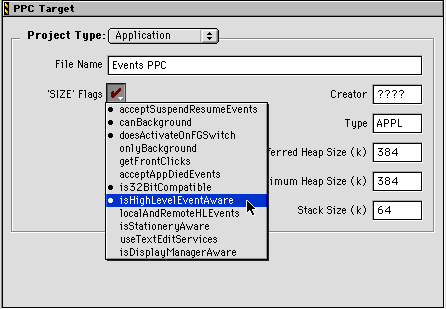
In this chapter you learned how to initialize a PowerPlant application, and about the PowerPlant utilities designed to help you in that task.
PowerPlant has a powerful set of macro-based debugging features for throwing exceptions or raising signals. These features are implemented in an independent section of PowerPlant so that you can use the debugging features without using the rest of PowerPlant.
PowerPlant uses an emergency reserve memory management strategy in association with a well-designed LGrowZone object. The LGrowZone object broadcasts a need for memory. Objects you create that can release memory can listen to the LGrowZone object and respond to the plea for memory donations. You also learned about the many stack-based utility classes that can assist you in robust memory management.
You learned how to register PowerPlant pane classes, and about the importance of registering your own classes as well. Finally, you read about the event dispatch mechanism in PowerPlant.
Let's see how it all works in some real code.
The application you work on in this exercise is named "Events." Because event dispatch is completely implemented in PowerPlant, this chapter emphasizes debugging and memory management. We also look at how the project sets up the development environment. These details are important when you want to turn debugging on, register new PowerPlant classes, and so forth.
As usual, we'll look at the application interface first, and then write code to implement the application.
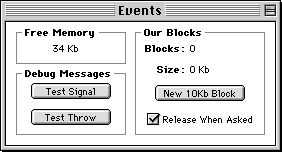
The Events application is a memory eater. Figure 9.4 shows you what the application looks like.
Examine the various panes in Constructor. In this code exercise the PPob resource is complete. You won't add or modify any panes.
There are three LGroupBox objects, of which we take no further note.
There are four LCaption objects. Two of them are simple labels. Two of them report information about the application's use of memory. The "Blocks" caption reports the number of blocks you have created. The "Size" caption reports how much memory the application has eaten.
The "Free Memory" caption is a custom caption pane. It reports available memory. You'll register this class when you write the application. The code for the class is provided for you.
There are three buttons. The Test Signal button sends a signal. The Test Throw button throws an exception. The New 10Kb Block button creates a memory block, if memory is available. The application
keeps track of the allocated blocks.
The Release When Asked button controls the application's behavior when it runs out of memory. At that time, the LGrowZone object will ask its listeners for memory. The application listens for the message and responds.
Like the code you wrote in Chapter 8, the application listens to the controls in its window and responds appropriately. You'll write some of that code in this exercise.
In this section you set up the development environment, set up debugging, and implement the Events application.
C/C++ settings dialog Events.mcp
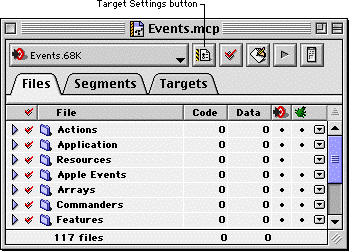
Click the Target Settings button on the Events.mcp project window (Figure 9.5). Then choose the C/C++ Language panel, as shown in Figure 9.6.
TIP The toolbar on the IDE Project Window and the global toolbar are completely customizable. See the IDE User Guide for more information on how to customize CodeWarrior.
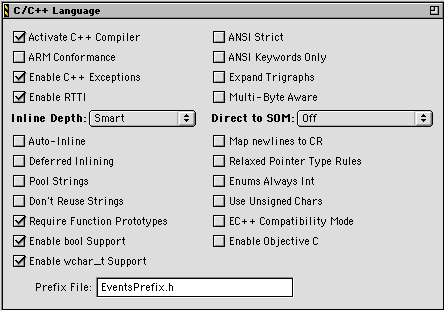
Notice that the prefix file is EventsPrefix.h. In the PowerPlant stationery, the prefix file is PP_DebugHeaders68K or PP_DebugHeadersPPC. The PP_DebugHeaders.cp file used to build those precompiled headers contains the following
code:
// Define all debugging symbols
#define Debug_Throw
#define Debug_Signal
// include the header files for the standard PowerPlant classes
#include <PP_ClassHeaders.cp>
One way to turn on debugging is to use PP_DebugHeaders for the correct build target (68K or PowerPC). To turn debugging
off, change the project prefix to PP_MacHeaders68K or PP_MacHeadersPPC.
You'll accomplish the same goal in EventsPrefix.h in just a bit.
You accomplish one primary in this step. You turn on debugging.
The existing code includes the correct version of PP_MacHeaders depending on the build target.
#include <PP_MacHeaders.h>
// Define debugging symbols.
#define Debug_Throw
#define Debug_Signal

// Include the PowerPlant prefix file.
#include <PP_Prefix.h>
The PP_Prefix.h file defines some additional terms for the universal headers,
and includes additional PowerPlant header files.
Save your work and close the file.
3. Examine the application class
class declaration CEventsApp.h
This particular application class inherits from LApplication and LListener. This allows the application to listen to the controls in the window. It also allows the application to listen to the LGrowZone object. Listing 9.8 contains the complete class declaration.
class CEventsApp : public LApplication, public LListener {
public:
               CEventsApp();
  virtual      ~CEventsApp();
  virtual void ListenToMessage( MessageT inMessage,
                                void *ioParam );

protected:
  LWindow*     MakeEventsWindow();

private:
  LWindow*     mWindow;
  LArray       mBlockList;
};
This class overrides the ListenToMessage() function inherited from LListener. It declares a new function,
MakeEventsWindow() to create the window. It has two new data members, mWindow and mBlockList. The former points to the application's only window. The latter
is a list of allocated blocks of memory.
When you are through examining the declaration, close the file.
4. Build the application object
The project's main() function is provided for you in this file. It initializes the
heap, initializes the Toolbox, creates the LGrowZone object, and
creates an application object. Of course, the application constructor
is called at that moment.
In this step you write the application constructor. There are five tasks you must accomplish. They are:
a. Set the action to occur on Throw_ and Signal_.
Use the SetDebugThrow_ and SetDebugSignal_ macros. Set the response to debugAction_Alert so an alert is displayed in response to either a throw or signal.
b. Register required core PowerPlant classes.
Register LWindow, LCaption, LStdButton, LStdCheckBox, and LGroupBox.
c. Register any custom classes.
The only custom class is the CFreeMemoryCaption class.
Call the application's MakeEventsWindow() function. It returns the LWindow*. You can store it in mWindow. And, now that you have debugging features available, use a macro
to check the LWindow pointer and ensure it isn't nil.
e. Link the application to the LGrowZone object.
Get the LGrowZone object and call its AddListener() function. You want to link the application object to the LGrowZone
object.
The solution code is listed here for reference. This function is empty in the start code. You write the whole thing here.
// Setup the throw and signal actions.
SetDebugThrow_( debugAction_Alert );
SetDebugSignal_( debugAction_Alert );
// Register required core PowerPlant classes.
RegisterClass_(LWindow);
RegisterClass_(LCaption);
RegisterClass_(LStdButton);
RegisterClass_(LStdCheckBox);
RegisterClass_(LGroupBox);

// Register custom classes.
RegisterClass_( CFreeMemoryCaption );

// Create the single application window.
mWindow = MakeEventsWindow();
ThrowIfNil_( mWindow );

// Listen to messages from the grow zone.
LGrowZone::GetGrowZone()->AddListener( this );
MakeEventsWindow() CEventsApp.cp
The PPob that describes this window has been provided for you. In this step you accomplish two tasks.
Call LWindow::CreateWindow(), the class creator function. The resource ID constant is rPPob_EventsWindow. The window's supercommander is the application object.
This call returns a pointer to an LWindow object. Use a macro
to ensure that the pointer is not nil. You can use Assert_.
b. Link the application to the controls in the window.
Call UReanimator::LinkListenerToControls(). The ID constant for the RidL resource is rRidL_EventsWindow.
The solution code for both tasks is listed here.
// Create the window.
LWindow* theWindow;
theWindow = LWindow::CreateWindow( rPPob_EventsWindow, this );
ThrowIfNil_( theWindow );
// Link the application (the listener) with the
// controls in the window (the broadcasters).
UReanimator::LinkListenerToControls( this, theWindow,
                                     rRidL_EventsWindow );

theWindow->Show();
The existing code shows the window and returns the LWindow pointer to the caller-the application constructor in this case.
ListenToMessage() CEventsApp.cp
The application listens to the controls in the window. It also
listens to the LGrowZone object. The application's ListenToMessage() function may receive four messages:
In this step you write some of the code to respond to the msg_GrowZone message, and all the code for testing the signal and throw mechanisms.
The code for creating a memory block is provided for you.
a. Release memory if appropriate.
When you receive a msg_GrowZone message, send yourself a signal. Although you wouldn't do this
in a real application, this is instructional here. When the LGrowZone
object asks for memory, you'll hear about it.
case msg_GrowZone:
{
  // We're asking for memory, let user know
  SignalPStr_("\pLGrowZone asking for memory" );
  SInt32 theBytesFreed = 0;
WARNING! Raising a signal here may cause a crash! This call causes PowerPlant to display a dialog. That dialog must be loaded into memory. Under just the wrong low-memory conditions, (and you'll be creating a low memory condition) there isn't enough room and a crash will result. You can omit this line of code without affecting the application. You just won't receive a notice when LGrowZone sends this message.
You should examine the remaining code in this case, it is very instructive. The code first determines the state
of the check box. If memory release is allowed, the application
walks through the list of memory blocks and releases them.
The code creates an iterator, starts with the first handle in the list, and operates on each handle. If the block is not a protected block, it removes the handle from the list and disposes of the handle. Notice that the iterator can modify the list while iterating! This causes no problems in PowerPlant. (See "Arrays.")
When complete, the application updates the two captions that reflect
the number of blocks and the amount of memory in those blocks.
Notice that the code uses an LStr255 object. This is a descendant of LString. Among other features,
the LString class provides a series of operator overloads for
working with strings. The code here takes advantage of the LString
features to automatically convert a 32-bit number into a string,
and uses the += operator to append strings. (See "LString.")
When the application receives msg_TestSignal, send a signal.
case msg_TestSignal:
{
  // Raise a test signal.
  SignalPStr_( "\pSignal test" );
}
break;
When the application receives msg_TestThrow, throw an exception. You can use PowerPlant macros for the entire
process. Create a try block. In the block, use Throw_ to throw an error. Use the value -1. In the catch block, you don't have to do anything. This is just a test.
case msg_TestThrow:
{
  try {
    // Throw an error.
    Throw_( -1 );
  } catch( LException& inErr ) {
    // Catch it here.
  }
}
break;
That's it. Save your work and close the file.
The code to handle msg_NewBlock has been provided for you. Study it as another example of list
management and string manipulation in PowerPlant.
7. Build and run the application.
Make the project and run it. When you do, a window should appear containing all the views. See Figure 9.4.
Notice the amount of free memory, the number of allocated blocks, and the space required for those blocks. The Release When Asked check box should be on.
Click the New 10Kb Block button. Watch how the free memory, size, and number of blocks
all change. Click the button repeatedly until you run out of memory.
When you do, a signal dialog should appear telling you that LGrowZone
is asking for memory.
 NOTE
NOTE This is where you might crash. If the signal dialog does not appear
and you crash, return to Step 6a and remove the code that calls
SignalPString().
If the signal dialog appears, click OK. Then observe the amount of free memory, number of blocks, and size.
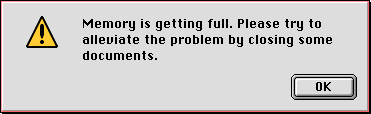
Now, turn off the Release When Asked check box. The application will no longer release memory when asked. Create new blocks until you run out of memory. Once again, you should see the signal dialog telling you that LGrowZone is asking for memory. Click OK. This time, memory is not released. You have run out of memory and you'll see a warning dialog, as shown in Figure 9.7.
This is the standard PowerPlant low-memory alert. It isn't 100% appropriate in this circumstance, because there are no documents to close. In your own application, you can modify this alert to display a more accurate message.
TIP The memory warning should never cause a crash, even in low memory conditions. These warning dialogs are preloaded and locked, so they are always available.
Don't forget to test the two Debug Messages buttons to observe the signal and throw dialogs.
If you want to explore, turn off signaling and see what happens
when you run out of memory. Turn off all debugging and see what
happens when you throw an exception. Use different PowerPlant
macros to test values, send signals and throw exceptions. Use
the standard C++ try, throw, and catch keywords rather than PowerPlant macros, and see if there's any
difference.
Finally, if you look at the free-memory caption closely you may
notice it flash every second or so. The code for this custom caption
was provided for you. Feel free to explore that code. This caption
inherits from LPeriodical and installs itself in a special queue.
Every time there is an idle event, this caption's SpendTime() function is called. We'll discuss how this works in "Periodicals." If you explore this process, think about how you might eliminate
or reduce the flashing. There is one straightforward solution.
You could store the previous value, and only update the caption
when the value changes. Implement that solution, or your own solution,
and observe the difference.
Once again, congratulations are in order. This chapter deals primarily with low-level coding details like memory management and debugging.While this isn't the most glamorous part of PowerPlant, these are critical skills in the real world of software development. Best of all, you have now explored how to use them most effectively in PowerPlant, and practiced those skills.
In the next chapter you start working on menus. After that, you'll implement windows and dialogs. Then you'll work with documents, files, and printing. Finally, you'll study periodicals and attachments. The exciting stuff is coming!