You have come a long way. This is the last chapter of the PowerPlant Book. At the end of this chapter we'll look back at everything we have covered so far, and discuss briefly where you should go from here.
In this chapter we close out the core elements of PowerPlant with a discussion of two important parts of the PowerPlant application framework:
We saved these two topics for last for good reason.
Periodicals are very easy to implement, and can serve for any kind of time-dependent function. They aren't restricted to particular application tasks like file I/O or menu handling. Periodicals are unbounded in terms of utility. Therefore it helps to have a good understanding of PowerPlant before discussing periodicals.
That is even more true for attachments. Attachments are perhaps the most astonishingly powerful and simple concept in all of PowerPlant. They are the epitome of elegance in design and implementation. You are really going to like attachments.
In this section we discuss LPeriodical, and how PowerPlant implements repetitive tasks. This is a very cool and simple feature of PowerPlant. The topics are:
Periodicals are very easy to implement.
In PowerPlant terminology, an object that receives time on a regular basis is a periodical. LPeriodical is an abstract base class. It inherits from no other class. Because it is an abstract class, you cannot instantiate a pure LPeriodical object. You must derive a new class that inherits from LPeriodical.
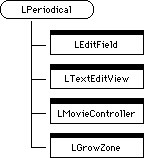
In PowerPlant, LPeriodical is used exclusively as a mix-in class. Whenever an object needs to get time repeatedly, it inherits from LPeriodical. Figure 15.1 illustrates the PowerPlant classes that inherit from LPeriodical.
The subclasses shown in Figure 15.1 belong to various class hierarchies in PowerPlant. Except for LGrowZone, each also inherits from other classes besides LPeriodical.
Because it is so loosely tied to the rest of PowerPlant, you can use LPeriodical separately in non-PowerPlant projects if you wish.
The only other class you need to use is LArray. LPeriodical maintains lists of objects that need regular attention. Those lists reflect the way that you use LPeriodical in PowerPlant.
PowerPlant deals with two kinds of periodicals, repeaters and idlers. A repeater gets time after every event. An idler gets time at every idle event.
LPeriodical has two data members, sRepeaterQ and sIdlerQ. Each of these data members is a pointer to an LArray object.
Each represents a queue of objects, repeaters and idlers respectively.
Both of these data members are static, so they are class variables. There is one and only one instance of each of these variables shared by all periodical objects. Because they are static data members, any application that has periodicals has one list of repeaters, and one list of idlers.
This section covers everything you need to work with periodicals. After looking at the member functions, we examine
Table 15.1 lists the LPeriodical member functions.
| Function |
Purpose |
|---|---|
The LPeriodical destructor also deserves mention. It removes the periodical from either or both the repeater and idler queues.
Typically, the only function you override is SpendTime(). It is a pure virtual function and must be overridden in any
subclass of LPeriodical. To understand these functions, let's
look at how PowerPlant gives time to periodicals.
PowerPlant calls LPeriodical::DevoteTimeToRepeaters() every time through the main event loop. You can find this code
in LApplication::ProcessNextEvent(). The DevoteTimeToRepeaters() function walks through the list of repeaters and calls each repeater's
SpendTime() function.
To add an object to the repeater list, simply call that periodical's
StartRepeating() function. In response, the object is added to the repeater queue.
When control returns to the main event loop, the object's SpendTime() function will be called.
 NOTE
NOTE The SpendTime() function will be called on the same pass through the main event
loop in which the repeater is added to the repeater queue.
PowerPlant calls the SpendTime() function for every repeater on each pass through the event loop.
PowerPlant does not call one repeater on one pass through the
event loop, and another repeater on another pass.
To remove a periodical from the repeater queue, call StopRepeating(). You do not need to make this call if you destroy the object.
The destructor does that for you.
When PowerPlant receives an idle event or a mouse-moved event,
it calls UseIdleTime(), which in turn calls LPeriodical::DevoteTimeToIdlers(). DevoteTimeToIdlers() walks through the list of idlers and calls each idler's SpendTime() function.
To add an object to the idler queue, simply call that periodical's
StartIdling() function. In response, the object is added to the idler queue.
The next time there is an idle event or a mouse-moved event, PowerPlant
calls the object's SpendTime() function.
This is the same SpendTime() function called when the object is a repeater. PowerPlant calls
the SpendTime() function for every idler for each idle or mouse-moved event.
To remove a periodical from the idler queue, call StopIdling(). You do not need to make this call if you destroy the object.
The destructor does that for you.
 TIP
TIP A periodical can safely delete itself. The queue's for idlers and repeaters (LArray objects) are safe against insertions or removals while an iterator is traversing the list. See "Arrays."
A single periodical can be on both the repeater and idler queues simultaneously. You can put the same periodical on either queue at any time. The two queues are fully independent.
Membership in either queue means that the periodical's SpendTime() function is called. In LPeriodical, this is a pure virtual function.
You must override this function in the derived class.
The SpendTime() function can do just about anything you want. You can maintain a progress bar, run a simple animation, blink a cursor, and so on. The PowerPlant classes that inherit from LPeriodical give a hint at the flexibility of this system.
LTextEditView and LEditField inherit from LPeriodical so that
they can blink the text cursor. An object of either class works
the same way. Each is an idler. In the BeTarget() function, the object installs itself in the idler queue by calling
StartIdling(). In the DontBeTarget() function, each calls StopIdling(). In the SpendTime() function, each calls ::TEIdle(). As a result, while the object is the target object, the text
cursor blinks. Very simple.
LMovieController is a periodical so that it can handle QuickTime
movies properly. When a movie is present, the controller should
receive every event so that the Toolbox can handle movie-related
events. To support this feature of the Mac OS, LMovieController
is a repeater. The LMovieController constructor calls StartRepeating() to put the controller in the repeater queue. As long as the movie
controller exists, its SpendTime() function is called from the event loop for each event. In SpendTime(), the controller receives the event and calls ::MCIsPlayerEvent() for processing. When the movie controller is destroyed, it removes
itself from the repeater queue.
LGrowZone is also a repeater. The LGrowZone constructor calls
StartRepeating() to install itself in the repeater queue. The SpendTime() function implements part of the PowerPlant memory strategy we
discussed in "Setup Memory Management." If the memory reserve has been released, SpendTime() attempts to restore the reserve. This function also warns the
user of memory problems if necessary.
These four examples give you a taste of the power and flexibility of the PowerPlant periodical design. Using the identical mechanism, PowerPlant implements cursor updating, event processing, and memory management. Not bad.
Your use of LPeriodical is limited only by your imagination. If
you have a situation where an object needs time repeatedly, make
it a periodical. Design the SpendTime() function to perform the necessary tasks. Install the object in
the appropriate queue-either repeater or idler-at the appropriate
times, and remove it from the queue when finished.
Remember that your periodical object is not required to respond
every time SpendTime() is called. Your object can keep track of the passage of time,
and only do something if a required interval has passed. For example,
you might want to update a timer every minute. Your timer object
might get called several thousand times during that minute, but
only act when a full minute has passed.
The periodical mechanism does not guarantee that your object will receive time within a certain time limit. The mechanism depends on the main event loop. Repeaters will get time on every pass through the event loop. If a single event requires a lot of time to process, your repeater must wait. Idlers get time at idle events. If no idle event is forthcoming, idlers get no time.
In actual practice, the event loop typically cycles several times a second. Intervals between idle events are usually very short. However, if your object is extremely fussy about receiving time at precise intervals, you will have to implement some other mechanism to ensure that your object gets called-probably a Time Manager task.
NOTE The StDialogHandler class implements its own event loop. That loop uses the same design as the main event loop, so repeaters and idlers are called while a modal dialog based on StDialogHandler is active.
An attachment is an object that-typically-alters the runtime behavior of another object. It is connected (attached) to the affected object. We refer to these two objects as the attachment and the host.
The attachment mechanism is very general-and very powerful. Exactly what an attachment is, and how to use one, becomes clear as we discuss:
There are two parts to the attachment mechanism in PowerPlant: the objects to which you connect the attachments, and the attachments themselves.
Objects to which you can connect an attachment are said to be "attachable." Be careful of the terminology here. The term "attachable" in normal usage implies that something is capable of being attached to something else. In PowerPlant, we use the converse meaning. Saying that an object is attachable means something can be attached to it.
An object to which an attachment is connected is called a host.
There are two corresponding base classes, LAttachable and LAttachment. Let's look at LAttachable first, and then at LAttachment.
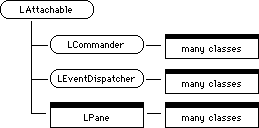
Figure 15.2 illustrates the PowerPlant classes that are attachable-that is, to which you can hook an attachment.
Stop for a moment and consider the import of Figure 15.2. Every commander class can have attachments-windows, applications, and so on. Event dispatchers can have attachments-applications and StDialogHandler. Every pane class-panes, views, and controls-can have attachments. In other words, every visual, command, and event-related element in PowerPlant can have attachments.
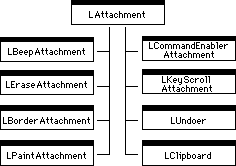
LAttachment describes the features of a generic attachment. PowerPlant also includes several attachment classes ready for your use. Figure 15.3 lists the PowerPlant attachment classes.
If you look at the list of subclasses that derive from LAttachment, you begin to get clues about the usefulness of attachments. PowerPlant uses attachments for modifying the appearance of a pane, for modifying the behavior of a pane, to support commands and keystrokes, the undo mechanism, and the clipboard. You can use attachments for other purposes as well. That's a lot of utility for one design pattern.
TIP For programmers familiar with MacApp, PowerPlant attachments supply the functionality of the MacApp adorner and behavior classes.
We'll discuss the individual attachment classes in "Specific PowerPlant Attachments." For now, let's get an overview of how attachments work, and then look at the features of attachments in general.
The PowerPlant approach to attachments is similar to the periodical mechanism with which you are already familiar. It is a very simple strategy.
As you know, there are attachments and hosts. These objects are closely connected.
Each host maintains a list of its own attachments. As a result, an object may have several attachments.The host can add or remove attachments from the list, so you can modify the list of attachments at runtime.
At certain well-defined moments, PowerPlant tells the host to walk through the list of attachments. We'll discuss the precise moments in "When and how PowerPlant calls attachments." PowerPlant sends a specific message that identifies the task that the host is about to undertake. PowerPlant also sends any necessary data that might be required to fulfill the task. This message is sent before the host performs its principal, underlying task.
In response, the host tells each attachment in the list to do whatever it is the attachment does. The attachment determines if the message is one to which it should respond. If the attachment is designed to respond to the message, the attachment executes.
The attachment also returns a Boolean value that tells PowerPlant whether the host object should still execute the original task.
Using this mechanism you can modify the appearance and/or behavior of any attachable object at runtime, without modifying the underlying object. You simply add or remove attachments.
That's all there is to it. The attachment mechanism is like a blend of the periodical and messaging systems. At certain well defined moments, a message is sent to each attachment. If the attachment recognizes the message, it responds and performs its task.
To implement this strategy, both attachable objects and attachments have data members and functions. Let's see what they are as we examine attachment characteristics.
In this section we examine both:
We look at LAttachable first, because it is an extremely simple class that implements the whole strategy.
LAttachable has one data member, mAttachments. This is a pointer to an LArray of attachment objects.
Table 15.2 lists all the LAttachable functions, except for the constructor and destructor.
| Function |
Purpose |
|---|---|
The first three functions modify the contents of the attachment
list. The class destructor calls RemoveAllAttachments() when destroying an attachable object. You can use it directly
yourself if you want to remove all attachments for any reason.
The ExecuteAttachments() function is the dispatch mechanism for the host. This is the
function that PowerPlant calls when it wants attachments to do
their work.
Typically you will never override any of these functions. LAttachable is a complete, fully-realized class that provides all the functionality you are likely to need.
LAttachment is almost as simple as LAttachable. It has three data members, listed in Table 15.3.
| Data Type |
Member |
Description |
|---|---|---|
Each attachment is designed to respond to a particular message.
That value is kept in the mMessage member. We'll discuss the possible messages in "Working With Attachments."
The class declares eight functions. Six of these functions are simple accessors for the three data members. There are two functions designed to implement attachment functionality, listed in Table 15.4.
| Function |
Purpose |
|---|---|
The Execute() function does the necessary testing. If the message received
is the message for which the attachment is designed, it calls
ExecuteSelf(). If the attachment executes, Execute() returns the value of mExecuteHost. Otherwise it returns true. PowerPlant uses this value to decide whether the host object
should also perform the task in question.
The only function you typically override is ExecuteSelf(). In fact, in LAttachment this is an empty function. You can study
the PowerPlant attachment classes like LPaintAttachment to see
how they implement ExecuteSelf().
In this section we discuss the code-level details you need to implement attachments in your PowerPlant application. We discuss:
PowerPlant asks attachments to execute before:
At these moments, PowerPlant calls a host's ExecuteAttachments() function. It passes two parameters: a specific message, and a
pointer to additional data.
Table 15.5 summarizes each call to ExecuteAttachments() in PowerPlant. Each entry in the table lists the type of host
object; the message sent; the data sent; the task or function
that may be performed immediately after the attachments execute.
PowerPlant use of attachments:
| Host |
Message |
Data |
Before |
|---|---|---|---|
Pay particular attention to the items in the "Before" column.
An object may have several attachments. If any attachment returns
false, these functions do not execute. Attachments can control whether event dispatch occurs, panes
draw, commanders handle commands, and so forth. This gives each
attachment the opportunity to tell your application "I have completely
handled this situation, you can ignore it." If all attachments
return a value of true, then the host function executes normally,
after the attachments completes their work.
TIP if you call ExecuteAttachments() yourself and send the message msg_AnyMessage, all attachments will execute.
In the discussion of "Specific PowerPlant Attachments" you will see examples of attachments that are designed to respond to various kinds of messages.
Creating an attachment is a fairly straightforward process. Use the PowerPlant attachment classes as examples.
You declare your derived class to inherit from LAttachment. Then
you override ExecuteSelf().
The ExecuteSelf() function does whatever it is you need to do. Attachments can
be designed to respond to a specific message, or a group of messages
if you override Execute().
The next sections give you some ideas about when you use attachments, and what you might do with them.
In general, an attachment is an excellent solution when you have an independent behavior that you wish to implement for a variety of panes or commanders, either in the same project or in different programming projects.
An attachment is also an excellent solution when you want to modify the behavior of a pane or commander dynamically. You can add and remove attachments at will depending upon the application's context.
You can think of an attachment as a kind of inheritance (in a very loose sense) for behaviors. An attachment connects a special function to an object, without the need to create a new class of object. If you think of an object as the sum of itself and its attachments, you can modify the composition of the object dynamically by adding or removing attachments.
About the only limitation to attachments is your imagination. The ideas described in this section are but a sampling of what you can do.
Consider the three principal kinds of objects that can host attachments. Applications are commanders and event handlers. Commanders handle commands and keystrokes. Panes handle clicks. Some panes are also commanders.
You may design an attachment for event pre-processing. Before any event is ever dispatched, the application's attachments get a crack at it. If ever there was a boundless horizon, this is it. You can do anything you want with the event, and subsequently short circuit event dispatch or allow the event to be handled normally. It's up to you.
A commander's attachments get first crack at all commands. You
may design an attachment to handle a specific kind of command.
In a traditional approach, your commander's ObeyCommand() function handles commands. You might want to create a command-handler
attachment that you can connect to any appropriate commander.
Then you don't have to duplicate code. If you decide a commander
should respond to a particular kind of command, you simply hook
up an attachment that does the work.
You could use a command-level attachment to create a demo version of an application. In the demo version, you hook up an attachment that intercepts certain commands-for example the New command-to disable them.
You might design an attachment to handle menu updating. A commander's
attachments get first crack at menu update requests as well. PowerPlant
provides an attachment for this purpose, LCommandEnabler. Rather
than write the code directly into your FindCommandStatus() function, you can hook attachments to your commander to handle
whatever menu commands you need to take care of.
With respect to panes, attachments have an opportunity to execute before drawing, clicking, and cursor adjustment. You may do some fancy drawing in or around a pane. Perhaps you have some panes that you want to have a fancy border. Create a border attachment and hook it up to those panes. If you want any unique behavior to occur when a pane is clicked, create an attachment to implement the behavior. The possibilities are endless.
Looking at some real attachments will help you grasp the power and potential in the attachment design pattern. As we stated before, PowerPlant provides several attachment classes. You can use these whenever appropriate in your own applications. You can also use them as models for your own attachments. In this section we discuss the following attachments:
All of these classes are declared in UAttachments.h and defined in UAttachments.cp.
The LUndoer class, which derives from LAttachment, is more than a simple attachment. It is the basis for the PowerPlant implementation of undo functionality.
The PowerPlant Reference for more on action classes and undo.
This is a simple attachment designed to respond to any message you want, typically a click message. When you create the object, you specify the message to which you want the attachment to respond. When attached to any host, this attachment beeps when the appropriate message is received.
This attachment is designed to respond to msg_DrawOrPrint. When you create this attachment, you specify a PenState, a foreground color, and a background color. You also specify
whether the host should draw as well.
This attachment draws a border around the pane's frame with the specified pen.
This attachment is designed to respond to msg_DrawOrPrint. When you create this attachment, you specify a PenState, a foreground color, and a background color. You also specify
whether the host should draw as well.
This attachment paints the host using the specified PenState settings and foreground and background colors. The painted rectangle
is inset from the pane's frame by the size of the pnSize field of the PenState. This lets you use an LPaintAttachment in conjunction with an
LBorderAttachment to draw a filled rectangle.
Because attachments draw first, you can use this attachment to fill in a background of a pane before drawing occurs.
This attachment is designed to respond to msg_DrawOrPrint. It simply erases the pane before drawing.
This attachment responds to msg_CommandStatus. This is a good example of a command-updating attachment. When
you create the attachment, you specify the command that should
be enabled.
When it executes, this attachment enables the menu item associated with the command. It does not set a mark or do any other item manipulation. It also prevents the host from executing, because it has already enabled the command in question.
You can use this attachment as a model for an attachment that handles other updating tasks. For example, you might create a check mark attachment that puts a check mark in front of a menu item.
This attachment is a good example of keystroke preprocessing. It is also an excellent example of the kind of task for which an attachment is ideally suited.
This attachment handles scrolling a view using keyboard navigation keys: Home, End, PageUp, and PageDown. This kind of functionality is a very nice thing to add to a view. Rather than writing code to implement this functionality in every scrolling view class, why not create an attachment that does the processing for you? Then, if you ever want to add this feature to a view, simply create and connect the attachment.
This particular attachment responds to msg_KeyPress. When you create the attachment, you provide a pointer to an
LView object. This is the scrolling view. Because this attachment
is responding to a keystroke, the attachment must be hosted by
a commander.
If you have a view that is also a commander-a class derived from both LView and LCommander-you can attach an LKeyScrollAttachment to it to implement keyboard navigation.
If your view is not a commander, you can attach the LKeyScrollAttachment to a superview that is a commander (such as the window containing the view).
 WARNING!
 If you can delete the scrolling view independently of the commander that has the attachment, you must take care to delete the attachment as well. If you do not, the attachment keeps the pointer to the now-deleted view (a dangling pointer) and you're in for big trouble.
In this chapter you learned how elegant design can make difficult programming tasks much easier to accomplish.
By the simple expedient of making an object inherit from LPeriodical,
you ensure that it receives time on a regular basis. Implementing
any time-dependent task becomes trivial. The object receives attention
on every pass through the event loop, or at idle time, depending
upon whether you install it in the repeater queue or the idler
queue. You override SpendTime(), and you're done.
PowerPlant's use of attachments reflects an extraordinarily simple, powerful, and unbounded design pattern. This kind of elegance can be found elsewhere in PowerPlant-for example, in the broadcast/listen messaging mechanism. But nowhere else are true power and simplicity so well combined.
You create an attachment, specify the type of message to which
it should respond, and override the ExecuteSelf() function. You connect the attachment to an appropriate host object.
PowerPlant gives your attachment the opportunity to execute at
several points in the ordinary flow of events.
Using attachments, you can create independent behaviors that you attach or remove from objects dynamically.
Because this chapter is the end of the PowerPlant Book, you'll find a brief recap after the code exercise that sums up where we have been. But first, let's jump into the final code exercise.
This is it, the goodies you've been waiting for. In this code exercise you get a glimpse at the real power of object-oriented programming with a well-designed application framework.
Best of all, you're going to create two pieces of code that are valuable, real-world additions to your personal collection of reusable code. One is a periodical, and the other is an attachment. Each demonstrates the ease with which you can use both of these marvelous PowerPlant features.
Appropriately, the application you write in this code exercise is titled "Goodies." Let's look at the interface briefly, and then build a periodical and an attachment.
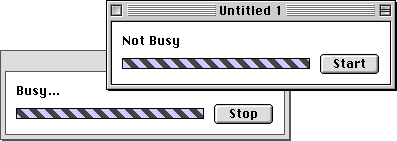
In the Goodies application, you create a window that displays
a progress bar, as shown in Figure 15.4. This application also has a Window menu, just like the menu you built in the code exercise in Chapter 11, "Windows."
There isn't any real task going on that requires a progress bar, this is just a demonstration. The window has a button to start the bar as if there were something going on. When you click the Start button, the "barber pole" progress bar animates. The text in the button changes to Stop, and the caption changes to Busy.
Open the Goodies.ppob project file in Constructor and examine the PPob resource for
this window. Pay particular attention to the characteristics of
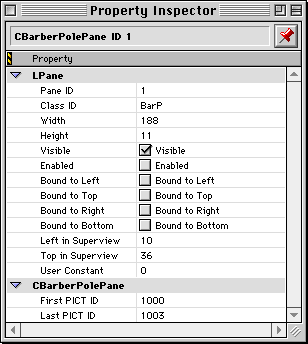
the barber pole pane, as shown in Figure 15.5.
This pane represents a custom class, with ID BarP. It also has
two custom data items, the First PICT ID and Last PICT ID. To
animate the barber pole, the pane cycles through a list of PICTs,
displaying each picture in turn. In this case there are four PICTs,
numbered from 1000 to 1003. The PICT resources have been provided
for you in Goodies.rsrc.
Feel free to examine the custom pane type-the CTYP resource-as well.You created a custom pane in the code exercise in Chapter 15, "Controls and Messaging."
In this section you implement a periodical task and an attachment.
The progress window is a periodical. The Window menu is an attachment.
This is the same Window menu you created in Chapter 11, so you should be familiar with how it works. The Window menu is implemented as a custom class derived from LMenu. The
application can't use the PowerPlant default menu-creation mechanism
because PowerPlant creates LMenu objects. This application creates
a CWindowMenu object and adds it to the menu bar.
In Chapter 11, you added code to the application's ObeyCommand() and FindCommandStatus() functions to manage the Window menu. In this exercise you write similar code, but put it in
the attachment's ExecuteSelf() function! Let's get started.
1. Examine the CBarberPolePane class
class declaration CBarberPolePane.h
Look at the code that declares this class. First, notice that this class inherits from both LPane and LPeriodical. It has a class ID BarP. There are several constructors, and a destructor.
The class overrides the SpendTime() function, as is necessary in any descendant of LPeriodical. The
class also overrides the DrawSelf() function inherited from LPane.
Finally, notice the data members and the kThrottleTicks constant. The object stores the resource IDs of the first, last,
and current PICT on display. It stores the time to change pictures
in mNextTime. It changes the picture every kThrottleTicks ticks on the system clock.You'll write the code to do this in
the next step.
Close the file when you are through examining this class.
2. Animate the barber pole pane.
SpendTime() CBarberPolePane.cp
The existing code gets the current tick count. After that, you:
a. Determine if it is time to change pictures.
Test the current tick count against mNextTime.
b. Advance to the next picture.
If it is time to change, increment mCurrPictID.
c. Keep the picture in the proper range.
Make sure mCurrPictID stays in the range defined by the mFirstPictID and mLastPictID.
Call the pane's Draw() function.
e. Reset the time to change pictures.
Add kThrottleTicks to the current time, and store the result in mNextTime.
SInt32 theCurrTicks = ::TickCount();
if ( theCurrTicks > mNextTime ) {
  // Increment the pict id.
  mCurrPictID++;

  // Rollover if needed.
  if ( mCurrPictID > mLastPictID )
    mCurrPictID = mFirstPictID;

  // Redraw.
  Draw( nil );

  // Get the next time.
  mNextTime = ::TickCount() + kThrottleTicks;
}
Take a quick look at the DrawSelf() function, just to see what it does. It gets the current picture
and draws it. Notice that in SpendTime() you call Draw(), not DrawSelf(). Draw() takes care of setup tasks, and calls DrawSelf() for you.
When you are through, save your changes and close the file.
SetBusyState() CProgressWindow.cp
CProgressWindow is also a custom class. It inherits from both
LWindow and LListener. When a CProgressWindow is created, it installs
itself as a listener to the Start/Stop button in the window. That
button sends a msg_ProgressControl message that the window receives in its ListenToMessage() function. Feel free to study the code to see how it works.
ListenToMessage() calls SetBusyState() to do the work, and passes a Boolean value. If the value is true, the window is becoming busy and the pane should animate. Otherwise,
the window is not busy and the animation should stop. The existing
code stores this value in the window's mBusy data member. Then:
The declared constant for this pane ID is kBarberPolePane.
b. Turn on the animation if busy.
Install the pane in the idler queue. Use the StartIdling() function.
Change the text in the Start button to "Stop." The declared constant
for this pane ID is kProgressControlButton.
Change the text in the status caption to "Busy" The declared constant
for this pane ID is kProgressMessageCaption.
c. Turn off the animation if not busy.
Remove the pane from the idler queue. Use the StopIdling() function.
Change the text in the Stop button to "Start." Change the text in the status caption to "Not Busy." See substep b for the names of the constants for these pane IDs.
mBusy = inBusy;
// Get the barber pole pane.
CBarberPolePane *theBarberPolePane;
theBarberPolePane = dynamic_cast<CBarberPolePane *>
                         (FindPaneByID( kBarberPolePane ));
Assert_( theBarberPolePane != nil );

if ( mBusy ) {

  // Start the barber pole idling.
  theBarberPolePane->StartIdling();

  // Set the button title.
  SetDescriptorForPaneID( kProgressControlButton, "\pStop" );

  // Set the message caption.
  SetDescriptorForPaneID( kProgressMessageCaption, "\pBusy" );

} else {

  // Stop the barber pole idling.
  theBarberPolePane->StopIdling();

  // Set the button title.
  SetDescriptorForPaneID( kProgressControlButton, "\pStart" );

  // Set the message caption.
  SetDescriptorForPaneID( kProgressMessageCaption, "\pIdle" );
}
You have now completely implemented the animated barber pole pane. When the user clicks Start, it animates. When the user clicks Stop, it stops. Save your work and close the file.
In the rest of this exercise, you add a Window menu attachment to the application. First, we'll examine the
Window menu code. After that, you have four principal tasks to accomplish.
You must install the menu in the menu bar, create an attachment
to handle the menu, connect the attachment to the application
object, and implement menu functionality in the attachment.
class declaration CWindowMenu.h
Examine the member functions in this class. You may recall these
functions from Chapter 11, because you wrote some of them. The InsertWindow(), RemoveWindow(), MenuItemToWindow(), WindowToMenuItem(), and SetCommandKeys() functions are all identical to the code you wrote in that previous
code exercise. Feel free to refer to that chapter for a refresher
on the menu operations.
What's new in this file is the declaration of the CWindowMenuAttachment
class. It inherits from LAttachment. It has one significant function,
ExecuteSelf(). It has a single data member-a pointer to the Window menu object. You'll write the ExecuteSelf() function a little later.
When you're through examining the class declaration, close the file.
As we mentioned at the start of this section, you cannot rely
on the PowerPlant menu-creation mechanism because it creates LMenu
objects. The Window menu is a CWindowMenu object.
In the application constructor, existing code registers the custom classes. In the Initialize() function, you have three tasks to accomplish.
a. Create a CWindowMenu object.
Use the new operator. The declared constant for the MENU resource ID is rMENU_Window. Store the result in the global variable, gWindowMenu.
b. Get the application's LMenuBar object.
Use LMenuBar::GetCurrentMenuBar().
c. Add the new menu to the menu bar.
Use the menu bar's InstallMenu() function.
  // Make the window menu.
  gWindowMenu = new CWindowMenu( rMENU_Window );
  ThrowIfNil_( gWindowMenu );
  // Get the menu bar.
  LMenuBar *theMBar = LMenuBar::GetCurrentMenuBar();
  ThrowIfNil_( theMBar );

  // Install the window menu.
  theMBar->InstallMenu( gWindowMenu, 0 );
6. Connect a Window menu attachment to the application.
The code for this step goes right after the code you wrote in the previous step. You have two tasks.
a. Create a CWindowMenuAttachment.
Use the new operator and create a CWindowMenuAttachment object. You write
this constructor in the next step.
b. Connect the attachment to the application.
Call the application's AddAttachment() function to connect the attachment to the application. Add the
new attachment to the end of the attachment list. Specify that
the application owns the attachment. This makes the application
responsible for deleting the attachment when the application is
deleted.
theMBar->InstallMenu( gWindowMenu, 0 );
  // Install the window menu attachment.
  CWindowMenuAttachment *theAttachment;
  theAttachment = new CWindowMenuAttachment( gWindowMenu );
  AddAttachment( theAttachment, nil, true );
Save your work and close the file.
7. Define the CWindowMenuAttachment constructor.
CWindowMenuAttachment() CWindowMenu.cp
To create this attachment, you must do two things.
a. Call the LAttachment constructor.
Set this attachment so it responds to any message, and allows the host to execute. This attachment must receive all messages so that it can identify and respond to menu commands and menu updating.
b. Initialize the CWindowMenuAttachment.
Set the mWindowMenu data member.
CWindowMenuAttachment::CWindowMenuAttachment(
                                 CWindowMenu *inWindowMenu )
  : LAttachment( msg_AnyMessage, true ),
       mWindowMenu( inWindowMenu )
{
}
Excellent! You have installed the menu, created the attachment, and connected the attachment to the application. The final task is to implement menu functionality.
In Chapter 11, you did this in the traditional way-by modifying the application's
ObeyCommand() and FindCommandStatus() functions. In the next two steps you implement the same kind
of functionality in the ExecuteSelf() function of the Window menu attachment.
8. Identify menu update requests.
Before updating menus, PowerPlant sends a message to the application's
attachments. This happens in the LCommander::ProcessCommandStatus() function. The message has two parameters. The first is the message
itself, msg_CommandStatus. The second parameter is a pointer to an SCommandStatus structure. That structure holds the data you normally find in
the FindCommandStatus() parameters.
The attachment receives this message at menu update time. Existing
code says that the host should execute, identifies the message
received, and defines local variables-including a pointer to an
SCommandStatus structure.
a. Determine if this is an item you should update.
All commands from the Window menu are synthetic, so call the static function LCommander::IsSyntheticCommand(). The attachment is not itself a commander, so you must specify
the class. Also make sure the menu ID matches the mWindowMenu menu ID. If the item is a synthetic command from the Window menu, then you have identified an item that you must update.
b. Get the window object associated with the menu item.
Use CWindowMenu's MenuItemToWindow() function.
If there is a window, set the mExecuteHost item to false. You are taking care of the item entirely right
here, so the host object (in this case the application) does not
need to ask a commander to set this menu item.
Set fields in the SCommandStatus structure. Enable the item, use a mark, and set the mark to noMark. If the window is the top window, set the mark to a check mark.
Use UDesktop::FetchTopRegular() to identify the top window.
SCommandStatus *theStatus = static_cast<SCommandStatus *>
                                       (ioParam);
if (LCommander::IsSyntheticCommand(
    theStatus->command, theMenuID, theMenuItem)
    && theMenuID == mWindowMenu->GetMenuID() ) {

  // Find window corresponding to the menu item.
  LWindow *theWindow =
                  mWindowMenu->MenuItemToWindow( theMenuItem );

  if ( theWindow != nil ) {
    // Handle it's status here.
    mExecuteHost = false;

    // All window items enabled and use a mark.
    *theStatus->enabled = true;
    *theStatus->usesMark = true;
    *theStatus->mark = noMark;

    if ( theWindow == UDesktop::FetchTopRegular() ) {

      // Check menu item for top regular window.
      *theStatus->mark = checkMark;
    }
  }
}
Remember, the attachment is not a commander. There is no inherited
FindCommandStatus() function for items you don't update. If you don't handle it,
the mExecuteHost value remains true, and the application asks a commander to take
care of updating the item.
Your attachment is only pretending to be a commander, but doing quite a nice job of it. The next thing your attachment must do is obey a command!
9. Handle a Window menu command.
Every item in the Window menu has cmd_UseMenuItem as the corresponding command number. That means PowerPlant generates
a synthetic menu command for each item in the menu.
Before calling the ObeyCommand() function, ProcessCommand() gives attachments an opportunity to handle a command. At that
time it passes the command itself as the message.
The existing code identified the msg_CommandStatus message, and you handled that message in the previous step. If
the message is not msg_CommandStatus, you must:
a. Determine if this is a command you should obey.
Call LCommander::IsSyntheticCommand(). Make sure the menu ID matches the mWindowMenu menu ID. If both conditions are true (it is a synthetic command
from the Window menu) then you have identified a command you must handle.
b. Get the window object associated with the menu item.
Use CWindowMenu's MenuItemToWindow() function. If you have a window, then you have a command you must
handle.
Set the mExecuteHost value to false. You are taking care of the command right here, so the host object
(in this case the application) does not need to ask a commander
to obey this command.
d. Bring the window to the front.
If the window is visible, bring it forward. Use UDesktop::SelectDeskWindow().
SInt16 theMenuItem;
if (LCommander::IsSyntheticCommand(
    inMessage, theMenuID, theMenuItem )
    && theMenuID == mWindowMenu->GetMenuID() ) {

  // Find the window selected.
  LWindow *theWindow =
                  mWindowMenu->MenuItemToWindow( theMenuItem );

  if ( theWindow != nil ) {

    // Handle the command here.
    mExecuteHost = false;

    // Bring the window to the front.
    if ( theWindow->IsVisible() ) {
      UDesktop::SelectDeskWindow( theWindow );
    }
  }
}
Notice once again that you aren't a commander. You can't call
an inherited ObeyCommand() function for commands you don't handle. If you don't handle it,
the mExecuteHost value remains true, so the application will ask a commander to
obey the command.
Save your work and close the file.
10. Build and run the application.
When the project builds correctly and you run the application, a progress window appears, like Figure 15.4. Click the Start button and the barber pole animates. Click Stop and the animation stops. Choose the New item to make more windows. Start them running. This is your periodical task at work. Observe that the animation runs even when the window is in the background.
Examine the items in the Window menu. There should be one for each window. The currently active
window should have a check mark in front of the item. Choose an
item, and the corresponding window should activate.
Each of these utility items-the progress window and the Window menu attachment-is a nice bit of reusable code.
The Window menu attachment can be dropped into any PowerPlant application.
You must make a few changes for it to work. You add the menu to
the menu bar when the application launches. You connect the attachment
to the application. You modify your window's FinishCreateSelf() function to add an item for itself in the window. You modify
the window's destructor to remove the corresponding item from
the Window menu. That's it.
The progress window is highly reusable. Simply create the window whenever you need to display progress. Keep in mind, this particular brand of progress window works at idle time. It will not work to mark progress in a long task that does not return to the event loop. However, it works great when the task whose progress you are indicating is another periodical or regularly returns to the main event loop.
In fact, the CBarberPolePane class could be used more generally as CPictAnimator-displaying any series of PICT's in any appropriate circumstance. You could animate icons, spin arrows, or impement a slide show.
Possibilities for experimentation abound. Make a progress window that draws the percentage complete of a task. The task that requires the progress window should create it, and maintain a connection to the progress window. It can post the percentage complete, and the progress window can draw itself. Play with different ways of representing completeness. You can have a 3-D effect in the bar, an analog clock with a sweep that completes a circle, or a cup that fills with color, just to name a few.
For attachments, create a different kind of menu that provides useful functionality. You might want to try adding a debugging menu that you can use to turn debugging on and off. Perhaps you can implement a font menu as an attachment. You might create a "Demo" attachment that converts an application into a demo version by disabling certain commands. Experiment with PowerPlant's built-in attachments in UAttachment.cp. Try to think of other ways in which you can use attachments.
As always, have a good time exploring. Don't worry about getting lost. You are now ready to head out on your own into the vast spaces of the PowerPlant landscape.
It has been a long journey from your first PPEdit application in Chapter 1 to the boundless horizons of attachments. Along the way you have learned a lot about PowerPlant.
You have seen PowerPlant from a high-level that emphasizes the design patterns and principles behind this marvelous application framework. You have seen PowerPlant from the mid-level of classes and functionality, and how objects of various classes work together to implement the design principles. And you have seen PowerPlant from deep inside the code.
You have learned not only what PowerPlant is, but-more importantly-how to use it. After all, isn't that the real goal? You now have all the critical pieces, and you know where they belong in the big picture.
Still, there is more. PowerPlant is not a done deal. PowerPlant is a living, breathing piece of code that continues to grow and evolve. As the Mac OS changes, so too will PowerPlant. Metrowerks wants to keep you at the forefront of technology. The PowerPlant engineers are dedicated to keeping PowerPlant the best Macintosh application framework available anywhere.
Use the PowerPlant Reference freely. Browse the PowerPlant code. Read the other PowerPlant documentation available in the CodeWarrior package. And don't forget the appendices to this manual. You'll learn about a wide variety of PowerPlant utilities not mentioned elsewhere in this book.
It is our hope that in these pages you have seen what a truly elegant, powerful, and robust application framework-PowerPlant-can do for you as a programmer. We at Metrowerks want to welcome you to the world of PowerPlant programming.
Congratulations! And may you code in interesting times.