
Mac OS code resources are binary files that add functionality to an application or the system software, but that cannot run by themselves.
Many applications, such as Adobe Photoshop, Bare Bones BBEdit, and FileMaker Pro, let you add features and commands with special types of code resources. The Mac OS lets you add additional functionality with such code resources as Chooser extensions, Control Panels, Window Definitions (WDEFs), and Control Definitions (CDEFs), and many other others.
In addition, you can create your own private code resources that make it easy to extend the features available to your applications quickly and easily.
 NOTE
NOTE Code resources will not be available under Mac OS X except as part of the Classic and Carbon environments.
You can create many different kinds of code resources for both 68K and Power-PC-based Mac OS computers. This section will discuss the various types, and give you some overview information about them.
NOTE CodeWarrior does not support the automatic creation of PowerPC device drivers.
The following types of code resources run on Mac OS computers:
The following types of PowerPC code resources can only run on a PowerPC-based Mac OS computer:
PowerPC Private Code Resource Power PC Accelerated Resources
The following code resource types contain both 68K and PowerPC code.
A 68K Device Driver code resource is a code resource that is used for interfacing to hardware devices, such as Ethernet networking cards. When linking a device driver code resource, the CodeWarrior linker automatically adds a a null character to the beginning of your resource's name and adds a device driver header to your resource when you build it.
A 68K standard code resource is perhaps the most common type of code resource. One example of a standard code resource is a Photoshop plug-in. The CodeWarrior linker adds a standard header to your resource when you build it. See Creating 68K Custom Headers for additional information.
You can also create a custom code resource. The CodeWarrior linker doesn't add a header to your custom resource. You must create one on your own. See Creating 68K Custom Headers for information on writing your own custom header.
A private resource is any kind of executable resource whose code is called directly by an application.When creating a private code resource, the CodeWarrior linker adds no start-up code to this type of code resource.
An accelerated resource is any resource containing PowerPC code that has a single entry point at the top and that models the behavior of a 68K stand-alone code resource. In essence, an accelerated resource is a PowerPC code fragment that replaces the 68K code in a resource. It can only run on PowerPC Mac OS computers.
A fat resource contains both Power PC and 68K executable code and can run on both 68K and PowerPC Mac OS computers. A Fat code resource contains a header that allows the Mac OS Mixed Mode Manager to avoid a context switch by running the resource in either native or using the 68K emulator.
NOTE A Fat code resource doesn't run natively on Mac OS X, but only in the Classic environment.
Visit Apple's Developer Technical web site for access to all the latest development kits, documentation, technical support, tools, and much more. The URL is:
http://developer.apple.com/technical/
To access Apple's Technical Documentation site for Mac OS 8 and 9 directly, visit:
http://developer.apple.com/techpubs/
This section describes the basic steps for creating code resource projects. It starts with a general overview of the project creation process, then provides additional details on implementing 68K, Power PC, and Fat code resource projects. It also describes some options for saving your executable code resource location.
As with any CodeWarrior project, there is a set of steps to get a new project up and running quickly. The instructions below provide a high-level overview of creating any type of code resource project.
1. Create an empty code resource project.
Select File > New to create a new project, then provide the new project with a Project name and Location, click OK.
2. Select appropriate stationery (optional).
Skip this step if you do not have any custom stationery for creating specific code resources. See Code Resource Stationery Options for more information.
3. Set your project's target setting options.
You could just accept the default project settings that accompany the project stationery, but you should review them to verify they work for your project. If not, change them to best suit your project goals. Choose Edit > targetName Settings to open the Target Setting window. Refer to the following sections for details:
Select the appropriate libraries for your code resource project. Which libraries you include are entirely dependent upon the type of code resource you are creating. See the appropriate topic below for information on choosing which libraries to add:
68K Code Resource Libraries PPC Code Resource Libraries Fat Code Resource Libraries
5. Write, make, and debug your code resource.
Now the fun work begins, actually writing your code resource's code to make it work.
By default, the CodeWarrior linker saves your resource file in the same folder as your project, with the name specified in the File Name field. You save the file somewhere else using the Display Dialog and Merge to File options. These options are described in Table 5.1.
Choosing where to save your resource:
| To save the resource here |
Do this |
|---|---|
|
|
There are no pre-built stationery projects included with the CodeWarrior product to create code resource projects. However, see the CodeWarrior Examples folder for some sample library projects.
If you find yourself often creating code resource projects, you can create custom stationery to use for any future library projects. See the IDE User Guide: Working with Projects chapter for information on creating custom stationery.
This section provides information on setting the appropriate target options for your code resource project. The topics include:
For guidelines on how to change target options, see "Application Project Target Options".
For 68K code resource projects, use Table 5.2 to see which target settings are required for a 68K code resource project. Open the Target Settings window for your project's build target, then select the appropriate panel from the Target Settings Panels list.
When you create a 68K code resource, you must determine whether it will be a single-segment or multi-segment resource. Generally, you'll create a single-segment code resource if your resource is under 32K-bytes in size, and a multi-segment code resource if your resource is over 32K.
However, you can use small model resources larger than 32K if you make sure that any functions that call each other are within 32K of memory space. If the functions are any further apart, CodeWarrior generates linker error messages when it attempts to link your resource.
When you're writing a multi-segment resource, you should unload
its segment with the function UnloadA4Seg() instead of UnloadSeg(). UnloadA4Seg() is declared in A4Stuff.h as this:
pascal void UnloadA4Seg(void *);68K code resource options:
| In Target Settings window... |
Set the following options... |
|---|---|
|
|
To specify a multi-segment code resource set: Enable Extended Resource The following options can be set now or later: Resource Name Creator Type ResType ResID SegType Header Type Resource Flags |
|
To specify a single-segment code resource set:
|
|
If the code resource is less than 32K in size:
If the code resource is greater than 32K in size or Extended Resource is enabled: |
To manually create a single-segment code resource, configure your
project so all its libraries and source files are in one segment
in the project window. You can see how your project window might
appear as shown in Figure 5.1. You can see how the CR_Actions.c file was moved from Segment 2 into First Segment. Next, remove
all #pragma segment directives from your source code files.
Multi-segment to single-segment example: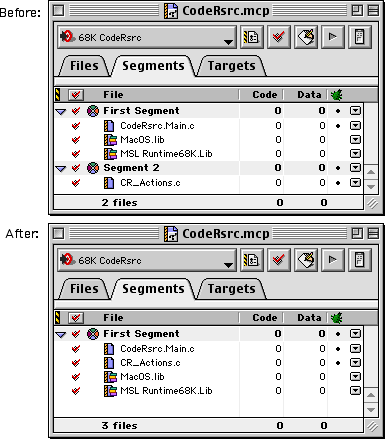
For Power PC code resource projects, use Table 5.3 to see which target settings are required for a PPC code resource project. Open the Target Settings window for your project's build target, then select the appropriate panel from the Target Settings Panels list.
| In Target Settings window... |
Set the following options... |
|---|---|
|
|
The following options can be set now or later: Resource Name Creator Type ResType ResID SegType Header Type Resource Flags |
|
NOTE: Do not use |
|
|
Use Table 5.4 to see which target settings are required for a Fat code resource project.
| In Target Settings window... |
Set the following options... |
|---|---|
The following options can be set now or later: Copy Code Fragments Suppress Warnings Copy Resources Skip Resource Types Creator Type |
This section describes which libraries to include in 68K and Power Macintosh code resource projects.
The topics in this section include:
The libraries that should be added to your project for creating 68K code resources are shown in Table 5.5.
If the library's name in Table 5.5 contains "xx", you need to choose a library based on some Target Settings panel options. To choose the correct library for the "xx" in
your project, refer to the naming conventions discussed in "Library Naming Conventions".
Once you have added the correct libraries to your project, you
need to make sure that the Target Settings are specified correctly
for your project. For example, if you include a library with "2i" in the name, you must not be using 4-byte integers in the Target
Settings. To learn how to configure the Target Settings, refer
to "Support for Motorola 68K."
Code resource libraries choices:
| If the project |
Add this |
|---|---|
The names of many of these libraries include "A4" in the name. These libraries contain global variables, and use the 68K A4 register to reference them instead of A5. Be sure you include the A4 version of these libraries.
NOTE Whenever you must access Global variables or functions, you must include the A4 libraries.
Table 5.6 lists the CodeWarrior libraries you might need to add to your PowerPC code resource projects.
NOTE MSL RuntimePPC.Lib should be included in Power Macintosh code resource projects, especially if they use C++ code.
| If the project |
Add this |
|---|---|
There are no special libraries associated with creating fat code resources. Since a fat code resource simply merges the executable code of 68K and PPC resources into a form that allows the code resource to execute natively on both 68K and PPC Mac OS computers, the libraries for each environment are already included.
Writing a code resource can require more work than writing an application. This section discusses some important points to watch out for when writing a code resource with CodeWarrior.
The topics in this section include:
Using CodeWarrior to create code resources, you can allow code resources use global data. To avoid any conflict with the running application, the resource accesses its globals referenced from the 68K A4 register, instead of A5. By default, the globals are appended to the first segment by the CodeWarrior linker. However, in a desk accessory or device driver built with the Extended Resource option enabled, the CodeWarrior linker appends your globals to the second segment.
If you're writing a desk accessory or device driver, CodeWarrior
sets up A4 for you. If you're writing any other kind of resource,
you must set up A4 yourself. Call EnterCodeResource() when you first enter main() and ExitCodeResource() just before you leave main(). These functions are declared in A4Stuff.h. The example shown in Listing 5.1 shows how these functions should be used.
Setting up A4 for a code resource:
#include <A4Stuff.h>
void main(void)
{
	EnterCodeResource();
	/*
	 * Your program goes here.
	 */
	ExitCodeResource();
}
A4Stuff.h and SetUpA4.h provide functions that set A4 and are useful when you can't be sure of A4's value. For an example of these routines, refer to the Multi-Seg CR w/ Callback example on your CodeWarrior Reference CD.
A code resource header, the first few bytes in the resource, tells the system software what your resource contains. If you create a 68K code resource with a standard header and the Extended Resource option disabled, the CodeWarrior linker uses Apple's suggested format for a header, as shown in Listing 5.2.
Standard header for a code resource:
	bra.s			__Startupcode__
	dc.w			0
	dc.l			Resource Type							// Contents of ResType field
	dc.w			Resource ID							// Contents of ResID field
	dc.w			Version							// Always 0
__Startupcode__:
	jmp		main
To create a 68K code resource with a custom header, you must do two things:
1. Create a function called __Startup__() to contain the header.
This function must be the very first piece of executable code
in the first segment of your code. Declare __Startup__() like this:
asm void __Startup__(void)
Be sure that all header files, including SetupA4.h, are included after it. This is necessary because SetupA4.h contains code.
2. Add the library MSL CustomCRStartup.Lib to the project.
The library must be placed in the first segment of your project
and within 32K bytes of __Startup__().
For additional examples, see the Code Resource Examples on the CodeWarrior Reference CD.
The code example in Listing 5.3 contains a C version of a single-segment custom header.
Custom header for a single-segment code resource:
//	File:	Startup.c
// Note: this must be the first file in your project !
//

// (single segment code resource version)
extern void main(void);												// This is the user main()
												// called by __Startup__()
extern void __Startup__(void);												// Resource/DRVR
															// startup code
asm void __Startup__(void)
		// Note: this must be the first code in

		// this file !
{
		bra.s			start				// 0		 standard macintosh code
									//		 resource header
		dc.w		0					// 2
		dc.l		'WDEF'					// 4		 code resource type
		dc.w		123					// 8		 code resource id
		dc.w		0					// 10	 code resource version no.

	start:
		jmp		main					// direct jump to main (no
									// special setup is needed)
}
The code example in Listing 5.4 contains a C version of a multi-segment custom header.
Custom header for multi-segment resource :
//	File:	Startup.c
//			(Multi-segment code resource version)
//
//			This must be the first file in your project!
//
#pragma near_code
		// All code references must be
		// 16-bit PC relative
#pragma far_data	 off
		// All data references must be
		// 16-bit A4 relative

extern void main(void);
		// This is the user main()
		// that __Startup__() calls
extern void __Startup__(void);		 		/
		// Code resource/DRVR startup code
extern void __SetupMainRsrc__(void *:__D0);
		// Relocation setup function
extern long SetCurrentA4(void);
		// Setup the A4 data ptr
		// (and return old A4 in D0)

// 			  This must be the first code in the file !
asm void __Startup__(void)
{
// This will be the start of your code resource.
// The code below is only an example. You can
// change this code, however you have to make
// sure that function "__SetupMainRsrc__()" is
// called with a setup A4 register before any
// function or variable is accessed that is not
// referenced by a 16-bit A4/PC relative offset.

	start:
		bra.s		 setup			// 0 standard macintosh code
							//      resource header
		dc.w	 0				// 2

		dc.l 	'WDEF'				// 4		code resource type
		dc.w 	123				// 8		code resource id
		dc.w 	0				// 10		 code resource version num

	setup:
		movem.l				d0-d2/a0/a1/a4,-(sp)	 							// Save registers
		jsr				SetCurrentA4								// Setup A4 for
														// addressing globals

		lea				start,a0								// Pass a pointer to
		move.l				a0,d0								// the start of this
														// function in D0
		_StripAddress
		jsr				__SetupMainRsrc__		 						// Relocate main
															// resource

		movem.l				(sp)+,d0-d2/a0/a1/a4								// Restore

																// registers
		jmp				main								// And jump to main
}
In the past, when you called a routine in a 68K code resource,
you could just load the resource and call the routine. But now,
when you call a routine in a PowerPC code resource, you must use
the routine CallUniversalProc(). This creates a problem if you're
creating a fat application. You must use macros to make sure that
the 68K code calls code resource routines one way and that the
PowerPC code calls code resource routines another way. In the
example below, the macro CallMainProc helps you code it correctly.
typedef	 void	(*MainProcPtr)(void);
enum {
	uppMainProcInfo = kThinkCStackBased
};

#if USESROUTINEDESCRIPTORS
typedef UniversalProcPtr MainProcUPP;
#define CallMainProc(userRoutine)		\

CallUniversalProc((UniversalProcPtr)(userRoutine),
									uppMainProcInfo)
#else
typedef MainProcPtr MainProcUPP;
#define CallMainProc(userRoutine)		\
		(*(userRoutine))()
#endif

main()
{
	Handle					resource;
	MainProcUPP					myProcPtr;

	resource = Get1Resource('MWCW', 128);
	HLockHi (resource);
	myProcPtr = (MainProcUPP)*resource;
	CallMainProc(myProcPtr);
}
The macro CallMainProc takes care of several things:
CallUniversalProc() for you.
#if USESROUTINEDESCRIPTORS directive checks whether you're creating a 68K or PowerPC application
and defines the correct version of CallMainProc.
You'll find more interesting PowerPC declarations in the header
file named MixedMode.h, installed in the Universal Headers folder in your CodeWarrior installation folder.