This chapter explains how to create, compile, and link dynamic link libraries (DLLs) for use on Win32/x86 systems.
This chapter includes the following topics:
For additional information, see "Creating Win32/x86 Applications" and "Standard Libraries for Win32/x86 Overview." These sections contain information on creating executable applications and static library projects. For more information on projects in general, refer to the IDE User Guide.
A dynamic link library (DLL), or shared library as it is sometimes called, is a collection
of functions and data that can be shared by application programs
(or other libraries) running on a Win32/x86 system. Unlike a static
library, whose contents are incorporated directly into the client
application, the code and data of a DLL reside in a separate file,
formatted very much like an executable application file itself.
Because the contents of a DLL are loaded into memory and linked
to the client application dynamically at execution time, the DLL
file must be available on the target machine at the time the application
is run.
 NOTE
NOTE To find a list of all the processors you can target, see "x86 Processor."
When you build a DLL, the linker creates two files (where lib_name is the name of your DLL project):
.dll: The DLL file itself, containing all of the library's code and
data.
lib: An import library for linking client programs (applications or
even other DLLs) to the DLL. Adding this file to a project makes
the contents of the DLL available within that project.
DLLs export the names of functions or variables to make them accessible to
client programs. For compatibility, CodeWarrior® compilers and
linkers follow conventions established by Microsoft® for such
exported names. This section describes the Microsoft naming conventions.
It does not attempt to explain the reasons behind them. The topics
in this section are:
There are two ways to export a name from a DLL for use by client programs:
1. Directly in your source code, by preceding its declaration
with the specifier __declspec(dllexport). This specifier exports the name whose declaration immediately
follows it in the source code:
__declspec(dllexport) void AnExportedFunction();
__declspec(dllexport) int AnExportedVariable;
For more information, see "Calling Conventions for Win32/x86" and the C Compiler Reference.
 TIP
TIP This is generally the best method to use when building a DLL to be used only by one of your own programs.
2. With an /EXPORT command in a linker command file. The use of such a command file
is optional, and is specified by the Command File setting in the x86 Linker project settings panel; see "x86 Linker" for more information. The /EXPORT command has the following syntax:
/EXPORT: ext_name [=int_name] [,@ordinal] [,DATA]
¯ ext_name is the external name seen by the client program.
¯ int_name is the C/C++ name used internally in the DLL's source code, if different from the external name.
¯ The @ordinal option allows you to export a function or variable by
number, rather than by name. This feature is an artifact of 16-bit
Windows, and generally should not be used in Win32 code.
¯ The optional keyword DATA indicates that the exported name is that of a variable rather
than a function.
/EXPORT: also supports [,NONAME] which indicates that a symbol should only be exported by ordinal value. Its name will not appear in the DLL.
/EXPORT:* indicates that all external symbols should be exported under their own name.
TIP This method of exporting names is more flexible than using the
__declspec(dllexport) specifier since it allows you to export a function or variable
under a different name from the one by which it is known in the
DLL source code. For this reason, this method is often better
if you're creating a DLL that is to be used by existing software:
you can use the /EXPORT command to export the name in exactly the form the client program
expects.
 WARNING!
 Be careful when exporting variables from a DLL that may need to reference those variables. You may need to use two header files to resolve the issue.
The easiest way to import a function into a program from an external
DLL is simply to include the static library in your project, and
then declare the imported name in your source code with the keyword
extern. No other special action is needed. However, this method applies
only to functions and cannot be used to import variables.
A more general method is to use the specifier __declspec(dllimport), which imports the name whose declaration immediately follows
it in the source code:
__declspec(dllimport) void AnImportedFunction();
__declspec(dllimport) int AnImportedVariable;
For more information, see "Calling Conventions for Win32/x86" and the C Compilers Reference.
TIP This method is the recommended way of importing all external function and variable names. Not only can it be used with variables as well as functions, it is also slightly more efficient even for functions, because it saves one jump instruction at every call.
A function or variable exported from a DLL can have as many as four different names, which can be used for different purposes and in different contexts:
C/C++ name declared in the DLL source code.
linker name, produced by the compiler for the linker to resolve. The linker
name is derived mechanically from the C/C++ name according to
the rules described below under "Linker names."
external name, used to link the DLL and its client program dynamically at load
time. You specify the external name when you export it from your
DLL, as described under "Exporting Names"; it may or may not be the same as the C/C++ name used in the
code of the DLL itself.
library name. placed in the static library (lib_name.lib) for client programs to import.
The linker name of an exported function or variable is derived from your original C/C++ name, modified ("decorated") as follows:
_) is prefixed to the original name: for example, the name CName
_CName
If you specify the __stdcall calling convention, the characters @nnn are also appended, where nnn is the number of bytes of parameters
the function takes: for example,
_CName@8
For more information on the __stdcall specifier, see "Calling Conventions for Win32/x86" and the C Compilers Reference.
C names with the __fastcall calling convention are prefixed with an '@' (at sign) and suffixed with an '@' and the number of bytes in the parameter list. For C++ names, a "mangled" name is generated, allowing the linker to distinguish among different versions of an over-loaded function or operator. The mangled name starts with a question mark, followed by the original C++ name or a special form of that name indicating an operator, followed by the encoded forms of the return type, template arguments, throw types, and function parameters. For example:
	?_DefaultConstructor@CBase1@@SAXXZ
  ??_7SplitDerived@@6B@External and library names
The external and library names of an exported function or variable depend on the method used to export it:
When you use the __declspec(dllexport) declaration specifier to export a function or variable, its linker
name (described in the preceding section) also becomes its library
name. The external name is then derived as follows:
¯ If the name is not a mangled name and is not declared with the
__stdcall specifier, the external name is simply the undecorated C/C++
name, with no leading underscore added.
¯ If the name is mangled or is declared with the specifier __stdcall, the external name is the same as the linker name.
When you use the linker command
/EXPORT: ext_name
the external name is exactly as specified in the /EXPORT command. The linker then searches for a linker name in the following
order:
b. The specified name with a leading underscore added.
c. Any mangled name or __stdcall name that could have been derived from the name specified. In
this case, there must be one and only one match among all names
in the link.
The linker name found becomes the library name.
When you use the linker command
/EXPORT: ext_name=int_name
the external name is exactly as specified in the /EXPORT command. The linker then searches for a linker name as described
in the preceding case, but basing the search on the specified
internal name (int_name) instead of the external name (ext_name).
In the linker name found, the internal name int_name is replaced
by ext_name to arrive at the final library name.
An example may help make all this clear. Suppose you have a C++
function named Fiddle, taking 12 bytes of parameters, that is declared with the __stdcall modifier and then exported with the linker command
/EXPORT: Faddle=Fiddle
This will result in the following names:
¯ The linker name is _Fiddle@12
¯ The library name is _Faddle@12
NOTE In all three of the export cases listed above, an additional library
name is created. This additional name is formed by adding the
prefix __imp_ to the library name described above. For functions, both the
ordinary library name and the one with the __imp_ prefix are placed in the library; for variables, only the __imp_ name is used. This ensures that only variables declared with
the __declspec(dllimport) modifier will match the library name.
A Win32 DLL can define an optional entry point. If it does, the
entry-point function will be called whenever a process or thread
attaches to the DLL or when an attached process or thread detaches
or terminates. The entry-point function must be declared with
the __stdcall specifier (see "Calling Conventions for Win32/x86" and the C Compilers Reference) and must have the following prototype:
BOOL WINAPI DllEntry
(HINSTANCE instDLL,
DWORD fdwReason,
LPVOID lpvReserved);
instDLL is the module instance handle for the DLL
DLL_PROCESS_ATTACH DLL_PROCESS_DETACH DLL_THREAD_ATTACH DLL_THREAD_DETACH lpvReserved is not currently used
The function's boolean return value indicates success or failure.
The entry point for a DLL is specified by the Entry Point Usage setting on the x86 Linker project settings panel (described in detail under "x86 Linker"). This setting can have the following values:
None: The DLL has no entry point. Default: The entry point is the standard library function
_DllMainCRTStartup@12
found in the MWCRTL.lib and MWCRTLD.lib library.
User Specified: The name of the entry-point function is specified in the Name field of the x86 Linker settings panel.
Any DLL that uses the C/C++ run-time library must use the default entry point in order to initialize the run-time library. In particular, you must use the default entry point if your DLL does any of the following:
Allocates memory Performs file operations Uses C++ static objects with constructors
If you don't perform any of these operations and don't need to
do any special initialization, you can safely set Entry Point Usage to None.
NOTE To give you a chance to perform additional initialization, the
standard entry-point function _DllMainCRTStartup calls a user-supplied "hook" function named _DllMain. If you use the default entry point, you must supply a _DllMain, even if all it does is return TRUE to indicate unconditional success.
The steps for creating a DLL are essentially the same as those for creating a stand-alone application, but with the following exceptions:
Project Type in the x86 Target settings panel, shown in Figure 6.1, must be set to Dynamic Link Library (DLL). x86 Target panel: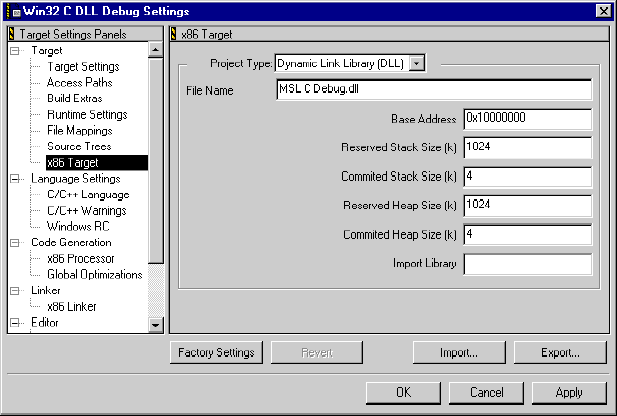
.dll instead of .exe.
Entry Point Usage setting in the x86 Linker settings panel, as described in "DLL Initialization."
PATH environment variable.
See "Creating an Application" for step-by-step instructions on creating an application project. For details on the various project settings and panels available, see "Target Settings for Win32/x86" as well as the relevant sections of the IDE User Guide, and the C Compilers Reference.
TIP The easiest way to begin a DLL project with all the appropriate settings and libraries is by selecting the predefined Win32 C DLL or Win32 C++ DLL stationery from the New Project dialog.
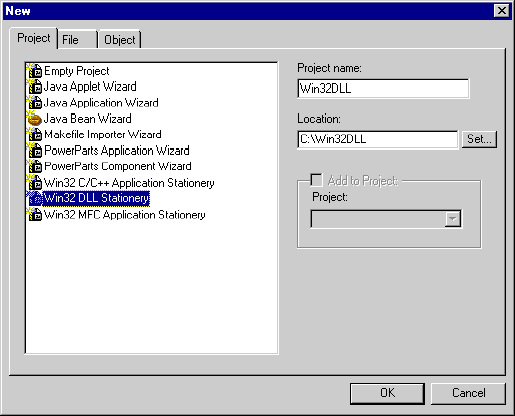
Choose File > New. The New dialog appears, as shown in Figure 6.2.
2. Select the project category.
Select the Win32 DLL Stationary from the list in the Project tab.
Type a name for your project in the Project name field. By convention, a project name ends with .mcp. You may use the Location field or Set button to choose a different location to store the project. Then
click OK.
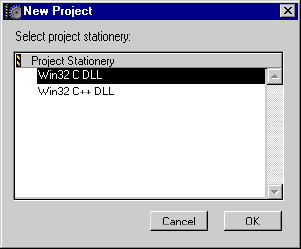
There are two stationaries to choose from. Which one you use will depend on the task at hand. Select the preferred stationary from the Project Stationary area of the New Project dialog, as shown in Figure 6.3. Then, click OK.
5. Add source files to the project.
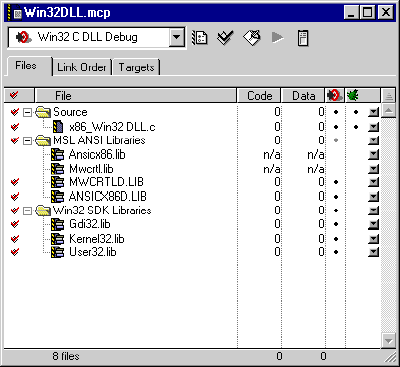
The project window appears, as shown in Figure 6.4. Most stationery projects contain source files that are just placeholders. If they contain any code at all, the code will not have been written with your project in mind. Thus, these placeholder files need to be deleted and replaced with your own code.
If you do not already have source files prepared, then you will need to write them. Click New Text File in the CodeWarrior IDE tool bar. An edit window appears, as shown in Figure 6.5. Write your source code, then choose File > Save. The Save document as dialog appears, as shown in Figure 6.6. Type a name for your source file in the File name field, then click Save.
Edit window:
Save document as dialog: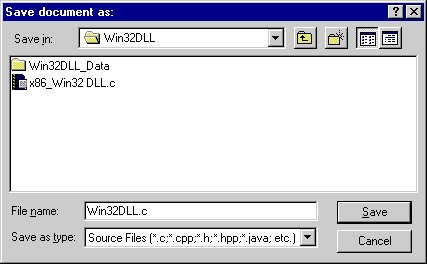
Once you have written your source files or if you already have source files written, select the Source folder in the project window, then choose Project > Add Files. The Select files to add dialog appears, as shown in Figure 6.7. Navigate to your source files, select them (use Control-click to select multiple files), then click Add. The Add Files dialog appears, as shown in Figure 6.8. Add the files to the preferred targets by enabling the options in the Targets area, then click OK.
Select files to add dialog: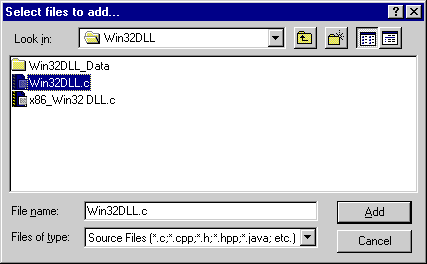
Add Files dialog: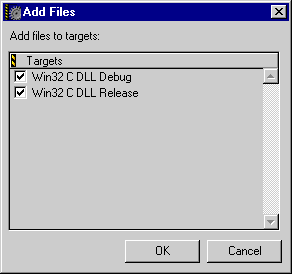
6. Remove the source file placeholders from your project.
Select the placeholder files in the Sources folder of the project window and choose Edit > Delete.
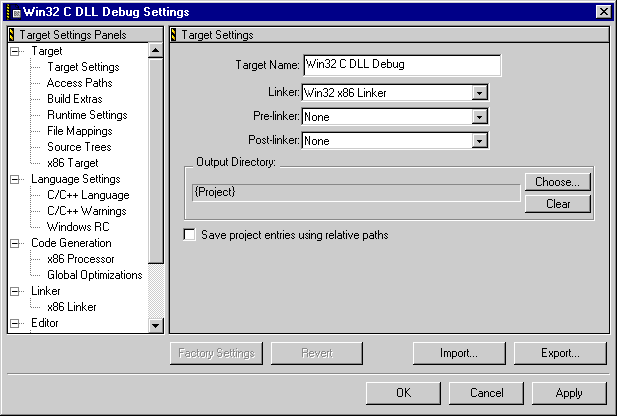
Choose Edit > Target Settings, where Target is the name of the project's currently selected
target. The Target Settings window appears, as shown in Figure 6.9. Use this window to specify various optional settings for your
project. The exact settings you can specify depend on:
For Win32/x86 projects, you must specify settings for the target platform, the project type, the compiler, and the linker. There are various other, optional settings that you can specify as well. To learn more about specifying settings beyond what we do here, refer to "Target Settings for Win32/x86."
The Target Settings panel appears by default in the Target Settings window. The settings in this panel are preset by the project
stationery, but you can change them if you necessary. See "Target Settings" for more information on the Target Settings panel.
Select x86 Target in the Target Settings Panels area. The x86 Target panel appears, as shown in Figure 6.10. Again, the settings are preset for you by the project stationery, but you can modify them if you wish. See "x86 Target" for more information on the x86 Target panel.
x86 Target
x86 Target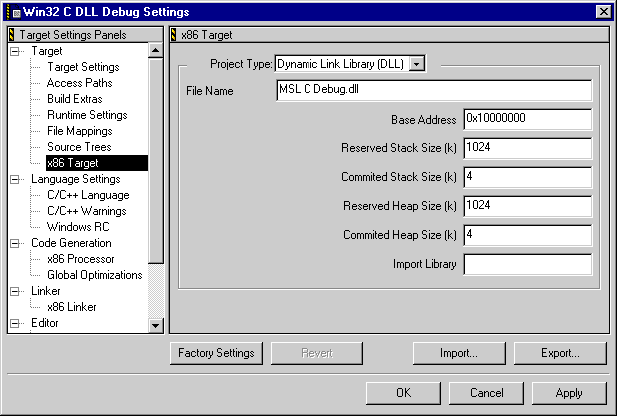
10. Specify language settings.
Select C/C++ Language in the Target Settings Panels area. The C/C++ Language panel appears, as shown in Figure 6.11. Ordinarily, the default settings are fine as they are in this
panel, but you are free to change them. For more information about
setting language preferences, refer to the C Compilers Reference.
C/C++ Language
C/C++ Language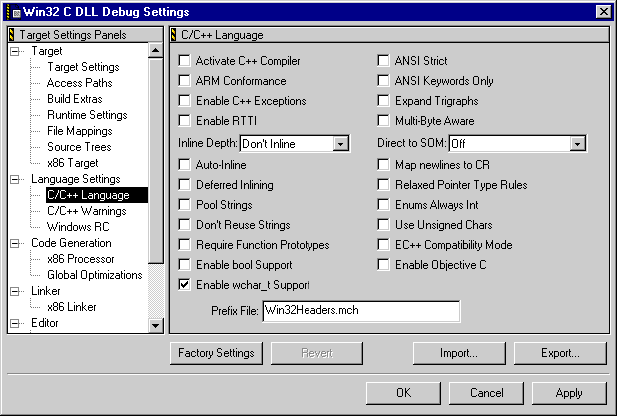
11. Specify additional settings.
You can continue to examine other target settings panels and change any settings you wish. For more information on the various panels and settings available, see "Settings Panels for Win32/x86" as well as the relevant sections of the IDE User Guide, and the C Compilers Reference. When you are finished examining project settings, click OK to save your settings and close the Target Settings window.
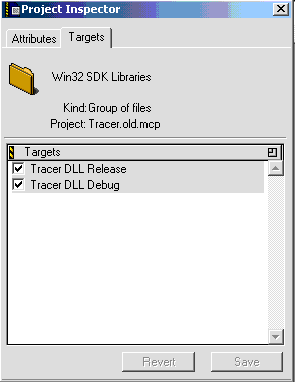
If you want, you can click on the Targets tab of the project window and choose Project > Create New Target. This allows you to add a special target group to better organize your build. You can also delete targets in this view. If you want to have certain files included in some targets but not in others, select the file in the project window and choose View > Project Inspector. The Project Inspector window appears, as shown in Figure 6.12. This window allows you to view information about a selected files and to assign files to specific targets. Click the Targets tab, then enable or disable the options in the Targets area to include or exclude the file from the targets in the project. Refer to the IDE User Guide for more information on managing multiple targets.
After your project is created and its contents and all necessary
settings are specified, you are ready to compile and debug your
code. Choose Project > Make to compile and link your project. If all goes well, the IDE stores
the resulting output file in your project folder under the name
you specified in the x86 Target settings panel. For more information on compiling and linking,
refer to the IDE User Guide. In addition, if you have checked
the SYM Format option on the x86 Processor panel and Generate SYM File on the x86 Linker panel, the CodeWarrior IDE will generate a symbol file, which
you will need for debugging your code.
Once you have successfully built your DLL, you can add it to your application project. If all goes well, congratulations! You have used the CodeWarrior IDE to build a running Win32/x86 DLL. If not, see "Debugging for Win32/x86" and the IDE User Guide for information on debugging.
This section describes which libraries to include in your Win32 DLL projects. For a more in-depth discussion, see "Libraries and Runtime Code for Win32/x86."
Generally, you will create a DLL project with project stationery, so you will not need to add libraries on your own. But, if you change certain project options, this section explains which libraries you may need to change.
The topics in this section include:
Table 6.1 lists some of the CodeWarrior libraries you might need to add to a C or C++ DLL project. Note that if you are building a C++ DLL, you must also include the C runtime libraries.
Libraries for a Win32 DLL project (Partial List):
| Library |
Use |
|---|---|
In addition to the standard libraries, there are variations for
specialized compilers. These include 3DNow!, Microsoft Exceptions,
and Debug versions. Versions of libraries with a final "D" before
the filename extension have debug information embedded in them.
For example, mwcrtld.lib is the debug version of the Metrowerks C/C++ runtime library.
NOTE Libraries with a 60 number in them are intermediate steps in creating the final library.
Any libraries that you may need to include to resolve (at link time) Win32 API calls made in your code are discussed on the World Wide Web at:
http://msdn.microsoft.com
This site includes information on all the libraries you may need, including the commonly used ones listed in Table 6.2. For a more in-depth discussion, see "Libraries for Win32 Development."
Common Win32 SDK Libraries (Partial List):
| Library Name |
Functionality |
|---|---|
Any libraries that you need to include to resolve (at link time) Microsoft Foundation Classes (MFC) API calls you made in your code are discussed on the World Wide Web at:
http://msdn.microsoft.com
This site includes information on all the libraries you may need, including the commonly used ones listed in Table 6.3. Documentation and resources, including more sample code, for using MFC is also found there.
| Library Name |
Functionality |
|---|---|
Note that you can also build your DLL to include the MFC DLL instead of statically linking-in the MFC libraries. This is an option that is made available to you when you use project stationery, as described in "Creating a Dynamic Link Library." This allows the size of your application to be smaller because the MFC DLL file that is required would need to be installed or already present on the computer on which you are running it.