[ First ] [ Previous ] [ Next ] [ Last ] [ Manuals ]
Target Settings

The following settings panels apply to most build targets:
Target Settings
The Target Settings panel, shown in Figure 9.4, is a very important settings panel for your project. You use this panel to perform all of the following tasks:
Selecting a particular linker specifies the target operating system or microprocessor. The hierarchical list in the Target Settings window updates to reflect your linker choice. Thus, you must set your build target before you can configure options that apply to that build target, such as compiler and linker settings.
You can use this settings panel to completely change the build target. However, if you make such a change, the IDE cannot change related project files for you. For example, if you change the build target such that the IDE requires a new compiler and linker, you must manually remove inappropriate libraries as well as add required libraries for use with the new compiler and linker.
 TIP
TIP
To avoid the complexities involved with manually changing a build target in your project, consider using the project stationery included with your CodeWarrior product. These stationery files include the appropriate libraries and support files for a variety of build targets. For more information, see "Creating a New Project".
Target Settings Panel: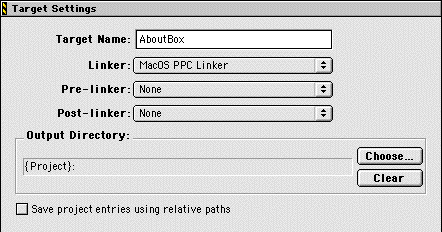
Target Name
Use this field to set or change the name of the current build target. This name appears in the Targets view in the Project window.
The name you enter in this field is not the name of your final output file. Rather, this field shows the name that you assign to the build target for your personal use. You typically set the name of the final output file in the settings panel for the linker you choose for your build target.
Linker
Choose from this pop-up menu the linker that you wish to use with the project.
To learn more about the linkers available to you, refer to the Targeting manual for your selected build target. The choices depend on the plug-in linkers that you have for your CodeWarrior product.
For example, CodeWarrior for Windows provides linkers for Win32 on x86. CodeWarrior for PlayStation¨ provides a linker for the PlayStation OS running on MIPS, as well as a post-linker.
 NOTE
NOTE
See "File Mappings" for more information about the file mappings associated with the linker you choose. The IDE uses these file mappings to recognize the files in your project.
Pre-linker
Some build targets have pre-linkers that perform additional work on the object code in your project. This work takes place before the IDE links the object code into the final executable file. For more information about the pre-linkers available for your build target, refer to the information in the appropriate Targeting manual.
Post-linker
Some build targets have post-linkers that perform additional work (such as format conversion) on the final executable file. For more information about the post-linkers available for your build target, refer to information in the appropriate Targeting manual.
Output Directory
This field shows the location in which the IDE places your final linked output file. The default location is the directory that contains your project file. Click Choose to specify a different location. Click Clear to remove the current location.
Save project entries using relative paths
Enable this checkbox to remember the location of a project entry as a relative path from one of the access paths. This extra location information allows the IDE to distinctly identify different source files with the same name. The IDE remembers the location information even if it needs to re-search for files in the access paths.
Disable the checkbox to remember project entries only by name. This situation can cause unexpected results if two or more files share the same name. In this case, re-searching for files could cause the IDE to find the project entry in a different access path.
See "Re-search for Files" and "Reset Project Entry Paths" for more information.
Access Paths
If you need to define additional access paths for the CodeWarrior IDE to search while compiling and linking your project, use the Access Paths settings panel, shown in Figure 9.5 (Windows) and Figure 9.6 (Mac OS).
Access Paths Settings Panel (Windows):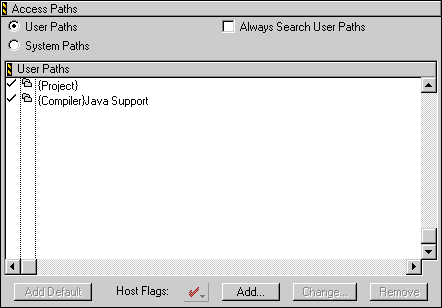
If a folder icon appears beside the name of a folder in either the User Paths pane or the System Paths pane, the IDE performs a recursive search on the path. That is, the CodeWarrior IDE searches the folder and all of its subfolders.
Clicking the folder icon to the left of any path in the User Paths pane or the System Paths pane toggles recursive searching of the subdirectories in that path. If the folder icon is visible, recursive searching is enabled. If the folder icon is not visible, recursive searching is disabled.
Access Paths Settings Panel (Mac OS):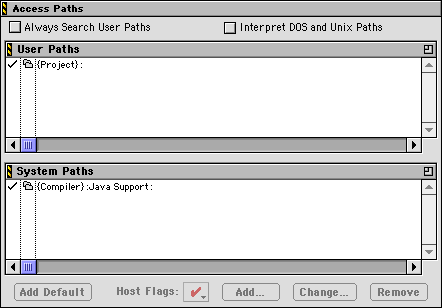
TIP
If you disable recursive searching of paths and add each specific path of every directory that contains your files to either the User Paths pane or the System Paths pane, you can speed compilation of your project.
Clicking the checkmark icon to the left of any path in the User Paths pane or the System Paths pane toggles searching that path in the current host computer. If the access path is checked, the current host computer searches that path. If the access path is not checked, the current host computer ignores that path.
If the files or libraries in your project are not located in the default access paths, the IDE cannot find them when compiling, linking, or running your project. You must explicitly add their access paths in order for the IDE to find them.
For more information about access paths, see "Interface pop-up menu."
Windows
The IDE automatically excludes Resource.frk files from the search list.
TIP
You can prevent the IDE from searching a folder and all its subfolders in an access path by using the Shielded Folders preference panel. For more information, see "Shielded Folders".
User Paths (Windows)
Click this radio button to display the User Paths pane in the Access Paths preference panel.
System Paths (Windows)
Click this radio button to display the System Paths pane in the Access Paths preference panel.
Always Search User Paths
Enable this checkbox to search for system header files or interface files in the same way as user header files. Disable the checkbox to treat #include <> directives differently from #include "" directives.
Interpret DOS and Unix Paths (Mac OS)
This checkbox determines how the IDE treats file names for interface files. Enable the checkbox to treat the backslash (\) and forward slash (/) characters as sub-folder separator characters. Disable the checkbox to treat these characters as part of the file name in an interface file.
For example, consider the following directive:
#include "sys/socks.h"
If the Interpret DOS and Unix Paths checkbox is disabled, the IDE attempts to search for a file named "sys/socks.h" for use with the project. If the checkbox is enabled, the IDE looks for a subfolder named "sys" that has a file named "socks.h".
User Paths pane
This pane shows the access paths specific to your project. In C, an #include "{Project}, which is the folder that contains the current project.
System Paths pane
This pane shows the access paths for system headers and similar files. In C, an #include <> directive causes the IDE to search these access paths. In Pascal, the IDE searches these access paths after those in the User Paths pane. By default, the System Paths pane contains {Compiler}, which is the folder that contains the CodeWarrior IDE.
Add Default
The CodeWarrior IDE lets you restore the default access paths in the User Paths pane or System Paths pane after you delete them. To add the default path to the active pane, click the Add Default button. The IDE adds the default path back into the active pane. Note that this button is not available if the default access path is currently present in the active pane.
Host Flags
This pop-up menu specifies the host platform that can use an access path. To allow a host platform to use a selected access path in the User Paths pane or System Paths pane, choose the host platform from the Host Flags pop-up menu.
To allow all host platforms to use the access path, choose All from the pop-up menu. To prevent any host from using the access path, choose None from the pop-up menu.
For example, selecting a path and choosing Mac OS in the Host Flags pop-up menu specifies that the IDE must search the access path on a Mac OS computer and ignore the access path when running on any other host platform.
Add
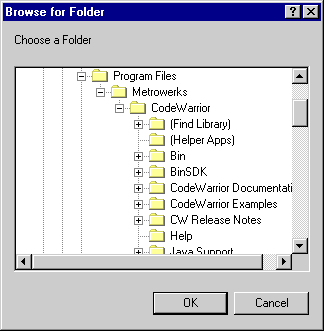
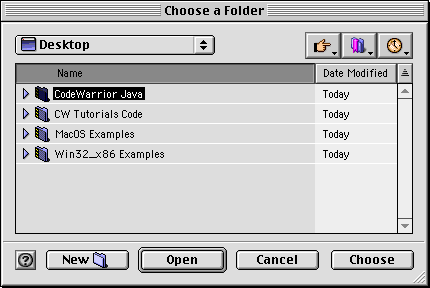
To add a new access path, first select the User Paths pane or the System Paths pane, then click the Add button. The dialog box shown in Figure 9.7 (Windows) or Figure 9.8 (Mac OS) appears. Use the dialog box to select the item for which you want to add an access path. You can also drag and drop folders onto the appropriate pane in order to add access paths.
Access Path Selection Dialog Box (Windows):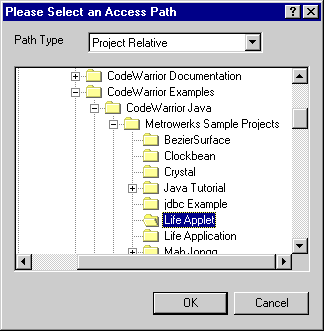
You can specify how CodeWarrior stores an access path by choosing one of the following options:
-
Absolute Path-Using this option, the IDE stores the access path from the root level of the startup hard drive to the folder whose access path you want to add, including all folders in between. You must update absolute access paths if you move the project to another system, rename the hard disk, or rename any of the folders along the access path.
-
Project Relative-Using this option, the IDE stores the access path from the folder that contains the project to the folder whose access path you want to add. You do not need to update project relative access paths if you move a project, as long as the hierarchy of the relative path is the same. You cannot create a relative path to a folder on a different hard drive than where your project file resides.
Access Path Selection Dialog Box (Mac OS):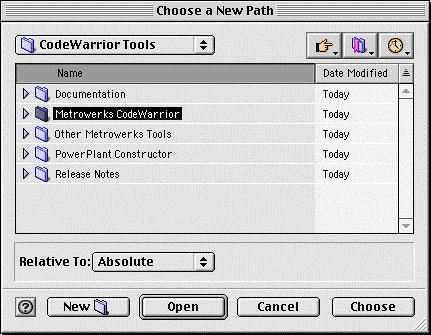
-
Compiler Relative-Using this option, the IDE stores the access path from the folder that contains the CodeWarrior IDE to the folder whose access path you want to add. You do no need to update compiler relative access paths if you move a project, as long as the hierarchy of the relative path is the same. You cannot create a relative path to a folder on a different hard drive than where your CodeWarrior IDE resides. On the Mac OS-hosted IDE, the Compiler Relative option is named CodeWarrior Relative.
-
System Relative-Using this option, the IDE stores the access path from the operating system's base folder to the folder whose access path you want to add. You do not need to update system relative access paths if you move a project, as long as the hierarchy of the relative path is the same. You cannot create a relative path to a folder on a different hard drive than where your active operating system's base folder resides.
-
Source Tree Relative-Using this option, the IDE stores the access path from the folder specified in the source tree. The actual name of this option includes the name of the source tree. For example, if you create a source tree named Sample, you can choose the Sample option when specifying how the IDE stores the access path. For more information about defining global source trees, see "Source Trees". For information about defining project-specific source trees, see "Source Trees".
NOTE
Relative paths allow projects to contain two or more files with identical names. However, for large projects, you might notice slower performance when adding relative paths to a project.
Select an access-path type from the available types, and then select the folder whose access path you want to add. Click OK to add the selected item's access path to the User Paths pane or the System Paths pane, or click Cancel to discard your changes and leave the panes unchanged.
Change
To change an access path, first select the path in the User Paths pane or the System Paths pane, then click the Change button. The dialog box shown in Figure 9.7 (Windows) or Figure 9.8 (Mac OS) appears. Use this dialog box to select a new access path. To learn more about the options in the dialog box, refer to "Add."
Remove
To remove an access path, select the path that you want to remove from the User Paths pane or the System Paths pane. Click Remove to delete the path from the pane.
Windows
You can also remove access paths by dragging them to the Recycle Bin on the Desktop.
Mac OS
You can also remove access paths by dragging them to the Trash on the Desktop.
Build Extras
The Build Extras panel, shown in Figure 9.9, contains various options that affect the way the IDE builds a project.
Build Extras Settings Panel: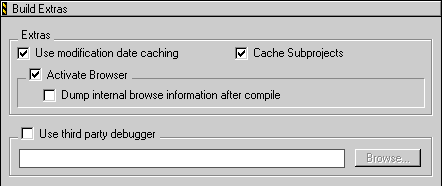
Use modification date caching
This checkbox determines whether the IDE checks the modification date of each project file prior to making the project. Enabling the checkbox causes the IDE to cache the modification dates of the files in a project. At compilation time, the IDE refers to this cache to determine whether a specific file should be recompiled. Disabling the checkbox causes the IDE to check every file each time you recompile the project.
If you exclusively use the CodeWarrior editor to create and modify the text files in your project, enable the checkbox to shorten compilation time. If you use other text editors in addition to the CodeWarrior editor, disable the checkbox to ensure that the IDE checks every file at compilation time.
Cache Subprojects
Enable this checkbox to improve multi-project updating and linking. Enabling the checkbox also allows the IDE to generate symbolics information for both the build targets and the subprojects within each build target. Disable the checkbox to reduce the amount of memory required by the CodeWarrior IDE.
Activate Browser
Enable this checkbox to allow the IDE to generate symbolics information for your project during each build. The CodeWarrior browser requires the symbolics information. Without this information, you cannot open browser windows for your project.
See "Making a Project" for more information about re-building your project. To learn more about browser settings and options, see "Browsing Source Code."
Dump Internal Browse Information After Compile
Enable this checkbox to view the raw browser information that a plug-in compiler or linker provides for the IDE. This option is useful if you develop plug-ins for use with the IDE.
NOTE
After enabling the Dump internal browse information after compile checkbox, you should only compile single files or small files. The internal browser information that the IDE displays can be huge when compiling an entire project.
Use third party debugger (Windows)
Enable this checkbox to use a third-party debugger in place of the CodeWarrior debugger. Enter the path to the third-party debugger application in the field provided, or click Browse to open a dialog box. Use the dialog box to locate the debugger application.
Runtime Settings
The Runtime Settings panel, shown in Figure 9.10 for a Windows build target, includes options for specifying a debugging application for non-executable files, defining a working directory, listing program arguments, and creating environment variables.
Runtime Settings Panel (for a Windows Build Target):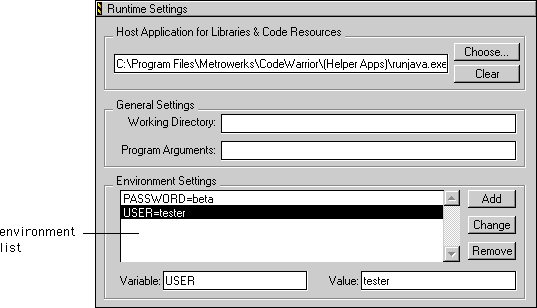
Host Application for Libraries & Code Resources
This field lets you specify a host application to use when debugging a non-executable file, such as a shared library, dynamic link library (DLL), or code resource. The application that you specify in this field is not the debugger application, but rather the application with which the non-executable file interacts.
For example, if you write a Photoshop¨ plug-in, you would select Photoshop as the host application. After you choose Project > Debug
To specify a host application, type the path to that application directly into the field. Alternatively, click Choose to display a dialog box. Use the dialog box to select the application. Click Clear to remove the current path from the field.
General Settings
This section has the following fields:
NOTE
The General Settings section appears only when you develop code for a Windows build target. The section does not appear for any other build target.
Environment Settings
This section allows you to specify environment variables to pass to your program as part of the environment parameter in your program's main() function, or as part of environment calls. These variables are only available to the target program. When your program terminates, the settings are no longer available. For example, if you write a program that logs into a server, you could use variables for PASSWORD and USER as shown in Figure 9.10.
NOTE
The Environment Settings section appears only when you develop code for a Windows build target. The section does not appear for any other build target.
To create a new environment variable, follow these steps:
1. Type a name for the environment variable in the Variable field.
2. Type a value for the environment variable in the Value field.
3. Click Add.
The new environment variable appears in the environment list shown in Figure 9.10.
To modify an existing environment variable, follow these steps:
1. Select from the environment list the environment variable that you wish to modify.
2. Modify the Variable and Value fields as desired.
3. Click Change.
The modifications appear in the environment list shown in Figure 9.10.
To delete an existing environment variable, follow these steps:
1. Select from the environment list the environment variable that you wish to delete.
2. Click Remove.
The selected environment variable is removed from the environment list shown in Figure 9.10.
File Mappings
The File Mappings settings panel, shown in Figure 9.11, allows you to associate a file-name extension such as ".c" or ".p" with a plug-in compiler. This association assigns a particular CodeWarrior compiler to process files with matching file-name extensions.
NOTE
The IDE recognizes a project's files based on the file mappings defined in the File Mappings settings panel. If you have trouble adding files to your project, or if the IDE refuses a folder or file that you drag and drop into the Project window, check the File Mappings settings panel. Because the IDE associates file mappings with the current linker, the mappings change as you select different linkers. For more information, see "Linker".
File Mappings Settings Panel: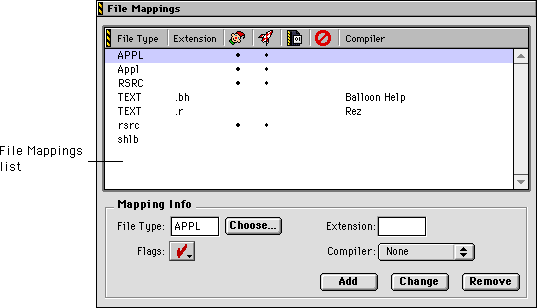
File Mappings list
The File Mappings list contains a File Type, associated Extension, and Compiler choice for each file-name extension in the list. This list determines the compiler that the IDE invokes to process a file with a matching extension.
To add a new extension to this list, you choose an existing entry in the list, edit the information in the Mapping Info section as desired, and click Add.
For example, to add a documentation file mapping to the current project, you would follow these steps:
1. Choose an existing file mapping.
2. Delete the text in the File Type field.
3. Change the text in the Extension field to ".doc" (without the quotes).
4. Choose None from the Compiler pop-up menu.
5. Click the Add button.
File Type
Enter in this field the file type for the selected file mapping in the File Mappings list.
Extension
This flag lets you enter a file-name extension, such as the ".c" or ".h" extensions, for a selected File Type in the File Mappings list. Table 9.1 shows the default file-name extensions used by the CodeWarrior IDE.
Default File-name Extensions:
Compiler
This pop-up menu allows you to choose a compiler for the selected File Type in the File Mappings list.
Flags
This pop-up menu allows you to enable and disable flag options. The File Mappings list contains a column for each flag option. The following icons label these columns (see Figure 9.11):
 Resource File
Enabling this flag causes the IDE to include in your finished product the resources from files with the selected file mapping.
 Launchable
Enabling this flag causes the IDE to open the source-code file with the application that created it after you double-click the file in the Project window.
 Precompiled
Enabling this flag causes the IDE to compile files with the selected file mapping before compiling other files. This flag is useful if the original files create documents that other source files or compilers use. For example, this option lets you create a compiler that translates a file into a C source-code file and then compiles the C file. YACC (Yet Another Compiler Compiler) files are treated as precompiled files because YACC generates C source code to be compiled by a C compiler.
 Ignored by Make
Enabling this flag causes the IDE to ignore files with the selected file mapping when compiling or linking the project. This flag is useful if the files contain comments or documentation that you want to include with your project but ignore during the compile-and-link process.
Source Trees
The Source Trees settings panel, shown in Figure 9.12, lets you define project-specific source trees (root paths) for use in your projects. You can define your project's access paths and build-target output in terms of source trees. Using this approach, you can easily share projects across various hosts. You need only make minor changes to the source trees' paths to maintain your project's functionality.
Source Trees Settings Panel: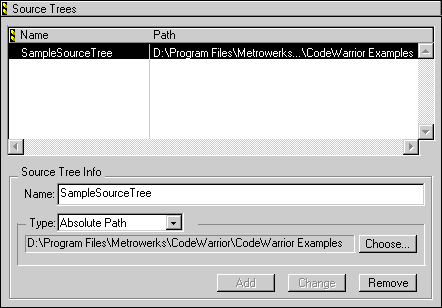
There is also a Source Trees preference panel that applies globally to the IDE. For more information about this preference panel, see "Source Trees". The source trees defined in the Target Settings window can only be used with the current build target in the active project. You can use the source trees defined in the IDE Preferences window with all projects. If you define the same source trees in both panels, the target-specific source trees take precedence over the global source trees.
Source Trees list
This list shows all of the project's source trees. The list consists of two columns:
Name
Use this field to enter a name for a new source tree, or to change the name of an existing source tree.This field is part of the Source Tree Info section shown in Figure 9.12.
Type
This field is part of the Source Tree Info section shown in Figure 9.12. Use the Type field to choose one of the following types of source trees:
Add
To add a new source tree, first select the appropriate type of source tree from the Type pop-up menu. Next, enter a name for the new source tree in the Name field.
When you create an Absolute Path source tree, the Choose button is available. Click this button to select a path using a standard dialog box, as shown in Figure 9.13 (Windows) and Figure 9.14 (Mac OS).
On the Windows-hosted IDE, you can specify how CodeWarrior stores a path by choosing one of these path type options:
NOTE
Relative paths allow projects to contain two or more files with identical names. However, for large projects, you might notice slower performance when adding relative paths to a project.
When you create an Environment Variable or Registry Key source tree, the field below the Type pop-up menu becomes available, as shown in Figure 9.15. Enter in this field the path to the environment variable or registry key.
Creating a Registry Key (Windows):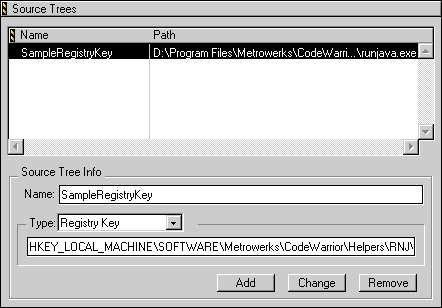
After you finish adding source trees, click the Save button in the Target Settings window to save your changes. The saved source trees appear in the path pop-up menus for your project. For example, if you create a source tree named Sample, you can use it to create an access path, as shown in Figure 9.16. You can also define your project's target output in terms of the source trees by using the Output Directory field in the Target Settings panel. For more information about this settings panel, refer to "Target Settings".
Change
To change a source tree, first select its name in the Source Trees list. Next, modify the Name and Type fields as desired. Then click Change. After you finish modifying the source trees, click Save in the Target Settings window to save your changes.
NOTE
After changing a source tree, you might need to modify your project so that you do not refer to the source tree in its original form. Therefore, the IDE displays a message reminding you to update your project.
Choosing Source Trees in Access Path Pop-up Menus: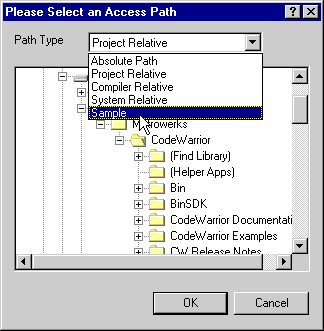
If your project's files or libraries are not in the source trees, the IDE cannot find them when compiling, linking, or running your project. Therefore, after you change an existing source tree, the IDE displays a message reminding you to update your project.
Remove
To remove a source tree, first select its name in the Source Trees panel. Click Remove to delete the source tree. After you finish removing source trees, click Save in the Target Settings window to save your changes.
NOTE
After removing a source tree, you might need to modify your project so that you do not refer to the removed source tree. Therefore, the IDE displays a message reminding you to update your project.
[ First ] [ Previous ] [ Next ] [ Last ] [ Manuals ]
Visit the Metrowerks website at: http://www.metrowerks.com
For assistance contact Metrowerks Technical Support at: cw_support@metrowerks.com
Copyright © 2000, Metrowerks Corp. All rights reserved.
Last updated: August 17, 2000