[ First ] [ Previous ] [ Next ] [ Last ] [ Manuals ]
General Preferences

This section describes the preference panels that control general IDE features:
Build Settings
The Build Settings preference panel, shown in Figure 8.3, allows you to customize project builds.
Build before running
Use this pop-up menu to determine how the CodeWarrior IDE handles project builds. You can choose to Always build projects before running them, Never build projects before running them, or let the CodeWarrior IDE Ask you how to proceed.
Save open files before build
Enable this checkbox to automatically save all open files before executing the following commands: Preprocess, Precompile, Compile, Disassemble, Bring Up To Date, Make, and Run.
Show message after building up-to-date project
Enable this checkbox to display a message after building an up-to-date project. The Message window displays the message. For more information about this window, see "Guided Tour of the Message Window". For more information about up-to-date projects, see "Updating a Project".
Use Local Project Data Storage
After loading a project file, the IDE creates or updates an associated project data folder. The IDE stores intermediate project data in this folder. After you build or close the project, the IDE uses the information in the project data folder to update the project file.
By default, the IDE places the project data folder within the same folder as the project file. However, the IDE cannot create or update a project data folder in a location that grants read-only privileges.
To specify a different location for the project data folder, enable the Use Local Project Data Storage checkbox, then click Choose to select the path to the location you wish to use. For more information about the types of paths available to you, see "Add".
Build Settings Preference Panel: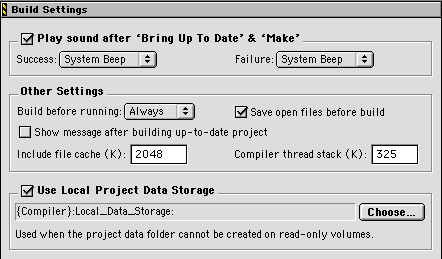
Play sound after `Bring Up To Date' & `Make' (Mac OS, Solaris, and Linux)
Enable this checkbox to play a sound after finishing a build of your project. You can choose different sounds for successful and unsuccessful builds by using the Success and Failure pop-up menus, respectively.
Compiler thread stack (Windows and Mac OS)
Use the Compiler thread stack field to specify the upper limit of stack size allocated by the IDE for compiling and linking thread support.
All builds in CodeWarrior are threaded, with compiling and linking occurring on a thread separate from the main application thread. This setting lets you control the size of the stack allocated for the compiler thread.
Normally, you should not change this setting. However, if you have a large or very complex project, you can increase this setting to avoid compiler crashes.
Include file cache (Mac OS)
This field, shown in Figure 8.3, specifies the upper limit on how much memory the IDE should use for caching #include files and precompiled headers. If your computer has substantial memory and you want to use that memory to accelerate builds, increase the number in this field.
IDE Extras
The IDE Extras preference panel, shown in Figure 8.4 (Windows) and Figure 8.5 (Mac OS), includes options for remembering previously opened projects and text files, as well as configuring the IDE for use with third-party editors.
Mac OS, Solaris, and Linux
The IDE Extras preference panel also lets you configure miscellaneous options, such as window zooming and the Scripts menu.
Menu bar layout
Use this pop-up menu to choose the default menu bar layout for the CodeWarrior IDE. The name of the menu bar layout suggests the host. For example, use the Windows menu bar layout to organize IDE menus according to Microsoft¨ Windows¨ user-interface standards. "CodeWarrior¨ IDE Menu Reference" shows the organization of the menu commands under each menu bar layout.
Recent projects
Enter in this field the maximum number of recent projects that you want displayed in the Open Recent submenu of the File Menu.
IDE Extras Preference Panel (Windows):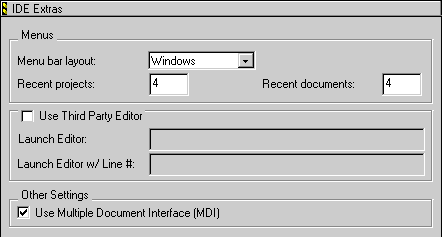
Recent documents
Type in this field the maximum number of recent documents that you want displayed in the Open Recent submenu of the File Menu.
Context popup delay (Mac OS, Solaris, and Linux)
Enter in this field the minimum length of time to hold down the mouse button before the IDE's contextual menus appear. You can enter a value from 0 to 240 ticks. Each tick represents 1/60th of a second (16.67 milliseconds). For general information about contextual menus, see "Using the Contextual Menu". To learn how to configure the types of commands that appear in the contextual menus, see "Contextual Menus".
 WARNING!
If you enter 0 in the Context popup delay field, the IDE completely disables the contextual menus. To restore the contextual menus, enter a number greater than 0.
IDE Extras Preference Panel (Mac OS):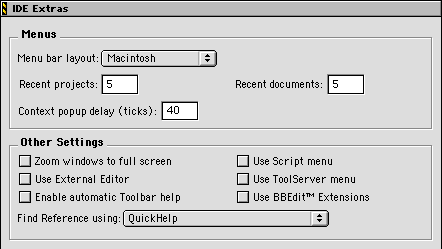
Zoom windows to full screen (Mac OS, Solaris, and Linux)
This checkbox configures the behavior of the zoom box in the upper right-hand corner of all editor windows. If you enable this checkbox, clicking the zoom box of an editor window resizes that window to fill the entire screen. If you disable the checkbox, clicking the zoom box of an editor window resizes that window to a standard size.
Use Script menu (Mac OS, Solaris, and Linux)
Enable this checkbox to display the Scripts menu in the IDE's menu bar. For more information about scripting the IDE, refer to the CodeWarrior Scripting Reference. For more information about scripting the IDE with AppleScript, refer to Targeting Mac OS.
Use External Editor (Mac OS, Solaris, and Linux)
Enable this checkbox to use a third-party text editor to modify text files. Disable the checkbox if you wish to use the CodeWarrior editor.
 NOTE
NOTE
The CodeWarrior IDE does not use the third-party editor for text editing unless you add the text file you are working with to the active Project window.
Mac OS
Enabling the Use External Editor checkbox causes the CodeWarrior IDE to send Open Document ('odoc') AppleEvents to AppleScript-compatible third-party text editors. To use this feature, create a (Helper Apps) folder (if it does not already exist) in the CodeWarrior IDE application folder. Next, place an alias inside the (Helper Apps) folder that points to your third-party editor application. Then, change the name of the alias to External Editor.
To learn how to add files to the Project window, see "Adding Files."
Use Third Party Editor (Windows)
Enable this checkbox to use a third-party text editor to modify text files. Disable the checkbox if you wish to use the CodeWarrior editor.
If you use a third-party text editor, you can enter command lines in the following fields:
For example, after you double-click an error message, the IDE invokes the Launch Editor w/ Line # command line to open a text file and display the code that caused the error message.
You can use two variables in the command-line strings:
The IDE expands the %file variable into the full file path.
The IDE expands the %line variable into the initial line number in the file.
For example, if you want to use the Emacs text editor to edit text files, then you would enter the following command line in the Launch Editor field:
runemacs %file
If you also want the text editor to jump to a particular line in the text file, you would type the following command line in the Launch Editor w/ Line # field:
runemacs +%line %file
Consult the documentation provided with your third-party text editor for more information about using command lines.
Use Multiple Document Interface (Windows)
This checkbox configures the interface style used by the IDE:
Use ToolServer menu (Mac OS)
This checkbox toggles the appearance of the ToolServer menu (Figure 8.6) in the IDE's menu bar. For more information about ToolServer, refer to Targeting Mac OS.
ToolServer Menu: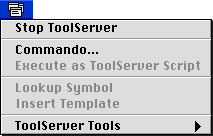
Enable automatic Toolbar help (Mac OS)
This checkbox toggles the appearance of Balloon Help for the toolbar icons. With automatic toolbar help enabled, as you rest the cursor over a toolbar icon, a help balloon appears and names the command represented by that icon.
Use BBEdit Extensions (Mac OS)
This checkbox toggles the appearance of the BBEdit Extensions menu (Figure 8.7) in the IDE's menu bar. This menu allows you to use the IDE to access BBEdit extensions. For more information about BBEdit, refer to its documentation.
BBEdit Extensions Menu:
Find Reference using (Mac OS)
Use this pop-up menu to select an online database application to look up references and definitions. Although they are not included in your CodeWarrior product, the IDE supports the following formats:
To learn more about online reference databases and how to use them, see "Online References."
Plugin Settings
The Plugin Settings preference panel, shown in Figure 8.8, contains options for troubleshooting third party IDE plug-ins.
Plugin Settings Preference Panel: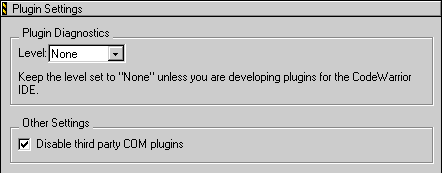
Plugin Diagnostics
Use this pop-up menu to determine the amount of information reported for the IDE plug-ins that you develop. This information is useful for diagnosing plug-in behavior, or for viewing detailed information about the properties of installed plug-ins.
Use the Level pop-up menu to report one of the following levels of plug-in diagnostic information:
NOTE
You must restart the IDE for any changes to the diagnostic level to take effect. After you change a plug-in diagnostic level and save that change, a dialog box appears and reminds you to restart.
You can save the text file, print it, and use it as an error reference for troubleshooting your plug-ins. The text file provides suggestions for correcting general plug-in errors.
Disable third party COM plugins
Enable this checkbox to disable all third-party Common Object Model (COM) plug-ins for the IDE. This option is useful for troubleshooting problems with the IDE.
 TIP
TIP
If you experience problems when using the IDE, try enabling this checkbox to disable third-party COM plug-ins. If the problem does not occur after you disable the plug-ins, then the source of the problem likely involves conflicts between third-party plug-ins and the plug-ins supplied with the IDE.
Shielded Folders
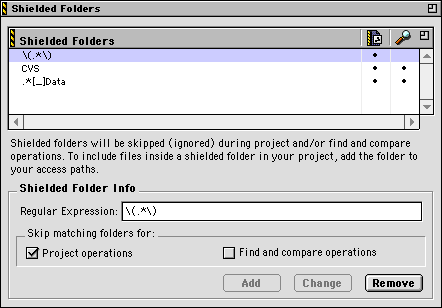
The Shielded Folders preference panel, shown in Figure 8.9, allows you to configure the IDE to ignore folders during certain operations. You specify regular expressions that match the names of the folders that you wish to ignore. The IDE treats matching folders as shielded folders and ignores their contents. For more information about regular expressions, see "Using Regular Expressions (grep)".
The Shielded Folders list at the top of the panel shows the current list of regular expressions. The IDE uses this list to determine whether to shield folders from the current project. The following regular expressions appear in the Shielded Folders list by default:
The Shielded Folders list includes two columns. These columns represent different types of operations for which you can shield folders:
 A bullet in the Project operations column, whose label appears at left, indicates that the IDE ignores matching folders for project operations. Such operations include dragging a folder into the Project window, building a project, or searching access paths after choosing the
 A bullet in the Find-and-compare operations column, whose label appears at left, indicates that the IDE ignores matching folders for find-and-compare operations. Such operations include dragging a folder into fields in the Find window, or comparing folder contents.
TIP
You can configure the project to include items within a shielded folder. Use the Access Paths target settings panel to specify the path to the shielded folder that you wish to include.
Add
To add a regular expression to the Shielded Folders list, follow these steps:
1. Enter in the Regular Expression field the expression that specifies the folders you wish to ignore.
You can enter the name of a specific folder, or you can enter a regular expression that matches several folder names.
2. Choose whether to shield matching folders from project operations, from find-and-compare operations, or from both.
Enable the Project operations checkbox, the Find and compare operations checkbox, or both. During the operations that you specify, the IDE ignores folders with names that match the regular expression.
3. Click Add.
After you click the Add button, the regular expression appears in the Shielded Folders list. Bullets in the list indicate the operations for which the IDE ignores matching folders.
4. Click Save.
Change
To modify an existing regular expression, follow these steps:
1. Select the regular expression that you wish to modify.
2. Modify the regular expression.
If desired, enter a new regular expression in the Regular Expression field.
3. Modify the operations for which to shield matching folders.
Enable the Project operations checkbox and the Find and compare operations checkbox as desired.
4. Click Change.
After you click the Change button, the modified regular expression appears in the Shielded Folders list. Bullets in the list reflect the changes that you made to the corresponding operations.
5. Click Save.
Remove
To delete an existing regular expression, follow these steps:
1. Select the regular expression that you wish to delete.
2. Click Remove.
After you click the Remove button, the IDE deletes the regular expression from the Shielded Folders list.
3. Click Save.
Source Trees
The Source Trees preference panel, shown in Figure 8.10, lets you define global source trees (root paths) for use in your projects. You can define access paths and build-target output in terms of source trees. Using this approach, you can share projects across various hosts. You need only make minor changes to the source-tree paths to maintain project functionality.
You can use the source trees that you define in the IDE Preferences window for all projects. However, you can use the source trees defined in the Target Settings window only for the current build target in the active project. If you define the same source trees in both windows, the target-specific source trees take precedence over the global source trees. For more information about the target-specific version of the Source Trees panel, see "Source Trees".
Source Trees Preference Panel: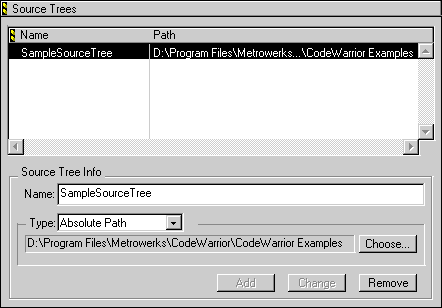
Source Trees list
This list shows all source trees defined for use with the IDE. The list contains two columns:
Name
Use this field to enter a name for a new source tree, or to change the name of an existing source tree.
Type
Use this pop-up menu to choose one of the following types of source trees:
Add
To add a new source tree, follow these steps:
1. Select the appropriate source-tree type from the Type pop-up menu.
See "Source-Tree path types" for more information about the path types listed in the pop-up menu.
2. Enter a name for the new source tree in the Name field.
3. Click Choose to select the path that you want the source tree to represent.
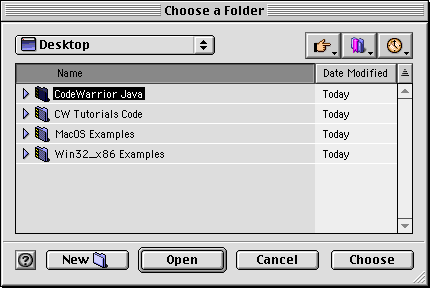
Use the dialog box, shown in Figure 8.11 (Windows), Figure 8.12 (Mac OS), and Figure 8.13 (Solaris and Linux), to select the path.
4. Click Add to add the new source tree to the Source Trees list.
Repeat these steps until you finish adding source trees, then click Save. You can then define access paths in terms of the source trees.
Source-Tree Path Selection Dialog Box (Windows):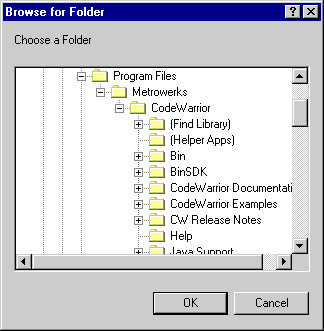
Source-Tree path types
You can choose at least one of the following path types when defining a source tree:
NOTE
Relative paths allow projects to contain two or more files with identical names. However, for large projects, you might notice slower performance after adding relative paths to a project.
Source-Tree Path Selection Dialog Box (Solaris and Linux):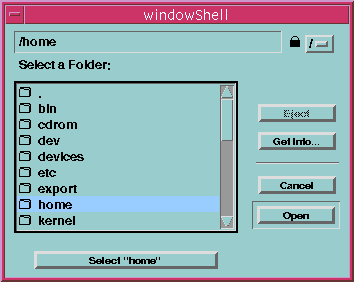
Choosing the Environment Variable or Registry Key source-tree types enables the field shown in Figure 8.14. Enter in this field the path to the environment variable or registry key.
Saved source trees appear in path pop-up menus for your project. For example, Figure 8.15 shows how you can define an access path in terms of a source tree named Sample. You can also define the target output for your project in terms of the source trees by using the Output Directory field in the Target Settings panel. For more information about this settings panel, see "Target Settings".
Creating a Registry Key: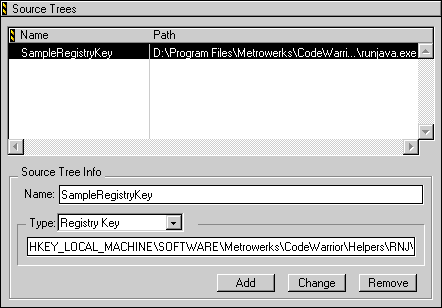
Change
To modify an existing source tree, follow these steps:
1. Select the source-tree name in the Source Trees list.
2. Modify the name and type of the source tree as desired.
Enter a new name for the source tree in the Name field, and choose a new source-tree type from the Type field.
3. Click Change.
Your modifications appear in the Source Trees list.
Repeat these steps until you finish modifying source trees, then click Save. You can then define access paths in terms of the modified source trees.
Choosing Source Trees in Access Path Pop-up Menus: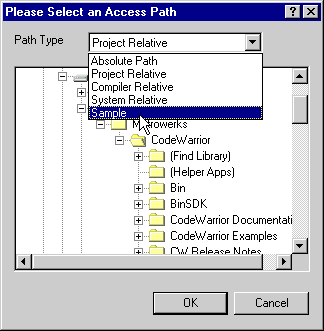
NOTE
After changing a source tree, modify the remainder of your project so that you do not refer to the source tree in its original form. The IDE cannot find files referenced by the original form of the source tree and will not be able to use those files when compiling, linking, or running your project. Therefore, the IDE displays a message reminding you to update your project.
Remove
To remove an existing source tree, follow these steps:
1. Select the source-tree name in the Source Trees list.
2. Click Remove.
The IDE deletes the selected source tree from the Source Trees list.
Repeat these steps until you finish deleting source trees, then click Save to commit your changes.
NOTE
After removing a source tree, modify the remainder of your project so that you do not refer to the deleted source tree. The IDE cannot find files referenced by a deleted source tree and will not be able to use those files when compiling, linking, or running your project. Therefore, the IDE displays a message reminding you to update your project.
[ First ] [ Previous ] [ Next ] [ Last ] [ Manuals ]
Visit the Metrowerks website at: http://www.metrowerks.com
For assistance contact Metrowerks Technical Support at: cw_support@metrowerks.com
Copyright © 2000, Metrowerks Corp. All rights reserved.
Last updated: August 17, 2000