In this chapter we discuss how PowerPlant handles dialog boxes. Creating and using a dialog in a PowerPlant application is simple. You'll learn just how easy it is as we discuss:
Along the way we will also encounter some PowerPlant utilities that manage simple dialogs almost automatically. We will use the terms "dialog" and "dialog box" as synonyms.
In this brief section we look at dialogs from three perspectives:
When you're through this section you should have a clear picture of the PowerPlant "philosophy" on dialogs.
In traditional Macintosh programming, a dialog box is a special kind of window. If you have written dialog-box code, you know that you must write special code to ensure that a dialog box behaves properly.
To use a modal dialog, you call the Toolbox routine ModalDialog(). You must provide an event filter procedure in the ModalDialog() call. If you do not, the modal dialog seizes complete control
of the computer. Nothing can work in the background. Windows won't
update, and background processes won't receive time. This is not
good.
To manage movable modal and modeless dialogs, you must modify
the event dispatch mechanism of your application. You use IsDialogEvent() to identify dialog-related events. You use DialogSelect() to take care of dialog-related events. The process occurs as
an adjunct to your regular event handling. As a result, much of
dialog event-handling code duplicates code in your main event
handling mechanism.
Bottom line, in traditional Mac OS programming, a dialog is a special kind of window that require special event handling and dispatch. This is not true in PowerPlant.
In terms of event handling and dispatch, there is no distinction in PowerPlant between a dialog and any other kind of window. In PowerPlant, a dialog is just another kind of window. Sure, it is a special kind of window, but the code to handle the dialog is built right into the PowerPlant event handling and dispatch mechanism.
In PowerPlant, a modal window occupies a special layer in the desktop display. As a result, other windows are deactivated properly and the modal window (or an object in the window) gets first crack at an event. There is no need for DLOG or DITL resources. Constructor makes it easy to arrange controls in any window.
The PowerPlant command and visual hierarchies work together to ensure that whatever event occurs, the appropriate pane, view, or control receives the event and has an opportunity to process it. The fact that the target object or pane is in a dialog window is irrelevant to this process.
PowerPlant does not use ModalDialog(), IsDialogEvent() or DialogSelect() to identify and dispatch dialog-related events. When a PowerPlant
application receives a command or keystroke, the current target
object gets the event, whatever kind of window contains the target
object. When a PowerPlant application receives a click, the pane
clicked gets the event. If the click is outside a modal dialog,
the application beeps. Everything works just the way it should,
with the same dispatch mechanism used throughout the application
for all windows: movable modal, floating, or regular.
However, there is one limitation. If you want an old-fashioned,
non-movable modal dialog, you must use the Mac OS Toolbox and
ModalDialog() and an event filter. You can do this inside a PowerPlant application,
as you'll see in this chapter. However, you cannot use a PPob
resource and PowerPlant event dispatch to manage a non-movable
modal dialog.
While it is important that you understand these design principles so you can use PowerPlant effectively, you also need to know the code-level implementation of this design. For that, we start with a quick look at the LDialogBox class hierarchy.
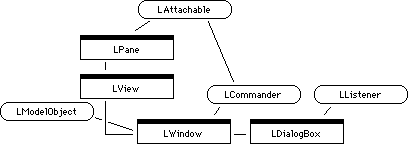
Figure 12.1 illustrates the classes from which LDialogBox inherits.
You can see that an LDialogBox object is a window (hence a view and a pane), can have attachments, is an LModelObject so it is scriptable, is a commander, and is a listener. In a nutshell, an LDialogBox is a window that is also a listener.
Inheriting from LListener is the most significant distinction between an LDialogBox and other windows. Most dialog boxes contain control items. Because it is a listener, the dialog box object can listen to messages from its controls. It can manage the controls or perform other actions in response to the messages.
When you write dialog-related code, you can keep responsibility for managing the dialog right where it belongs-in the dialog itself, or in a supercommander.
LDialogBox is actually a very simple extension of LWindow. Because a dialog is a window, everything you learned about windows in the previous chapter applies to dialogs.
There is only one characteristic added to a regular window-button tracking for the default and cancel buttons.
LDialogBox has data members to identify the default and cancel
buttons in a dialog. They are mDefaultButtonID and mCancelButtonID. You specify the button by its Pane ID number.
You would typically specify these values in Constructor when you
build the visual hierarchy. When the LDialogBox stream constructor
builds the dialog, it automatically puts the required outline
(using LDefaultOutline) around the default button. LDialogBox
also automatically supports the standard key-equivalents for both
the default and cancel buttons-Enter or Return for the default
button, command-Period or Cancel for the cancel button. You can
see how in LDialogBox::HandleKeyPress().
You can also set the buttons at runtime. The accessors for these
data members are SetDefaultButton() and SetCancelButton(). Examine LDialogBox::FinishCreateSelf() to see how PowerPlant sets up the buttons to behave correctly.
For all its simplicity, PowerPlant gives you several different techniques you can use to create and manage a dialog. In this section-the real meat of this chapter-the discussion covers these topics:
As we talk about dialog management, you will learn everything you need to know to implement a dialog by any of the five methods alluded to above:
Use a class derived from LDialogBox. Use LDialogBox with negative message numbers. Use the StDialogHandler utility class. Use UModalDialog functions. Use the Mac OS directly.
You will find that one approach might be very useful in certain circumstances, and another useful at other times. But first, let's look at how to create the dialog object.
You can create a dialog using Constructor, or on the fly in your code. We'll talk about each method. Then we discuss what you do when you derive your own class from LDialogBox.
Dialogs work almost exactly like windows.
If you have built a PPob resource for a dialog in Constructor,
creating the dialog (and all of its contents) is simple. You call
LWindow::CreateWindow(). You provide the resource ID number for the PPob resource, and
a pointer to the dialog's supercommander. PowerPlant does the
rest. There is no LDialogBox::CreateDialog(). The LWindow function serves just fine. Typically you typecast
the returned LWindow pointer to be an LDialogBox pointer.
Creating a dialog in Constructor is simple. While in the Constructor
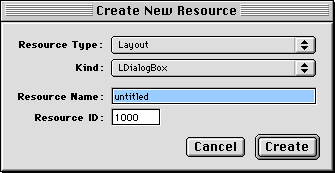
project window, select the Windows and Views choose New Resource (command-K) from the Edit menu. When you do, the dialog in Figure 12.2 appears.
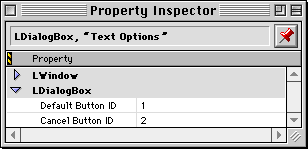
Choose PPob as the resource type, and LDialogBox as your view type. You can set the name and ID right here. Click the create button to create the new PPob resource. Open the new PPob resource to see the layout editor, and then the Property Inspector window for this particular dialog. It is identical to the window dialog as shown in Figure 11.4, with one exception. You can specify the default and cancel buttons by Pane ID, as shown in Figure 12.3.
Remember, when you derive your own classes you must change the class ID to your own unique value and register the class with PowerPlant before creating any objects of that class.
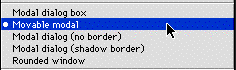
When setting the characteristics for a dialog window, set the Window Proc to one of the available dialog options, as shown in Figure 12.4.
To create a movable modal dialog, choose the Movable modal item in the popup menu.
 WARNING!
 Although you can choose a modal dialog box with various borders, the behavior of a pure modal dialog created this way will not follow human interface guidelines. See "Traditional Dialogs" for more on this topic
To create a modeless dialog, use the document window option. A modeless dialog should have a go away box, a title bar, no zoom box, no grow box, and should not be resizable.
Because of the elegant design of PowerPlant event handling, you don't need to do anything else to specify a movable modal or modeless dialog. These are just other kinds of windows. Of course, you must populate the dialog with the necessary panes, views, and controls, just like you would for any window.
"Creating a Window" and "Register PowerPlant Classes."
You build a dialog on the fly the same way you would a regular
window. There is a dialog constructor that takes an SWindowInfo structure as its only parameter.
Typically, Constructor or the dialog utility functions available in PowerPlant will provide all the functionality you need. We discuss dialog utilities in "StDialogHandler" and "Simple Movable Modal Dialogs."
"Creating a window on the fly."
Deriving your own dialog class is one of the principal techniques used in PowerPlant for creating and managing custom dialogs. Each dialog is likely to have a different set of controls, and you may wish to respond to those controls in unique ways.
You can do so by deriving from LDialogBox and overriding the ListenToMessage() and ObeyCommand() functions. You are already familiar with these functions from
our earlier discussions of listeners and commanders. LDialogBox
is both a listener and a commander.
A typical approach to dialog management in a derived class is to perform the following steps.
1. Create the derived dialog object. Usually you do this with a PPob, after registering the new class with PowerPlant.
2. Link the dialog object to its controls. You call LinkListenerToControls() with the RidL resource ID for this dialog. Remember from the
Controls chapter that Constructor automatically creates a RidL
resource with the same resource ID as the window for all the controls
in a window. Alternatively, you link a few individual controls
to the dialog as necessary.
3. Override ListenToMessage(). The dialog object listens to messages from linked controls.
ListenToMessage() can respond to the message directly. Or, ListenToMessage() can call the dialog's ProcessCommand() function. This function in turn calls ObeyCommand().
4. Override ObeyCommand(). If ListenToMessage() calls ProcessCommand(), control passes to ObeyCommand(). Handle the message in ObeyCommand().
Of course, you may override any other functions necessary to fully
implement your dialog's behavior. You might override FindCommandStatus() to handle menu updating, for example.
You also add whatever new functions you need to process the information generated in the dialog. For example, you might define a function to manage enabling or disabling a set of controls that are dependent upon the state of a check box.
Taking this approach, responsibility for handling dialog-related
events rests primarily with your dialog object. Your dialog's
behavior is certainly message-based, and could be command-based
as well if you transform messages into commands and call ProcessCommand().
There is an alternative to putting all this responsibility down in the dialog object. For example, you might have a situation where changing a setting in a dialog might affect several windows. Responsibility for such a widespread change should probably reside with the application. It should almost certainly reside with some object higher than the dialog. In such a case, the dialog should issue a command when it hears the message.
How do you send a command up through the chain of command?
Recall that a control can send any message by calling BroadcastMessage() at the appropriate moment. Some controls also use the BroadcastValueMessage() function. Either way, if the dialog is linked to the control,
the dialog hears the message.
In response to the message, you want something to happen. As we
discussed above, the dialog object can send a command to itself
in response to the message by calling ProcessCommand(). The dialog can, alternatively, send a message/command directly
to the dialog's supercommander. LDialogBox::ListenToMessage() has a mechanism for passing a command to a higher level. Listing 12.1 contains the code.
Excerpt from LDialogBox::ListenToMessage():
else if (inMessage < 0)
{
  // Relay message to supercommander
  if (GetSuperCommander() != nil) {
    SDialogResponse theResponse;
    theResponse.dialogBox = this;
    theResponse.messageParam = ioParam;
    ProcessCommand(inMessage, &theResponse);
  }
}
If the message is negative, LDialogBox creates an SDialogResponse structure. It then sends the message as a command to the supercommander's
ProcessCommand() function, along with the SDialogResponse data. It is the supercommander's responsibility to handle the
command or pass it on up the chain of command.
Keep in mind that there is a distinction between the message that a dialog receives, and a command that might be issued as a result of receiving the message. However,
in LDialogBox::ListenToMessage() that distinction becomes blurred. The negative message number
becomes a negative command number.
If you use this technique exclusively-that is, if all the messages (except the close message) from your dialog's controls are negative-then you don't have to derive a class from LDialogBox at all. You can give the dialog's supercommander the responsibility for responding to messages.
A third solution is a mix of the two approaches. You derive a dialog class from LDialogBox. However, if the dialog engenders a situation that requires high-level attention, you make sure that the control involved sends a negative message. You also ensure that somewhere in the chain of command there is a commander that can deal with that message appropriately.
Of course, if you override LDialogBox you can override ListenToMessage() and replace or ignore the negative message mechanism entirely.
Let's stop for a moment and consider all the possibilities. The situation is this: you have a dialog, it contains controls, the controls send messages. So far you have at least four possible ways of handling messages in a dialog.
ListenToMessage() or ObeyCommand() functions.
The various PowerPlant mechanisms, while simple in their own rights, give you many possible paths to a desired outcome. As a PowerPlant programmer you analyze your needs and pick the path that best suits your situation.
 TIP
TIP When it comes time to close a dialog, you have choices again.
The default or cancel buttons can send the dialog a cmd_Close message. Or you may call the dialog's DoClose() function directly at the appropriate moment. However, in some
cases it is wise to simply hide the dialog and show it again when
necessary. To implement this, you should override AllowSubRemoval() to hide the window rather than deleting it, and return false
to not allow removal of the dialog. Overriding AllowSubRemoval() ensures that the correct behavior occurs whether AttemptClose() or DoClose() is called.
While everything up to now may seem complicated, it's about to get a lot simpler.
StDialogHandler is a stack-based utility class for managing movable modal dialogs.
Until now, the various strategies we've discussed for managing a dialog all rely on the PowerPlant event dispatch mechanism. StDialogHandler takes a different approach. It manages all events while a dialog box is active. This is closer to the traditional way in which the Mac OS handles dialogs.
Being a stack-based class, you create a local StDialogHandler object. The constructor requires that you pass in two parameters, the PPob resource ID for the dialog, and the supercommander for the dialog. The constructor requires that there be a RidL resource describing the controls in the dialog, and the RidL resource must have the same ID number as the PPob resource ID.
WARNING! Don't use StDialogHandler with a PPob for a non-movable modal window. The modal window will not behave according to human interface guidelines-the user will be able to switch applications. PowerPlant uses movable modal windows.
Before showing the dialog, you may need to set the values of any
panes that could not be set in the PPob. After you display the
dialog, you repeatedly call the StDialogHandler's DoDialog() function. This is analogous to the Toolbox ModalDialog() call. DoDialog() retrieves and processes events, and returns messages from the
controls (all messages, positive or negative). In response to
the message, your code acts accordingly. Listing 12.2 shows the code for a very simple loop that calls DoDialog() and responds to the messages received.
while (true) {
  MessageT hitMessage = theHandler.DoDialog();

  if (hitMessage == msg_Cancel)
  {
    break;
  }
  else if (hitMessage == msg_OK)
  {
    // process result of dialog
    break;
  }
}
When you are through with the dialog, you exit the DoDialog() loop, and ultimately exit the function in which the StDialogHandler
object was created. The class destructor is called automatically
and cleans up for you.
If that's not easy enough, it gets easier still.
There are many cases where you want to display a movable modal dialog that gets a single number or string. For example, you may want the user to specify a font size, or enter a name.
The UModalDialogs class implements two static functions that use StDialogHandler. One of these functions returns a single number. The other returns a single string. Using them is trivial.
To display a dialog to get a single integer, call UModalDialogs::AskForOneNumber(). It handles all the work for you. You provide the supercommander,
the PPob ID number, the pane ID number for the editable text field,
and the default number that should appear in the dialog. Making
the call displays a movable modal dialog for entering a single
number. The call returns true if the user clicks OK. Here's an
example of code that uses UModalDialog::AskForOneNumber().
Boolean result = UModalDialogs::AskForOneNumber (
          this, dialogID, editFieldID, number);
if (result)
{
  // do something with number
}
The UModalDialogs::AskForOneString() function works exactly the same, except you provide a string
instead of a number.
TIP Examine these two functions to learn how to use StDialogHandler effectively in more complex cases.
If you have a choice, do not use the Dialog Manager directly from PowerPlant. PowerPlant is much more powerful, and much more elegant. The StDialogHandler and UModalDialogs classes really make dialog management a snap.
From time to time, however, you may find yourself forced to use
the Dialog Manager directly or indirectly for various non-movable
modal dialogs. You may wish to display a simple alert. You may
need to support legacy code that uses ModalDialog(). Or you may want to do something as simple as display the Mac
OS standard file dialog. You can do so, as long as you keep two
things in mind.
First, remember that any time you display an alert or a modal
dialog using the Dialog Manager, ModalDialog() seizes control of all events. PowerPlant event processing-such
as giving time to periodicals-is interrupted. In addition, background
processes get no time unless you provide an event filter.
Second, before doing anything that invokes the Dialog Manager
from a PowerPlant application, you must call UDesktop::Deactivate(). This call ensures that all PowerPlant windows are properly deactivated
before the modal dialog appears. After you dismiss the dialog,
call UDesktop::Activate() to restore all PowerPlant windows to their correct state. You'll
do this in the code exercise for this chapter.
TIP The need to deactivate PowerPlant windows can sneak up on you.
Remember to call UDesktop::Deactivate() before making any Mac OS Toolbox call that displays a dialog. Afterwards, call
UDesktop::Activate().
In this chapter you learned how PowerPlant handles dialog-related events. PowerPlant treats dialogs as just another kind of window and relies on the command and visual hierarchies to dispatch an event or command to the proper object, regardless of the nature of the window containing the object.
You also learned what makes a dialog object different from other windows-it can track the default and cancel buttons.
Finally, you discovered the flexibility PowerPlant gives you for dialog management. You can create movable modal, and modeless dialogs with ease. You can choose from a variety of methods for managing the dialog, including deriving your own dialog classes, using negative command numbers, using StDialogHandler, using UModalDialogs, and even the Mac OS Dialog Manager.
In the code exercise you can put this knowledge to practical use.
In this code exercise you build an application named "Dialogs." This is a long code exercise. To make it a little more digestible, we're going to treat this as two separate code exercises: one for simple dialogs, and one for a more complicated dialog.
In the simple dialog exercise, you create and use four dialogs using three techniques: UModalDialogs, StDialogHandler, and the Mac OS Toolbox. In the complex dialog exercise, you create a dialog window that listens to its controls and handles the messages it receives in a variety of ways.
The application is based on the same dynamic caption object you used in the code exercise for Chapter 10, "Commanders and Menus." The four simple dialogs allow the user to change the text, font, font size, and style of the caption by modifying the caption's text traits resource or its descriptor. The complex dialog performs all these services in the same dialog. Changes in any dialog are applied to the caption text in the top regular window.
All the necessary resources have been provided for you in their entirety. There are four simple dialogs.
Simple dialogs and their resources:
| Dialog |
Type |
Resource Type |
Resource ID |
|---|---|---|---|
The PPob resources are in Dialogs.ppob. The DLOG and DITL resources are in Dialogs.rsrc. Constants for these resource IDs and the dialog contents are
declared in DialogsConstants.h.
Explore these resources until you are comfortable with their elements. Each PPob contains a dialog window. When you examine the dialog characteristics, you'll see that each dialog is movable modal, and in the modal layer. Each dialog has an OK and a Cancel button, and one other item, either a popup menu or an editable text field.
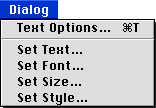
Figure 12.5 illustrates the application's Dialog menu. This part of the exercise concerns the last four items
in the menu. These are the four simple dialogs listed in Table 12.1.
When the user chooses one of the last four items, the application object displays the appropriate dialog. When the user approves the dialog, the application object retrieves the necessary information and changes the topmost caption. If the user cancels the dialog, the application does nothing.
In this section you write the code to implement the text dialog using UModalDialogs. You implement the font dialog using StDialogHandler. The size dialog also uses StDialogHandler, so that code is provided for you. You implement the style dialog using the Mac OS Dialog Manager.
1. Examine commands in the Dialog application.
In this step you explore ObeyCommand() so you have an idea of what's happening in support of the dialogs
you are about to build.
This function has a series of case statements for the commands the application handles. Of particular
interest to us here are these four commands:
The application receives these commands when the user chooses
the corresponding item in the Dialog menu. Locate the case statements for these commands, and examine the code. You don't
write any code in this step, just review the existing code.
Each starts identically. The application gets the top regular window. If there is a window and it is the right kind of window, the application then gets the dynamic caption object.
Setting up to create a dialog.:
// Get the top regular window.
LWindow *theWindow = UDesktop::FetchTopRegular();
if ( theWindow != nil && theWindow->GetPaneID() ==
               rPPob_SampleTextWindow ) {

  // Get the dynamic caption.
  CDynamicCaption *theCaption;
  theCaption = dynamic_cast<CDynamicCaption *>
              (theWindow->FindPaneByID( kDynamicCaption ));
Assert_( theCaption != nil );
After it has the caption, the application gets either the caption descriptor (for the Set Text dialog) or the caption's text traits record (for the other dialogs).
Finally, in each case there is code that calls a function to manage the dialog. For
example, to set text the code is:
if ( AskForText( theText ) ) {
  // Set the caption's text.
  theCaption->SetDescriptor( theText );
}
Each of the AskFor...() functions returns a boolean value indicating whether the user
clicks OK or Cancel. If the user clicks OK, the application sets
the appropriate information for the caption. In the example above,
it sets the caption's descriptor.
This dispatch code is provided for you. You have already worked
extensively with the ObeyCommand() function in previous exercises, so you know how it works. In
the next steps you write three of the AskFor() functions to display and manage dialogs. Each demonstrates a
different technique for creating, displaying, and managing dialogs.
2. Use UModalDialogs to manage a dialog.
This movable modal dialog contains an LEditField pane to allow
the user to enter text. Your task is to create, display, and manage
the dialog. You get the text, dismiss the dialog, and return the
correct value-true or false-to the caller. You can do all this
with one line of code and the UModalDialogs::AskForOneString() function. The declared constant for the PPob resource is rPPob_SetTextDialog. The declared constant for the edit pane is kSetTextEditField.
  Boolean theResult = false;

  theResult = UModalDialogs::AskForOneString( this,
                 rPPob_SetTextDialog, kSetTextEditField, ioText );

  return theResult;
3. Use StDialogHandler to manage a dialog.
As you know, the StDialogHandler stack-based class takes over all event processing. Your tasks are similar to those in the previous step. You must create, display, manage, and dismiss the dialog. Along the way, you get the necessary data (in this case a font number) and return the correct value to the caller.
Declare a local StDialogHandler variable. You provide the PPob
resource ID and the commander. The declared constant for the resource
ID is rPPob_SetFontDialog. After you create the handler, get the pointer to the dialog
window from the handler object.
Boolean theResult = false;
// Create the dialog handler.
StDialogHandler theHandler( rPPob_SetFontDialog, this );

// Get the dialog.
LWindow *theDialog;
theDialog = theHandler.GetDialog();
Assert_( theDialog != nil );
Existing code then gets the popup menu item and initializes it.
After the existing code initializes the popup menu, display the dialog. Solution code for this substep is in substep c.
After displaying the dialog, loop repeatedly and call the handler
object's DoDialog() function. Respond to the messages. There are two possible messages,
msg_Cancel and msg_OK.
If the user cancels the dialog, exit the loop and return a value
of false.
If the user accepts the dialog, get the text for the current font
in the popup menu. Use the Toolbox function GetMenuItemText(). Then get the font number. Use the Toolbox function GetFNum(). Set theResult to true, and return.
// Make the dialog visible.
theDialog->Show();
while ( true ) {

  // Handle dialog messages.
  MessageT theMessage = theHandler.DoDialog();

  if ( theMessage == msg_Cancel ) {

    // Just break out of the loop.
    break;

  } else if ( theMessage == msg_OK ) {

    // Get the font name chosen.
    ::GetMenuItemText( thePopup->GetMacMenuH(),
                       thePopup->GetValue(), ioFontName );

    // Get the font number.
    ::GetFNum( ioFontName, &outFontNumber );

    // Turn on the result flag and
    // break out of the loop.
    theResult = true;
    break;
  }
}

return theResult;
This approach gives you more flexibility than the UModalDialogs utilities. Although this is a simple example that receives two messages, you can use StDialogHandler to receive and handle an arbitrary set of messages from the dialog contents.
The code in AskForFontSize() uses the same approach as this step. That code is provided for
you.
4. Use the Mac OS Dialog Manager to manage a dialog.
In this step you write code at the beginning and end of this function. The code to run the dialog is provided for you, because it is pure Toolbox and has nothing directly to do with PowerPlant.
However, if you wish to use the Dialog Manager to handle dialogs, there are some PowerPlant-related tasks you must perform before you run the dialog.
a. Deactivate PowerPlant windows.
The code you are about to write sets the GrafPort directly, effectively
changing the port behind PowerPlant's back. Call LView::OutOfFocus() so PowerPlant knows that the focus is no longer reliable.
DialogPtr theDialog;
// Deactivate desktop windows.
UDesktop::Deactivate();

// invalidate LView's focus cache.
LView::OutOfFocus( nil );

// Create the dialog.
Existing code creates and runs the dialog. It uses ModalDialog(). In this example there is no event filter proc provided. If you
use the Dialog Manager and modal dialogs in a real application,
you should provide an event filter.
After the dialog is complete, the existing code disposes of the dialog. You have one more PowerPlant task to perform.
c. Reactivate PowerPlant windows.
Once again, use a function in UDesktop. This code goes at the very end of the function.
  ::DisposeDialog( theDialog );
  // Activate desktop windows.
  UDesktop::Activate();
That takes care of the simple dialogs. Save your work. You can leave the file open if you wish, you'll be using it again a little later.
5. Build and run the application.
Make the application. You may get a couple of warnings about unused variables, but you can ignore them. You'll use them in the second part of this exercise.
All of the four simple dialogs should work correctly at this point. Display each dialog in turn.
Observe the state of the menu bar and menu items. When you display
the Set Text dialog, the Edit menu is enabled. UModalDialogs takes care of that for you because
you have an editable text field in the dialog. For the Set Font
and Set Size dialogs, only the System menus-Apple, Help, Application-are
available. For the Set Style dialog, the Apple and Application
menus are also disabled. This is a modal dialog, and you cannot
leave the application when a modal dialog is frontmost.
Play with the various dialogs, clicking the Cancel and OK buttons, and observe the effect on the sample text.
If the application does not behave as you expect, check your code against the solution code to make sure you performed each step correctly. If you'd like to study further, you can quit the application, enable the debugger, rebuild the application, and run it under the debugger. Set breakpoints at various judicious spots and watch what happens. You could also add a new dialog to modify the caption's color. Perhaps you can use the color control you built in the exercise on controls.
However, if you'd like to continue forward, there's more to be done! Let's put all four dialogs into one. This enables the user to modify any text trait in the same dialog, and to preview the effect of changes.
In essence, a dialog in PowerPlant is a window with controls. You use those controls just like you would in any other window. The controls send messages. Any appropriate object may listen to the controls. When it receives a message the listener acts. Typical listeners include custom controls in the dialog, a custom commander object, the dialog window itself, or the application object. In this application, the listener is the dialog window.
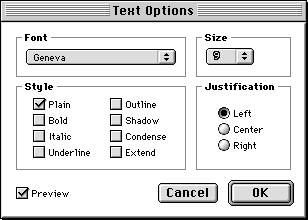
Figure 12.6 illustrates the Text Options dialog you work with in the remaining
steps in this exercise. Use Constructor to open the Dialogs.ppob project file, and examine the Text Options Dialog PPob resource
with ID number 1100. This PPob resource describes the contents
of this dialog.
If you examine the window characteristics you'll see it is a movable modal dialog in the modal layer. It is a custom object. The class ID is TxtD. The text options dialog class overrides a few of the LDialogBox functions. We'll examine the class in the next step.
After examining the window characteristics, look at the individual controls in the window. Each has a value message. The value message is the sum of the PPob resource ID and the pane ID. For example, the Preview check box is pane ID 3, and the value message is 1103. This kind of systematic numbering can make it easier to keep track of controls in a complex dialog.
The OK and Cancel buttons use negative message numbers, -1101 and -1102 respectively. We'll use this fact to demonstrate what happens to negative message numbers when working with a dialog.
Like the simple dialogs, the user displays the Text Options dialog
by choosing the correct item in the Dialog menu. The application's ObeyCommand() function receives a cmd_TextOptionsDialog message. That's where we'll begin writing code.
Before we do that, however, let's take a quick look at the CTextOptionsDialog class.
6. Examine the CTextOptionsDialog Class
class declaration CTextOptionsDialog.h
The class ID is TxtD, just like the value specified in the PPob resource.
This class has two new data members, mTextTraits and mOriginalTextTraits. The dialog modifies the text traits resource interactively,
but must allow the user to cancel the operation and restore the
caption to its original state. The dialog object stores a pristine
copy of the original text traits in mOriginalTextTraits. The mTextTraits member is the "new" text traits. It reflects the changes going
on because of choices in the dialog.
You'll work on each of these functions in subsequent steps.
This class also declares three new functions:
SetupDialog() GetTextTraits() AdjustSizeMenuForFont()
Each of these functions is provided for you. SetupDialog() initializes the data members and sets the controls in the window
to initial values. GetTextTraits() returns the modified or "new" text traits. AdjustSizeMenuForFont() sets the items in the Size popup menu to use outline style if
there is a bitmap font available for that size.
In the remaining steps in this exercise we're going to take the following path. We start at the application and create the window. Then we write the code to implement the dialog. Finally, we return to the application to handle messages not fully handled by the dialog. Let's get started.
7. Instantiate and display the dialog window.
When the user chooses the Text Options item in the Dialog menu, the application's ObeyCommand() function receives a cmd_TextOptionsDialog message. There is a case statement to handle that message. The existing code gets the
top regular window and the text traits for the caption object
inside that window.
After that, you have three tasks to accomplish. You must:
Use the LWindow::CreateWindow() function. Typecast the return value as a CTextOptionsDialog pointer.
The declared constant for the PPob resource ID is rPPob_TextOptionsDialog.
Use the dialog object's SetupDialog() function.
Use the dialog object's Show() function.
theCaption->GetTextTraits( theTextTraits );
// Create the text options dialog.
CTextOptionsDialog *theDialog;
theDialog = dynamic_cast<CTextOptionsDialog*>
         (LWindow::CreateWindow( rPPob_TextOptionsDialog, this ));
Assert_( theDialog != nil );

// Setup the dialog
theDialog->SetupDialog( theTextTraits );

// Show the dialog.
theDialog->Show();
Save your work. Notice that there is no event handling and no dialog loop. You are simply creating a window. The regular PowerPlant event handling mechanism takes care of all event handling.
8. Finish building the dialog.
FinishCreateSelf() CTextOptionsDialog.cp
After creating the dialog object, PowerPlant calls the object's
FinishCreateSelf() function. You write the complete function in this step. This
function should accomplish two tasks.
a. Call the inherited FinishCreateSelf().
CTextOptionsDialog inherits from LDialogBox. The inherited function sets up the OK and Cancel buttons.
b. Link the dialog to its controls.
Use LinkListenerToControls(). The declared constant for the RidL resource ID is rRidL_TextOptionsDialog.
  // Call inherited. LDialogBox FinishCreateSelf
  // sets up the default and cancel buttons.
  LDialogBox::FinishCreateSelf();

  // Link the dialog to the controls.
  UReanimator::LinkListenerToControls( this, this,
                                       rRidL_TextOptionsDialog );
The dialog is now finished. In the normal course of events, the
user clicks controls in the dialog window. The dialog's ListenToMessage() function handles each message. In the next few steps you handle
some of those messages.
9. Respond to the cancel message.
ListenToMessage() CTextOptionsDialog.cp
When the user clicks the Cancel button, the dialog receives the
cmd_TxtD_CancelButton message from the control. This message has a value of -1102.
You must do two things.
a. Restore the original text traits.
Call the dialog's ProcessCommand() function. Send a cmd_SetTextTraits command along with the original text traits from the mOriginalTextTraits member. The application object ultimately receives and handles
this command.
This is an application-level responsibility. The application created
the dialog, the application should dispose of it. Call the inherited
ListenToMessage() function. The LDialogBox::ListenToMessage() function passes negative messages as commands to the supercommander,
in this case the application.
case cmd_TxtD_CancelButton:
{
  // Restore the original text traits.
  ProcessCommand( cmd_SetTextTraits, &mOriginalTextTraits );

  // Pass message to inherited ListenToMessage.
  LDialogBox::ListenToMessage( inMessage, ioParam );
}
break;
10. Respond to the preview message.
ListenToMessage() CTextOptionsDialog.cp
When the user clicks the Preview check box, the dialog receives
the cmd_TxtD_PreviewCheckbox message. In response you should:
a. Determine if the button is on or off.
Examine the contents of the ioParam parameter.
b. If the button is on, set the new text traits.
Call ProcessCommand(). Send a cmd_SetTextTraits command along with the new text traits from the mTextTraits member.
c. If the button is off, restore the original text traits.
Call ProcessCommand(). Send a cmd_SetTextTraits command along with the original text traits from the mOriginalTextTraits member.
case cmd_TxtD_PreviewCheckbox:
{
  if ( *(static_cast<SInt32 *>(ioParam)) == Button_On ) {
    // Use new text traits.
    ProcessCommand( cmd_SetTextTraits, &mTextTraits );

  } else { // Preview turning off

    // Restore original text traits.
    ProcessCommand( cmd_SetTextTraits, &mOriginalTextTraits );
  }
}
break;
11. Respond to the plain style message.
ListenToMessage() CTextOptionsDialog.cp
When the user clicks the plain style check box, you must not only set the text traits, but clear all the other style check boxes as well. However, every time you set the contents of one of the other check boxes, it sends a message! This could cause problems.
To complete this step you should:
This prevents the dialog from hearing messages as it changes the values of certain controls.
Use SetValueForPaneID(). The declared constant for this pane is kTxtD_PlainCheckbox.
c. Turn off all the other style check boxes.
Loop from kTxtD_BoldCheckbox to and including kTxtD_ExtendCheckbox. Turn each control off.
Now that you are finished changing control values, you can listen again.
e. Set the new text traits style to normal.
Use mTextTraits. The Toolbox constant for this is normal.
f. If the preview feature is on, set the new traits.
Check the value of the kTxtD_PreviewCheckbox control. If it is on, send the cmd_SetTextTraits message.
case cmd_TxtD_PlainCheckbox:
{
  // Turn off listening temporarily.
  // Otherwise we get in a tug-of-war as
  // controls broadcast their changing values.
  StopListening();
  // Turn check box on always. You can't turn
  // this box off by clicking on it.
  SetValueForPaneID( kTxtD_PlainCheckbox, Button_On );

  for ( PaneIDT i = kTxtD_BoldCheckbox;
              i <= kTxtD_ExtendCheckbox; ++i ) {

    // Turn off the other style check boxes.
    SetValueForPaneID( i, Button_Off );
  }

  // Start listening again.
  StartListening();

  // Set the style to plain.
  mTextTraits.style = normal;

  if (GetValueForPaneID( kTxtD_PreviewCheckbox) == Button_On ) {

    // Send the set text traits command.
    ProcessCommand( cmd_SetTextTraits, &mTextTraits );
  }
}
break;
12. Pass unhandled messages up the chain.
ListenToMessage() CTextOptionsDialog.cp
The default case takes care of any messages not handled. They should go to the
inherited ListenToMessage() function.
default:
{
  // Call inherited.
  LDialogBox::ListenToMessage( inMessage, ioParam );
  break;
}
The code to handle all the other messages is provided for you. Examine the code if you wish. The tasks performed are essentially the same as what you have already accomplished.
FindCommandStatus() CTextOptionsDialog.cp
The last thing the dialog object must take care of is menu updating.
Here is an exception to the rule that you always pass on that
which you don't handle to the inherited function. When a movable
modal dialog is the frontmost window, the Apple menu, the Help menu, and the Application menu should be active. All others should be inactive. The System
takes care of the Help and Application menus.
You should activate the About item in the Apple menu, and disable all other commands.
// Disable all commands.
outEnabled = false;
if ( inCommand == cmd_About ) {

  // Enable the about command.
  outEnabled = true;
}
Save your work and close this file. You have completely implemented the dialog window. The final task is for the application to handle those commands not taken care of by the dialog window.
14. Handle messages at the application.
The application receives three commands from the Text Options dialog window:
cmd_TxtD_OKButton-a negative message converted by LDialogBox::ListenToMessage() into a command and sent to the supercommander. cmd_TxtD_CancelButton-a negative message converted by LDialogBox::ListenToMessage() into a command and sent to the supercommander. cmd_SetTextTraits-a command issued by the dialog window's ListenToMessage() function to update the caption in the top regular window.
In this step you handle the cancel button. The remaining code is provided for you.
When the user cancels the Text Options dialog, the dialog sends
a cmd_SetTextTraits command that restores the original text traits. The application's
only duty is to dispose of the dialog window. To do that, you
should:
a. Get a pointer to the dialog response record.
It's in the ioParam parameter.
b. Get a pointer to the dialog window.
This is stored in the dialogBox field of the dialog response record.
case cmd_TxtD_CancelButton:
{
  // Get the dialog response.
  SDialogResponse *theResponse =
                       static_cast<SDialogResponse *> (ioParam);
  Assert_( theResponse != nil );
  // Get dialog box from the dialog response.
  CTextOptionsDialog *theDialog;
  theDialog = dynamic_cast<CTextOptionsDialog *>
                      (theResponse->dialogBox);
  Assert_( theDialog != nil );

  // Delete the dialog.
  delete theDialog;
}
In response to a click on the OK button, the code provided for you uses the same technique to get the dialog window, and then get the new text traits from the window. The code then sets the traits and deletes the dialog.
In response to the cmd_SetTextTraits command, the application gets the caption for the top regular
window and sets its traits.
Save your work and close the file. You're all done.
15. Build and run the application.
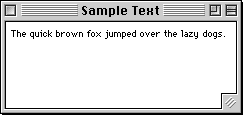
At last! Make the project and run it. When you do, a window should appear with a caption object, as illustrated in Figure 12.7.
Display the new Text Options dialog. Observe the state of the
menu bar and menu items. Only the System menus-Apple, Help, Application-are available. This is appropriate for a movable modal dialog.
Change settings while the Preview check box is checked and unchecked. Observe the different behavior.
If the application does not behave as you expect, check your code against the solution code to make sure you performed each step correctly. If you'd like to study further, you can quit the application, enable the debugger, rebuild the application, and run it under the debugger. Set breakpoints at various judicious spots and watch what happens.
For example, set a breakpoint in the dialog's ListenToMessage() default case statement. Follow the flow of control when the OK
button is clicked to see what happens to a negative message.
If you'd like to enhance the application, modify the dialog to include a color control, and change the text color.
Now it's time to leave the world of windows, dialogs, panes, views, and controls, and move on to a different part of PowerPlant: documents. In the next two chapters we explore the document pattern in PowerPlant. You'll learn how to open and close files on disk, write and read data in files, and print documents. The best part of the adventure lies ahead!