LWindow is a complex class that descends from and adds a great deal to LView. You will use this class often in your PowerPlant programming, both directly and as a base class for your own window classes. It serves as a wrapper class for the Macintosh Toolbox WindowRecord structure, so you can easily create and use windows in PowerPlant.
The good news is, you already know 90% of what you need to know to use windows effectively. Chapter 7, "Views" introduced you to LView and its descendants, including LWindow. At the time we skipped any detailed discussion of the single most important kind of view, the window.
In this chapter we concentrate on those aspects of window objects that make a window different from other views. In our discussion we will cover three main topics:
Along the way we will also encounter several window-related utilities in PowerPlant.
On the Macintosh, a window is the visual representation of a very special data structure that incorporates a GrafPort for drawing and other data to control drawing characteristics. On a monitor, this structure shows up as a window.
In PowerPlant, a window is an object of the LWindow class. This object is connected to a Mac OS WindowRecord, and appears on screen as an ordinary Macintosh window.
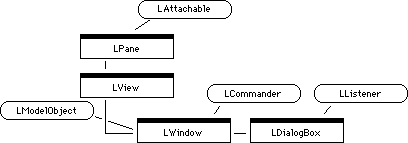
Figure 11.1 illustrates the inheritance chain for LWindow.
As you can see from the class diagram, LWindow has three direct ancestors.
First, LWindow inherits from LView, a descendant of LPane. That gives a window all the features of panes and views. Windows can receive and respond to mouse clicks within their bounds. They can contain other panes. Windows can perform all the other magic associated with panes and views, not the least of which is the ability to have attachments.
LWindow inherits from LCommander. That means that a window can receive and handle menu commands and key presses. It can update and manage menus as any other commander can.
Finally, LWindow inherits from LModelObject. Therefore, a window can respond to Apple events-it is scriptable.
LWindow has one descendant in PowerPlant, LDialogBox.
If you stop to think about all the important classes from which LWindow inherits, you see that its behavior encapsulates everything we talked about in chapters 6, 7, and 9 on panes, views, and commanders. That's a lot of power.
Beyond that, LWindow has significant attributes and behaviors that are unique to it. In the rest of this chapter we discuss what they are.
Chapter 15, "Periodicals and Attachments," Chapter 12, "Dialogs," and the PowerPlant Reference for more on scriptability.
Do not lose sight of the fact that, although we mention this only in passing, everything you have learned about panes, views, and commanders applies to windows. That means that windows have an image, manage coordinate conversions, respond to clicks, and all the rest.
In addition to all those characteristics and behaviors, windows also have the following additional characteristics.
windowKind field.
We discuss additional window-related behaviors in "Working With Windows."
Each window has a set of special attributes that define the kind of window it is, and how the window behaves. These attributes determine the layer in which the window appears, the various controls that appear around the perimeter of the window (like a close box or zoom box), and some other aspects of window behavior.
Table 11.1 lists all the window attributes and their meaning. In the sections following the table we discuss each of these attributes in some detail.
| Attribute |
Purpose |
|---|---|
PowerPlant uses three layers to determine how a window behaves in certain respects. From front to back, the layers are:
Modal windows are always in front, and all other windows are inactive when a modal window is present. Modal windows must be dismissed before you can perform other actions in the program. The modal dialog is a perfect example. We'll discuss modal windows in Chapter 12, "Dialogs."
Floating windows are always active, except when a modal window is active. The floating layer is used for tool palettes and other kinds of accessory windows. These "float" above the regular front window. You may activate any regular window, and a floating window remains displayed in front of it. It appears to be active and frontmost, even though the regular window may be frontmost as far as the Mac OS is concerned.
As you'll see in the Working With Windows section, implementing floating windows is simple. Floating windows are one of the really nice features of PowerPlant.
Regular windows are beneath all modal and floating windows. The top regular window is active, except when a modal window is active. All other regular windows are inactive. Windows in the regular layer behave like normal Macintosh windows.
The next set of window attributes determine whether the window has a close box, a title bar, a zoom box, and or a grow box.
The CloseBox attribute determines whether the window has a close box. Regular
and floating windows typically do. Modal windows typically do
not.
The TitleBar attribute determines whether the window has a title bar. Typically,
a non-moveable modal dialog does not have a title bar. All other
windows have a title bar.
The Resizable attribute determines whether the user can manually resize the
window by clicking and dragging in the bottom right corner of
the window. Note that being resizable does not automatically give
the window a size box. You must set the SizeBox attribute to have a size box appear in the window.
The SizeBox attribute determines whether the window has a size box. If this
attribute is set, the Resizable attribute should also be set. A resizable window may not have
a size box, but all windows with a size box should be resizable.
The Zoomable attribute determines two things: whether the windows is zoomable,
and if it has a zoom box. All zoomable windows have a zoom box.
Modal windows are typically not zoomable. Regular and floating
windows may or may not be zoomable.
Three attributes control various facets of how a window draws.
The ShowNew attribute determines whether a new window is initially visible
or not.
The HideOnSuspend attribute is typically true for floating windows. When an application
is suspended-sent to the background-the human interface guidelines
dictate that all floating palettes should be hidden. This attribute
is typically false for regular and modal windows. Regular and
modal windows become inactive, but do not hide.
The EraseOnUpdate attribute determines how window drawing occurs. If this attribute
is true, PowerPlant erases the contents of the window before drawing.
This attribute is typically true for windows.
The remaining window attributes control how the window responds to clicks.
The Enabled attribute determines whether the window is enabled-that is, can
it respond to clicks.
The Targetable attribute determines whether the window is or can contain a command
target object-that is, can it respond to menu commands and keystrokes.
Most windows are targetable. This feature isn't really enforced.
For example, assume you have a window with an LTextEditView object.
If this attribute is not set for the window, the LTextEditView
object can still become the target object. However, when the window
is deactivated and reactivated, the LTextEditView will not be
restored as the target object.
The GetSelectClick attribute determines what you do with the click that activates
the window. For regular windows, usually the click activates the
window, and does nothing else. For tool palettes in the floating
layer, you typically set this attribute to true. In that case,
the click that activates the window is also treated as a click
in the window contents (for example, a click on a button in the
tool palette). This maintains the illusion that the palette is
always active.
If the DelaySelect attribute is true, a click in an inactive window is first treated
as a click in the contents. After the click event is processed,
if the mouse button has been released in the window, the window
is selected. You set this attribute to true to support drag and
drop. In the drag and drop human interface, you should be able
to drag selected information out of a background window without
activating the window.
 WARNING!
 To support dragging from an inactive window, you must override LPane::Click(). See the PowerPlant Advanced Topics chapter on Drag and Drop for a thorough discussion of this issue.
The LWindow class has three accessors related to attributes. You use these accessors to determine the state of the window's attributes, or to modify the attributes at runtime. The functions and their purpose are listed in Table 11.2.
| Function |
Purpose |
|---|---|
Typically you set the attributes in Constructor when you design
the visual interface for your application, or before creating
a window on the fly. Setting or clearing attributes does not have
an immediate effect on a window that has already been created.
For example, setting the windAttr_CloseBox attribute doesn't suddenly give the window a close box.
In addition to the many window attributes, a window has its own unique way of keeping track of its dimensions.
Windows may have a minimum and maximum size (although this feature is only important for resizable windows). Windows also have a standard size-used for zooming.
These sizes control how large or small the window may become as the user resizes the window manually. If the window is not resizable, these values are not used.
The minimum and maximum sizes are stored in a single Rect data
member named mMinMaxRect. The top and left fields of the Rect define the minimum size.
The bottom and right fields of the Rect define the maximum size.
For example, if the mMinMaxRect fields were {100,100,300,400}, then the minimum window size would
be 100 x 100 pixels, and the maximum window size would be 300
x 400 pixels.
The accessors for this data are GetMinMaxSize() and SetMinMaxSize(). Typically you set this information in Constructor when defining
the window characteristics.
The minimum size should be large enough to show some meaningful content. In general, a window shouldn't be smaller than a size of 100 by 100 pixels.
The maximum size should be large enough to show all the data in the window. By default, PowerPlant sets the maximum size to 32K by 32K. In Constructor you see this value expressed as -1.
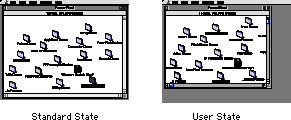
Clicking the zoom box of a zoomable window toggles the window between its standard state and its user state. The standard state is the optimal size and position for the window. The user state is the runtime size and position of the window that the user sets manually on the desktop. The user state changes when the user drags or resizes the window.
When the user clicks the zoom box, PowerPlant checks whether the window is in the standard state. If it is, PowerPlant resizes the window to the user state. If the window is not in the standard state, PowerPlant resizes the window to the standard state.
The standard size characteristic of a window defines the size
of the window in its standard state. This value is stored in an
SDimension16 data member named mStandardSize. The accessors are GetStandardSize() and SetStandardSize().
Typically you set this information in Constructor when defining the window characteristics. The default standard size is 32K by 32K. In Constructor you see this value expressed as -1.
When PowerPlant resizes a window to its standard state, PowerPlant uses either the standard state value or the size of the dominant screen, whichever is smaller. The dominant screen is the screen that contains most of the window. If the screen dimensions are used, PowerPlant allows a two-pixel margin around the edges of the screen and the menu bar.
For example, if the standard state of a window is 600 by 400 pixels, it will fit comfortably on a 13-inch monitor. If most of the window is on a Classic-sized monitor, PowerPlant resizes the window to 508 by 318 pixels.
As you know, every pane has GetDescriptor() and SetDescriptor() accessors for the pane's descriptor characteristic. The LWindow
class uses these accessors to retrieve or modify the window title.
Once again, you can set the title in Constructor. However, this is one case where you are likely to use the accessors fairly regularly in your code. The title of a document-related window is likely to change as the user saves the document to a file.
To help you distinguish PowerPlant windows from non-PowerPlant
Macintosh windows, PowerPlant stores a special value in the WindowRecord's
windowKind field. PowerPlant assumes that any window whose windowKind
is greater than or equal to PP_Window_Kind is a PowerPlant window. This constant is defined in LWindow.h,
and its value is 20000.
You can use this feature to keep track of different kinds of PowerPlant
windows in your application, if that is necessary in your design
although you could accomplish the same goal using the pane ID.
Using the window kind is the only way to distinguish subclasses
of LWindow at runtime using a WindowRecord. Just give different
kinds of windows unique window kinds greater than PP_Window_Kind. You can also use this feature to distinguish between PowerPlant
and other windows. We'll discuss how to set the windowKind field in "Creating a Window."
To get a PowerPlant window's window kind, use LWindow's GetMacPort() member function. Cast the returned GrafPtr to a WindowPeek so you can access the windowKind field.
WindowPeek thePeek = (WindowPeek)theWindow-> GetMacPort();
short theKind = thePeek->windowKind;
Because you already know about how to work with panes, views, and commanders, you already know most of what there is to know about windows. However, LWindow does have its own behaviors in addition to those inherited from other classes.
You can create a window using Constructor, or on the fly in your code. We talk about each method. Then we discuss what you do when you derive your own class from LWindow.
Creating a window in Constructor is simple.
While in the Constructor project window, select the Windows and
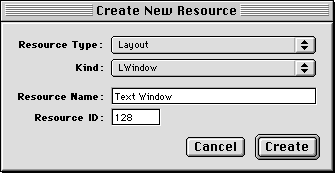
Views resources, and choose New Resource (command-K) from the Edit menu. Fill in the details in the Create New Resource dialog to
create a new PPob resource.
Double-click the new PPob resource to see the layout editor for the new window. Double-click the new window in the layout editor to see and set the window characteristics, as shown in Figure 11.4.
Setting window properties with Constructor: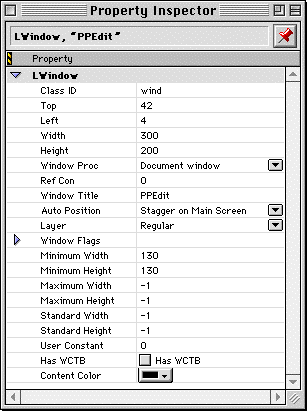
Note that a window has some of the same information as a pane, including location, size, and class ID. There is no binding information, because this is the top view. There is no pane ID for the same reason. Remember, when you derive your own classes you must change the class ID to your own unique value and register the class with PowerPlant before creating any objects of that class.
All of the window attributes we discussed earlier are available. You select a window layer. You select the peripheral window parts for your window. You set the other clicking and drawing attributes. You set the minimum, maximum, and standard sizes. And you set the window title.
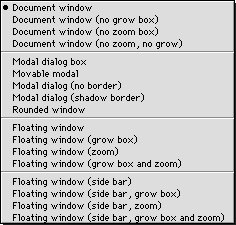
You can set the window proc by choosing an item from the popup menu illustrated in Figure 11.5.
For regular windows, you choose the Document window item. The movable modal type is most appropriate when creating dialog boxes. Making a floating window is as simple as choosing the correct window type and putting the window in the floating layer. The "side bar" type puts the floating window's "title bar" on the side of the window rather than across the top.
Use the floating window types exclusively for floating windows. Good interface design dictates that floating windows look different from other windows, because they behave differently.
 NOTE
NOTE To use a floating window, you must also use the UFloatingDesktop.cp implementation of the UDesktop class. See "UDesktop."
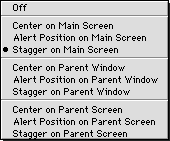
You can use System 7's auto-positioning feature for windows. Choose an item from the popup menu illustrated in Figure 11.6.
Finally, you can set initial values for a user constant or the
window refCon. The latter represents the classic Mac OS WindowRecord refCon field. PowerPlant uses the refCon field to store a pointer to the LWindow object. You cannot use
the refCon for other purposes. Use the userCon field instead.
Use the refCon field in Constructor if you want your window to have a unique
window kind characteristic. Make sure the value is greater than
PP_Window_Kind. When PowerPlant creates the window object, it moves the value
from the refCon field of the resource to the windowKind field
in the WindowRecord, and replaces the refCon with a pointer to
the window object.
All of the possibilities for all of the characteristics give you a plethora of possible window designs. Creating unique and interesting windows is as simple as making a few choices in the pane Property Inspector window for the LWindow object.
With a PPob resource, creating the window (and all of its contents)
in code is simple. Call LWindow's class creator function, LWindow::CreateWindow(). PowerPlant does the rest.
"Register PowerPlant Classes."
If you wish to create a window on the fly, you use the SWindowInfo structure, detailed in Listing 11.2. This structure specifies the values required to build a window.
You define an SWindowInfo structure, and fill in the values. In the structure you provide
the resource ID of a WIND resource, the layer in which to place
the window, the attributes, the minimum, maximum, and standard
sizes, and the userCon value.
To set the window kind from a resource, set the refCon value in the window's WIND resource to be your desired window
kind. You can also change the windowKind field directly after creating the window. Make sure the value
is greater than PP_Window_Kind for a PowerPlant window.
Then you call the LWindow constructor. There is a constructor
that takes a reference to an SWindowInfo structure as a parameter.
struct SWindowInfo {
  ResIDT        WINDid;
  SInt16        layer;
  UInt32        attributes;
  SInt16        minimumWidth;
  SInt16        minimumHeight;
  SInt16        maximumWidth;
  SInt16        maximumHeight;
  SDimension16  standardSize;
  SInt32        userCon;
};
You can use LWindow-specific calls to set or modify other information about the window after you create it. After you have built the window, you can add whatever panes and views you wish.
Creating your own window class is a fairly common occurrence. There are many reasons why you might want to extend the functionality of the basic LWindow class.
For example, you might want a window that can listen to control items (like an LDialogBox object). You might want your window to zoom or grow in unusual ways. There's no telling what you might want to do with a window.
In the case of deriving from LWindow, you are very likely to override the functions listed in Table 11.3.
Commonly overridden LWindow functions:
| Function |
Purpose |
|---|---|
You are familiar with all four of these functions from our earlier discussions of panes, views, and commanders.
Beyond the functions listed in Table 11.3, it is difficult to typify the other functions you will override. Suffice it to say, if your window has unique behavior, you override those functions necessary to implement that behavior. To determine what functions you need to override, explore the LWindow class to see how the default behavior is implemented. We discuss some of these functions in the "Managing Window Behavior."
For example, if you want to modify how a window resizes (perhaps
to allow switching between a few specific sizes) you should examine
LWindow::ClickInGrow(), LWindow::DoSetBounds(), and LWindow::DoSetZoom() to see if you should override them.
A window is a view. Drawing a window is just like drawing a view.
You call the window's Draw() method. LWindow does not override this method. The inherited
LView::Draw() function first calls the window's own DrawSelf() function, then walks through the list of subpanes and tells each
of them to Draw().
The LWindow::DrawSelf() function erases the window contents (if the EraseOnUpdate attribute is set), and then draws the size box (if there is one).
The net effect is the window erases its contents, and then the
subpanes draw themselves into the empty window.
In certain situation, you may want to use LOffscreenView for drawing. You can put an LOffscreenView object into the window to enclose several other panes. When you draw the subpanes, they all draw in the offscreen view. When all panes are finished drawing, the complete image is blitted to the screen. Even though this is a trifle slower than drawing the individual panes directly on screen, the net effect appears faster to the user because all the panes appear simultaneously. This technique is also useful if the panes overlap and might cause flicker while drawing.
LOffscreenView creates and destroys a temporary GWorld every time you draw. If you want a view or panes within the view to use a GWorld that lasts for more than one update, use LGWorld.
Examine the function definitions in the UGWorld.cp file. For example, if you wanted an individual pane to use an
LGWorld, you would create a new LGWorld object from the constructor,
and delete the LGWorld object in the destructor. You could then
use the LGWorld to store the visual image of the pane. Listing 11.3 is one example of how you might do this.
MyPane::MyPane() {
  Rect frame;
  CalcLocalFrameRect(frame);
  mGWorld = new LGWorld(frame, 8);
}
MyPane::~MyPane() {
  delete mGWorld;
}

MyPane::DrawSelf() {
  Rect frame;
  CalcLocalFrameRect(frame);
  mGWorld->CopyImage(GetMacPort(), frame);
}
This hypothetical MyPane class would need a new function to draw the contents of the pane into the GWorld in the first place, and to update those contents when necessary. Such a function might look something like Listing 11.4.
MyPane::DrawInGWorld {
  mGWorld->BeginDrawing(); // Draw in GWorld
  // code to draw pane
  mGWorld->EndDrawing();
You use the LGWorld function BeginDrawing() to prepare the GWorld, and EndDrawing() when you're finished. All the drawing in between occurs in the
GWorld and not on screen.
 TIP
TIP LGWorld is another independent PowerPlant class. You can use LGWorld without using any other part of PowerPlant.
Windows have several common behaviors with which you are familiar, including activating, dragging, resizing, zooming, and closing. In this section we examine the behavior of an LWindow object and the default implementation of these functions in LWindow. Unless your window does something unusual you shouldn't have to override this behavior.
Remember the three facets of a pane's state: visible/hidden, active/inactive, enabled/disabled. All of these apply to windows. Windows, of course, do unique things to manage state, but the general principles remain the same.
In addition, you may select a window, and respond when an application as a whole suspends or resumes. Table 11.4 lists some of the functions related to the window's state.
Some LWindow state-related functions:
| Function |
Purpose |
|---|---|
There are two points to make about these functions.
First, the four "self" functions are protected member functions.
Typically you would never call them directly. They are listed
here for information only. You should use the corresponding public
interface of Show(), Hide(), Activate(), and Deactivate(), each of which calls the corresponding "self" routine. To implement
unique behavior in a derived class, you would override the "self"
routines.
Second, if you examine the source code for these functions, you'll see that several of them call static members of the UDesktop class. UDesktop encapsulates much of PowerPlant's window management behavior.
the discussion of "State" and "UDesktop."
A click in a window is, in many ways, the defining event in an application. What you do in response to a click determines how your application behaves.
Clicks in a PowerPlant window can be thought of as occurring in one of two general locations: in the peripheral window parts or in the window content.
LWindow has default behaviors for handling most if not all of
these situations for you. LWindow::HandleClick() parses the click and dispatches control based upon the location
of the click.
A click in a peripheral control ultimately results in one of these functions being called, whichever is appropriate for the click:
If you examine the code for these functions, you'll see that each of them uses Apple events while implementing their respective behavior. As a result, these actions are scriptable and recordable in a PowerPlant application.
The default implementation of these functions in LWindow is likely to suit your needs just fine. If it does not, you can derive your own window class and override whichever behavior does not fit your precise needs.
LWindow::ClickInContent() handles a click in the content area of a window. This function
selects the window if necessary. It then calls Click() to handle the click. LWindow does not override Click(), so it uses LView::Click().
LView::Click() identifies whether the click occurred inside a pane within the
window. If it is within a pane, the function calls the pane's
Click() function so the pane can respond.
If the click is within the window contents but not inside a pane,
control passes one step higher up the inheritance chain to LPane::Click(). After performing some housekeeping details, LPane::Click() calls ClickSelf().
Neither LWindow nor LView overrides ClickSelf(). Therefore, the LPane::ClickSelf() function executes. The default implementation of LPane::ClickSelf() does nothing. If you want your window to respond to clicks outside
of any subpanes, override ClickSelf().
LWindow has two functions associated with closing a window, AttemptClose() and DoClose(). These very similar functions are used at different times and
in different circumstances. Understanding the differences can
help you decide which to use, and which to override.
Listing 11.5 displays the code for AttemptClose().
LWindow::AttemptClose() function:
if ((mSuperCommander == nil) ||
      mSuperCommander->AllowSubRemoval(this))
{
  // Send Close AE for recording only
  SendSelfAE(kAECoreSuite, kAEClose, false);
  delete this;
}
The code for DoClose() is almost identical.
if ((mSuperCommander == nil) ||
      mSuperCommander->AllowSubRemoval(this))
{
     delete this;
}
The difference between these functions is that AttemptClose() sends an Apple event. As a result, a scripting environment can
record the window closure. Otherwise, the functions are identical.
Within PowerPlant, AttemptClose() is called in response to a click in the close box of a window.
This reflects PowerPlant's support for script recordability.
The DoClose() function is called in two cases: when LDialogBox::ListenToMessage() receives a close message; and when the window receives an Apple
event to close.
If you want to close a window, call AttemptClose(). This is your best bet to ensure your application's recordability.
If you override window-closing behavior, AttemptClose() is again the best bottleneck. However, good design dictates that
the same perceived behavior should occur whether the user clicks
in the close box, or the window receives a close Apple event.
To ensure that the same behavior occurs, you may need to override
DoClose() as well, depending upon what you do in your override of AttemptClose().
Finally, note that each function calls the commander's AllowSubRemoval() function. Why? For example, in a typical implementation a document
is the supercommander of a window. This gives the document an
opportunity to check whether there are any changes, and gives
the user the chance to save them.
Because both AttemptClose() and DoClose() pass through the AllowSubRemoval() bottleneck, you can institute your required closing behavior-such
as a "save changes" check-in this function once, and leave AttemptClose() and DoClose() alone.
WARNING! If the floating window is targetable, or it contains the current target object (such as an editable text field), when you issue a Close command it will operate on the floating window! That's because this is the window that contains the target object. You may want to override the default closing behavior to close the frontmost regular window in this case. Your user interface will determine precisely how you should handle the close behavior.
PowerPlant has two classes that contain a variety of utilities for managing window-related tasks. They are UWindows and UDesktop. All of the functions in both of these classes are static, so you can call them at any time.
The UWindows utility functions relate to Mac OS WindowRecords, not to PowerPlant LWindow objects. You can use the UWindows functions without using any other part of PowerPlant.
The functions in UWindows relate to finding the dimensions or front-to-back order of an individual Mac OS window record. There is also a function for finding the device on which most of a specified rectangle appears. Table 11.5 lists the functions.
| Function |
Purpose |
|---|---|
Consult the PowerPlant Reference for details on how to use these functions.
UDesktop encapsulates much of PowerPlant's low-level window management behavior. Unlike UWindows, UDesktop is dependent upon the LWindow class. Where functions in UWindows typically have a Mac OS WindowPtr as a parameter or return value, UDesktop uses pointers to LWindow objects. As a result, you can't use UDesktop without using a significant part of PowerPlant.
Just like UDesktop relies on LWindow, LWindow relies on the existence of the UDesktop functions. You must include some file in your project which implements the class defined in UDesktop.h. PowerPlant has two versions of UDesktop. You can use UDesktop.cp or UFloatingDesktop.cp, but not both. If you attempt to include both, you will get a link error for multiple definitions of the same class. You can substitute your own implementation of UDesktop if you wish.
TIP The implementation of UDesktop found in UDesktop.cp does not support floating windows. Use UFloatingDesktop.cp in your project if you use floating windows.
Table 11.6 lists all the member functions of UDesktop. Remember that in this context the term "window" refers to an LWindow object, not a Mac OS WindowRecord, unless otherwise specified.
| Function |
Purpose |
|---|---|
You are free to call UDesktop functions directly at any time if they suit your purpose. Most of the time, you won't need to use them directly. PowerPlant uses these as utility functions to perform what are, for the most part, low-level window management tasks. However, you might find some of them useful in particular circumstances where you need to know some desktop detail, such as whether the front window is modal or not.
When dealing with windows in a PowerPlant application, you must still work directly with the Mac OS Window Manager from time to time. PowerPlant provides several functions for dealing with the Mac OS GrafPort, or an LWindow object's associated WindowPtr.
Table 11.7 lists the available functions.
GrafPort and WindowPtr utility functions:
| Function |
Purpose |
|---|---|
Both the GetCurrentPort() and FetchWindowObject() functions are static functions, so they are always available.
Using these four functions in appropriate combination you can do some interesting things.
For example, you can always find the front window object by getting
the current port and then finding the associated window object.
If you have a pane object, you can get the Mac OS WindowPtr for
the window that contains this pane by calling GetMacPort().
You may recall a discussion about "Finding the topmost view." If the topmost view is a window, you can get the topmost view this way:
Finding the containing LWindow object:
GrafPtr theWindowP = thePane->GetMacPort();
LWindow* topView = LWindow::FetchWindowObject(theWindowP);
PowerPlant is a flexible tool. In many cases PowerPlant gives you several ways to solve a problem. Getting the topmost window object is but one example.
In this chapter you learned all about windows in PowerPlant. We discussed what a window is, and the LWindow class hierarchy.
We discussed the additional features of a window that distinguish it from other views or panes, including special window attributes, special sizes, and the LWindow use of the descriptor characteristic.
Window attributes control a window's layer, the controls around the edges of the window, how the window draws, and how it handles clicks.
We discussed how to work with windows, including how to create windows, draw windows, draw off screen, handle clicks, and close a window.
Finally, we discussed a variety of window-related utility functions in PowerPlant that allow you to manage window behavior, and work with the Mac OS Window Manager.
In this code exercise you write an application named "Windows."
In the process you implement a feature that is common to many
applications-a Window menu that lists open windows. You also write the code to create
both a floating window and a regular window.
As you have in several other exercises, you'll accomplish this in two sections. First you examine the interface, and then you write the code.
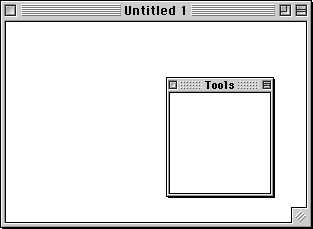
The final application creates two different kinds of windows, as shown in Figure 11.7: a regular window and a floating window.
Both windows are empty. This exercise concentrates on creating windows and working with menus.
Open the Windows.ppob project file in Constructor and examine the two PPob resources.
PPob resource ID 1000 is the regular window. Examine the characteristics
of this window.
The features of this window are pretty common. The window kind is a document window, and the window is in the regular window layer. The window uses the auto-position feature. In the clicking and drawing section, notice that the window does not get the select click and does not hide on suspend.
The window has a class ID of RegW. This is a custom window with
some unique behaviors. In particular, the FinishCreateSelf() and destructor functions are different from LWindow. These functions
add or remove the window in the Window menu.
Now, open the PPob for the floating window, and examine the window's characteristics as illustrated in Figure 11.8.
The floating window properties: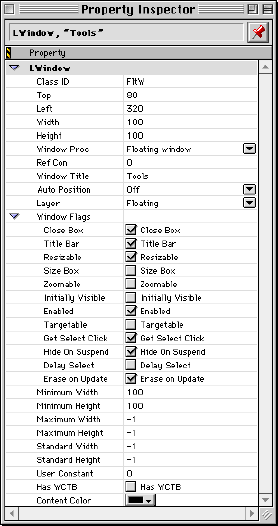
There are several differences between the Tools window and the regular window. Most importantly, the window kind is a floating window and it is in the floating layer. These two features control most of the window's basic appearance and behavior. However, there are other important characteristics.
The window is not targetable or initially visible. The window has a close box and a title bar. There is no size box or zoom box. The window is not resizable. A typical floating window does not resize or zoom.
Next, observe the clicking and drawing features. This window gets the select click. As a result, a click that activates the window is also treated as a click in the window content. You'll see how this works when you write code to respond to a click.
This window also hides when the application is suspended. Again, this is not mandatory. This feature reflects the typical behavior of a floating window in the Mac human interface.
Finally, this is a custom window with class ID FltW. In this case,
the difference between this window and the behavior of LWindow
is in the ClickSelf() and ClickInGoAway() functions. You'll write the code for these functions a little
later in this exercise.
You can close the PPob windows and the Constructor project file.
Before we get started on the actual code, let's take a quick look at where we're going so you know where all the pieces fit.
The Window menu is implemented as a custom class derived from LMenu. CWindowMenu
has some additional features we'll explore in just a bit. The
application can't use the PowerPlant default menu-creation mechanism
because PowerPlant creates LMenu objects. This application creates
a CWindowMenu object explicitly and adds it to the menu bar. The
application stores a pointer to the CWindowMenu object in a global
variable, gWindowMenu.
When the user creates or destroys a regular window, the window
title is added or removed as an item in the Window menu. You write the code to make that happen. You also write
the code that allows the application to run everything. Let's
get to it.
class declaration CWindowMenu.h
When you look at the class declaration, you see that this class inherits from LMenu. In addition to the usual constructors and destructor, CWindowMenu declares five new functions. They are:
You write InsertWindow() and RemoveWindow() in the next two steps to add or remove items from the Window menu. The other three functions are provided for you. MenuItemToWindow() returns the LWindow pointer for a given menu item. WindowToMenuItem() returns the correct menu item for a given LWindow pointer. SetCommandKeys() assigns numerical command keys to the first nine open windows.
There are two new data members as well, mBaseItems and mWindowList.
The first item in the Window menu is an item to show or hide the Tools window. If there is
a regular window open, the next item in the Window menu is a separator bar. These are the "base" items tracked in
the mBaseItems member. All other items in the menu match the titles of various
open windows.
The mWindowList member is a list of open regular windows.
When you are through studying, close the file.
The existing code in this function first determines whether the window is already in the list. If it is not, you must accomplish these tasks.
a. Add the window to the window list.
Use mWindowList, and call InsertItemsAt() to add a new item to the list.
Use the window's GetDescriptor() function.
c. Add an item to the Window menu.
This is a bit more complex. You use the CWindowMenu's inherited
InsertCommand() function. However, it calls the Toolbox InsertMenuItem() function. The Toolbox function recognizes and uses "metacharacters"
so you can accomplish tasks like setting a mark or command key
when you insert an item. Unfortunately, one or more characters
in your window title might be misinterpreted as a metacharacter,
causing odd results.
To avoid this problem, when you call InsertCommand(), pass a blank space as the text for the new menu item. You also
specify a menu command. Use cmd_UseMenuItem. Add the item to the end of the menu.
After the call to InsertCommand(), use the Toolbox SetMenuItemText() function to change the text for the item to match the window
title.
The Window menu has a feature that assigns numerical command keys to the
first nine windows in the window list. Call SetCommandKeys() to implement this behavior.
Existing code handles the else condition when the window is already in the list. It changes
the text of the menu item to match the window title. As a result,
you can use this function for two purposes: to add a new window
to the menu, or to modify the menu when the window title changes.
      mBaseItems++;
    }
  }

  // Add the window to the list.
  mWindowList.InsertItemsAt( 1, LArray::index_Last, &inWindow );

  // Get the window title.
  Str255 theTitle;
  inWindow->GetDescriptor( theTitle );

  // Insert title into the menu as a -1 item.
  InsertCommand("\p ", cmd_UseMenuItem, 16000 );
  ::SetMenuItemText( GetMacMenuH(),
             ::CountMItems( GetMacMenuH() ), theTitle );
  // Renumber the command keys.
  SetCommandKeys();

} else { // Already in list
3. Remove a window from the menu.
Existing code ensures that the window you are removing actually exists. If it does, you have two tasks to accomplish.
a. Remove the menu item corresponding to the window.
The order of window titles in the menu matches the order of windows
in the window list. Get the index number of the window from the
window list. Use the menu object's inherited RemoveItem() function to remove the item from the menu. Don't forget to add
mBaseItems to the index value of the window to get the correct menu item
number.
b. Remove the window from the window list.
Use mWindowList, and call Remove() to remove the specified window from the list.
// Remove the item from the menu.
Assert_( mWindowList.FetchIndexOf(
                &inWindow ) != arrayIndex_Bad );
RemoveItem( mWindowList.FetchIndexOf(
              &inWindow ) + mBaseItems );
// Remove the window from the list.
mWindowList.Remove( &inWindow );

if ( mWindowList.GetCount() == 0 && mBaseItems > 1 ) {
The existing code then handles the separator, removing it when
there are no more windows in the Window menu. The existing code also resets the command keys for the
open windows.
When you are through, save your work and close the file. It's time to implement window behavior.
4. When creating a window, add it to the menu.
FinishCreateSelf() CRegularWindow.cp
When the user creates a regular window, you want to add it to
the Window menu. The FinishCreateSelf() function is designed for the tasks
you must accomplish to finish a pane, view, or control.
The Mac human interface says that new windows not associated with
any file on disk should be named "Untitled" followed by a number.
The existing code uses the UWindows::FindNamedWindow() utility to ensure that you have a unique and appropriate title
to assign to your window.
When you have a good title, you have two tasks to accomplish.
Use the window object's SetDescriptor() function.
b. Add the window to the Window menu.
Use the gWindowMenu global variable. (You'll initialize this variable in a subsequent
step.) Use the CWindowMenu object's InsertWindow() function.
  theTitle += (LStr255) theNumber;
}
// Set window title.
SetDescriptor( theTitle );

// Add the window to the window menu.
gWindowMenu->InsertWindow( this );
5. When destroying a window, remove it from the menu.
~CRegularWindow() CRegularWindow.cp
Use the gWindowMenu global variable. (You'll initialize this variable in a subsequent
step.) Use the CWindowMenu object's RemoveWindow() function.
CRegularWindow::~CRegularWindow()
{
  // Remove the window from the window menu.
  gWindowMenu->RemoveWindow( this );
}
You have completely implemented all the new behavior of the CRegularWindow object. Save your work and close the file.
6. Handle a click in the floating window content.
ClickSelf() CFloatingWindow.cp
In a typical application the window's contents would usually handle the click. However, the Tools window is empty, and a click in the content has no real significance. The code you write in this step is for instructional purposes only, just so you can see how a floating window responds to a click.
Make the window beep when there is a click in the contents.
#pragma unused ( inMouseDown )
  ::SysBeep (30);
7. Handle a click in the floating window close box.
ClickInGoAway() CFloatingWindow.cp
When the user clicks in the close box for the floating window, you could destroy the window. When the user wants to see the Tools window again, you would have to build it from scratch. This application uses a different strategy. It creates the window once, and then shows or hides the window.
Existing code calls the Toolbox TrackGoAway() function. If the call returns true, hide the window.
There is one other task you must perform. You must set the menu
update flag as well. PowerPlant does not update menus for clicks
in the title bar or peripheral controls. However, a click in the
close box should modify the Window menu. The first item in the Window menu says (alternatively) either Show Tools or Hide Tools.
if ( ::TrackGoAway( GetMacPort(), inMacEvent.where ) ) {
  // Hide the window.
  Hide();

  // Update the menus.
  SetUpdateCommandStatus( true );
}
You'll create and show the window in subsequent steps. However, you have fully implemented the unique behavior of the floating window. Save your work and close the file. All that remains is to use these items-the menu, the regular window, and the floating window-in the finished application. (See "When To Update Menus.")
As we mentioned at the start of this section, you cannot rely
on the PowerPlant menu-creation mechanism because it creates LMenu
objects. The Window menu is a CWindowMenu object.
In the application constructor, existing code registers the custom
classes. After that, in the Initialize() function you have three tasks to accomplish.
a. Create a CWindowMenu object.
Use the new operator. The declared constant for the MENU resource ID is rMENU_Window. Store the result in the global variable, gWindowMenu. It's always wise to check that creation was a success. You can
use ThrowIfNil_.
b. Get the application's LMenuBar object.
Use LMenuBar::GetCurrentMenuBar().
c. Add the new menu to the menu bar.
Use the menu bar's InstallMenu() function.
// Make the window menu.
gWindowMenu = new CWindowMenu( rMENU_Window );
ThrowIfNil_( gWindowMenu );
// Get the menu bar.
LMenuBar *theMBar = LMenuBar::GetCurrentMenuBar();
ThrowIfNil_( theMBar );

// Install the window menu.
theMBar->InstallMenu( gWindowMenu, 0 );
As we discussed above, this application's strategy for the Tools palette is to create the window once, then show and hide it as necessary. You should create the Tools palette in the application's Initialize() function.
To do so, call the LWindow::CreateWindow() function. The declared constant for the PPob resource is rPPob_FloatingWindow.
You can use the LWindow::CreateWindow() function because the floating window-although it has slightly
different behavior-is identical to an LWindow object with respect
to the data required to create the window object and its contents.
However, you should typecast the return value from LWindow::CreateWindow() to be a CFloatingWindow pointer. Store the result in an application
data member, mToolsWindow.
theMBar->InstallMenu( gWindowMenu, 0 );
// Create the tools window.
mToolsWindow = dynamic_cast<CFloatingWindow *>
            (LWindow::CreateWindow( rPPob_FloatingWindow, this ));
ThrowIfNil_( mToolsWindow );
10. Create a regular window at launch.
The StartUp() function is called when the application launches without documents.
As a result, a typical use for this function is to create a default
window if the user does not open a document.
That's just what the "Windows" application does. When the application
launches, a window opens automatically. To implement this behavior,
simply call the application's ObeyCommand() function. Use the cmd_New command. (See "PowerPlant and Apple Events.")
CWindowsApp::StartUp()
{
  ObeyCommand( cmd_New, nil );
}
In this function you should respond to three commands: a selection
in the Window menu, cmd_New, and cmd_ToolsWindow. In the substeps in this step, you handle each command.
a. Handle a Window menu command.
Recall that when you inserted an item in the Window menu, you assigned cmd_UseMenuItem as the corresponding command number. That means PowerPlant generates
a synthetic command for each item.
Existing code identifies synthetic commands, and tests to ensure
that the command is from the Window menu. If it is, you get the window object that corresponds to
the menu item. Use the CWindowMenu's MenuItemToWindow() function. Then, if there is a window and it is visible, select
the window. Use UDesktop::SelectDeskWindow().
if (theMenuID == gWindowMenu->GetMenuID() ) {
  // Get window corresponding to the menu item.
  LWindow *theWindow =
         gWindowMenu->MenuItemToWindow( theMenuItem );

  if ( theWindow != nil && theWindow->IsVisible() ) {
    // Bring the window to the front.
    UDesktop::SelectDeskWindow( theWindow );
  }
} else { // Synthetic command not in Window menu
b. Create a new regular window.
The existing code has a case statement for cmd_New. In response to that command, you should create and show the
window. Use the LWindow class creator function. The declared constant
for the PPob resource ID is rPPob_RegularWindow.
case cmd_New:
{
  // Create the window.
  LWindow *theWindow;
  theWindow = LWindow::CreateWindow( rPPob_RegularWindow, this );
  Assert_( theWindow != nil );
  // Show the window.
  theWindow->Show();
}
break;
c. Show or hide the tools window.
The application receives the cmd_ToolsWindow command when the user selects the first item in the Window menu. In response to this command, you should toggle the visibility
of the window. Determine if the window is visible. It it is, hide
it. If it is not, show it. Use the mToolsWindow data member.
case cmd_ToolsWindow:
{
  // Toggle visible state of the tools window.
  if ( mToolsWindow->IsVisible() ) {
    mToolsWindow->Hide();

  } else {
    mToolsWindow->Show();
  }
}
break;
Notice that the default case for both synthetic and non-synthetic
commands passes any unrecognized command to the inherited ObeyCommand() function for further processing.
FindCommandStatus() CWindowsApp.cp
Finally, you must update menus appropriately. You should respond
to three kinds of items: Window menu items, the New item in the File menu, the Tools window item. In the substeps in this step, you handle each item.
Recall that when you inserted an item in the Window menu, you assigned cmd_UseMenuItem as the corresponding command number. That means PowerPlant generates
a synthetic menu command for each item. It also means that PowerPlant
will call the FindCommandStatus() function for each item.
Existing code identifies synthetic commands, and tests to ensure
that the item is from the Window menu. If it is, you should get the window object that corresponds
to the menu item. Use CWindowMenu's MenuItemToWindow() function. If there is a window, enable the item, use a mark,
and set the mark to noMark. Then, if the window is the top window, set the mark to a check
mark. Use UDesktop::FetchTopRegular() to identify the top regular window.
if (theMenuID == gWindowMenu->GetMenuID() ) {
  // Find window corresponding to the menu item.
  LWindow *theWindow =
                gWindowMenu->MenuItemToWindow( theMenuItem );

  if ( theWindow != nil ) {
    // All window items enabled and use a mark.
    outEnabled = true;
    outUsesMark = true;
    outMark = noMark;

    if ( theWindow == UDesktop::FetchTopRegular() ) {

      // Check menu item for top regular window.
      outMark = checkMark;
    }
  }
} else { // Synthetic command not in Window menu
b. Enable the New item in the File menu.
The existing code has a case statement for cmd_New. Enable the item.
case cmd_New:
{
  // Enable the New command.
  outEnabled = true;
}
break;
c. Set the Show/Hide Tools text.
The application receives the cmd_ToolsWindow command for the first item in the Window menu. Enable the item. Set the text based on the visibility of
the window. Determine if the window is visible. It it is, the
item should say "Hide Tools." If the window is not visible, the
item should say "Show Tools." Use the outName parameter to set the item text. PowerPlant does the rest.
case cmd_ToolsWindow:
{
  // Item is always enabled.
  outEnabled = true;

  // Toggle the menu item text.
  if ( mToolsWindow->IsVisible() ) {
    LString::CopyPStr( "\pHide Tools", outName);
  } else {
    LString::CopyPStr( "\pShow Tools", outName);
  }
}
break;
Notice that the default case for both synthetic and non-synthetic
commands passes any unrecognized command to the inherited FindCommandStatus() function for further processing.
13. Build and run the application.
All right! Time to see the result of your work. Make the project and run it. When you do, an empty window should appear with the name "Untitled 1."
Look in the Window menu. The first item should be Show Tools, followed by a separator bar and the name of the regular window.
Close the window and look in the Window menu again. How does it differ?
When you launch the application, the Tools window is not visible. Remember, the PPob for the Tools window specified that the window was not initially visible. As a result, although you create the window at launch, the window does not appear automatically.
Choose the Show Tools item. The Tools window appears. Look in the Window menu again, and the first item should say "Hide Tools."
Create a new regular window. The floating window remains active.
Click in the Tools window. The computer beeps. Although you have
clicked in another window, the regular window remains active.
Play with the Tools window. Move it around. Click in the close
box, and the window disappears. Show it again, then choose Hide Tools from the Window menu. The window hides.
Create several new regular windows. Look in the Window menu, and observe the various menu items. Close some windows,
and observe what happens in the Window menu. Every time you open or close a regular window, the menu
adjusts accordingly.
Activate various windows and observe the check mark in the Window menu. The mark should always denote the currently active regular
window. Try the command keys for Window menu items. The corresponding window should become active.
If you would like to expand on this application, here are some suggestions.
Add a ClickSelf() function to the regular window, and make it beep just like the
floating window. Rebuild the app, make two windows, and click
the inactive window. The window activates, but does not beep.
Click again in the active window, and it beeps. Now, use Constructor
to turn on the GetSelectClick feature of the regular window. Repeat
the experiment. What happens this time? Does the window beep when
you activate it? It should, because the activating click now activates
the window and is passed to the window for processing. Turn off the GetSelectClick feature for the floating window and
see if it makes a difference. It shouldn't. Why not? Because a
floating window is always active. Create a function that allows the user to change a window title.
Update the Window menu along with the window title. Put some content in the windows!
Congratulations! You've passed another milestone. You have now worked extensively with menus, and created and used both regular and floating windows. In the next chapter we cover another kind of window in great detail-dialogs.
However, before you go running off to the next stage of the adventure,
we want you to stop for a moment and think about the concept of
adding a Window menu to an application.
As implemented in this chapter, the menu is an integral part of
the application. There is nothing wrong with that. However, adding
such a menu to existing code or removing it from a project would
entail some substantial changes scattered here and there in the
code. For example, you would have to modify window creation, window
destruction, the application object's FindCommandStatus() and ObeyCommand() functions, as well as the application constructor.
You might wish it could be easier than this. Well, it is. We are going to revisit this topic in Chapter 15, "Periodicals and Attachments." Keep it in mind.