
This chapter gives you a brief overview of Java in the CodeWarrior IDE, installation, system requirements and tools available to you.
This chapter includes the following topics:
If you can run the CodeWarrior IDE, you can target the Java virtual machine.
The Windows-hosted CodeWarrior tools require the following:
The Mac OS-hosted CodeWarrior tools require the following:
The Solaris-hosted CodeWarrior tools require the following:
To install your CodeWarrior package, use the supplied CodeWarrior installer application. Be sure to follow the instructions in the installer application. Using the supplied installer ensures that everything is installed in the proper locations.
See the Getting Started brochure for instructions on installing CodeWarrior on your particular platform.
 NOTE
NOTE If you are installing CodeWarrior PersonalJava Platform Edition, and do not have PJEE (PersonalJava Emulation Environment) already installed, the CodeWarrior installer will install it for you automatically as part of the install process.
On Windows and Solaris systems, the CodeWarrior IDE can be configured to use multiple VMs. On Windows, the IDE determines which versions of the standard Sun JDKs are installed by examining registry keys.
For other VMs, such as PJEE (the PersonalJava Emulation Environment),
the IDE needs additional configuration to determine the properties
of the VMs. Configuration is accomplished by use of the vmregistrar utility. On Solaris, configuration of the IDE for use with third-party
VMs is also accomplished with the vmregistrar utility.
NOTE The CodeWarrior installer in the PersonalJava product automatically configures the IDE for PJEE if PJEE is already installed.
Once configured, alternative VMs will appear in the Virtual Machine pop-up menu in the Java Target settings panel. For more information on the Java Target settings panel refer to "Target Settings Panels".
NOTE We are using the PersonalJava virtual machine as an example in this section. However you can apply these steps to any third-party virtual machine of your choice.
 TIP
TIP You can turn on tool tips in the Help menu of the VMRegistrar application. Tool tips will help familiarize you with what each control does.
Following are the steps you must take to allow the CodeWarrior IDE to work with a third party virtual machine once it is installed:
1. Run the vmregistrar program.
Launch the vmregistrar program. It can be found in the Java_Support directory in your CodeWarrior installation. A window is displayed
listing the registered alternative virtual machines on your system
(Figure 2.1).
Virtual Machine Registration Utility - main window: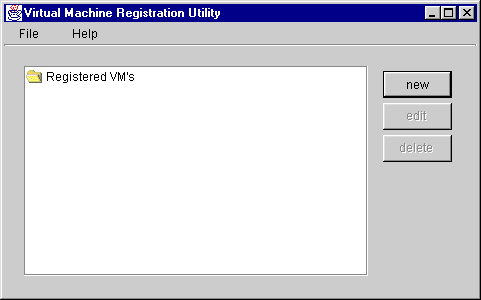
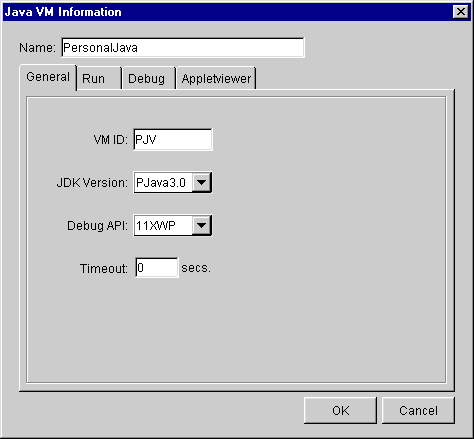
Click the New button to create a new entry. The Java VM Information window is displayed (Figure 2.2) with the General pane displayed.
NOTE If the General pane is not displayed as in Figure 2.2, click the General tab to display it now.
Supply a name for the new entry in the Name edit field. The entry name can be anything you want. The name you supply appears in the Virtual Machine pop-up menu in the Java Target settings panel. See "Java Target" for more information on this pop-up menu.
b. Specify the virtual machine ID.
In the VM ID edit field supply the virtual machine ID.
The virtual machine ID is a unique, three character (alphanumeric)
ID that identifies the virtual machine being registered. The VM
ID for PersonalJava is "PJV"
Choose the JDK version supported by the virtual machine from the JDK Version pop-up menu. In some cases you will choose a special JDK type from this menu, such as PJava3.0.
Choose the debug API supported by the virtual machine from the Debug API pop-up menu.
PersonalJava provides the 11XWP debug API. Other VMs may provide the JDWP debug API.
e. Specify the time-out value.
Supply a number of seconds in the Timeout edit field. If the virtual machine fails to initialize within the specified time then the debugger displays an error dialog box and quits.
NOTE If the amount of time specified for the Timeout (seconds) setting in the CodeWarrior IDE Java Debugging preferences panel is larger than this timeout value, it is used instead.
Click the Runtime tab to display the Runtime pane as shown in Figure 2.3. These settings take effect when a Java project is run that uses this VM.
a. Specify the virtual machine executable.
In the Launch executable edit field supply the path to the virtual machine executable by clicking the Choose button.
In the Library path edit field supply the path to the DLLs required to run the virtual machine. This path is added to the PATH environment variable when the debugger launches the virtual machine.
In the Classpath edit field supply the path to the class library for this virtual
machine. This is usually the path to the "classes.zip" file. To specify multiple files, use the standard classpath
delimiter (semicolon on Windows; colon on Solaris)
Java VM Information window - Runtime settings: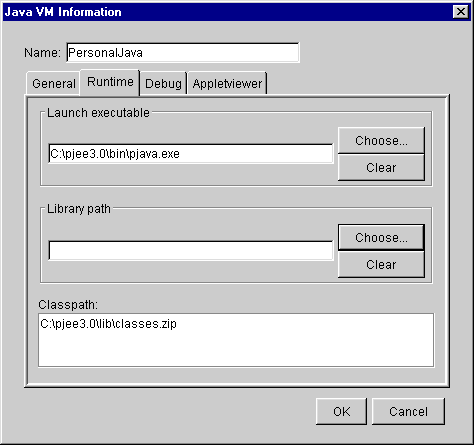
Click the Debug tab to display the Debug pane as shown in Figure 2.4. These settings take effect when a Java project is debugged that uses this VM.
a. Specify the debug version of the virtual machine executable.
In the Launch executable (debug) edit field supply the path to the debug version of the virtual machine executable by clicking the Choose button.
b. Specify the debug libray path.
In the Library path (debug) edit field supply the path to the debug version DLLs required to run the virtual machine. This path is added to the PATH environment variable when the debugger launches the virtual machine.
c. Specify the debug classpath.
In the Classpath (debug) edit field supply the path to the debug version of the class library for this virtual machine. To specify multiple files, use the standard classpath delimiter (semicolon on Windows; colon on Solaris).
Java VM Information window - Debug settings: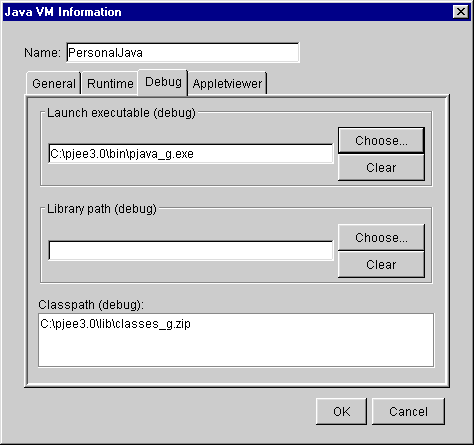
6. Supply applet viewer settings.
Click the Appletviewer tab to display the Appletviewer pane as shown in Figure 2.5.
a. Specify the applet viewer executable.
In the Appletviewer executable edit field supply the path to the applet viewer executable by clicking the Choose button.
b. Specify the applet viewer Java class.
In the Appletviewer class edit field supply the Java class name that represents the applet viewer.
NOTE Debugging is only available if the applet viewer executable is a Java application and you have supplied a fully-qualified Java class name for the applet viewer.
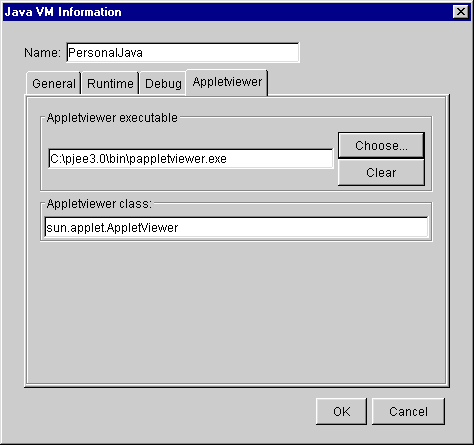
Click the OK button to save the new entry. The Virtual Machine Registration Utility main window (Figure 2.6) now shows the new entry.
Virtual Machine Registration Utility - main window: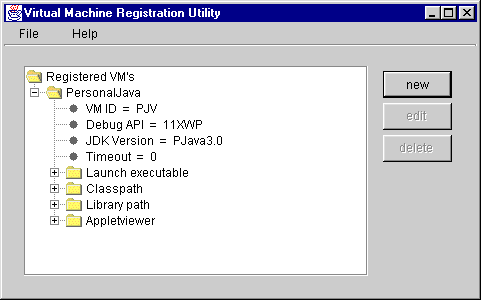
8. Quit the vmregistrar program.
Choose File > Quit to exit the vmregistrar program. CodeWarrior is now able to use the alternate virtual machine.
Java is both a programming language and, in a virtual sense, a computer platform-a target, in CodeWarrior terminology. As such, Java is unique among the languages and targets supported in the CodeWarrior IDE. You can think of Java as not only a language, but as an instruction set for the Java virtual machine.
The virtual machine, commonly called a VM, is an abstract computer microprocessor. Like any silicon computer chip, the virtual machine has an instruction set. The instructions for the Java virtual machine are called bytecodes.
A bytecode is a stream of formatted bytes that has a precisely defined impact on the virtual machine. Bytecodes tell the virtual machine to do things like push and pop values on a stack, branch, load and store values, and so forth. Just like traditional assembly language instructions affect a silicon-based processor, the Java bytecodes are a real instruction set for the Java virtual machine.
The reason for the abstract nature of the virtual machine and its bytecode instruction set is to allow you, the programmer, to create platform-independent code. The runtime interpreter and just-in-time compilers replicate in a real operating system the effect that a bytecode has on the virtual machine.
What you do in the Java environment is a little different from what you do using C, C++, or Pascal.
The development process for Java software in CodeWarrior has the following basic steps:
In CodeWarrior, you write Java source code in exactly the same way you do for C, C++, and Pascal. You use the same project manager and the same source code editor. You get all the power and features of CodeWarrior. To target the Java virtual machine, you make the appropriate selection in the proper settings panel.
Again, this process is exactly like it is for any language and
target supported in CodeWarrior. You issue the appropriate Compile or Make command from the CodeWarrior Project menu. In response, the CodeWarrior Java compiler generates Java
bytecodes based on your source code. CodeWarrior saves the bytecodes
in a Java class file.
The bytecodes in the Java class file are analogous to the object code generated by a C/C++ or Pascal compiler. The difference between traditional object code and Java bytecodes is in how they run.
Object code can run directly on the platform for which it was compiled, but cannot run on any other platform. You must compile it over and over again for each platform. There are also serious cross-platform problems you can encounter trying to address multiple operating systems and computer microprocessors.
Compiling and running object code: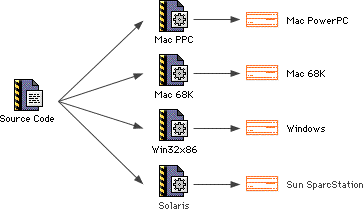
Java bytecodes cannot run directly on any real machine. On the other hand, the Java bytecodes created by the CodeWarrior Java compiler can be interpreted to run on any platform that has a bytecode interpreter (BCI). You write the code once, compile it once, and then you are done.
Compiling and running Java bytecodes: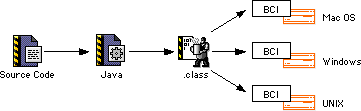
Choose Project > Run to run the Java executable. If the project output is a Java applet,
the IDE launches the applet with the applet viewer chosen in the
Target Settings panel. If the project output is a standard Java application,
the IDE launches the application in the applet viewer chosen in
the Target Settings panel. If the project output is a stand-alone Java application,
the IDE launches the Java application without the use of an applet
viewer. To learn how to specify an applet viewer, see "Target Settings."
Remember, the bytecodes in the class file cannot run directly on any real platform. The class file must be run under the control of a bytecode interpreter (BCI). The BCI is responsible for translating the bytecodes into machine-native instructions.
The final step in the development process is to test and debug your code. You debug Java code using the same CodeWarrior debugger you use for C/C++ code. The CodeWarrior debugger understands Java. The debugger does everything you would expect the debugger to do. It has a stack crawl, displays local variables, and allows you to set breakpoints.
To debug Java code, your applet or application must be built to include debugging information.
a. Choose Project > Enable Debugger to enable the debugger
b. Click the debug column in the project window next to the file you want to debug to tell the IDE to include debugging information when it compiles the file
c. Choose Project > Make to compile and link your code.
d. Choose Project > Debug to launch the program under debugger control.
The CodeWarrior IDE compiles, links, and launches your program under debugger control. From here you can set break points, and debug the program.
That is all there is to it. As you can see, the big difference between Java and compiled languages is that Java code is interpreted at runtime.
If you have used CodeWarrior in the past, developing Java code in CodeWarrior is going to look very familiar to you. If you are new to CodeWarrior, you will find developing Java code to be a pleasure once you master the tools.
These are the tools CodeWarrior provides for developing Java software:
The CodeWarrior Integrated Development Environment (IDE) provides a complete set of tools for developing application programs for a variety of target platforms, including Windows systems, PowerPC-based Mac OS systems, Java, Solaris, and Linux. You use the same IDE when developing code for all target platforms; you designate the platform, code compiler and linker of your choice when you create your project.
For detailed information on the CodeWarrior IDE, see the IDE User Guide.
CodeWarrior RAD tools let you visually construct an application. The tools included with the IDE are for use with C++ and Java. They extend the graphical capabilities of the IDE for use with RAD.
For a quick tutorial on how to build a Java applet using CodeWarrior RAD tools, see "CodeWarrior RAD Tutorial".
For more information on CodeWarrior RAD tools, see the IDE User Guide.
Like the compilers, the Java linker is a plug-in tool integrated into the CodeWarrior IDE. The Java linker executes after the Java compiler. It links the compiled Java binaries, packs them into Jar files, class folders, or hands them to MRJAppBuilder depending on project settings.
The CodeWarrior debugger controls your program's execution and allows you to see what is happening internally as your program runs. You use the debugger to find problems in your program's execution.
The debugger can execute your program one statement at a time, and suspend execution when control reaches a specified point. When the debugger stops a program, you can view the chain of function calls, examine and change the values of variables, and inspect the contents of the processor's registers.
For general information about the debugger, including all of its common features and its visual interface, you should read the IDE User Guide.
For more information about debugging software for Java, see "Debugging Java Projects."
JavaDoc is a post-linker that processes Java source code files, and uses the comments preceding classes, methods, etc. to generate HTML based documentation for the code. See "JavaDoc" for more information.
JavaCheck is a tool for testing whether applications and applets are compatible with Java platforms. It analyzes Java class files to find dependencies not included in a particular Java API specification. This helps developers to write Java applications and applets that can run safely on different Java platforms.
For instructions on how to use JavaCheck, see "Using JavaCheck (PersonalJava)".
For information on how to configure JavaCheck in the CodeWarrior IDE, see "JavaCheck (PersonalJava)".