
This section discusses the preference panels that control CodeWarrior editor features:
The Editor Settings preference panel, shown in Figure 8.16, provides options for configuring the CodeWarrior editor's behavior.
The Remember options control the settings that the editor remembers between editing sessions.
Enable this checkbox to allow the IDE to remember the visible part of a file's text, the location of the insertion point, and any selections that were made. Disable the checkbox to force the editor to go to the first line of each opened source-code window. This feature requires writable files. To learn more about writable files, see "Common VCS Operations".
Editor Settings Preference Panel: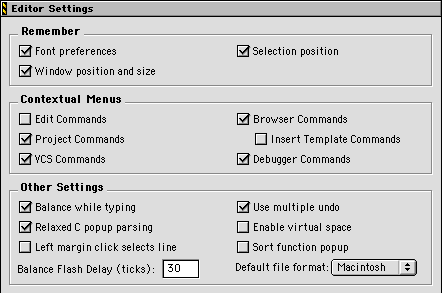
Enable this checkbox to save each window's position and size so that it always reappears at the same location on the screen. This feature requires writable files. To learn more about writable files, see "Common VCS Operations".
Enable this checkbox to display commonly used menu commands from the Edit menu. See "Edit Menu" for more information.
Enable this checkbox to display commonly used menu commands from the Browser menu. See "Browser Menu" for more information. After you enable this checkbox, you can also enable the Insert Template Commands checkbox to display templates from your source code. The contextual menus then display the Insert Template command, shown in Figure 7.4. If necessary, this command displays a submenu that lists the templates.
Enable this checkbox to display commonly used menu commands from the Project menu. See "Project Menu" for more information.
Enable this checkbox to display commonly used menu commands from the VCS menu. See "VCS Menu" for more information.
Enable this checkbox to display commonly used menu commands from the Debug menu. See "Debug Menu" for more information.
Enable this checkbox if you want the IDE to check for balanced parentheses, brackets, and braces as you type. Each time you type a closing parenthesis, bracket, or brace, the editor attempts to locate the matching opening counterpart. When successful, the editor brings the matching counterpart into view, highlights it for a specified length of time (the Balance Flash Delay), and then returns to where you were typing. If the editor fails to find a matching counterpart, a beep sounds. By default, the Balance while typing checkbox is enabled. See "Balance Flash Delay" for more information.
 TIP
TIP
Enable this checkbox to undo and redo multiple actions. Disable the checkbox to undo or redo only the most recent action. See "Redo" and "Undo" for more information.
Enable this checkbox to allow the CodeWarrior IDE to recognize the Kernighan and Ritchie style coding conventions in your source code and properly display function names in the Routine pop-up menu (see "Function Pop-Up Menu"). Disable the checkbox if you use non-standard macros that can interfere with Kernighan and Ritchie conventions. For more information, refer to "Reference Manual," of The C Programming Language, Second Edition (Prentice Hall) by Kernighan and Ritchie.
 NOTE
NOTE
This checkbox configures cursor behavior in the left margin of all editor windows:
Enable this checkbox to alphabetically sort the items listed in the Function pop-up menu. See "Function Pop-Up Menu" for more information.
Enter in this field the number of ticks that the CodeWarrior editor should display and highlight an item. Each tick represents 1/60th of a second (16.67 milliseconds). This option applies to balancing punctuation. For more information, see "Balancing Punctuation" and "Balance while typing."
 WARNING!
Use this pop-up menu to configure the default end-of-line conventions that the CodeWarrior IDE uses to save files. You can choose one of three formats: Macintosh, DOS, or Unix. For more information, see "Document Settings Pop-Up Menu."
The Font & Tabs preference panel, shown in Figure 8.17, provides options for configuring font and tab preferences in editor windows.The preferences in this panel apply to the active editor window. If no editor windows are currently open, the saved preferences become default settings in the CodeWarrior editor.
Font & Tabs Preference Panel: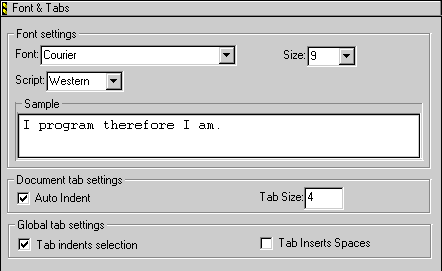
The editor restores your font and tab preferences each time you open the text file. This feature requires writable files. To learn more about writable files, see "Common VCS Operations".
Use this pop-up menu to choose your desired text font.
Use this pop-up menu to choose your desired font size.
This field shows sample text that reflects the current settings in the Font and Size fields.
These options control the use of tabs within the CodeWarrior editor.
Enter in this field the number of spaces that you wish to represent the width of a tab.
These options control the use of tabs throughout the IDE.
Enable this checkbox to insert spaces in the text after you press the Tab key. Use the Tab Size field to specify the number of inserted spaces.
Use this pop-up menu to choose your desired script system (language).
The Text Colors preference panel, shown in Figure 8.18, configures text coloring in IDE windows.
The following options control color settings for IDE windows.
Text Colors Preference Panel: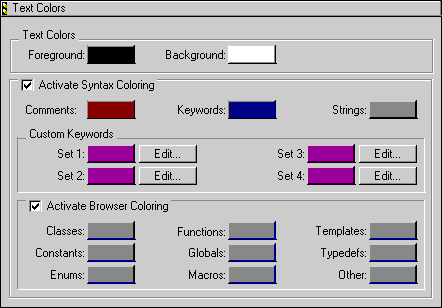
This option configures the color of any text not affected by the options in the Activate Syntax Coloring or Activate Browser Coloring sections. Click the color swatch to change the current color.
Enable this checkbox to configure the color of comments, keywords, strings, and custom sets of keywords in editor windows. Table 8.1 describes each of these elements. Click the color swatch beside the desired element to change the current color.
Syntax Coloring Elements:|
Element
|
Description
|
|---|---|
For more information about custom keywords, see "Defining custom keyword sets" and "Importing and exporting custom keywords". For more information about toggling syntax coloring for individual files, see "Document Settings Pop-Up Menu."
To add a keyword to a custom keyword set, follow these steps:
1. Click the Edit button next to the custom keyword set that you wish to modify.
The four custom keyword sets appear in the Text Colors preference panel (Figure 8.18). After clicking Edit, the Custom Keywords dialog box appears (Figure 8.19).
2. Enter in the topmost field of the Custom Keywords dialog box the keyword that you wish to add.
For example, enter restartApplet in the topmost field, as shown in Figure 8.19.
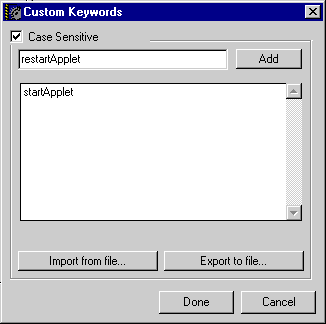
The IDE adds the new custom keyword to the custom keyword list. The custom keyword list in Figure 8.19 already contains startApplet.
NOTE
TIP
To delete a keyword from a custom keyword set, follow these steps:
1. Ensure that the Custom Keywords dialog box is open.
See "Defining custom keyword sets" for more information about opening this dialog box.
2. Select the keyword that you wish to delete.
To import a custom keyword set, follow these steps:
1. Click the Edit button next to the custom keyword set into which you wish to import new keywords.
The four custom keyword sets appear in the Text Colors preference panel (Figure 8.18). After clicking Edit, the Custom Keywords dialog box appears (Figure 8.19).
A standard Open dialog box appears.
3. Use the dialog box to select the custom keyword set that you wish to import.
The IDE imports the selected custom keyword set and adds its keywords to the custom keywords list.
The imported custom keywords become part of the custom keyword set.
To export a custom keyword set, follow these steps:
1. Click the Edit button next to the custom keyword set that you wish to export.
The four custom keyword sets appear in the Text Colors preference panel (Figure 8.18). After clicking Edit, the Custom Keywords dialog box appears (Figure 8.19).
A standard Save dialog box appears.
3. Use the dialog box to save the exported custom keyword set.
The IDE exports the custom keyword set and saves it.
 If the checkbox is enabled, moving the cursor to the left edge of an editor window changes the cursor's icon to a right-pointing arrow. Clicking the left margin with this cursor selects the line next to the cursor. Dragging the right-pointing arrow along the left margin selects more than one line.
 If the checkbox is disabled, the cursor's icon is an I-beam. You cannot use this cursor to select an entire line with a click.