In this chapter we're going to talk about views-LView objects and objects that descend from LView-in detail. Like the preceding chapter on panes, we'll discuss background information on views first, and then go into detail about how to use views in your application.
The principal topics in this chapter are:
After we complete this discussion, you'll create and manipulate real views in this chapter's coding exercise.
Earlier in this manual we discussed views in a general sense as a concept in an application framework. From now on, we use the term "view" to mean an object that descends directly or indirectly from LView.
As you know, a view is a special kind of pane-one that can contain another pane. As a result, the LView class is the fundamental class for managing the visual hierarchy in an application.
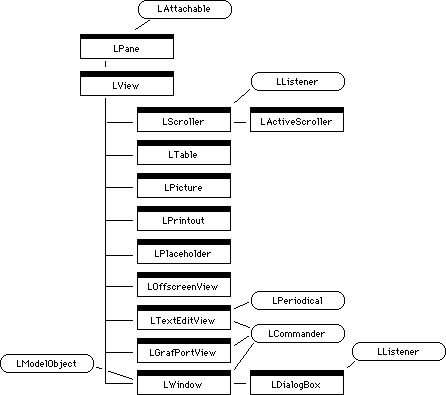
Figure 7.1 illustrates the inheritance hierarchy for LView and its descendants. (Remember, this is the class hierarchy, not the visual hierarchy you create in an application. To keep these ideas distinct, we will always refer to the "visual hierarchy" when talking about how panes relate to each other on screen.)
In a PowerPlant application, you will use several kinds of views, including LView itself. You use a plain vanilla LView object as a way of grouping panes.
Of the subclasses, LWindow is the most significant and complex. We will discuss LWindow in great detail in Chapter 11, "Windows."
 NOTE
NOTE Programmers familiar with other frameworks (such as MacApp) may wonder why there is a distinction between panes and views in PowerPlant. Panes encapsulate the behavior of "something that appears in a window." Views extend that behavior to "and includes other panes." By factoring these behaviors into different classes, LPane is kept as lean as possible. Behavior for managing lists of subpanes is restricted to LView and its descendants.
The LView class encapsulates a generic interface for all view objects. As a result, all views share certain common characteristics.
Remember that all views are also panes. Therefore, everything we said in Chapter 6, "Panes" applies to views as well. They have an ID number, a frame, frame binding, contents, state, and mouse information. All of the data members and member functions discussed in that chapter apply equally to views.
In this section we discuss the additional features of views that make them different from panes. They are:
To see how some of these characteristics are reflected in Constructor, refer to Figure 7.7.
A view may contain an arbitrary number of other views and panes.
To support this characteristic, each view has an mSubPane data member. This is an LArray object that maintains the list
of subpanes.
PowerPlant uses this data member to step through all subpanes
for various purposes such as modifying state, getting an ID number,
and so forth. For example, when you call FindPaneByID(), PowerPlant walks through the subpane list in search of the pane.
You can modify the subpane list dynamically at runtime. We'll talk about the details in "Managing Subpanes and the Visual Hierarchy."
In addition to a frame, a view also has an image. Like the frame, the image is specified by a location and a size. The image defines a rectangular area that holds the contents of the view-a picture for example, other views, other panes, or a combination of these and other objects.
The image may be larger than the frame, in which case only a portion of the image is visible in the frame. A view allows you to scroll the image area around in the frame. We will revisit scroll bars in detail in the section on scrolling, below.
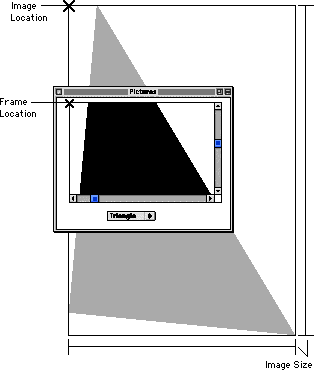
Figure 7.2 shows the relationship between a frame and an image.
In Figure 7.2, we're looking at the image area of a view that is attached to a scroller, which in turn is contained in a window view.
Because the frame and image may not be the same size, views support scrolling so that you can see different parts of the image. In practice, the only views you'll use for scrolling are LScroller and its subclass, LActiveScroller. From now on we will call these "scroller views," or simply "scrollers."
The most important feature of a scroller view is that it has one and only one subpane. That subpane is a view. The subview may contain an arbitrary number of panes and views. The net effect is that the scroller view may contain (through the intermediary subview) any number of panes of any type. We will call the single subview contained inside the scroller the "scrolling view" because it is the view that moves around. Remember, there is a distinction between the scroller view (that manages the scroll bars and coordinate system adjustments) and the scrolling view (that simply appears inside the scroller).
 WARNING!
 Make sure your scroller has only one subpane! To put multiple items in a single scrolling view, use LView as the subpane to the scroller, and put the multiple items in the LView.
Scroller views implement all the functionality of scroll bars with which you have become familiar. They create, maintain, resize, move, hide, show, enable, disable, and manage everything having to do with scroll bars. The only difference between LScroller and LActiveScroller is that the latter supports dynamic scrolling of the view. Dynamic scrolling means that the window contents scroll while the user drags the scroll bar thumb.
Views are responsible for transforming coordinates among four different coordinate systems:
When you derive classes and create code to draw your own panes, you will likely face situations where you must convert coordinates. You should understand what the coordinate systems are so that when you do need to manage coordinates, you'll know what's going on. PowerPlant pane and view classes have a series of coordinate conversion routines you can use to do the work.
We'll discuss the individual routines in "Working With Views."
NOTE Most of the coordinate transformation routines are available to all panes, not just views. However, in the non-view classes the functions simply call the superview's coordinate transformation routines. Therefore, all real work happens in the view objects.
The global coordinate system has its origin (0,0) at the top left corner of the main monitor. This is the monitor with the menu bar. The range of coordinate values is -32,768 to 32,767 (a signed 16-bit integer).
We will call this area "QuickDraw space." At the standard 72 dots-per-inch screen resolution, QuickDraw space is a square about 76' (23 m) on each side.
QuickDraw uses global coordinates to determine the positions of multiple monitors in QuickDraw space, and to position windows. Monitors or windows to the left or above the top left corner of the main monitor would have negative coordinates.
You use this coordinate system when you use a Toolbox routine that requires global coordinates.
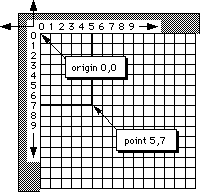
In the port coordinate system, the origin (0,0) is the top left corner of the content space of a GrafPort (usually a window). This system is also called the window coordinate system.
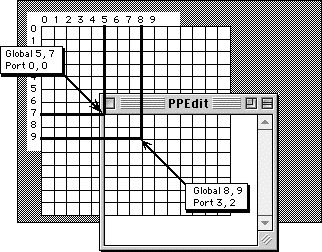
Except for the fact that it has a different origin, the port coordinate system is identical to the global coordinate system, as shown in Figure 7.4.
Note that there is a separate port coordinate system for each open GrafPort. Each port has its own top left corner, and that's the (0,0) point for its internal coordinate system. That same point also has a global value, which can be any location in QuickDraw space.
In traditional Macintosh programming, most of your work is done in port coordinates. In PowerPlant, you use this coordinate system to specify the location of panes within a window. Therefore, the location data for the frame of each pane is in port coordinates, and represents the distance from the top left corner of the port.
PowerPlant uses this coordinate system internally to maintain the spatial relationships among panes and views.
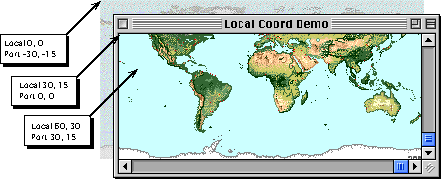
In PowerPlant, the origin of local coordinates is the top left corner of the image in a view. Local coordinates are 16-bit values in QuickDraw space. Figure 7.5 displays this relationship. There is a scrolling view in part of the window. Parts of the view's image extend beyond the view frame and would normally be invisible. We have dithered the image for illustrative purposes. The view frame is the viewable area of the window.
The top left corner of the view frame is at location (-30,-15)
in port coordinates as shown in Figure 7.5. The image in a view may be scrolled, so the top left corner
of the image is not necessarily the same as the top left corner
of the view frame. Local coordinates measure from the top left
corner of the image, not the view frame. In Figure 7.5, the location of the frame is (30,15) in local coordinates.
Each view has its own local coordinate system. This means that you can draw in a view without worrying about the view's location in a window or in another view. PowerPlant takes care of most of the necessary coordinate transformations automatically.
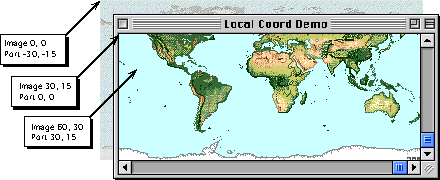
The image coordinate system is PowerPlant-specific. The image coordinate system uses 32-bit values in which the top left corner of the image is (0,0), just like local coordinates.
You may have noticed that the illustration for image coordinates is virtually identical to that for local coordinates. At values less than 16K, local coordinates and image coordinates are identical. Most applications do not use a drawing space larger than 16K pixels.
If you do need a large drawing space, the image coordinate system provides the support you need to scroll an image larger than that allowed in standard QuickDraw space.
PowerPlant uses positive numbers for image coordinates. The drawing area ranges from 0 to 2,147,483,647 to the right and down from the origin. At a resolution of 72 dpi, this is a square more than 470 miles (757km) on a side.
WARNING! If a view's image size is larger than 16K pixels, you must convert image coordinates to local coordinates before drawing. We'll discuss this problem in detail in "Managing Coordinate Transformations."
In this section we discuss how to use PowerPlant for view-related tasks. We'll talk about:
You can create a view using Constructor, or on the fly in your code. We talk about each method. Then we discuss what you do when you derive your own class from LView or its descendants.
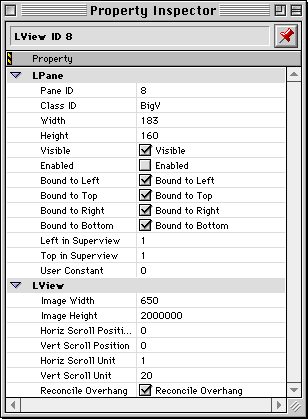
Creating a view object in Constructor is simple. While in Constructor, you drag a view object from the tool palette into a containing view. Then you set the characteristics for that object. Figure 7.7 shows the Property Inspector window for a simple view.
Creating a view in Constructor: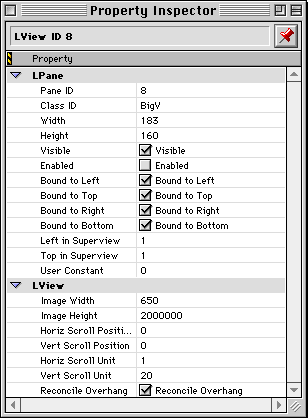
Note that a view has all the same information as a pane, including location, size, pane ID, class ID, binding, and state information. Remember, when you derive your own classes you must change the class ID to your own unique value and register the class with PowerPlant before creating any objects of that class.
Each view has its own location in its superview, specified by the top left coordinates. The coordinates for any pane you place inside the view are relative to the view's top left corner. If you change the pane's superview, you may need to change the pane's location as well. If you don't, you may encounter some seemingly odd behavior. Here's an example.
Assume you design a window, and place a pane at coordinate 200, 300. You subsequently decide to create a new view inside the window to contain the pane, and locate that view at 190, 290. If you simply move the original pane to its new view, it appears at coordinate 200,300 in the view, or 390, 590 in the window. If you want the pane to appear at position 10,10 in the new view (200,300 in the window), you must change the pane's location to 10,10.
The scroll unit is the number of pixels to scroll when the user clicks in the scroll arrow. The scroll position is the starting point of the scroll when the view is created, typically zero.
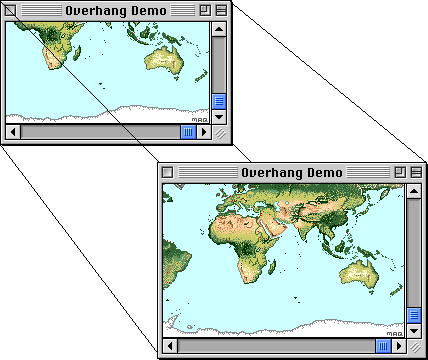
The Reconcile Overhang check box (see Figure 7.7 above) controls how the view's contents scroll when the superview is resized beyond the bottom right corner of the contents. If Reconcile Overhang is on (Figure 7.8), the contents reposition so that the bottom right corner of the contents remain at the bottom right corner of the window.
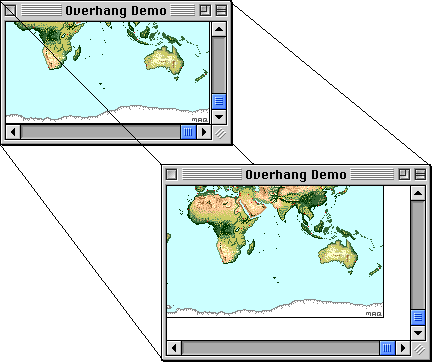
If Reconcile Overhang is off, then the contents do not reposition, as shown in Figure 7.9.
Other view classes have additional characteristics. We'll examine some of them in "Some Specific Views." Remember, the general process for creating any view object with Constructor is: drag the item into the view, set its position in the view hierarchy, then set its characteristics.
NOTE When you create a new PPob resource in Constructor, you automatically get a new view. You choose from LWindow, LDialogBox, LPrintout, LGrafPortView, or LView. This is the top view of the visual hierarchy, and it has no superview. You must set the characteristics for this view as well.
"Register PowerPlant Classes."
The typical approach used when creating a view object on the fly
is to define both an SPaneInfo structure and an SViewInfo structure. The SViewInfo structure in Listing 7.1 specifies the values required to build a generic view. You then
call the appropriate constructor. Depending upon the particular
view you are creating, you may need to pass additional parameters.
NOTE The LWindow and LDialogBox classes use a different structure,
SWindowInfo. See "Creating a window on the fly" for more information.
typedef struct SViewInfo {
  SDimension32  imageSize;
  SPoint32      scrollPos;
  SPoint32      scrollUnit;
  SInt16         reconcileOverhang;
} SViewInfo;
Note how the fields in this struct parallel the characteristics you provide in Constructor, as shown in Figure 7.7.
Each view class has specific constructors of course, one of which
(except for windows) receives pointers to the SPaneInfo and SViewInfo structures. Most have additional parameters you must provide.
Use the PowerPlant Reference HTML documentation to learn details
on the various constructors and the parameters you must provide
to successfully create an object on the fly.
 TIP
TIP For code demonstrating window and pane creation on the fly, see
the Panes Demo code in the CodeWarrior Examples:Mac OS Examples:PowerPlant Examples:Updated
Examples folder.
After you have created a view and installed all its panes, you
should call FinishCreate(). This function ensures that each pane's state (visible/invisible,
active/inactive, enabled/disabled) matches its superview.
You are also responsible for maintaining the visual hierarchy.
If the new view will have a superview, call SetDefaultView() for the container view before creating the new view with a stream constructor. This ensures
that when you create the new view it has the correct superview.
Alternatively, you can call PutInside() as described in "Managing Subpanes and the Visual Hierarchy" below.
Similarly, if the new view is also a commander (LWindow, LDialogBox, LTextEditView, LGrafPortView, or your own derived class), you must maintain the command hierarchy as well. Call SetDefaultCommander() before creating the view.
"Creating a pane on the fly" for more on the SPaneInfo structure, "Managing Subpanes and the Visual Hierarchy," and "Command Chain" for more on the command hierarchy.
When you derive a class from LView or one of its descendants,
you typically define a destructor and several constructors: a
default constructor, a constructor to build the view from SPaneInfo and SViewInfo structures, a constructor to build the view from a stream, and
a copy constructor. For more on stream constructors, see "Stream constructor."
NOTE The LWindow and LDialogBox classes use a different structure, SWindowInfo. See "Creating a window on the fly" for more information.
When you derive your own class, you may of course override whatever functions are necessary for your needs. We'll discuss the specific details of deriving window classes in "Deriving your own windows."
"Creating a view on the fly" for more on the SViewInfo structure.
The typical view is a container for panes, and the panes draw
themselves. Therefore, drawing a view requires nothing more than
calling the view's Draw() function.
In most cases, the default behavior provided in PowerPlant will
suffice for your needs. Draw() performs housekeeping details, calls the view's DrawSelf() function, walks through the list of subpanes, and sends each
subpane a Draw() message.
Views, being panes, have a DrawSelf() function that you can override if necessary to do view-specific
drawing. For example, an LWindow object may erase itself before
drawing all its subpanes. Note that the DrawSelf() function is called before subpanes draw, because the view is
visually behind its contained subpanes.
TIP Remember that if you do any drawing in a view that does not go
through the Draw() function, you must call FocusDraw() yourself to ensure that the port is set up correctly.
All pane classes have member functions for adding themselves to
a superview (going up the tree). Use PutInside() to make any pane
or view a subpane to a superview. To remove a pane or view from
a superview, call PutInside() and pass nil as the new superview. PutInside() is the only function you need for complete visual hierarchy maintenance.
You do not need to work from the view level going down. If you have a group of panes and you want to add them to a view, you do not tell the view to add the panes. You tell each pane to add itself to the view. The view is a container, the panes do the work.
There is no member function to identify the topmost container
in a visual hierarchy, typically a window. The code in Listing 7.2 shows you one way to do this. It assumes you have a pointer to
an LPane object in a variable, inPane. When this code completes, the local variable theTopView holds the topmost view in the visual hierarchy.
LView* theTopView = inPane->GetSuperView();
if (theTopView != nil)
{    // follow chain of superviews to top
    while (theTopView->GetSuperView() != nil)
    theTopView = theTopView->GetSuperView();
}
else // thePane is the top
{
  theTopView = dynamic_cast<LView*> (inPane);
}
View classes have several functions for dealing with their subpanes, as listed in Table 7.1.
| Function |
Purpose |
|---|---|
The last four functions in Table 7.1 are accessors for the same value and descriptor information we discussed in "Value and descriptor." These functions simply find the pane by ID number and call the appropriate accessor.
Like the frame in a pane, you can adjust the image in a view. Table 7.2 lists the available functions and their purpose.
Image and frame management function:
| Function |
Purpose |
|---|---|
Note that if the image is connected to a scroller, resetting the
image size means you should update the minimum and/or maximum
values of the scroll bars by calling the scroller's AdjustScrollBars() member function.
All view classes have certain functions required for scroll management. Under normal circumstances, you should never have to deal with these functions with the possible exception of three accessors.
| Function |
Purpose |
|---|---|
For all practical purposes, scrolling is limited to two classes: LScroller and LActiveScroller. These classes have the real functional tools you use when scrolling. There are four data members of general interest, listed in Table 7.4.
| Date Type |
Name |
Purpose |
|---|---|---|
When you create a scroller view in Constructor, you provide scroll-specific information, as shown in Figure 7.10.
Scroller-specific information in Constructor: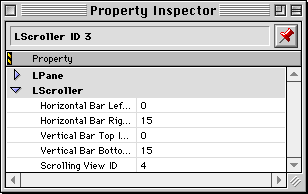
The Scrolling View ID corresponds to the mScrollingView data member. The "indent" values are the distance from the edge
of the view to the end of the scroll bar. An indent of 15 pixels
at the bottom right of the view allows room for a grow box and
keeps the two scroll bars from overlapping. If you don't want
a scroll bar in one direction, set the left or top indent to -1.
Unless you are doing something unusual you shouldn't have to override any of the default behavior. Table 7.5 lists some of the common functions in the LScroller class.
Some scroll-related functions:
| Function |
Purpose |
|---|---|
No matter how helpful an application framework is, from time to time you may find yourself working at the pixel level. At that time, coordinate manipulation may become important to you. PowerPlant has routines for converting from one coordinate system to another, as listed in Table 7.6.
Coordinate conversion functions:
| From |
To Global |
To Port |
To Local |
To Image |
|---|---|---|---|---|
| Global |
||||
| Port |
||||
| Local |
||||
| Image |
Don't forget CalcPortFrameRect() and CalcLocalFrameRect(). These functions return any pane's frame (views are panes after
all) in the desired coordinate system.
Two additional functions you may find useful when working with
image coordinates are ImageRectIntersectsFrame(), and ImagePointIsInFrame.These functions determine whether a Rect or Point in image coordinates
appears in the view's frame.
If the image size of a view is greater than 16K pixels, you must keep in mind the difference between image coordinates and local coordinates. As long as the image size is less than 16K, the image and local coordinates are identical for a given view. If your view's image is larger than 16K pixels, you must convert from image to local coordinates so that QuickDraw can handle the drawing.
For example, suppose that you want to draw a 10 by 10 square at the bottom right corner of the image. This is how you would do it if you know that the image fits entirely in QuickDraw space.
void MyView::DrawSelf()
{
  Rect    square;
  square.top    = mImageSize.height - 10;
  square.left   = mImageSize.width - 10;
  square.bottom = mImageSize.height;
  square.right  = mImageSize.width;

  ::FrameRect(&square);
}
To handle an image larger than 16K pixels, the member function might look like this.
void MyView::DrawSelf()
{
  SDimension32   imageSize;
  SPoint32       imPos;
  Point          localPos;
  Rect           square = {0, 0, 10, 10};
  GetImageSize(imageSize);
  imPos.v = imageSize.height - 10;
  imPos.h = imageSize.width - 10;

  // if this is visible in frame
  if (ImageRectIntersectsFrame(imPos.h, imPos.v,
                               imPos.h + 10, imPos.v + 10)) {
    // convert to local coordinates
    ImageToLocalPoint(imPos, localPos);
    ::OffsetRect (&square, localPos.h, localPos.v);
    ::FrameRect(&square);
  }
}
Like the LPane class, LView has several direct and indirect descendants. In this section we list some of the features of each that make them unique. We will discuss the following classes:
There are other classes that derive from LView, discussed elsewhere in this manual. See also:
Chapter 11, "Windows" for a discussion of LWindow. Chapter 12, "Dialogs" for a discussion of LDialogBox. Chapter 14, "Printing" for a discussion of LPrintout and LPlaceholder. "Managing Scrolling" for information on LScroller and LActiveScroller.
An LGrafPortView object is a top-level PowerPlant view (it's superview should be nil) that can be hosted inside a non-PowerPlant window. This allows you to use PowerPlant panes in other application frameworks or in externals such as HyperCard XMCDs.
An LGrafPortView object acts as the interface between PowerPlant Panes and "foreign" code that knows nothing about PowerPlant. You are responsible for calling proper LGrafPortView functions at certain times.
The PowerPlant Reference for more on the LGrafPortView class.
An LOffscreenView is a view whose image draws off screen in a temporary GWorld and is then copied to the screen. Using an LOffscreenView can result in smoother screen updating.
This is a fairly simple extension of the standard LView class.
When you draw, the LOffscreenView object creates a stack-based
StOffscreenGWorld object. The view then draws its contents into
the offscreen world. When the drawing operation ends, the StOffscreenGWorld
goes out of scope. Its destructor uses CopyBits() to blit the image to the screen before destroying itself.
The typical use for LOffscreenView is as a superview for several subpanes, where you want all the panes to appear to draw simultaneously. When you draw the subpanes, they all draw in the offscreen view. When all panes are finished drawing, the complete image is blitted to the screen. Even though this is in fact no faster (and actually a trifle slower) than drawing the individual panes directly on screen, the net effect appears faster to the user because all the panes appear simultaneously. This technique is also useful if the panes overlap and might cause flicker while drawing.
LTextEditView is a wrapper class for the TextEdit functionality of the Macintosh Toolbox. LTextEditView provides significant, text-related functionality using a multiple styles.
LTextEditView also inherits from LCommander so that it can respond to keystrokes, and LPeriodical to maintain cursor flashing.
Figure 7.11 illustrates additional information you provide in Constructor for an LTextEditView object.
LTextEditView-specific data in Constructor: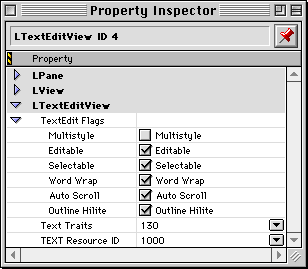
You can specify a TEXT resource to use as the initial text. Like all text-related PowerPlant objects, you can set the font, style, size, color, and justification of the contents of the LTextEditView object using a text traits resource.
The LTable class displays and manages tabular data-rows and columns of rectangular cells in a two-dimensional grid. This is a fairly simple class that provides significant functionality.
TIP The PowerPlant Advanced Topics manual has a chapter devoted to the display of tabular data with LTableView. If you work with tabular data, you'll find that chapter very useful.
Figure 7.12 illustrates the kind of characteristics you can specify in the LTable class. Like other classes, you can create an LTable easily in Constructor, or on the fly using constructor functions.
LTable-specific data in Constructor: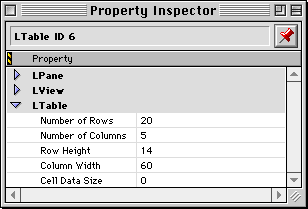
Most of these characteristics are self-evident. The Cell Data Size characteristic controls how much memory is allotted for holding the tabular data, in bytes. If your data has a maximum size, you specify the size required to hold the data for a cell. PowerPlant creates an object of LArray with the number of elements equal to the number of cells in your table. You must initialize the array contents yourself.
If your data is not a known size, you can specify zero as the cell data size. You are then completely responsible for attaching data to individual cells in whatever way is appropriate for your application.
Table 7.7 lists common LTable functions.
| Function |
Purpose |
|---|---|
The default functions of the LTable class simply draw the cell's
row and column number in the cell. Clicking in a cell causes it
to be highlighted. However, by deriving your own class from LTable
and overriding the DrawCell() and ClickCell() functions you can modify the LTable class to support the display
of any kind of data and respond to clicks in whatever way is appropriate.
This makes LTable much more flexible than the Toolbox List Manager, or PowerPlant's LListBox class that uses the List Manager. At the time of this writing the LTable class does not support multiple-cell selections. You would have to add this functionality in a derived class if it is important to your application. You can also explore the LTableView class.
The LPicture class displays a PICT resource. This is a simple
extension of the LView class. The only additional feature is that
the LPicture class keeps the resource ID of a PICT resource. It
provides accessors to get and set the number. The LPicture class
overrides DrawSelf() to display the picture.
This class derives from LView rather than directly from LPane because a picture's dimensions may be larger than the available frame. Therefore, the LPicture class requires the image feature of the LView class. The image bounds of an LPicture object typically match the bounds of the attached picture.
You've reached another major milestone in your understanding of the fundamental PowerPlant building blocks. You have learned all about views.
Views are the fundamental PowerPlant object for maintaining the visual hierarchy. There are many kinds of views, including LView, LWindow, LScroller, LTextEditView, LTable, LPicture, and so forth.
Views have a variety of characteristics. In addition to everything a pane has, views have a subpane list, and an image. Views also manage scrolling and coordinate systems.
You typically create a view with Constructor. You can build views
on the fly in code. For views other than LWindow, you use both
the SPaneInfo and SViewInfo structures as a basis, and pass any other necessary information
to the appropriate constructor function. You can get, set, or
otherwise manipulate every characteristic of a view at runtime
should you so desire.
Like panes, this is a tremendous amount of information to absorb at one time. However, you now have a really solid understanding of LView and some of its descendants. That will make understanding windows and dialogs that much easier when we discuss them later.
Let's put all this view-related knowledge to work and see how to create and use views in code.
In this exercise you build an application titled, appropriately enough, "Views." This exercise is structured very much like the exercise in Chapter 6 on panes. A PPob with most of the necessary objects has been provided for you. You will create a custom view that manages and draws in an image 650 pixels wide by 2,000,000 pixels long-about 2,300 feet (700m)!
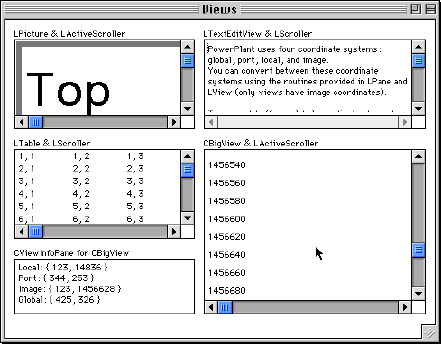
The final application looks like Figure 7.13. Take a look at the picture.
There are eight views in this window. There are four scrollers: two LActiveScroller objects, and two LScroller objects. Each scroller contains one view: an LPicture, an LTextEditView, an LTable, and a custom view, CBigView. You will write the code for CBigView.
There are six panes. Five of them are simple captions that we won't discuss any further. The pane in the lower left corner of the window is a custom CViewInfoPane. It reports cursor coordinates when the cursor is in the CBigView.
Examine the PPob resource with Constructor as you read the description of the views and panes.
The LActiveScroller for the picture is bound to the top left of the window. Its scrolling view has an ID of 2. The LPicture view has an ID of 2. It is bound on all sides to its superview (the LActiveScroller). It is visible, but not enabled, so it will not receive clicks. The LPicture uses a PICT resource with ID 1000. This PICT has been provided for you in the application resources. The scroll unit for the LPicture is 5 pixels horizontally and vertically. A click in a scroll arrow scrolls the picture by 5 pixels in the correct direction.
The LScroller in the top right corner of the window is bound to the top, left, and right of the window. Its scrolling view has an ID of 4. The LTextEditView object has an ID of 4. It is bound on all sides to its superview, the LScroller. It is visible and enabled, so it will receive commands, keystrokes, or clicks (LTextEditView is a commander and a pane, so it receives all three). The initial text is in a TEXT resource with ID 1000, provided for you in the application resources. It uses the text traits resource with ID 130.
The LScroller in the center left of the window is bound to the top left of the window. Its scrolling view has an ID of 6. The LTable view has an ID of 6. It is bound on all sides to its superview, the LScroller. It is visible and enabled, so it will receive clicks. It has 5 columns and 20 rows. Notice that the scroll unit matches the size of a cell. One click in a scroll arrow will scroll the table one cell left, right, up, or down.
All of these are standard PowerPlant views.
The interface also includes a custom pane, CViewInfoPane. You built a custom pane in the previous exercise. We give you the pane in this exercise. It is bound to the top, left, and bottom of the window. Note the class ID is InfP. This pane is visible, but not enabled so it does not respond to clicks.
There are two views missing from the PPob, an LActiveScroller and the CBigView.
If you have not already opened the PPob project file, double-click the Views.ppob file in the IDE project window. Constructor launches and the Constructor project window appears. Double click the LWindow view to see its contents. Also, make sure the Catalog window is open.
Drag an LActiveScroller object from the Catalog window and drop it on the Views window. Double-click the object to open the property inspector window so you can set its characteristics as shown in Figure 7.14.
Setting LActiveScroller properties: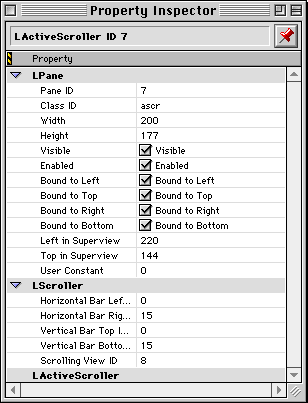
Set the location and size. The view is bound to all four sides of the window. It is enabled and visible. The Pane ID is 7, the Scrolling View ID is 8.
Close the LActiveScroller property inspector window.
CBigView is based on a plain LView object. Drag an LView object from the Catalog window and drop it inside the LActiveScroller you just created in the Views window. Double-click the CBigView object to open the property inspector window so you can set its characteristics as shown in Figure 7.15.
Set the location and size. The view is bound on all four sides to its superview. The view is visible but not enabled. The Pane ID is 8. The Class ID is BigV. Set the image size and scroll unit. The vertical scroll unit is 20 pixels. This is an important value to guarantee that the solution code works correctly, so don't change it. Turn Reconcile Overhang on.
3. Examine the view hierarchy.
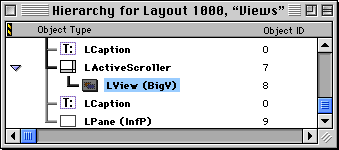
If you dropped the CBigView inside the LActiveScroller, you should be all set. However, the hierarchy is critical so let's make sure. Open the Constructor hierarchy window. Make sure the new LView pane (representing the CBigView object) is hierarchically under the LActiveScroller. If it is not, reposition it so that it is. The end result should look like Figure 7.16.
Save your changes, close all the Constructor windows, and return to the CodeWarrior IDE. It's time to write some code.
All the views except for CBigView are standard PowerPlant objects. You don't have to write any code to make them work properly. The application-level code that creates the window has been provided for you. You'll work with applications in Chapter 9, and windows in Chapter 11.
In the remaining steps you write the code to implement the custom view.
Most of the header has been provided for you. PowerPlant relies on each pane class (and a view is a kind of pane) having a unique class ID. In Step 2 you specified "BigV" as the class ID for the CBigView class.
Each view class has a class_ID enumerated constant. Declare that constant to have the value
BigV.
class CBigView : public LView {
public:
  enum { class_ID = 'BigV' };
Examine the header briefly. The only function CBigView overrides
is DrawSelf(). You write this function in the next few steps. All the code
for the class creator function, the constructors and destructor
has been provided for you. You wrote similar functions in the
Panes exercise.
Save your changes and close the header file.
The CBigView::DrawSelf() function is fairly complex. You write this function in the next
three steps. Follow the code carefully. What you're going to do
in the next three steps is:
The significant work you do with respect to PowerPlant is coordinate conversion. You must change back and forth from local to image coordinates and back again to get things to draw properly.
5. Get the coordinates for the exposed image.
The existing code at the start of this routine preserves the text state of the port, then sets it to Geneva 9 point.
TIP The StTextState class preserves and restores existing text settings. You can read about this class in "UDrawingState."
After that you have three tasks to accomplish:
a. Get the view frame in local coordinates.
Define a Rect variable and call CalcLocalFrameRect().
b. Convert the frame to image coordinates.
Define two SPoint32 variables. Use these in calls to LocalToImagePoint(). Convert the top left of the frame and the bottom right of the
frame from local to image coordinates.
Define an SDimension32 variable. Use the GetImageSize() accessor.
The necessary code for all these tasks is listed here.
  TextSize( 9 );
  // Calculate the frame rect in local coord.
  Rect theFrame;
  CalcLocalFrameRect( theFrame );

  // Convert the frame to image coordinates.
  SPoint32 theTopPos;
  SPoint32 theBotPos;
  LocalToImagePoint( topLeft(theFrame), theTopPos );
  LocalToImagePoint( botRight(theFrame), theBotPos );

  // Get the image size.
  SDimension32 theImageSize;
  GetImageSize( theImageSize );
Existing code then manipulates the value of the bottom image coordinate to allow for the height of the text you're going to draw, and to make sure it stays within the image. This code is given to you because it has nothing to do with PowerPlant.
Save your work before proceeding.
6. Draw the vertical image coordinate string.
In this step you write a loop. For every 20th pixel, you convert the vertical image coordinate into a string, and draw the string in the view. You plot a point in the view image, then convert it to local coordinates before drawing at that point.
a. Indent the horizontal drawing position.
Define an SPoint32 variable. We'll call it theImagePos for reference. This point will hold the image coordinate at which
you wish to draw.
Set the horizontal component of theImagePos to 4. You want the text to draw just a little in from the left
edge of the view, for aesthetics.
b. From the top of the visible image, step every 20 pixels to the bottom of the visible image.
In Step 5 you created local variables to hold the top left coordinate
of the visible part of the image, and the bottom right coordinate.
Use the top and bottom values as the beginning and ending points
of a for loop.
Set theImagePos.v to the top value. Then step by 20 pixels. Loop as long as theImagePos.v is less than the bottom plus 12 pixels. Add 12 pixels to the
test to ensure that any partial lines of text appear along the
bottom of the view.
c. Convert the image coordinate to local coordinates.
The variable named theImagePos now has both the horizontal and vertical component set properly,
in image coordinates. Define a Point variable and call ImageToLocalPoint() to convert theImagePos to local coordinates.
d. Create a string of the vertical image coordinate.
Define a local Str15 variable. Call the Toolbox routine NumToString(). Use theImagePos.v as the number.
Call the Toolbox routine MoveTo() to move to the local coordinate. Call the Toolbox routine DrawString() to draw the string.
The solution code is listed here for reference. Existing code (in italic) is provided so you can locate where to place this code.
if ( theBotPos.v > theImageSize.height ) {
  theBotPos.v = theImageSize.height;
}
// Set the horizontal image coordinate
SPoint32 theImagePos;
theImagePos.h = 4;

// Step every 20 pixels.
for ( theImagePos.v = theTopPos.v;
      theImagePos.v < theBotPos.v+12;
      theImagePos.v += 20 ) {

  // Convert image into local coordinates.
  Point theLocalPos;
  ImageToLocalPoint( theImagePos, theLocalPos );

  // Create the string.
  Str15 theString;
  ::NumToString( theImagePos.v, theString );

  // Draw the vertical coordinate string.
  ::MoveTo( theLocalPos.h, theLocalPos.v );
  ::DrawString( theString );
}
Existing code then prepares for the next step, in which you draw a box in the image. Save your work.
In this step you draw directly into a view with a 32-bit image. The steps you take are similar to those in the previous step.
Existing code sets up a box that is 30 pixels square. To draw this box in the view you must:
a. Define an image coordinate at which to draw.
You can use theImagePos variable again from Step 6. In Step 5 you got the size of the
image. Set theImagePos.h to 100. Set theImagePos.v to one-half the image height.
b. Determine if any part of the box is visible.
Call ImageRectIntersectsFrame(). This call takes four 32-bit values representing the left, top,
right, and bottom coordinates. Pass the correct values based on
theImagePos. If the call returns true, part of the box is visible and it
should be drawn.
c. Convert the coordinate to local coordinates.
Define a Point variable and call ImageToLocalPoint() to convert theImagePos to local coordinates.
The box is at (0,0). It should appear at the local position you
calculated in substep c above. Call OffsetRect() to reposition the rectangle. Then call FillRect(). The solution code uses UQDGlobals::GetQDGlobals() to access the gray pattern.
The solution code is listed here for reference. Existing code (in italic) is provided so you can locate where to place this code.
const SInt16 kBoxSize = 30;
Rect theBox = {0,0,kBoxSize,kBoxSize};
// Where the top left of the box will be.
theImagePos.h = 100;
theImagePos.v = theImageSize.height / 2;

// Draw the box if some of it is in the frame.
if ( ImageRectIntersectsFrame( theImagePos.h, theImagePos.v,
        theImagePos.h + kBoxSize, theImagePos.v + kBoxSize ) ) {

  // Convert the image point to a local point.
  Point theLocalPos;
  ImageToLocalPoint( theImagePos, theLocalPos );

  // Now we can use QuickDraw to draw it.
  ::OffsetRect( &theBox, theLocalPos.h, theLocalPos.v );
  ::FillRect( &theBox, &UQDGlobals::GetQDGlobals()->gray );
}
Save your work and close the file.
You must register any custom PPob class. The application constructor already registers one custom class, the CViewInfoPane. We give you that class because it isn't directly related to views, and it does a few things you haven't learned about yet (like installing itself as a periodical task).
However, you must register the CBigView class you created. Enter
the new code after the existing call to RegisterClass_(). The required header files are added for you.
//Register custom classes
RegisterClass_(CViewInfoPane);
RegisterClass_(CDemoTable);
RegisterClass_(CBigView);
9. Build and run the application.
Make the project and run it. When you do, a window should appear containing all the views. See Figure 7.13. Play with the window and watch what happens.
Scroll each of the views, and watch what happens. Drag the thumb in the LScroller and the LActiveScroller views, and observe the difference in behavior. Notice how easy it is to implement scrolling. None of the code you wrote had anything to do with scrolling in either type of scroller. It is a gift from PowerPlant.
Observe the LTable view. The numbers you see are the default behavior of the LTable class. In a real application you would replace that behavior to draw your own data of whatever type. The default LTable is not a commander, so it does not receive keystrokes. Typing an arrow key does not modify the selection. LTable also does not support multiple selection. New table classes are planned for PowerPlant that will implement some of these features.
The LTextEditView field is fully functional. LTextEditView supports all of the more advanced features you like to see in a text field, such as automatic scrolling.
Best of all, take a good look at CBigView. After all, you wrote the code for this one. Scroll the view. Observe the vertical coordinate lines as you do. Keep on going, with two million pixels you can go a long way. Use the thumb and drag to somewhere near the middle. The grey box is at the halfway point. When you created the view in Constructor, you set the image to be two million pixels high. Scroll until you reach the million-pixel coordinate to find the grey box. Not bad!
To observe the effect of "Reconcile Overhang," scroll the big view all the way down and to the right. Now resize the window larger. Observe what happens to the view in CBigView. The two-million pixel mark remains at the bottom of the scrolling view.
As you move the cursor in CBigView, observe the contents of CViewInfoPane. As long as the cursor is within CBigView, it displays the coordinate of the cursor in all four coordinate systems: global, port, local, and image. Observe the global and port coordinates. Move the window and look again, to see how they vary relative to each other. With CBigView scrolled fully up and to the left, observe that local and image coordinates are the same. Scroll down until they no longer match. When does that happen? Locate the grey box you drew, and put the cursor at the very top left corner of the box. What are the image coordinates?
When you are through observing, quit the application.
If you'd like to explore further, feel free to do so. Create new and different views. Change the values of the existing views in Constructor. Draw new items in the CBigView at various locations and practice coordinate conversions. Create your own views, with scrolling views inside. Experiment with LActiveScroller views and plain LScroller views.
You may want to explore CViewInfoPane as it uses a periodical
to work its magic. We'll discuss periodicals in "Periodicals." If you examine the DrawSelf() function for this pane, all it does is frame the pane. Where
does all that data come from? The SpendTime() function draws it every time there is an idle event. It uses
a utility class that is not officially part of PowerPlant, UDrawTypes.
If you go exploring in here, check out ShowViewPoints() for some classic PowerPlant coordinate conversion. You should
have a good time.
Congratulations! You have implemented several different kinds of standard PowerPlant views, as well as a completely new custom view with an image two million pixels high. You're making great progress.
There's only one more fundamental visual building block in PowerPlant, the control. And that's what we talk about next.