This chapter and the next two chapters-on views and controls-form the Basic Building Blocks section of the book. These chapters deal with the visual objects you use in PowerPlant. Because an application framework is often used as a tool for creating a visual interface, panes, views, and controls are fundamental to PowerPlant.
This chapter discusses panes in general, and certain specific pane classes. Views and controls are also panes, but they have additional features that make them worthy of a separate discussion. Talking about views and controls in separate chapters also breaks the visual hierarchy in PowerPlant into more digestible bites.
The principle topics in this chapter are:
After we complete this discussion, you'll create and manipulate real panes in this chapter's coding exercise.
In its most general sense, a pane represents a rectangular drawing area. In a more precise sense, a pane is usually a visible object such as a button or text box that appears in a view.
The fundamental pane class in PowerPlant is LPane. LPane describes a rectangular object that can display graphics. Some panes also respond to mouse clicks. You will rarely, if ever, create an actual LPane object. The LPane class serves to encapsulate a common interface for all the pane subclasses. Although LPane is not an abstract class, several important functions in the LPane class do nothing. They are overridden in LPane's descendants.
Now that you know what a pane is, let's talk about the different kinds of panes available in PowerPlant.
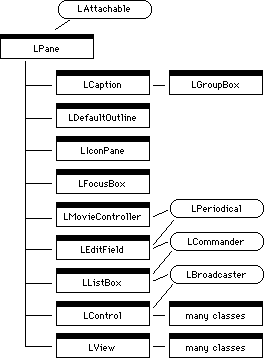
Figure 6.1 shows the class hierarchy for the pane classes.
Notice that the LView class inherits from LPane. Chapter 7, "Views" discusses views in detail. The LControl class has several subclasses. Chapter 8, "Controls and Messaging" covers controls. We'll talk about the other individual pane classes in "Some Specific Panes."
 TIP
TIP For detailed information on any PowerPlant class, including a list of its ancestors, member functions, and data members, you can and should refer to the PowerPlant Reference.
In a PowerPlant application, you typically work with subclasses of LPane. LPane encapsulates a common interface for pane objects. As a result, all panes share certain common characteristics.
In this section we talk about the various features of panes. We talk about how PowerPlant allows you to modify and manipulate those features in the next section, "Working With Panes."
We're going to be careful here to not cause confusion with the terms "pane" and "view." The LView class inherits from LPane, and it has many subclasses. We discuss views extensively in the next chapter.
The principal distinction between a pane and a view is that a view can contain other panes. Therefore, we can divide pane classes into two groups: those that inherit from LView, and those that do not. Those panes that do not inherit from LView we will call "simple panes" because they cannot contain any other pane. If you look at the hierarchy diagram in Figure 6.1, the simple panes are all the classes in the diagram except LView and its descendants.
Although each of the view classes is a "pane" in the general sense, some of the characteristics we're about to discuss apply to simple panes-panes that are not also views.
Panes that are not views comprise most of the real visual objects you draw on screen, including static text, editable text fields, buttons, check boxes, popup menus, icons, and so forth.
A simple pane is a leaf in the visual hierarchy. Every simple pane resides in a view of one sort or another. This view is called the pane's superview.
 NOTE
NOTE Most views also reside in some other view. However, some views are at the top of the view hierarchy and have no superview (LWindow for example).
Simple panes use the coordinate system of their superview. The view is responsible for maintaining coordinates, as you'll see when we discuss views.
Finally, a simple pane cannot scroll its own contents. Views are responsible for scrolling. You can scroll panes inside a view, but you cannot scroll the contents of an individual simple pane.
Everything discussed in this section applies to all panes, including LView and its descendants. Chapter 7, "Views" covers several additional features specific to views.
All panes have the following features:
To see how many of these characteristics are reflected in Constructor, see Figure 6.5.
Each pane has an all-important ID number. Typically you assign the pane ID in Constructor when
you define the pane's characteristics. The pane ID is a number
of type PaneIDT, a 32-bit number. You may also specify the pane ID as a "text"
ID-a sequence of four characters analogous to a resource type
or file creator.
The LPane class has functions for managing the ID number, and
finding a pane by ID. You will use FindPaneByID() regularly. Clearly each pane must have a unique ID or you're
going to run into problems where the FindPaneByID() function returns a pointer to the wrong pane.
TIP Actually, the limitation is that all panes in a single window
for which you call FindPaneByID() must have unique ID numbers. You might have several panes with
the same ID if you never look for them by ID number.
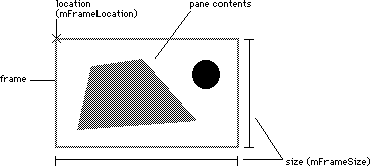
The frame is the rectangular area that the pane occupies. Like most rectangular areas in PowerPlant, the frame is specified by two structures: the location and the size. The location specifies the position of the top left corner of the rectangle in the superview's local coordinates. The size specifies the height and the width of the bounding rectangle.
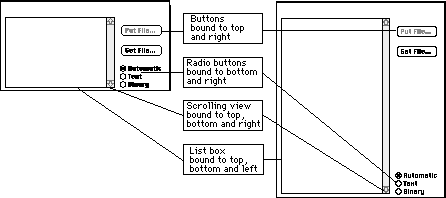
Each side of the frame has a binding option that specifies what happens to that edge when the pane's superview changes size. When an edge of a pane is bound, it is always the same distance from the corresponding edge of the superview. As a result, a pane may or may not change location or size in response to a change in the dimensions of its superview. Figure 6.3 illustrates the effect of binding on the size and location of panes.
Whether it is appropriate for a pane to change size or location depends upon the nature of the pane and the needs of your application. For example, a radio button should probably remain the same size no matter how the window grows or shrinks, but it may need to change position. A text object, on the other hand, may need to resize itself to fill its enclosing window.
Each pane has an SBooleanRect data structure that specifies frame binding. This structure is
a series of four Boolean values, one for each of the four sides
of the frame.
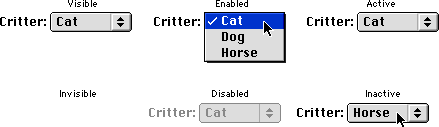
Each pane has three states, as illustrated in Figure 6.4:
Figure 6.4 uses a standard popup menu control to illustrate the effect of different states.
The visible/hidden state controls whether you see the pane. The effect of visibility is obvious.
The enabled/disabled state determines whether the pane responds to clicks. For example, a click on a disabled popup menu results in no action.
The enabled/disabled state usually affects the pane's appearance, particularly if the pane is a control item. In the Mac human interface, disabled controls are dimmed as shown in Figure 6.4.
The active/inactive state refers to whether the window containing the pane is active or inactive. When you make a window inactive, that change propagates down through all the panes in the window. An inactive pane is not responsive to a click because it -and the window that contains it-are inactive.
The active/inactive state may or may not affect the visual appearance of the pane. For example, some controls looks the same in an inactive window. A scroll bar hides itself when inactive. A text pane may display a selection as an outline rather than highlighted when it is in an inactive window.
In a typical PowerPlant application, you may modify a pane's visible or enabled state if you need to do so. PowerPlant usually manages the active state for you.
When drawing a pane, consider whether the pane's state affects its appearance, and draw it accordingly.
Some panes have two other important features: a value and a descriptor. The value is a numerical representation of the contents of the pane.
While this is a feature available to all panes, only certain PowerPlant
panes have a value, as summarized in Table 6.1. In each case, the value is an SInt32-a 32-bit integer. The value feature is used for different purposes
in different classes.
| Class |
Purpose of value |
|---|---|
| Class |
Purpose of descriptor |
|---|---|
For LCaption and LEditField, the value is useful if the text string represents an integer. In that case, you can use the value as the mathematical equivalent of the text string.
In addition to the value, some panes (Like LCaption and LEditField) also have a descriptor. This is a Pascal string. Like the pane's value, its purpose depends on the kind of pane, as summarized in Table 6.2
TIP The LSingleDoc class also has a Pascal-string descriptor. It is either the name of the associated file (if there is one) or the name of the associated window.
You have a great deal of flexibility in how you implement either the value or the descriptor in your own classes derived from LPane. However, when appropriate you should follow the convention that a pane's value represents a numeric quantity and its descriptor is the name of the pane or the textual representation of the value.
NOTE The LPane class itself has no data member to store either value or descriptor. These are declared in the subclasses, when necessary. Some subclasses that use value and/or descriptor have data members to store this information. Other classes access data stored in Macintosh Toolbox structures. What LPane provides are the general functions for accessing the contents of the value or descriptor.
Panes also have a "generic" 32-bit data member, the mUserCon, that you can use for any purpose whatsoever. The purpose of
mUserCon is analogous to the refCon field found in many Macintosh data structures.
The LPane class maintains several pieces of information related to mouse movements and actions as they affect the pane. This information is stored in data members as described in Table 6.3.
| Type |
Data Member |
Purpose |
|---|---|---|
If you need to examine the contents of any of these data members, use the accessors provided in the class. Each of these data members is static. In other words, these data members are pane globals. There is exactly one instance of each data member, and that instance is shared by all panes. As a result, you can always determine which was the last pane clicked, when it was clicked, if it was a double-click, and so forth.
A frame typically has something inside it. What is inside the pane depends entirely upon the nature of the specific pane. For example, the contents of a static text pane is a string of characters. The contents of a scrolling view may be a series of subpanes, text, or an image.
The contents are drawn by the specific pane's DrawSelf() function. Every subclass of LPane overrides this function to
draw itself.
LPane is a complex class with quite a few member functions. However, we can associate these functions into groups. Many of these groups are related to the characteristics we just studied. Grouping functions like this makes the purpose and use of the functions much easier to grasp. We're going to talk about
NOTE The LPane class also provides functions for managing coordinate systems. These are of primary importance in the view classes. We'll talk about these functions in "Managing Coordinate Transformations."
You can create a pane using Constructor, or on the fly in your code. We talk about each method. Then we discuss what you do when you derive your own class from LPane or its descendants.
You can use Constructor to define the characteristics of PowerPlant classes and your own derived classes. PowerPlant uses stream-based constructors to build entire containment hierarchies based on the 'PPob' data structure. You can edit a PPob in Constructor, Resorcerer, or Rez. The structure of the PPob resource is too complex for ResEdit to handle.
Creating a pane object in Constructor is simple. While in Constructor, you drag a pane object from the tool palette into a containing view. When you double click the object, an Info window opens so you can set the characteristics for that object. The precise contents of the window will vary for each pane, but most of them have the fields shown in Figure 6.5.
Creating a pane in Constructor: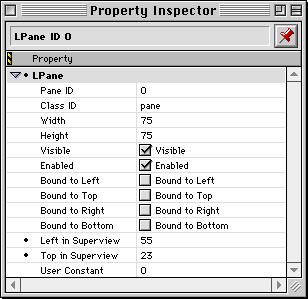
The top left coordinate is relative to the pane's immediate superview. In Constructor, if you rearrange the view hierarchy to move a pane from one view to another, its position becomes relative to the top left corner of the new superview. We'll discuss views in the next chapter and revisit this point.
You're familiar with the Pane ID. Set it to a an appropriate value, (unique if you intend to access the pane by ID). You can use the User Constant for any purpose you see fit. It is a 32-bit value, and you can specify it as a number or a series of four characters (like a file's type or creator codes).
The Class ID field is a four-character code that PowerPlant uses to identify the appropriate routine for building the new pane.
If you are using PowerPlant classes, the class ID is set for you by Constructor with the correct value. When you derive your own classes, you must change the class ID to your own unique value. You must also register the class ID with PowerPlant before creating any objects of that class.
PowerPlant defines constants for the ID of each class that can
be created from the 'PPob' resource. The value is an enum named class_ID specified within the declaration of each class.
For example, here's a snippet from the declaration of LCaption.
class LCaption : public LPane {
public:
  enum { class_ID = 'capt' };
This is a standard C++ technique used to define class-specific
constants. You can access the class ID as LCaption::class_ID. You must provide a unique class ID in any derived pane class.
NOTE PowerPlant reserves the set of all-lowercase class IDs for internal use. If you use at least one uppercase letter in your class ID, you will avoid a conflict with any and all PowerPlant classes, past, present, or future.
"Register PowerPlant Classes."
The typical approach used when creating a pane object on the fly
is to define an SPaneInfo structure. This structure specifies the values required to build
a generic pane. You then call the appropriate constructor. Depending
upon the particular pane you are creating, you may need to provide
additional information.
struct   SPaneInfo {
  PaneIDT       paneID;
  SInt16        width;
  SInt16        height;
  Boolean       visible;
  Boolean       enabled;
  SBooleanRect  bindings;
  SInt32        left;
  SInt32        top;
  SInt32        userCon;
  LView*        superView;
};
Each pane class has specific constructors, one of which receives
a pointer to the SPaneInfo structure. Most have additional parameters you must provide.
Refer to the PowerPlant Reference for details on the various constructors
and the parameters you must provide to successfully create a specific
object on the fly.
After you have created a pane and installed it in a view, you
should call FinishCreate(). This function ensures that the pane's state (visible/invisible,
active/inactive, enabled/disabled) matches its superview. It also
calls FinishCreateSelf(). The FinishCreateSelf() function gives you the opportunity to provide "finishing touches"
when creating a pane or view, because there may be times when
you can't fully initialize a pane in its constructor.
For example, for performance reasons you may want a view to maintain
pointers to some of its subpanes. (This saves the overhead of
repeatedly calling FindPaneByID() when the view wants to access a subpane.) You cannot initialize
the view's list of subpanes during view construction, because
subpanes are created after the superview. However, you can override
FinishCreateSelf() to create the list after the subpanes are built.
There are additional member functions in the LPane class that
you may use when creating a pane on the fly, if you don't use
the SPaneInfo structure.
You may use PutInside() to make the pane a subpane of a view.
To remove a pane from a superview, call PutInside() and pass nil as the new superview.
PlaceInSuperFrameAt() places the pane at a location relative to the superview's frame and PlaceInSuperImageAt() places the pane at a location in the superview's image. The distinction between a view's frame and its image is discussed in the "Views" chapter, in the section "Image."
"Managing Pane Characteristics" for information on setting individual features of a pane.
When you derive a class from LPane or one of its descendants,
you typically define a class creator function and several constructors:
a default constructor, a constructor that receives an SPaneInfo structure, a copy constructor, and a constructor to build the
pane from a stream. The class creator function and the stream
constructor are worthy of special attention.
"Creating a pane on the fly" for more on the SPaneInfo structure.
Older PowerPlant classes use a creator function when creating a pane-based object. These creator functions are static. The function receives a pointer to an LStream (the stream that contains the data from which to create the object), and returns a pointer to the new object. The prototype for a CCustomPane creator function is listed here as an example.
static CCustomPane* CreatePaneStream(LStream *inStream);
This method is no longer used, but may still be encountered in older classes. Class creator functions can be safely removed from any class that uses them.
When you derive a pane class, you must provide a stream constructor and a class_ID.
"Register PowerPlant Classes."
A stream constructor receives a pointer to an LStream object, reads data from the stream, and builds the object based on that data.
Here's the code for the LPane stream constructor.
LPane::LPane(LStream* inStream)
{
  SPaneInfo thePaneInfo;
  inStream->ReadData(&thePaneInfo, sizeof(SPaneInfo));
  InitPane(thePaneInfo);
}
Chapter 13, "File I/O" discusses LStream in more detail.
This code tells the stream to read in a certain amount of data
and put it in an SPaneInfo structure. It then calls InitPane() to initialize the object based on that information.
When you derive your own pane classes, you must provide a stream constructor. If your pane does not need to read any data from the stream, you still need to have an LStream constructor, but your derived stream constructor can simply call the base class's stream constructor.
For example, assume you derived a class from LIconPane, and it needed no additional data. Your stream constructor might look like this.
Stream constructor for a hypothetical icon pane class:
CMyIconPane::CMyIconPane(LStream* inStream)
  : LIconPane(inStream)
{
}
If you need to create custom panes that have additional data, you can do so in Constructor. See the Constructor for PowerPlant Guide for details. In this case, your stream constructor would read the additional data and initialize the object based on that data.
Of course, you may override whatever functions are necessary in your own pane class. The functions you are likely to override include:
Commonly overridden pane functions:
| Function |
Purpose |
|---|---|
Of course, you would only override the value and descriptor accessors if your pane class used those features.
NOTE Views and controls have additional functions specific to those types of classes that you would typically override. See "Creating a View," and "Creating a Control."
Like most Macintosh applications, PowerPlant draws the contents of a pane when an update event occurs. When your application receives an update event for a window, PowerPlant's default behavior calls the window's UpdatePort() member function, which in turn calls the window's Draw() member function. Draw() sets up the coordinate system (described in more detail in "Drawing a View"), calls the window's DrawSelf() function, and then calls Draw() for each subpane in the window.
The pane's Draw() function does the necessary setup work. The default LPane::Draw() function prepares for drawing the pane by calling the local LView::FocusDraw(). Panes rely on the superview to set the focus and manage coordinate
transformations.
TIP The preferred way to draw a pane is to call the Draw() function. You should never call DrawSelf() directly. If you do any drawing that does not go through the
Draw() function, you must call the view's FocusDraw() directly to ensure that the port and coordinate system are set
up correctly.
After setting the focus (and performing some other housekeeping
details), the pane's Draw() function then calls DrawSelf(). All classes derived from LPane must override DrawSelf() to draw
the contents of the pane.
To draw the contents of a pane or a view, you use standard Macintosh drawing routines as you would for any other Macintosh program. PowerPlant does not replace QuickDraw.
For example, Listing 6.4 shows the DrawSelf() function for LStdControl-the class that represents standard Macintosh controls. (The actual code is more elaborate, but this gives you the idea.)
void LStdControl::DrawSelf()
{
  // mMacControlH is a data member of LStdControl
  // that contains a Macintosh control handle
  ::Draw1Control(mMacControlH);
}
For a pane that draws an X from one corner of the pane to the
other, the DrawSelf() function might look like this:
DrawSelf() for a derived pane:
void MyPane::DrawSelf()
{
  Rect   frameRect;
  // CalcLocalFrameRect returns the pane's frame
  // as a QuickDraw rectangle in local coordinates
  CalcLocalFrameRect(frameRect);
  ::MoveTo(frameRect.left, frameRect.top);
  ::LineTo(frameRect.right, frameRect.bottom);
  ::MoveTo(frameRect.right, frameRect.top);
  ::LineTo(frameRect.left, frameRect.bottom);
}
On occasion, you may wish to force an update event or prevent one from happening. The LPane class provides the functions listed in Table 6.5 to assist you.
Validating and invalidating areas:
| Function |
Purpose |
|---|---|
The rectangle or region specified should be in port coordinates.
 WARNING!
 You should use these routines rather than the corresponding Toolbox
calls InvalRect(), InvalRgn(), ValidRect(), and ValidRgn(). For one thing, the PowerPlant calls handle coordinate transformations
correctly. In addition, the Toolbox calls require that the current
GrafPort be a window. However, a pane could be in another kind
of GrafPort, such as a printer port or a GWorld. If the pane is
not in a window, calling one of these Toolbox routines will cause
a crash (when the Toolbox tries to access a nonexistent update
region).
If your pane draws or behaves differently when its state changes, override the functions ActivateSelf(), DeactivateSelf(), EnableSelf(), and DisableSelf().
As you know, panes have many features. PowerPlant lets you adjust those features freely.
Panes reside in views. Typically you set the view hierarchy in a PPob resource using Constructor. However, you can modify the view hierarchy at runtime if you wish. This lets you create panes on the fly and install them in existing views.
To get a pane's current superview, use GetSuperView(). To put a pane inside a view, use PutInside().
Every pane has a unique ID that you can retrieve with the function
GetPaneID(). You can set this value with SetPaneID(). You won't normally need to use the setter function. The pane
ID is typically set in Constructor, or by using the SPaneInfo constructor function appropriate for the pane you are building
on the fly.
The more common occurrence is that you want a pointer to a pane
when you already know the ID number. You usually know the ID number
because you assigned it at some point. To get the pointer, you
call FindPaneByID(). You will use this function often. It searches the current view
hierarchy and returns a pointer to the specified pane. This is
analogous to the Mac Toolbox routine GetDialogItem() used to retrieve a pointer to a dialog item.
TIP You can also retrieve a pane hit by a mouse click with FindSubPaneHitBy(). However, this function is only useful in views (which have subpanes).
Recall that the pane's frame is described by two structures, the location and size. Table 6.6 lists some functions you may use for managing frame characteristics.
Some frame management functions for panes:
| Function |
Purpose |
|---|---|
The frame binding is usually specified in a PPob resource using
Constructor, or in the SPaneInfo record if you build the pane on the fly.
Use GetFrameBinding() to retrieve the current settings, and SetFrameBinding() to change the current settings.
If you derive a class from LPane or its descendants, you are responsible for rendering the appearance. See "Drawing a Pane" for full details. You can study PowerPlant's own panes to see how they draw themselves.
Use GetValue() and SetValue() to access the value data member. Use GetDescriptor() and SetDescriptor() to access the descriptor data member.
Remember that all pane classes have the value and descriptor accessors, but only a few PowerPlant classes actually use them. In LPane, the accessors do nothing.
NOTE If you are using PowerPlant's debugging features, these accessors throw a signal to alert you to inappropriate use.
Use GetUserCon() and SetUserCon() to access the mUserCon data member.
Table 6.7 lists the pane functions used to manipulate the pane's state. You can query the pane to determine current state, and set the state to an appropriate value.
| Function |
Purpose |
|---|---|
TIP These functions modify the pane's state, not its behavior or appearance.
Override ActivateSelf(), DeactivateSelf(), EnableSelf() and DisableSelf() for changing appearance or modifying behavior as state changes.
Mouse information in panes is typically maintained for you automatically by PowerPlant. You may wish to perform two mouse-related tasks: adjusting the cursor and identifying whether a click hits a particular pane.
If your pane uses its own cursor, override AdjustCursorSelf().
You should also be aware of the MouseEnter(), MouseWithin(), and MouseLeave() functions. These are empty member functions defined in the LPane
class. PowerPlant does not use these functions at all. They allow
you to implement your own mouse tracking. For example, you might
create a pane that also inherits from LPeriodical. The SpendTime() function would be called regularly, and would determine if the
mouse was entering, within, or leaving a pane. The SpendTime() function would then call MouseEnter(), MouseWithin(), or MouseLeave() as appropriate.
You can also manage cursor adjustment using attachments. Create
a subclass of LAttachment that responds to msg_AdjustCursor, and attach it to the pane. Your attachment could be a highly
reusable bit of code that you could connect to almost any pane
when cursor adjustment was important.
"Periodicals" and "Attachments."
PowerPlant manages most hit testing for you. There will be times when you'll want to test whether the mouse is in a pane, and whether a click is in a pane. You'll also respond to clicks.
The LPane class has the functions listed in Table 6.8.
| Function |
Purpose |
|---|---|
Most hit testing is provided for you automatically by PowerPlant.
In a simple application, the only function in Table 6.8 that you'll override in your own classes is ClickSelf().
The three functions related to finding subpanes are useful for LView and its descendants. These are the only classes of panes that can contain subpanes. In the LPane class these are empty functions.
Now that you have absorbed all that knowledge about panes in general, let's take a quick look at some specific pane classes and the features that are unique to them. Remember, we'll be discussing views and controls in subsequent chapters.
In this section we'll talk about every pane class that is neither a view nor a control. The classes covered are:
LCaption displays text. This class uses a text traits resource to specify characteristics such as font, size, style, color, and justification. LCaption uses the UTextDrawing class to draw text.
You can set the text and the text traits resource in Constructor, or you can modify these characteristics at runtime.
You may encounter a drawing problem if you change the contents
of the caption at runtime. LCaption::DrawSelf() uses UTextDrawing::DrawWithJustification(). This does not erase the previous contents of the caption. The
best way to erase the contents is to attach an LEraseAttachment
object to the caption.
This class derives from LCaption. The text is the title of the
group. The object draws a box around the confines of the group.
Note that the top of the object's frame does not coincide with the top line drawn for the group box.
The other panes that are visually within the group box do not "belong" to the group box in any hierarchy. They simply overlap visually. The group box is a visual decoration. It does not control or affect the panes within the box in any way.
The primary use for this class is to draw an outline around the default button in a dialog. You will typically not create an object of this class yourself. You cannot create one in Constructor. PowerPlant makes one for you when you create a dialog and specify a default button.
LIconPane draws a single icon from an icon family. It stores the ID of an icon family and draws it on the screen. Because it uses the Mac OS icon-handling routines, an LIconPane object draws the member of the icon family that best fits the color status and bit depth of the current device.
An LFocusBox object outlines a pane to indicate that the pane is the current focus for keystrokes. This class is used internally by PowerPlant in conjunction with LListBox to highlight entries in the list. Like LDefaultOutline, you will typically not create an object of this class directly. You cannot create one in Constructor.
This is a wrapper class that creates, draws, and disposes of a standard QuickTime movie controller. You would typically use this in conjunction with UQuickTime if your application supports QuickTime movies.
The LMovieController class inherits from LPeriodical, so it can receive and process every event retrieved by the event loop.
LEditField uses single-style TextEdit to implement an editable text field, such as those in standard Macintosh dialog boxes. PowerPlant also handles undo and redo for most text-related actions. This class derives from LPane, LCommander, and LPeriodical.
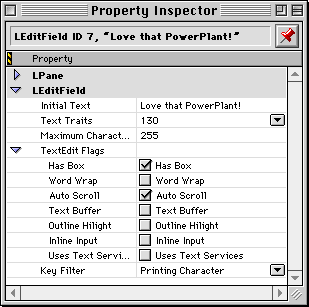
This object does not have a scrollbar. You can set the object to "auto-scroll," meaning that the displayed text will scroll as the text cursor moves through the text. Figure 6.6 shows some of the options you can set in Constructor. The initial text and text traits can also be set using Constructor.
Notice that PowerPlant allows you to attach a key filter to the LEditField. There are several default key filters available. Look up the UKeyFilters class in the PowerPlant Reference for more information. PowerPlant also implements Undo and Redo for most standard actions.
If you have two or more edit fields in a view, human interface guidelines suggest that typing the Tab key should advance the text entry cursor from one field to the next.
You can implement this behavior very easily by using a helper
class named LTabGroup. In Constructor, you choose the Make Tab Group item from the Arrange menu. This adds the LTabGroup object to the PPob resource.
The LTabGroup object is faceless-you cannot see it. It is not a pane. LTabGroup inherits from LCommander. It will receive the Tab keypress and automatically shift the target object to the next editable text object in the view. LTabGroup also supports Shift-Tab for moving to the previous editable text object.
TIP Some key filters handle Tab keypresses before the tab group gets them. You may need to create your own filter to ensure that Tab keypresses are passed to an LTabGroup object.
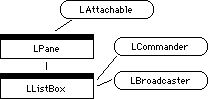
LListBox is a wrapper class for the Mac OS List Manager. With some work, this class allows you to create a two-dimensional table of cells that scroll, respond to keystrokes, and so forth. Figure 6.7 shows the inheritance hierarchy that leads to LListBox.
If you use Constructor to create an LListBox object, you can only
create a list with one column. To add columns (or rows) on the
fly, call GetMacListH() to get the Toolbox ListHandle. Then use the List Manager-calling
::LAddRow() and/or ::LAddColumn().
The default LDEF resource (list definition) used by the Toolbox draws text in each cell. If you want to display other types of data, you must provide your own LDEF resource.
TIP The LTable class provides basically the same functionality as LListBox with greater flexibility and better performance. See "LTable." The LTableView class is even more powerful. LTableView is discussed in PowerPlant Advanced Topics.
The ClickSelf() function in LListBox responds to double-clicks. All clicks are
passed to the List Manager for processing by the Toolbox LClick() routine. If that call returns true, the click in the cell was a double-click. LListBox broadcasts
a message to that effect so that any listeners can respond.
If you want listeners to be aware of single clicks, you must derive
a new class from LListBox and override the ClickSelf() function. Listing 6.6 shows one way to do that.
Broadcasting single clicks from a list box:
void
CMyListBox::ClickSelf (const SMouseDownEvent &inMouseDown)
{
  SwitchTarget(this);
  FocusDraw();

  if (::LClick(inMouseDown.whereLocal,
        inMouseDown.macEvent.modifiers,mMacListH))
  {
    BroadcastMessage(mDoubleClickMessage, this);
  } else {
  // msg_SingleClick is a const that you define
    BroadcastMessage(msg_SingleClick, this);
  }
}
Panes are the fundamental visual objects in PowerPlant. There are many kinds of panes, including views, controls, LCaption, LGroupBox, LIconPane, LEditField, LMovieController, and others.
Panes have a variety of characteristics including position in a view hierarchy, ID number, frame, frame binding, contents, value, descriptor, state, and mouse information.
You typically create a pane with Constructor. You can build panes
on the fly in code, using the SPaneInfo structure and passing any other necessary data to the constructor
function. You can get, set, or otherwise manipulate every characteristic
of a pane at runtime.
You have just absorbed a tremendous amount of information about panes. As we said before, the LPane class and its derivatives are fundamental to all the visual objects in PowerPlant. The LPane class is correspondingly complex. However, you now have a really solid understanding of panes and their offspring. That will make understanding views and controls much easier in the next chapters.
Let's put all this knowledge to work and see how to create and use panes in code.
Because this is the first code exercise, let's be explicit about how these exercises are designed, and about some assumptions we're going to make. You can use these exercises in several ways. They are designed to be as flexible as possible to accommodate your individual learning style.
Each exercise has a "start code" and a "solution code." The exercise itself is a series of steps in which you add code to one or more files in the start code project. In the process you learn step by step how to implement some feature in PowerPlant. In this chapter, for example, you learn how to work with panes.
WARNING! Do not attempt to build and run the start code project without performing the steps. Critical code is missing, and the project will either not build, or crash when it runs.
The solution code represents the complete project after you have followed all the steps. It contains all the code that the exercise steps ask you to add, and all the resources you build in Constructor.
Each exercise is a series of steps. The step title specifies a particular task you should accomplish. The code locator specifies the precise file and function involved in the step. The step instructions explain what you are supposed to accomplish in the step. Each step also includes the code you must write. We frequently include some existing code as well, so you can locate the precise spot where you should be adding new code. Existing code is in italic.
This design gives you at least three strategies you can use as you perform an exercise.
First, there is the "tutorial" strategy. With this approach, you follow the steps precisely and copy the code exactly as provided. This technique guarantees that your final project will work. You will be "following along in the book" as you implement the task at hand. You will learn a lot about PowerPlant from doing it as experts do.
Second, there is the "guide" strategy. In this approach, you read the step instructions, ignore the code, and solve the problem yourself. You use the steps as a guide to your own work. This technique is more suited for the adventurous programmer. If you pursue this tack, you are likely to make mistakes and your project may not work right the first time. As you eliminate the bugs, you'll learn a lot about PowerPlant by finding your own way.
Third, there is the "example" strategy. In this approach, you don't write any code. You use the steps in the exercise as an explanation of example code. In this case, use the files in the solution code project. As you read the steps, study the code. This approach is best suited to someone who wants a theoretical understanding of the inner workings of PowerPlant, or someone who wants a little guidance but is eager to apply the principles directly in their own project.
For each chapter, there is a folder titled "Chap nn Start Code" where "nn" is the chapter number. These folders are located in the "PP Book Code" folder. We assume that you have located the appropriate start code and copied it to your hard drive.
Inside each start code there is a CodeWarrior project file. There are project files for both 68K and PowerPC code. We assume that you have launched CodeWarrior and opened the project file.
Immediately after the step title, you will usually see a code locator:
This identifies the file and function you work on in the step. We assume you have opened the file and located the function.
We're going to assume that you'd rather write code than build PPob resources. As a result, we're going to provide most of the PPob resources required to perform these exercises. You should keep in mind, however, that this is a gift. In your own work you must build PPob resources, usually from scratch.
Finally, a few words about the project files in these exercises. These projects are not derived from the standard PowerPlant stationery files. We wanted to make sure that all of the necessary files were included in the project, so you can concentrate on learning PowerPlant, not adding and removing files in CodeWarrior.
We'll explore some of the subtle differences in the code exercise for Chapter 9. However, there are some apparent differences worthy of note here.
First, the PPStarterResources.rsrc file has been replaced with two files, appname.rsrc and appname.ppob, where "appname" is the name of the application in that project.
As we mentioned in the code exercise in the introduction, this
makes it easy for you to open the file in the correct resource
manager application. Some of the resources in PPStarterResources.rsrc have been omitted because they are unnecessary in these projects.
We have also added two resource files, PP AppleEvents.rsrc and ColorAlertIcons.rsrc. The first includes the `aedt' resource for PowerPlant. (The
`aedt' resource is part of the PPStarterResources.rsrc file.) The second replaces the black and white alert icons with
color icons. Appendix B, "Resource Notes" discusses the PowerPlant resource files and their contents. For
more information, see "ColorAlertIcons.rsrc" and "PP AppleEvents.rsrc."
There are a few more changes behind the scenes with the project prefix, included files, and so on. We'll point those out in Chapter 9 when you work on the background details in a PowerPlant application like setup, debugging, and memory management.
Now that we have the ground rules established, we can begin our adventure.
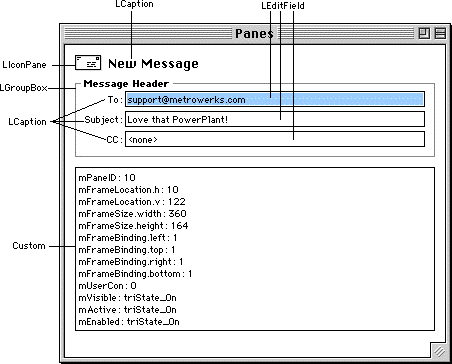
In this project you build an application titled "Panes." The final product looks like Figure 6.8.
There are ten panes in this window, as noted in the illustration. If you examine the PPob resource with Constructor, you learn the following about these panes.
The LIconPane is bound to the top left of the window. It is not enabled, so it won't respond to clicks.
All LCaption objects are bound to the top left of the window. None is enabled. The "New Message" caption uses a text traits resource of zero-the system font. The others use a text traits resource ID 131-Geneva 9 point, flush right.
The LGroupBox is bound to the top, left, and right of the window. As the window changes width, it will too. It is not enabled. It uses a text traits resource ID 132-Geneva 9 point, flush left, bold.
The LEditField panes are all bound to the top, left, and right of the window. As the window changes width, they will too. They are enabled, so they can respond to clicks and keystrokes. Each uses a key filter to limit input to "legal" characters. Each uses the text traits resource ID 130, Geneva 9 point, flush left.
With a series of editable text fields, the Mac OS human interface
guidelines say that typing a Tab key should advance the cursor
to the next editable field. In PowerPlant, you do this by creating
an LTabGroup object. If you examine the hierarchy window in Constructor
for this PPob, you can see the LTabGroup positioned in the hierarchy.
To make a tab group object, choose the Make Tab Group item from the Constructor's Arrange menu.
All of these are standard PowerPlant panes. The interface also includes a custom pane. This one, you build yourself.
If you have not already opened the Constructor project, double-click the Panes.ppob file in the IDE project window. Constructor launches and the Constructor project window appears. Double-click the LWindow view to see its contents. Also, make sure the Catalog window is open.
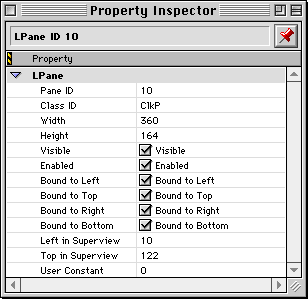
Drag an LPane object from the Catalog window and drop it on the Panes window. Double-click the object to open the property inspector window so you can set its characteristics as shown in Figure 6.9.
The pane is bound to all four sides of the window. It is enabled and visible. The Pane ID is 10.
You are creating a new class of object, and it must have its own class ID. Change the class ID from the default value "pane" to a new value, "ClkP". The value "ClkP" is arbitrary. It is an acronym for click pane. You're going to write code so that this pane responds to a click in a special way.
Save your changes, close all the Constructor windows, and return to the CodeWarrior IDE. It's time to write some code.
All the panes except for the custom pane are standard PowerPlant objects. You don't have to write any code to make them work properly. The application-level code that creates the window has been provided for you. You'll work with applications in Chapter 9, and windows in Chapter 11.
In the remaining steps, you write the code to implement the custom pane. This is going to be a lot easier than you might think.
Class declaration CClickPane.h
Because this is the first step, we'll point out the code locator.
Open the CClickPane.h file, and locate the class declaration. Most of the header has
been provided for you. We assume you know what a class is, and
the C++ syntax necessary to declare one.
PowerPlant relies on each pane class having a unique class ID.
In Step 2 you specified "ClkP" as the class ID for the CClickPane
class. Each pane class has a class_ID enumerated constant. Declare that constant to have the value
ClkP.
class CClickPane : public LPane {
public:
  enum { class_ID = 'ClkP' };
4. Study the class declaration.
Class declaration CClickPane.h
Look at the rest of the code in this class declaration. The CClickPane
class inherits from LPane. There are several constructors and
a destructor. The class also declares a new function, DrawPaneStats().
Finally, the class overrides three inherited functions: DrawSelf(), ClickSelf(), and AdjustCursorSelf(). You write each of these functions in subsequent steps.
Save your changes and close the header file.
5. Write the stream constructor.
CClickPane(LStream *) CClickPane.cp
Building a CClickPane object does not require any data other than the data used to describe a simple LPane object. Therefore, CClickPane can use the LPane stream constructor as its own stream constructor.
Call the LPane stream constructor.
CClickPane::CClickPane(LStream *inStream )
    : LPane( inStream )
{
}
The other constructors and the destructor are all empty and are provided for you.
You have done everything you need to build a CClickPane object. You have written both the class declaration and the stream constructor that builds the object from the stream. PowerPlant will call this function automatically as it reads the PPob resource. The CClickPane object will be built based on the information you set in Constructor.
In the remaining steps you implement CClickPane functionality.
This function should draw a frame around the pane, and then draw the contents. You are free to draw anything in the pane that suits your fancy.
In the solution code, this pane displays statistics about itself.
You can use the DrawPaneStats() function for this purpose. This function is provided for you,
because it does not directly involve PowerPlant.
CClickPane::DrawSelf()
{
  // Calculate the frame rect.
  Rect theFrame;
  CalcLocalFrameRect( theFrame );

  // Draw a frame around the pane.
  ::FrameRect( &theFrame );

  // Draw the pane stats.
  DrawPaneStats();
}
Feel free to examine the DrawPaneStats() function if you wish. It reads various data members from the object, converts the values to string representations, and draws the strings.
TIP The StTextState class used in DrawPaneStats() preserves and restores existing text settings. You can read about this class in "UDrawingState."
This function is called whenever the user clicks an enabled pane. Write code to make something happen when the user clicks this pane. The solution code beeps. Again, feel free to experiment.
CClickPane::ClickSelf(const SMouseDownEvent &inMouseDown )
{
#pragma unused( inMouseDown )
  ::SysBeep( 9 );
}
The input parameter is unused in the solution code. If you have
compiler warnings on, you may get a warning. You can avoid the
warning using the #pragma as shown.
AdjustCursorSelf() CClickPane.cp
When the user moves the mouse into your pane, you may want to adjust the cursor. In PowerPlant, you don't have to worry about when to do this. The framework calls AdjustCursorSelf() at the right time.
In this function you should get a cursor and display it. The solution
code uses a cursor provided in the project resources. The constant
rCURS_Finger is defined at the beginning of this source file. It represents
the resource ID for a finger cursor.
CClickPane::AdjustCursorSelf( Point inPortPt,
                              const EventRecord &inMacEvent )
{
#pragma unused( inPortPt, inMacEvent )
  // Get the cursor.
  CursHandle theCursH = ::GetCursor( rCURS_Finger);

  // Set the cursor.
  if ( theCursH != nil )
    ::SetCursor( *theCursH );
}
Save your work and close the file.
To register any PowerPlant or custom class, you need to include the header file for that class in your main source file.
// Custom class headers
#include "CClickPane.h"
The Step 5 instructions said that PowerPlant calls the stream constructor automatically. This only happens if you register your class with PowerPlant. We don't actually discuss registering classes until "Register PowerPlant Classes." However, it must be done for your custom class to work.
Put the new code in this step after the existing call to RegisterClass_(LTabGroup) in the CPaneApp constructor.
RegisterClass_(LTabGroup);
// Register custom classes.
RegisterClass_(CClickPane);
11. Build and run the application.
Make the project and run it. If it doesn't build, examine the steps and your code carefully to see where things went wrong. If all else fails you can use the solution code.
When the project builds correctly and you run the application, a window appears containing all the panes. See Figure 6.8. Play with the window and watch what happens.
Resize the window. Watch what happens to the various panes as you do. The pane binding determines the result.
Click on the various captions, and nothing happens. These panes are not enabled. However, the editable text fields are fully functional. Try them out! You can enter text, cut, copy, paste, and so forth.
Press the Tab key to cycle through the three editable text fields. Press Shift Tab to cycle backwards. This is the automatic behavior of the invisible LTabGroup object in action. The fact that this works has nothing to do with the group box. The group box is just an aesthetic feature. It does not group the items functionally.
Observe the custom pane field. If you implemented the solution
code, the pane statistics appear in the field. Move the mouse
until the cursor is over the pane. The cursor should change to
the finger cursor. Click the pane, and it should beep. This is
your code at work: DrawSelf(), ClickSelf(), and AdjustCursorSelf().
PowerPlant takes care of calling your functions at the appropriate moment. You take care of implementing the functionality.
When you are through observing, quit the application.
Congratulations! You have implemented several different kinds of standard PowerPlant panes, as well as a completely new custom pane. You're on your way! In the next chapter we move on to panes that can contain other panes-the PowerPlant view classes.