Although some folks like to skip introductions, we strongly recommend you read this one. Why? It serves several important purposes, not the least of which is that you write a complete PowerPlant application! This chapter is really your introduction to PowerPlant, not just this book.
What is PowerPlant? PowerPlant is Metrowerks' world-class, object-oriented, Macintosh application framework. Using PowerPlant you can quickly build the reliable interface your program needs to be successful with your customers or clients. PowerPlant gives you a complete, powerful, ready-to-run application that takes advantage of the latest features of the Mac OS. All you have to do is add the content that makes your application unique.
Exactly what PowerPlant is-what its parts are, and how to use them-is what this book is all about. This book gives you a thorough understanding of the design principles and implementation details behind PowerPlant. Along the way you'll discover that PowerPlant is not that hard to learn. It is complex, sure. But it is also logical, organized, and very well designed.
This Introduction gives you a road map so that you will have an idea of what to expect as you read this book. At the end of the introduction you write your first PowerPlant application. The Introduction discusses these principle topics:
These sections will help you find your way through what will be an enjoyable and worthwhile project: learning how to use PowerPlant.
PowerPlant is a growing, evolving framework. There have been many changes and additions to PowerPlant. Some of the more significant changes include:
Previous versions of PowerPlant included Try_, Catch_(), and EndCatch_ exception handling macros. At the time, the CodeWarrior compilers did not support true C++ exception handling. These macros are now obsolete. You should update your code to use the proper C++ try, catch mechanism. PowerPlant uses the LException class for all exceptions so a standard try/catch block looks like:
try { // do something
} catch( LException& inErr )
// catch exception here
}
Many PowerPlant classes have been improved, expanded and debugged. Some changes include:
UScrap.cp & UProcessMgr.cp. You will need to add these files to existing PowerPlant projects.
UPrinting.cp as part of PowerPlant's Carbon support. If you use LDocument
or LDocApplication in your projects, you need to remove UPrintMgr.cp from your existing projects and add UPrinting.cp in its place.
PowerPlant Release notes for more detailed information.
CodeWarrior now supports Apple's Carbon API's for transistioning code to Mac OS X. You can now target Carbon in PowerPlant. The new target means changing files in existing projects.
The PowerPlant Book does not cover how to change your code for Carbon, nor does it cover Carbon-specfic issues.
PowerPlant Release notes and the PowerPlant Carbon Converstion document for more detailed information.
This book assumes you are familiar with:
To be familiar with Macintosh application programming means you understand concepts such as the event loop, creating and managing menus, creating and managing windows, creating and managing dialogs and control items, idle time processing, memory management, and so forth.
To be familiar with C++ implies that you not only understand C++ syntax (such as what a class is, a constructor, a destructor, and so forth), but also that you are familiar with the features of an object-oriented language such as inheritance, polymorphism, overriding, and overloading.
If you are unfamiliar with these topics, you should pursue them before you expect to use PowerPlant effectively. The extensive documentation available with CodeWarrior can help.
The CodeWarrior Reference CD contains electronic versions of several programming books including: Learn C on the Macintosh by Dave Mark; Programming Starter Kit for Macintosh by Jim Trudeau; and Learn C++ on the Macintosh by Dave Mark. These books cover everything you need to know about programming languages as well as Mac programming, from memory management to drag and drop using an object-oriented approach in C. The exercises use the CodeWarrior environment.
These and other third-party books on Macintosh programming and C++ are available at computer bookstores everywhere, and directly from Metrowerks at the CodeWarrior Store.
For more information about the CodeWarrior development environment, consult the CodeWarrior documentation, especially the IDE User Guide. These will familiarize you with the environment.
In the code exercises in this book you will regularly encounter and use PowerPlant's view-editing sidekick, Constructor. This book explains what Constructor is and what you use it for. However, we will not go into detail about how to use Constructor. While performing the code exercises in this book, if you have questions about Constructor, you can consult the Constructor for PowerPlant User Guide that comes with the CodeWarrior documentation.
"Other Resources" for more on PowerPlant and object-oriented programming.
This book is divided into a series of chapters. The chapters can be grouped into three sections:
Each section has several chapters.
Chapters 2 through 5 make up the Background section. Chapter 2, "Installing PowerPlant" discusses installing PowerPlant, and PowerPlant resource templates. Chapter 3, "PowerPlant Conventions" discusses name and style conventions in PowerPlant code. Chapter 4, "Application Frameworks" discusses the nature of application frameworks in general, and the kinds of design features you are likely to encounter in an application framework. Chapter 5, "PowerPlant Architecture" introduces you to the basic design of the PowerPlant framework, and the classes, objects, and resources you will encounter as you use PowerPlant.
The chapters in the Background section are informational. They give you the big picture overview of PowerPlant, and how PowerPlant fits into the world of object-oriented programming. These chapters do not have any code exercises.
Chapters 6 through 8 comprise the Basic Building Blocks section. The chapters in this section give you an early look at PowerPlant's most important objects. The chapters are:
In these chapters you write real PowerPlant code. You will use this experience in the Writing PowerPlant Code section.
Chapters 9 through 15 cover various aspects of PowerPlant application programming from a task-based perspective. The chapters are:
Chapters 6 through 15-the Basic Building Blocks and Writing Code sections-are more practical and detailed. Here you find the solid information you need to answer the real-world question, "How do I use PowerPlant?" Each chapter has two parts.
The first part of the chapter discusses PowerPlant fundamentals. It introduces you to the classes involved in that chapter and how you use them. We'll discuss their member functions and data members, their inheritance chain, and the common situations in which you use the class.
The second part of each chapter is a code exercise. In this part of the chapter you write real PowerPlant code following step-by-step instructions. This gives you an opportunity for hands-on practice with the real thing.
The code exercises are all application-based. PowerPlant is first and foremost an application framework, after all. However, you can use PowerPlant classes for other programming projects such as code resources and shared libraries. As you learn about PowerPlant, you'll see how the very design of this framework allows you to use just those parts of the framework that you need for your particular project.
A good application framework has lots of utility functions to aid you in your work. PowerPlant is no exception. We discuss many task-based utilities in the chapters as we work through the book. However, you should consult Appendix A, "PowerPlant Utilities" for a potpourri of additional helpful ditties in PowerPlant.
The chapters in this book are more or less sequential. Each chapter builds on the knowledge gained in previous chapters. As a result, the typical path through these sections is linear. For the most part, you start at the beginning and work through to the end.
Everyone who is new to PowerPlant should read Chapter 2, "Installing PowerPlant" to ensure that you are familiar with the various source and header files you will encounter. You should also read Chapter 3, "PowerPlant Conventions" so you understand the naming conventions used throughout PowerPlant.
Programmers unfamiliar with application frameworks in general should continue with Chapter 4, "Application Frameworks" to learn about the common design patterns you encounter. If you are an experienced object-oriented programmer and you know about application frameworks and the design patterns you encounter in them, you can safely skip this chapter. From that point on, if you are new to PowerPlant you should read all the remaining chapters sequentially.
Experienced or somewhat experienced PowerPlant programmers can examine the Table of Contents for a chapter that addresses an application programming topic of interest, and go to that chapter. You can always revisit a topic in some other chapter if you encounter something you don't understand.
The best way to learn PowerPlant is to learn about the concepts, then play with example code. This simple fact is reflected in the structure of the code-intensive chapters: we discuss fundamentals first, and then work with real code right away.
You can skip the code exercises if you wish. If you do, the lessons learned in the fundamental section of each chapter will remain theoretical. While theory is both necessary and useful, theory can only take you so far when it comes time to implement real working solutions in code. We recommend that you also work with the code exercises in each chapter to master the intricacies of PowerPlant.
As you perform the code exercises, think about what you've learned in the fundamentals discussion. Apply those lessons to the problems presented in the coding steps. All of the code you need will be included in with the steps, tutorial fashion. However, feel free to attempt your own solution to the problem.
Solving problems in your own way is the best way to learn. You may discover on some occasion that your solution fails because you didn't understand some subtlety in the framework design or the code. That's fine. The lessons you learn from the failure will be far more valuable and stick with you much longer than those you learn from blindly copying code in the tutorial steps.
As you become familiar with the general structure of the PowerPlant framework, you'll gain confidence. You'll find your own solutions becoming more reliable, and more accurate. Very soon you'll be able to apply these lessons to your own programs. When you do, you'll find that you can create better, more powerful, and more reliable Macintosh software faster than you ever could before.
After you have completed this book, or those parts of the book you find of personal interest, you may want to go further. This book does not cover a variety of advanced PowerPlant programming topics. However, do not be alarmed. There are places to go to learn more about PowerPlant.
Your first and most common stop on the path to learning more about PowerPlant will be PowerPlant Referemce. This document is available in electronic form as part of the CodeWarrior documentation. It is a series of HTML files describing all the PowerPlant classes, their data members and member functions. This hypertext reference allows you to locate specific functions, trace class derivations, look up inherited data members, and so on.
The comments found in the PowerPlant source files are another valuable source of insight about PowerPlant. This information is frequently duplicated in the PowerPlant Reference.
Metrowerks provides additional PowerPlant documentation as well. The PowerPlant Advanced Topics manual covers a variety of subjects in-depth. The precise nature of what's available varies from release to release, and as PowerPlant evolves. Check out the PowerPlant documentation folder for the latest information.
PowerPlant is a hot topic on various on-line services and the
Internet newsgroups comp.sys.mac.oop.powerplant and comp.sys.mac.programmer.codewarrior. Experienced PowerPlant programmers and Metrowerks employees
often answer questions in these groups. The newsgroup discussions
are archived on the Reference CD, in the Metrowerks Documentation
folder. You can search through the archives for information on
a wide variety of PowerPlant topics. They are a useful resource.
Metrowerks maintains a World Wide Web site where you can find updates to PowerPlant classes as well as third-party classes based on PowerPlant. These classes extend PowerPlant's functionality in unique and useful ways. You can find the web page at:
http://www.metrowerks.com/db/powerplant.qry?function=form
There is a wealth of knowledge available if you want to learn more about object-oriented programming in general. There are several books on the subject. A quick sampling of titles includes:
If you want to learn more about programming with PowerPlant, there are a few books to look at. They include:
In addition, there are many web sites dedicated to object-oriented programming. Some of these sites are specific to the Mac OS.
http://www.codewarrrior.org/
http://www.apple.com/developer/
http://www.themost.org/
http://cafe.AmbrosiaSW.com/alt.sources.mac/macintosh-c/
http://www.cernet.com/~mpcline/C++-FAQs-Lite/
http://www.lysator.liu.se/c/index.html
This book uses various typographical conventions to make reading easier.
Computer Voice is used for source file names and code examples.
Bold text is used when refering to menu names and items, as well as specific
buttons in dialogs. For example, click the Save button.
Key words or book names are presented in italic text.
Additionally, this book may reference a hypothetical application
called HyperApp with main application files CHyperApp.cp, HyperApp.rsrc, and HyperApp.PPob. Unless otherwise stated, descriptions of this hypothetical application
apply to all PowerPlant applications.
Assuming that you have never done any PowerPlant programming, you're in for a treat. Admittedly, you're not going to learn a lot of PowerPlant specifics by following the steps in this exercise, because you haven't got all the background information that will help you process and categorize the new knowledge.
Nevertheless, by writing a real application right away you will see first hand the tremendous advantages that PowerPlant gives you when you're developing software. And that should give you all the incentive you need to absorb the background material. Soon you'll be ready for some intense PowerPlant coding.
 NOTE
NOTE This exercise assumes you have installed PowerPlant. If you have not installed PowerPlant and you wish guidance on what you need to do, Chapter 2, "Installing PowerPlant" will help. In addition, the screenshots in this book are from the latest version of Constructor. If you are using an earlier version, the appearance of the Constructor windows and some features may vary.
We're going to do this in two stages. In the first stage, you use Constructor to build a visual interface for a very simple text-editing application. In the second stage, you'll write the code to create the application.
The necessary files are in the "Chap 01 Start Code" folder, inside the "PP Book Code" folder. Locate this folder on the Reference CD-ROM and copy it to your hard drive.
As always, you have two ways you can open a file. Double click
the PPEdit.mcp project file icon, or launch CodeWarrior IDE and open the project
using the Open command from the File menu.
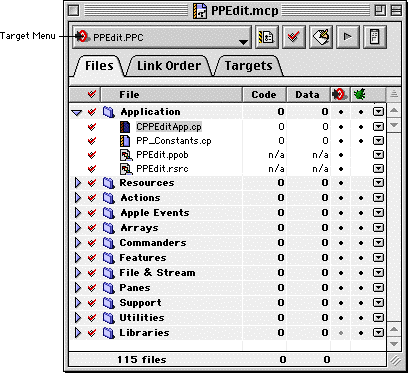
When you do, a project window opens. It should look like Figure 1.1. Choose the appropriate target for your computer (68K or PPC) from the Target Menu on the Project Window. The 68K target will work on all Mac OS computers.
The IDE User Guide for more information on "Targets."
In this project we have divided the application resources into
two resource files, PPEdit.ppob and PPEdit.rsrc. The file creator for the .ppob file is Constructor. The file
creator for the .rsrc file is ResEdit. You will not have to modify
the .rsrc file at all.
NOTE Constructor is used to create and edit PPob, Txtr, MBAR, MENU, Mcmd, CTYP and bitmap resources. We'll discuss PowerPlant resources in detail in Chapter 5, "PowerPlant Architecture".
In the project window, double-click the PPEdit.ppob file. Constructor launches and opens a Constructor project window,
as shown in Figure 1.2.
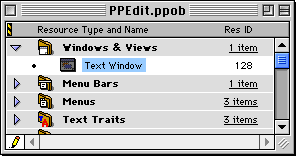
The PPEdit.ppob project window: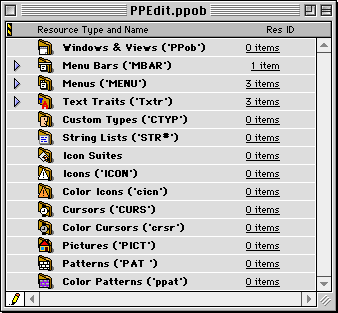
There are already menu bar, menu, and text trait resources in this file. In this exercise you add a window and view (PPob) resource that describes the text editor's visual interface.
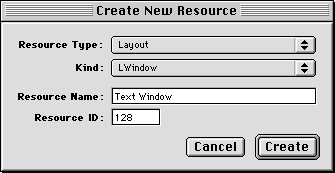
Choose New Resource (command-K) from the Edit menu. A dialog appears, as shown in Figure 1.3. Set the values in this dialog to match the illustration.
Set the resource type to Layout. Set the view type to LWindow. Enter the name of the new resource. Set the resource ID to 128. Then click the Create button. The new resource appears in the project window, as shown in Figure 1.4.
You have just created the beginnings of a PPob resource. The ID number is significant. You use the ID number to tell PowerPlant which PPob resource to use when creating a new window. The name you assign isn't significant. The name helps you identify the correct resource when you have several. In this application you have one PPob resource. When you're through, the PPob resource will define the entire view and its contents.
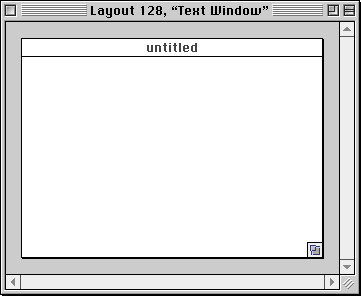
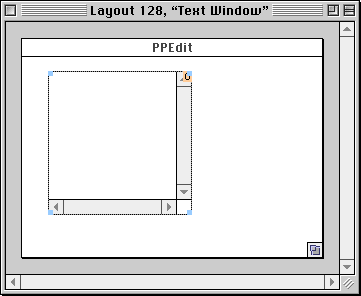
In the Constructor project window, double-click the new Text Window resource. A window opens that displays the new (untitled and empty) window, as shown in Figure 1.5. This is the Constructor layout window. The layout window itself identifies that you are working with a PPob resource, with ID number 128, named "Text Window."
4. Set the window characteristics.
You can double-click the area of the new window, or click it once
to select it (four little selection handles will appear at the
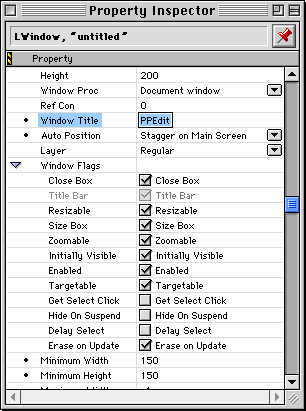
corners) and choose Property Inspector from the Window menu. When you do, the Property Inspector window appears, as
shown in Figure 1.6.
This window allows you to specify the various characteristics of the window, including location, size, type, title, and several other features. Set up your new window to match the characteristics displayed in Figure 1.6.
To do this, you need to set the window title, set its minimum
size to 150 by 150, and set its auto position to be Stagger on the Main Screen. All the other characteristics use default values.
When you're through, close the property inspector window. Save your work. It's always wise to save your work often.
In any text-editor, you want to be able to scroll text. In PowerPlant, that means you want a scrolling view. Adding a scrolling view to your new window is simple.
First, make sure the Catalog window is visible. If it isn't, choose
the Catalog item from the Window menu.
When the window is visible, display Views, then click and drag the LScroller icon from the Catalog window and drop it anywhere in the layout window, as shown in Figure 1.7.
6. Set the scroller characteristics.
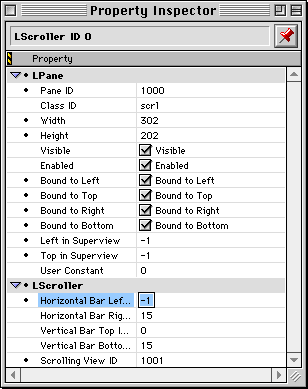
Double-click the new scroller, or select it to see its properties in the Property Inspector. Set the values to match those shown in Figure 1.8.
Set the top left to (-1,-1), the width to 302, and the height to 202. These dimensions are one larger on all sides than the underlying window. Set the new view to be bound on all sides to the "Superview" by clicking the appropriate check boxes. Views and superviews are a hierarchy of drawing areas. In this case the superview is the window. Binding means that as the window resizes, the scrolling view (which is inside the window) stays pinned to the top left of the window and resizes along with the window.
Set the Pane ID to 1000. Each pane in a view usually has a unique ID.
Set the Scrolling View ID to 1001. Putting that number in the Scrolling View ID tells PowerPlant that this scrollbar controls the pane numbered 1001. In the next step you'll create pane 1001, the text edit pane.
Finally, set the horizontal scroll bar left indent to -1 so that you won't have a horizontal scroll bar. The other values are defaults.
When you're through setting the scroller characteristics, close the Pane property inspector window and save your work.
 TIP
TIP Have you noticed a pattern here? You create the object you want, then you modify its characteristics. Some characteristics-like size and location-you modify interactively by dragging and resizing the object in the window. To set most characteristics, you open the Pane property inspector window.
7. Create and set the characteristics for the text edit pane.
Now, click and drag the LTextEditView icon from the Catalog window, and drop it inside the scrolling view. Then set the properties for the new text edit pane.
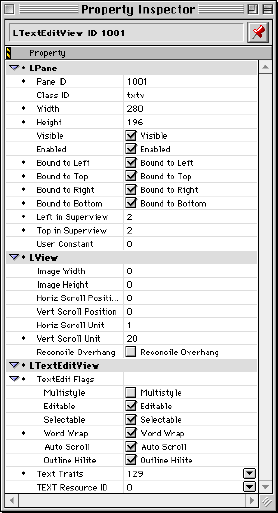
Set the characteristics to match those in Figure 1.9.
Set the top left to (2, 2), the width to 280, and the height to 196. These dimensions mean that the text edit pane is slightly smaller than the window (and allows room for the scroll bar on the right). As a result, the text in the pane will not come right up against the very edge of the window or the scroll bar.
Set the edit text pane to be bound on all sides to the superview. The superview in this case will be the scroller pane. What this means is that as the window resizes, the text pane will resize along with the scroller and the window.
Set the Pane ID to 1001. This matches what you set in the scroller characteristics. Set the text traits ID to 129. We'll look at text traits in step 9. Set the vertical scroll unit to 20.
When you're through, close the property inspector window and save your work.
8. Examine the view hierarchy.
In a view hierarchy, some views contain other views. This is critical in some situations, such as when you have a view inside a scrolling view. When you drop a pane inside a view in Constructor, as you did in the previous step, Constructor puts the pane inside the view hierarchically.
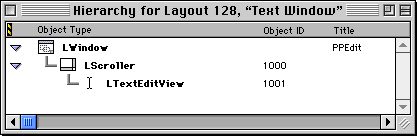
To view the current hierarchy, choose Show Object Hierarchy from the Layout menu. When you do, the hierarchy window appears as shown in Figure 1.10.
Notice that LTextEditView is "inside" LScroller and both are in the LWindow object. If your hierarchy window looks like this, you're all set. You can go to the next step.
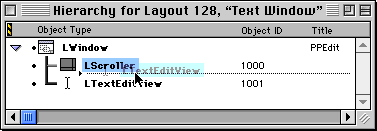
If LTextEditView is not inside the LScroller, you can set the hierarchy manually. To accomplish this, click and drag the LTextEditView object one position to the right underneath LScroller. This can be a little tricky the first time you do it, but the secret is to put the mouse over the item inside which you wish the object to appear, as shown in Figure 1.11.
As you drag, a tiny black triangle and flashing line appear to indicate where in the hierarchy you are about to drop the item. When you are through, your hierarchy should look like Figure 1.10, with the LTextEditView object underneath and indented one position to the right of the LScroller object. The LTextEditView doesn't actually indent until after you finish the drag. A disclosure triangle appears to the left of the LScroller to show you that it has contents.
When you are through, close the hierarchy window, and save your work.
Constructor allows you to create text traits resources that you can then apply to panes that contain text.
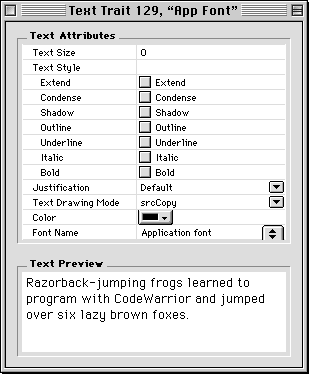
Return to the Constructor project window, and double-click any one of the text traits resources. A window appears that allows you to edit the characteristics for the text, as shown in Figure 1.12.
You don't have to make any changes to the resource, this step is just to show you what the text traits resource is. Remember that you set the text edit pane you created in step 7 so that it uses the text traits resource with the ID number 129.
When you are through studying, close the text traits window.
Save your work and quit Constructor. You have just specified a complete visual interface for our simple text-editor. In the process, you created a single PPob resource and a visual hierarchy. That resource describes the window and all of its contents: the scrolling view and the text view.
In the next section you write the code to display that window on the screen, and use it to enter text. You may be surprised to learn that the steps you have just completed are more complicated than writing the code to create the application! Let's write the code and see.
In code-related steps, you will encounter a feature that helps you identify what function or location in the file you are working with, and what file it is in. It looks like this:
You'll see a line like this at the beginning of every step. We assume that you have opened the file and located the right spot in the code.
In the following steps you write all the code necessary to fully realize the PPEdit text-editor. Each step lists the code you must write in the step. Some code has already been provided for you. The code printed in each step usually includes some of the existing code, to make sure you put the new code in the right spot. Existing code is always in italic.
If you don't understand exactly what it is you're doing in any of these steps, don't worry about it. Just follow along. The mysteries will become clear as you work through the rest of the book.
1. Examine the CPPEditApp.h file.
class declaration CPPEditApp.h
To make a PowerPlant program, you typically make a new application
class derived from LApplication. This new class overrides certain
member functions of LApplication-such as ObeyCommand()-to perform specific program actions. In the following steps you
complete the functions of CPPEditApp.cp.
If you haven't already done so, switch back to the CodeWarrior
IDE and take a look at the CPPEditApp.h file, located in the Chap 01 Start Code folder.
As you see from the class declaration, the CPPEditApp class derives from LApplication. There are no new functions added to this class. However, this class overrides three functions in the base class. They are:
You'll modify each of these functions in the next few steps. For now, just note their existence. When you are through, close this file.
2. Declare a constant for the PPob resource.
near start of file CPPEditApp.cp
Near the beginning of the file, you'll see a comment as shown in the code below. Define a constant with the value 128 to match the ID number of the PPob resource you created earlier in this exercise.
// Step 2: declare a const for the PPob resource
const ResIDT textWindow = 128;
The correct data type is ResIDT. This is a PowerPlant-defined data type used for resource ID
numbers. You'll meet it again later.
3. Register required PowerPlant classes.
PowerPlant must create the objects you specified in the PPob resource. There are functions in each class to create the objects of each class. However, you must tell PowerPlant where those functions are. That's the purpose of "registering" the PowerPlant classes.
You register each PowerPlant class you need individually. (You use the same registration method when you create your own classes and objects. We'll talk about how to do that later in this book).
In the CPPEditApp() constructor, write the following code.
CPPEditApp::CPPEditApp()
{
	// Register classes required to create our window

	RegisterClass_(LWindow);
	RegisterClass_(LScroller);
	RegisterClass_(LTextEditView);
}
When the application launches, your application receives one of
three Apple events from the Finder-open application, open document,
or print document. If you launch without documents, the application
calls its own Startup() function in response to the open application Apple event.
Add this code to the function (existing code is in italics).
CPPEditApp::StartUp()
{
	ObeyCommand(cmd_New, nil);
}
You are telling the application to perform a specific command.
In this case, the command is cmd_New. The cmd_New value is a constant defined in the PowerPlant headers. It corresponds
to the New item in the File menu. (We'll discuss exactly how menu commands work later in
the book).
NOTE The Startup() function is only called if the application is aware
of Apple events. To ensure that it is, you should make sure that
the isHighLevelEventAware flag (in the SIZE flags) is on in the project preferences. This
flag has been set for you in this project.
5. Respond to the New command.
Your application should obey the "New" command, and make a new
window. Add this code to the switch statement, before the existing default case.
case cmd_New:
	LWindow *theWindow;
	theWindow = LWindow::CreateWindow(textWindow,this);
	break;
This code tells PowerPlant to make and display an LWindow object with the PPob resource ID textWindow (that you defined in step 2 to be 128). And it says that this window's commander is the application.
NOTE PowerPlant doesn't just create the window, it creates everything inside the containment hierarchy of the window, including the scrollbars and the editing pane. PowerPlant was designed to let the PPob resource format do a lot of the organizational work, so you can design a program interactively in Constructor.
All other commands, such as Quit, are passed to the LApplication::ObeyCommand() function by the default case.
FindCommandStatus() CPPEditApp.cp
This application must have the New command on the File menu enabled. Setting a menu item's status is accomplished with
the FindCommandStatus() function. PowerPlant calls this function
for each menu item.
Add this code to the switch statement, before the existing default case.
case cmd_New:
	outEnabled = true;
	break;
This code means that the New item in the File menu is always enabled.
Save your work. Then choose the Make command to build the new application. Compiling will start slowly, because the environment must search for the headers. Subsequent compiles in this project will be much faster.
If you have any errors, carefully examine your code against the steps in this exercise, to see where you might have forgotten a detail. If you cannot find the problem, you can use the code in the Solution Code folder for this exercise.
When the project has been successfully built, choose Run from the Project menu.
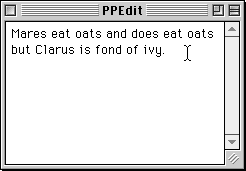
The PPEdit application will appear, with just three menus: Apple, File and Edit. A new blank window appears as well. Click in the window and start typing.
Look at all the functionality you get for free! You can enter text, cut, copy, paste (from outside applications as well), clear, and select all. You can display an About Box. You can create new windows, close them, zoom, resize, drag, and grow the windows. You can add more windows, limited only by memory. You can switch windows freely, and they activate and deactivate appropriately. The scroll bar works! And you did all this with about ten lines of code.
All of this behavior is a gift to you from PowerPlant. The classes that you are using-LApplication, LWindow, LScroller, and LTextEditView-all have default behavior to support these activities. That gift-the default behavior of a complete and powerful Macintosh application-is why using PowerPlant is so worthwhile.
When you are through playing with your new application, choose
Quit from the File menu, and you're done. (Yet another freebie from PowerPlant.)
If you're the curious sort and you'd like to follow along with
the PowerPlant code, you can do so easily. To trace the commands
and keystrokes, choose Enable Debugging from the Project menu. The next time you run the application, it will invoke the
CodeWarrior Debugger. You can step through each command as you
choose. For more information on debugging, see the Debugger User
Guide.
If you look at the size of your new application, you may be surprised at how big it is for how little work you did. When we build PPEdit according to the instructions, the application occupies about 175K on disk depending on which build target you use. You can make it smaller if you compile with optimizations on, and without debugging.
Of course, there are a lot of things this little application doesn't do, like printing, or saving and opening files. We're going to be talking about those topics and much more in the chapters ahead of us.
If you are new to PowerPlant programming, and you'd like to learn more before you go off adventuring, feel free to ignore the suggestions for enhancements we're about to make. However, if you're in an adventurous mood, here are some suggestions for what you can do with PPEdit.
As you have seen, you can get a lot from just a few lines of code in PowerPlant. But there are a number of features that would make this little text editor nicer. You can try to add these features. If you do, we guarantee you'll learn a lot about PowerPlant.
Of course, because you don't know much about PowerPlant yet, things may not go right. That's often what happens when you explore unfamiliar territory. But you will be exploring and you'll remember the places you visit and the sights you see. Try these on for size.
FindPaneByID() (with the ID of the text edit pane) and SetLatentSub()
The first two suggestions are probably the easiest. Did you notice that when the window appears, you have to click in the window to activate text entry? Wouldn't it be nice if the window was already set for text entry when it opened? Dynamic scrolling is a breeze to add. PowerPlant provides all the functionality automatically.
We realize that at this point you may feel you don't know enough
about PowerPlant to pursue these ideas. You may be saying to yourself,
"What's this SetLatentSub() stuff?" and "How do I use StDialogHandler?"
That's perfectly normal. PowerPlant is big and powerful, and it is based upon high-level design concepts with which you may not be familiar. That situation is about to change. Before long, easy solutions that allow you to implement all of these features will be apparent to you.
How is that going to happen? You're going to read this book. In the next few chapters-the Background chapters-we're going to talk about installing PowerPlant, PowerPlant naming conventions, and the high-level design principles upon which the PowerPlant architecture is based.
After you have that solid foundation in the fundamental underpinnings of PowerPlant, we're going to take you through every aspect of application programming using PowerPlant.
PPEdit and the other example projects in this book come already
set up for you with all the files already part of the project.
To start your own PowerPlant project, you would use one of the
stationery projects supplied with CodeWarrior. To use the supplied
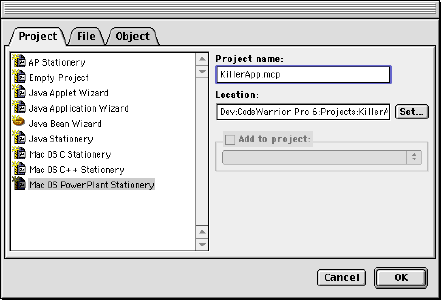
stationery, choose New from the File menu. Select Mac OS PowerPlant Stationery as shown in Figure 1.14.
Type the name of your project in the Project name field. Set the location to save your project. Click OK.
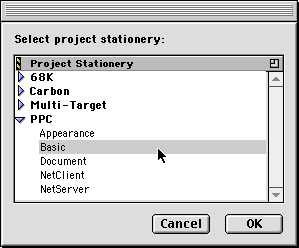
The available PowerPlant stationery is shown in Figure 1.15. Choose the stationery project that satisfies your requirements
and click OK. Once your project is created, you can add or remove files as
required.
Table 1.1 describes each stationery project.
PowerPlant stationery descriptions:
| Stationery |
Description |
Build Targets |
Main Files |
|---|---|---|---|
Each stationery project is a fully functional application. You may want to change the main application file names to coincide with the name of your program.
For example, if you want to write a new document-based application
called HyperApp, you choose the PowerPlant Document stationery
and create your project. You would then change the files CDocumentApp.cpp, CDocumentApp.h, Document.ppob, and Document.rsrc to CHyperApp.cp, CHyperApp.h, HyperApp.ppob, and HyperApp.rsrc.
You are not required to rename any files, but it is a good idea to do.
The IDE User Guide for information on renaming files in a CodeWarrior project.
NOTE Our hypothetical application file names are substituted for the file names used in the stationery projects throughout this book.